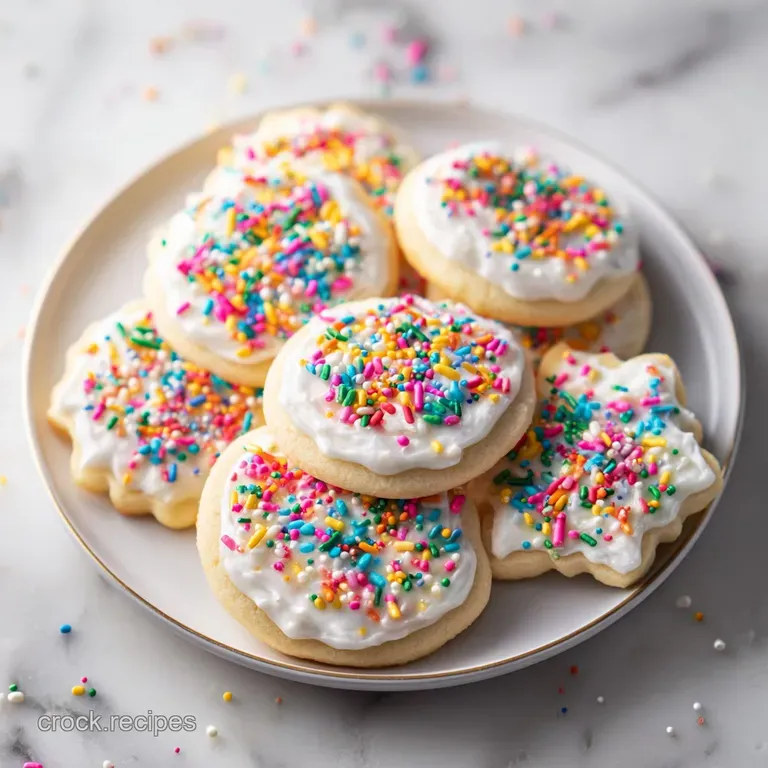
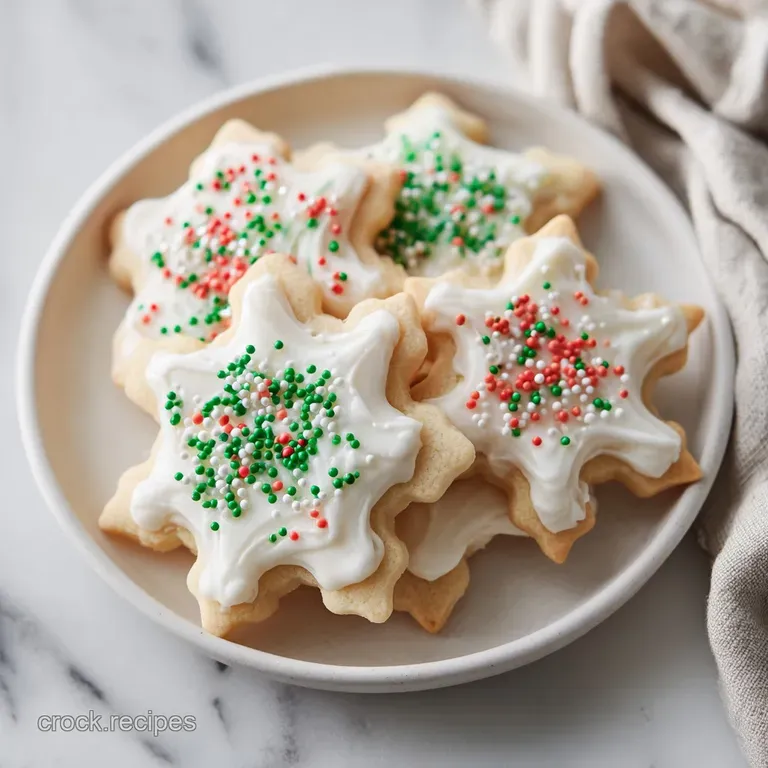
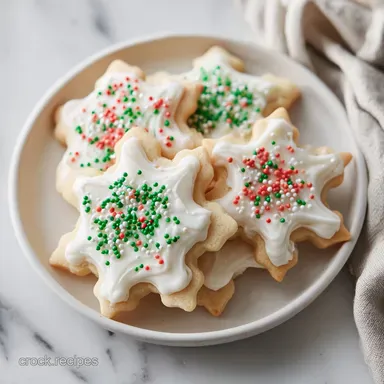
Best Cut out Sugar Cookie Recipe: Stable and Tender
- Time:20 minutes active + 2 hours 10 mins chilling/baking = 150 minutes total
- Flavor/Texture Hook: A satisfying buttery snap followed by a tender, melt in-your mouth crumb.
- Perfect for: Holiday gift boxes, intricate decorating parties, or a cozy rainy afternoon.
- How Texture and Stability Define This Best Cut Out Sugar Cookie Recipe
- Precise Time and Temperature for Holiday Baking Success
- Selecting Premium Elements for a Satisfying Buttery Crumb
- Essential Kitchen Tools for Clean Sharp Cookie Edges
- Step by Step Guide to Perfect No Spread Cookies
- Fixing Dough Issues and Common Baking Problems
- Flavor Variations and Dietary Substitutions for Everyone
- Preserving Freshness and Reducing Kitchen Waste Tips
- Beautiful Presentation Ideas for Your Festive Cookie Platter
- Common Myths Debunked
- Recipe FAQs
- 📝 Recipe Card
How Texture and Stability Define This Best Cut Out Sugar Cookie Recipe
The kitchen is quiet, except for the rhythmic thud thud of a rolling pin against chilled dough and the faint, sweet scent of almond extract floating through the air. You know that feeling when you pull a tray of carefully cut stars out of the oven, only to find they’ve spread into sad, amorphous blobs?
It’s heartbreaking. I’ve spent many winter afternoons scraping "blob stars" off baking sheets, wondering why my kitchen looked like a flour explosion had occurred with nothing to show for it but soggy, shapeless biscuits.
This recipe is about the contrast between a crisp, clean edge and a surprisingly rich, tender interior. Most sugar cookies are either rock hard or too soft to handle icing, but we’re aiming for that satisfying middle ground.
We want a cookie that can stand up to a thick layer of glossy icing but still feels like a hearty comfort food when you take that first bite. It’s the kind of cookie that makes you want to put on a thick sweater, grab a mug of something warm, and just enjoy the moment.
The secret to success here isn’t magic; it’s about controlling how the ingredients interact before they even see the heat of the oven. We are going for a low aeration mix, which means we aren't whipping air into the butter like we’re making a sponge cake.
Instead, we’re creating a dense, stable emulsion that stays exactly where you put it. When you bite into one of these, you'll notice the edges shatter slightly before giving way to a velvety center.
It’s a simple pleasure, but getting that balance right is what makes this the best cut out sugar cookie recipe you'll ever keep in your box.
Precise Time and Temperature for Holiday Baking Success
When we talk about the mechanics of a great cookie, it usually comes down to how we handle the fats. If the butter is too warm, the sugar just slides around. If it's too cold, it won't bond with the flour. We're looking for that "cool room temperature" sweet spot where the butter is pliable but still has a chill to it.
This keeps the dough from becoming a greasy mess when you're trying to move your reindeer and snowflakes from the counter to the pan.
Structural Integrity: The cream cheese acts as a stabilizer, providing a tighter crumb that resists spreading during the bake.
Low Air Emulsion: Mixing on medium low speed prevents air bubbles from forming, which means your cookies won't puff up or "belly" in the middle.
Starch Reinforcement: Adding a small amount of cornstarch interferes with gluten development, ensuring the cookie stays tender rather than becoming bread like.
Moisture Control: Using a single egg provides just enough protein to bind the dough without adding excess liquid that would cause the sugar to dissolve and spread.
| Thickness | Bake Time | Visual Cue | Best For |
|---|---|---|---|
| 1/8 inch | 7-8 minutes | Edges turn very light gold | Ultra crispy, delicate snaps |
| 1/4 inch | 10 minutes | Top looks matte and set | The gold standard for decorating |
| 3/8 inch | 12-13 minutes | Center no longer looks wet | Thick, soft, bakery style bites |
Choosing your thickness is the first big decision. I personally swear by the 1/4 inch mark. It provides enough surface area for the icing to sit comfortably without the cookie breaking under the weight.
If you go too thin, the "shatter" becomes a "crumble," and nobody wants a broken heart (or a broken heart shaped cookie).
Selecting Premium Elements for a Satisfying Buttery Crumb
The flavor map of this cookie is a journey from the rich, savory notes of high-quality butter to the bright, floral finish of almond and vanilla. We aren't just looking for sweetness; we're looking for a satisfying depth of flavor that makes you reach for a second one.
I’ve found that using a pinch of fine sea salt rather than standard table salt makes the butter flavor pop in a way that’s almost addictive.
| Ingredient | Science Role | Pro Secret |
|---|---|---|
| Cream Cheese | Fat & Acid | Use the brick style; the tub version has too much water and will ruin the snap. |
| Cornstarch | Protein Softener | It creates a "short" texture, meaning the cookie breaks cleanly when bitten. |
| Almond Extract | Flavor Bridge | It mimics the scent of high end European bakeries and cuts through the sugar. |
When it comes to the dry ingredients, how you measure them is the difference between a tender cookie and a puck. I always recommend spooning your flour into the measuring cup rather than dipping the cup into the bag. Dipping packs the flour down, and you can end up with 20% more than you actually need.
That’s how cookies turn out dry and "floury" instead of rich and buttery.
For the Dough
- 1 cup (226g) unsalted butter: Softened to cool room temp. Why this? Provides the foundational fat and rich flavor profile. (Sub: Salted butter, but omit the extra salt).
- 2 oz (56g) full fat brick style cream cheese: Not the spreadable kind! Why this? Adds tang and incredible structural stability. (Sub: Mascarpone for a richer, creamier finish).
- 3/4 cup (150g) granulated sugar: For sweetness and browning. Why this? Fine crystals dissolve perfectly into the fats. (Sub: Caster sugar for an even smoother texture).
- 1 large egg: Room temperature is a must. Why this? Acts as the primary binder for the dough. (Sub: 1/4 cup unsweetened applesauce, though it will be softer).
- 1 1/2 tsp vanilla extract: The classic aromatic. Why this? Rounds out the sweetness of the sugar. (Sub: Vanilla bean paste for those beautiful black specks).
- 1/2 tsp almond extract: The secret weapon. Why this? Provides that professional "bakery" scent and taste. (Sub: Lemon extract for a bright, citrusy twist).
- 3 cups (375g) all purpose flour: Spooned and leveled. Why this? Provides the structure without being too heavy. (Sub: 1:1 gluten-free baking flour works surprisingly well here).
- 2 tbsp (16g) cornstarch: For the "melt in-your mouth" factor. Why this? Softens the flour's proteins for a tender crumb. (Sub: Arrowroot powder).
- 1/2 tsp baking powder: Just a tiny lift. Why this? Prevents the cookie from being too dense. (Sub: Omit for an even flatter, denser cookie).
- 1/2 tsp fine sea salt: To balance the sugar. Why this? Enhances the perception of the butter flavor. (Sub: Kosher salt, but use 3/4 tsp).
For the "Hard Set" Glossy Icing
- 2 cups (240g) powdered sugar: Sifted to remove lumps. Why this? The base for a smooth, pourable glaze. (Sub: Organic powdered sugar, though it may be slightly beige).
- 2.5 tbsp whole milk: To reach the right consistency. Why this? Liquid medium for dissolving the sugar. (Sub: Heavy cream for a thicker, richer icing).
- 1 tbsp light corn syrup: For the shine. Why this? Gives the icing a professional, glossy finish when dry. (Sub: Agave syrup, though it won't shine quite as much).
- 1/4 tsp clear vanilla or lemon extract: Flavoring. Why this? Keeps the icing tasting as good as the cookie. (Sub: Any clear flavoring like peppermint or coconut).
Essential Kitchen Tools for Clean Sharp Cookie Edges
To get the best results, you don't need a professional kitchen, but a few specific tools will make your life significantly easier. I remember the year I tried to roll out dough with a wine bottle and cut shapes with the rim of a glass. Let’s just say the results were "rustic" at best.
Investing in a heavy gauge aluminum baking sheet (like a half sheet pan from Nordic Ware) ensures that the heat is distributed evenly, so you don't end up with some cookies burnt on the bottom while others are still raw in the middle.
A stand mixer is your best friend here because it allows you to control the speed with precision. Using the paddle attachment is crucial. Avoid the whisk attachment, which is designed to incorporate air. We want to press the sugar and butter together, not whip them into a frenzy.
I also highly recommend using parchment paper. Not only does it prevent sticking, but it allows you to roll the dough out without adding extra flour, which can make the cookies tough.
If you’re feeling fancy, grab some rolling pin spacers or a rolling pin with adjustable rings. This ensures every single cookie is the exact same thickness. I learned this cutout cookie guide method of rolling first and then chilling from the pros, and it’s a game changer. It means you aren't fighting a rock hard block of dough later; you just peel back the paper and cut.
step-by-step Guide to Perfect No Spread Cookies
Phase 1: The Base Emulsion
In a stand mixer with a paddle attachment, combine the cool butter, cream cheese, and granulated sugar. Beat on medium low speed for 2 minutes until uniform and pale. Note: We are looking for a smooth paste, not a fluffy cloud.
If you see too many air bubbles, you've gone too far. The butter should still feel slightly cool to the touch. This stage is where you build the foundation of that satisfying, hearty texture.
Phase 2: Incorporating Dry Science
Add the room temperature egg, vanilla extract, and almond extract. Mix until just combined. In a separate bowl, whisk together the all purpose flour, cornstarch, baking powder, and fine sea salt. Gradually add these dry ingredients to the wet mixture on the lowest speed possible.
Stop the mixer immediately once the last streak of flour disappears. Note: Overmixing at this stage develops gluten, which leads to a tough, "bready" cookie instead of a tender one.
Phase 3: The "Sandwich" Roll & Chill
Place the dough between two large sheets of parchment paper. Roll it out to a consistent 1/4 inch thickness. Note: Using parchment prevents the dough from sticking to the pin and eliminates the need for extra flour. Slide the entire "dough sandwich" onto a baking sheet and place it in the refrigerator to chill for 2 hours.
This rest period allows the flour to fully hydrate and the fats to firm back up, ensuring the cookies hold their shape perfectly.
Phase 4: Precision Cutting and Baking
Preheat your oven to 350°F (175°C). Peel off the top layer of parchment, then gently press it back on. Flip the whole thing over and peel off the other layer this ensures nothing is sticking. Cut your shapes using your favorite cookie cutters.
Transfer the shapes to heavy gauge aluminum baking sheets, leaving about an inch of space between them. Bake for 10 minutes or until the edges are just set but not browned. The tops should look matte and opaque.
Phase 5: The Glossy Finish
Cool the cookies completely on a wire rack. While they cool, prepare the icing by whisking the powdered sugar, milk, corn syrup, and flavoring until smooth. It should be thick enough to hold a line for a few seconds before disappearing back into the bowl. Dip the cookies or use a piping bag to decorate.
Let the icing dry completely for at least 4 hours (or overnight) if you plan on stacking them.
Fixing Dough Issues and Common Baking Problems
Even with a great recipe, things can get a bit wonky. I once had a batch of cookies that looked like they had a "heat stroke" they just melted into each other the second the oven door closed. It turns out I hadn't chilled the dough long enough. Patience is the most important ingredient in this entire process.
If the dough feels soft when you're cutting it, put it back in the fridge for 10 minutes. It should feel like cold clay, not sticky play dough.
If your cookies are coming out with bumpy surfaces, it’s usually because of air bubbles. You can fix this by gently rolling over the cut shapes one last time with the pin before baking, or by simply reducing the mixing time during the cream the-butter phase next time.
And if the bottoms are getting too dark, try doubling up your baking sheets (stacking one inside the other) to provide a bit of insulation.
Why Your Cookies Spread
If your stars are turning into circles, the culprit is usually temperature. If the butter was too soft to start with, or if the dough got too warm while you were cutting it, the fat will melt before the flour structure has a chance to set.
Another common issue is using "spreadable" butter or margarine, which has a higher water content. Stick to the high-quality brick butter for that classic snap.
| Problem | Root Cause | Solution |
|---|---|---|
| Cookies are tough | Overmixed dough | Stop mixing as soon as the flour is gone. |
| Shapes are distorted | Dough was too warm | Chill cut shapes for 10 mins before baking. |
| Icing is runny | Too much milk | Add powdered sugar 1 tbsp at a time to thicken. |
Common Mistakes Checklist:
- ✓ Pat the cream cheese dry if there is any surface moisture (prevents excess steam).
- ✓ Ensure your egg is truly room temperature so it doesn't "seize" the cool butter.
- ✓ Use a flat spatula to move shapes; don't use your fingers which add heat.
- ✓ Avoid dark colored baking sheets which absorb too much heat and burn bottoms.
- ✓ Let the oven preheat for at least 20 minutes to ensure a stable temperature.
Flavor Variations and Dietary Substitutions for Everyone
While the classic vanilla almond combo is my absolute favorite, this dough is a blank canvas. If you want something a bit more seasonal, you can swap the almond extract for lemon zest or even a bit of crushed culinary lavender. For a deeper, more comforting flavor, try replacing the vanilla with maple extract and adding a pinch of cinnamon to the flour mix. It’s similar to the vibe of these cinnamon spiced treats, but with the structure of a cutout.
Scaling this recipe is fairly straightforward. If you're baking for a huge crowd, you can double the recipe easily, but I recommend only increasing the spices and salt by 1.5x to avoid them becoming overpowering.
If you need to cut the recipe in half, just beat the egg in a small bowl first and use exactly half of it (about 2 tablespoons).
For a Citrus Infused Holiday
Add the zest of two lemons and 1 teaspoon of lemon extract to the dough. This cuts through the richness of the butter and makes the cookies feel light and bright. It’s particularly good with a simple glaze made from powdered sugar and fresh lemon juice instead of milk.
For a Lower Glycemic Option
You can substitute the granulated sugar for a 1:1 monk fruit sweetener. Keep in mind that the cookies will brown a bit faster and may have a slightly different "snap," but the flavor remains excellent.
Avoid using liquid sweeteners like honey or maple syrup in the dough, as they will completely change the hydration and cause the cookies to spread.
| Original Ingredient | Substitute | Why It Works |
|---|---|---|
| All Purpose Flour | 1:1 GF Flour | Provides structure without gluten. Note: Cookies may be slightly more fragile. |
| Granulated Sugar | Monk Fruit (1:1) | Reduces sugar content. Note: Results in a slightly cooler mouthfeel. |
| Whole Milk | Coconut Milk | dairy-free alternative. Note: Adds a very faint tropical note to the icing. |
Chef's Tip: If you want a truly white cookie (perfect for snowmen!), use clear vanilla extract. Regular vanilla is brown and will tint your dough and icing a very light ivory.
Preserving Freshness and Reducing Kitchen Waste Tips
Sugar cookies are the champions of the "make-ahead" world. You can bake these weeks in advance if you store them correctly. The key is to keep them away from moisture. I like to store them in an airtight container with a piece of parchment paper between each layer to protect the icing.
If you haven't iced them yet, they are even more durable.
Don't throw away those odd shaped scraps of dough after you've cut out your shapes! Gather them up, press them back into a ball, and roll them out again. I usually do this once or twice.
By the third time, the dough has been handled a lot and might be a bit tougher, so I save those scraps for "tester" cookies the ones I eat while the pretty ones are drying. You can also freeze those scraps and crumble them over vanilla ice cream for a "cookie dough" sundae.
- Storage: Keep iced cookies at room temperature in an airtight container for up to 1 week. Uniced cookies can last 2 weeks.
- Freezing: You can freeze the baked, uniced cookies for up to 3 months. To thaw, just leave them on the counter for an hour. You can also freeze the raw dough discs (wrapped tightly in plastic) for 2 months.
- Zero Waste: Use leftover icing to "glue" together broken cookies into "sandwich" cookies, or thin it out with a little more milk to make a glaze for morning muffins.
Beautiful Presentation Ideas for Your Festive Cookie Platter
Now that you've mastered the best cut out sugar cookie recipe, it's time to show them off. There's something so satisfying about a platter of perfectly uniform, glossy cookies. I like to play with textures maybe leave some cookies with just a simple flooded icing and others with a sprinkle of sanding sugar for a "snowy" effect.
The contrast between the matte cookie and the shiny icing is what makes them look professional.
When serving these at a party, consider the "flavor neighbors." These cookies pair beautifully with a sharp, aged cheddar or a tart apple slice to balance out the sweetness. Or, if you're going full dessert mode, serve them alongside a rich chocolate fondue. The sturdy snap of the cookie makes it an excellent "dipper."
Ultimately, these cookies are about sharing. Whether you're making them for a school bake sale or just to have something sweet in the jar for when a friend stops by, they carry a sense of home and effort. They aren't just snacks; they're tiny, edible pieces of art that taste like a warm hug.
So, grab your favorite cutters, put on some music, and enjoy the process. There's no such thing as a "perfect" cookie only the one you're enjoying right now.
Common Myths Debunked
"You must use room temperature butter for baking." This is a half truth that ruins many sugar cookies. For a cutout cookie, you actually want "cool" room temperature butter (about 60°F or 15°C).
If the butter is too warm and greasy, the dough won't have the structural integrity to hold those sharp edges. If you can leave a fingerprint in the butter but it still feels cool to the touch, you're ready to go.
"Sifting flour is an unnecessary step." While I often skip sifting for muffins, for this specific cookie, sifting your dry ingredients (especially the powdered sugar for the icing) is vital. Lumps in your dough create weak spots, and lumps in your icing will clog your piping tips and make your decorations look messy.
It takes two minutes but saves a lot of frustration.
"More flour prevents sticking." While it's tempting to throw a handful of flour on the counter when things get sticky, this is the fastest way to make a tough, dry cookie. Every bit of flour you add changes the ratio of the recipe.
Stick to the parchment paper method; it’s cleaner, easier, and keeps your cookies tender and buttery.

Recipe FAQs
What is the secret to cut out cookies?
Chill the dough for 2 hours after rolling. Cold dough is the single most important factor for maintaining crisp, sharp edges on your shapes during the bake.
What is the best sugar for cut-out cookies?
Use standard granulated sugar. It provides the necessary structure and grit to support the dough without adding the extra moisture found in brown sugar, which could cause unwanted spreading.
What is the secret to a good sugar cookie?
Avoid over aerating the butter and sugar mixture. By mixing on medium low for only 2 minutes, you create a dense, stable dough that holds its form, a principle of texture control that applies to many classic cookie recipes.
What is the 321 cookie rule?
No, this is a common misconception. This specific recipe relies on a precise ratio of 3 cups flour to 1 cup butter and 3/4 cup sugar to ensure the cookies bake at 350°F (175°C) without losing their definition.
How to keep cookies from spreading in the oven?
Use heavy gauge aluminum baking sheets and ensure the dough is cold. When you transfer chilled, cut shapes directly to the preheated oven at 350°F (175°C), the butter firms up immediately rather than melting into a puddle.
How to avoid tough, dry cookies?
Stop the mixer the second the flour streaks disappear. Overworking the dough develops gluten, which makes the cookies tough instead of tender, so fold the flour in gently on the lowest speed.
How to tell when cut-out cookies are done baking?
Remove them after 10 minutes when the edges are just set. They should not show any brown color; pull them from the oven while they still look soft to ensure they remain perfectly chewy once cooled on the wire rack.
Best Cut Out Sugar Cookie
Ingredients:
Instructions:
Nutrition Facts:
| Calories | 182 kcal |
|---|---|
| Protein | 1.8 g |
| Fat | 7.9 g |
| Carbs | 26.3 g |
| Fiber | 0.4 g |
| Sugar | 15.1 g |
| Sodium | 52 mg |
