Cast Iron Pan Pizza: the Crispy Frico King
- Welcome to the World of Frico: Your Weeknight Pizza Game-Changer
- Essential Components for the Ultimate Cast Iron Pan Pizza
- From Dough to Dinner: Detailed Cooking Instructions
- Mastering Texture: The Science Behind the Perfect Pan Pizza Crust
- Troubleshooting Your Crust: Expert Pan Pizza Tips
- Making Ahead and Maximizing Leftovers
- Storage & Freezing
- Recipe FAQs
- 📝 Recipe Card
Welcome to the World of Frico: Your Weeknight Pizza Game Changer
That aroma when it comes out of the oven? Pure heaven. The steam rising off the melted cheese and the smell of the olive oil frying the crust that’s the signature of a perfect Cast Iron Pan Pizza (K: 1).
It’s not just dinner; it’s an event you can create on a Tuesday night.
Forget messy pizza stones and frustrating dough slings that leave you covered in flour. This technique is a complete weeknight game changer because the pan does all the heavy lifting, acting as your oven and shaping tool.
It’s way faster than traditional deep dish and yields a spectacular result every single time.
Trust me, once you experience the crispy, cheesy edges of this homemade Cast Iron Pan Pizza (K: 2), you will never order delivery again. Let's crack on and talk about the simple science behind this revolutionary crust.
I used to spend hours trying to replicate New York style thin crust, but frankly, I failed most of the time. The humidity was always wrong, the oven never hot enough, and the dough was a pain to stretch. Then I discovered the glorious simplicity of the deep dish style achieved in a cast iron skillet.
This simple switch is the secret weapon for making outstanding Cast Iron Pan Pizza (K: 3) right in your own home.
This method gives you the best of all worlds: the soft, airy interior of a deep dish, coupled with the phenomenal crunchy base of thin crust. It’s an exercise in letting time and oil do the work for you. If you already have a well seasoned cast iron skillet, you are halfway to pizza paradise already.
What is the "Frico" Crust and Why You Want It
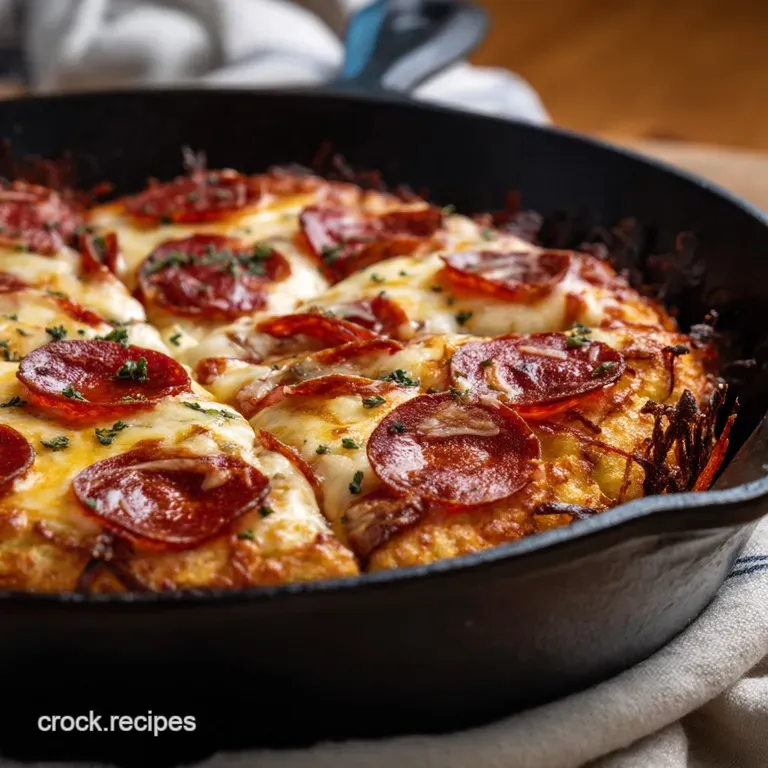
The 'frico' is arguably the most important element of any great Cast Iron Pan Pizza (K: 4). Frico is that incredible, dark golden brown, lacy, crispy edge where the cheese and the dough meet the hot, oiled cast iron surface.
It’s basically cheese fried in olive oil, stuck to the bottom of the dough and it is utterly irresistible.
We achieve this by intentionally pressing the sticky dough into a pool of olive oil and then letting the cheese cascade slightly to the edges during baking. This results in maximum textural contrast that you just cannot replicate with a baking sheet.
You get that soft, cloud like crumb on the inside, framed by a shatteringly crisp exterior.
The Magic of the No-Knead, High Hydration Dough
Traditional pizza requires muscle and elbow grease to develop the gluten structure, but we are cheating beautifully here. We use a high hydration dough (meaning lots of water) and rely on time, not effort, to create the necessary strength.
This specific dough consistency makes the ideal Cast Iron Pan Pizza (K: 5) foundation.
The dough rests for several hours, doing its thing, and then we use gentle stretch and folds instead of vigorous kneading. This builds an open, airy crumb structure that resists becoming dense or heavy under the weight of the toppings. A slightly stickier dough holds moisture better and results in a more tender crust.
Tools of the Trade: Why a Cast Iron Pan is Essential
You absolutely cannot make this specific recipe without a cast iron pan, which is why we call it Cast Iron Pan Pizza (K: 6). This isn't just a suggestion; it’s mandatory if you want the frico base.
Cast iron holds heat far better than stainless steel or aluminum, ensuring the entire base is uniformly blasted with heat from the oven.
This intense, sustained heat transfer is what enables the oil to literally fry the crust bottom, creating the frico effect we crave. If you don’t have a cast iron pan, you could try using a carbon steel pan, but the depth and heat retention of cast iron are truly unmatched here.
Essential Components for the Ultimate Cast Iron Pan Pizza
Flour Matters: Selecting High Protein Dough Bases
I learned the hard way that using cheap all-purpose flour results in a sad, flabby crust. Bread flour, with its higher protein content, is key to giving this dough the structure it needs to rise tall and stay chewy.
If you don’t have bread flour, you can absolutely use standard All-Purpose (Plain) Flour, but be aware the final crumb structure will be slightly softer and less intensely chewy.
Yeast and Hydration: Achieving the Right Sticky Consistency
We use instant yeast here because it’s simple and reliable no need to bloom it separately. Just mix it right into the dry ingredients. The hydration level is critical for this easy Cast Iron Pan Pizza (K: 7) method.
The dough must look wet and be incredibly sticky right after mixing. Do not panic and add more flour! If you only have Active Dry Yeast, make sure to dissolve it first in the warm water with a pinch of sugar for about ten minutes until it is nice and foamy before adding it to the dry ingredients.
The Sauce Layer: Simple vs. Reduced Tomato Options
For this recipe, we keep the sauce incredibly simple. Overly complicated or cooked sauces usually contain too much moisture, which can sink into the dough and ruin the frico. I prefer using high-quality whole peeled tomatoes (San Marzano style, if possible) and crushing them by hand right before topping.
| Ingredient | My Recommendation | Substitution/Hack |
|---|---|---|
| Crushed Tomatoes | high-quality canned whole peeled | Use tomato paste mixed with water and seasoning for an ultra low-moisture base. |
| Dried Oregano | Use quality dried Mediterranean oregano | Substitute with Italian seasoning blend or dried basil. |
Choosing Your Cheese: Low-Moisture Mozzarella is Key
This is where many home cooks fail: they use fresh mozzarella. While delicious, fresh mozzarella releases too much water during baking, leading directly to a soggy center. The key to the best Cast Iron Pan Pizza (K: 8) is using low-moisture, pre-shredded or block mozzarella that you grate yourself.
You want the cheese barrier method. We sprinkle some cheese directly onto the dough before the sauce, protecting the crust below from liquid saturation. If you don’t have mozzarella, a grated block of Provolone or a low-moisture blend like Fontina can work, but avoid anything high in water content.
From Dough to Dinner: Detailed Cooking Instructions
Mixing and Resting: The Initial Dough Development
Combine your dry ingredients, then add the water and the two tablespoons of olive oil. Mix until there are no dry pockets left. The dough should look shaggy and be super sticky this is exactly right!
Give it the initial 30 minute rest, often called the autolyse, which helps kickstart the gluten development without intensive kneading.
The Pan Press: Dimpling and Stretching the Dough
After the initial rest, generously oil your pan with the remaining olive oil. This oil bath is non-negotiable for achieving that signature crispy Cast Iron Pan Pizza (K: 9) base. Transfer the sticky dough into the oiled pan, turning it once to coat the entire mass.
Let it rest again for 30 minutes, covered. Now, the fun part: gently use oiled fingertips to press and dimple the dough towards the edges of the pan. If the dough snaps back stubbornly and shrinks away, stop immediately!
Let it rest another 10 minutes; gluten needs patience and time to relax.
Layering the Toppings: When and Where to Place the Cheese
Once the dough is fully spread and puffy after its 2 3 hour proof, it's time for the layers. Remember that cheese barrier! Sprinkle half the mozzarella directly onto the dough first. This protective layer ensures your Cast Iron Pan Pizza (K: 10) base stays dry and crisp.
Next, lightly spoon the crushed tomato sauce over that initial cheese layer. Do not drown the pizza in sauce; less is definitely more here to avoid saturation. Finish with the remaining mozzarella and a light sprinkling of Parmesan.
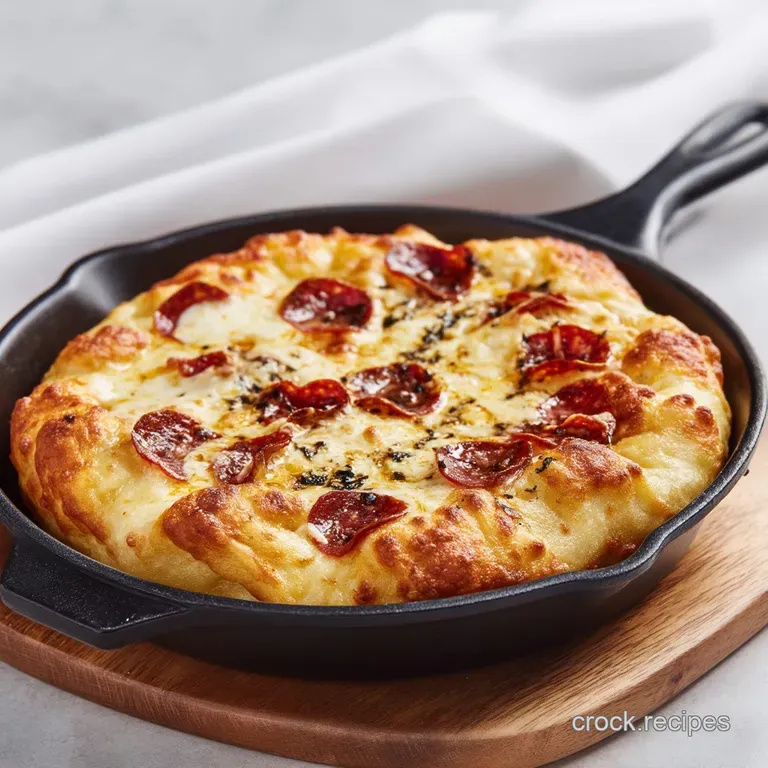
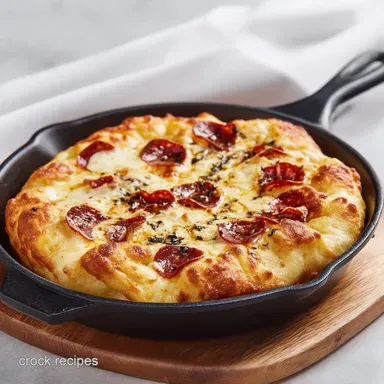
Crucial Tip: Leave a visible ring of bare dough (about ¾ inch) around the edges. This area will bloom beautifully into a pillowy crust during baking.
Baking Strategy: Oven to Stovetop Transfer for Maximum Crisp
Preheat your oven to a blistering 500°F (260°C) for a minimum of 30 minutes. The cast iron pan must be scorching hot before the dough goes in. We simply bake the Cast Iron Pan Pizza (K: 11) immediately without a stovetop pre-sear.
Why? Because the high heat of the oven combined with the oil-soaked dough in the screaming hot pan is enough to achieve the desired frico crispness. Bake for 18– 20 minutes, or until the crust is deep golden brown and the base, when peeked at, is dark brown and crispy.
Mastering Texture: The Science Behind the Perfect Pan Pizza Crust
The texture of a truly great Cast Iron Pan Pizza (K: 12) is what sets it apart from standard thin crusts. It’s all about the interplay between oil, time, and heat. The long, slow proofing process allows gas bubbles to form, giving the interior that beautiful, open cell structure.
This makes the crust light, almost cloud like, despite its deep dish thickness.
The secret to this texture lies in the deep, dark char achieved on the base the frico. When you remove the pizza, if the bottom is pale, you didn't preheat the oven long enough or the temperature wasn't high enough. Remember, we are trying to fry the dough bottom slightly while baking the interior. For those who love the ultimate crunch, you might enjoy my recipe for a Cast Iron Skillet Pizza: Achieve Ultra Crispy Pizzeria Crust .
Troubleshooting Your Crust: Expert Pan Pizza Tips
Handling Sticky Dough: The Oil and Water Trick
If you find your high hydration dough completely unmanageable, you probably tried to shape it with dry hands. Always oil your hands before touching the dough in the pan. Water works too, but oil prevents sticking better and won't throw off the hydration.
This is crucial for successful Cast Iron Pan Pizza (K: 13) shaping and handling.
Preventing a Soggy Center
The two culprits here are excess sauce and fresh mozzarella. As mentioned, use low-moisture cheese and apply the cheese barrier directly onto the dough first. Also, drain your crushed tomatoes slightly before using them.
If the center still seems a little pale, next time try pushing the dough dimples slightly deeper in the center than on the edges to thin it out just a tad.
The Importance of Oven Temperature Preheating
I can’t stress this enough: your oven thermometer might lie to you. When I say 500°F (260°C), I mean the cast iron pan needs to have fully absorbed that heat. This typically takes 30 to 45 minutes of preheating, especially if you’re using a thick cast iron skillet.
If your pan isn't screaming hot when the dough goes in, you risk having a pale, steamed bottom crust instead of a wonderfully crispy Cast Iron Pan Pizza (K: 14) crust.
Making Ahead and Maximizing Leftovers
The Cold Proof Advantage: Developing Deep Flavor
Want truly restaurant quality flavor in your next Cast Iron Pan Pizza (K: 15)? The long, room temperature proofing is great, but cold proofing is even better.
After the initial mix and rest, put the dough (coated lightly in oil) in a sealed container in the fridge for 24 to 48 hours.
When you are ready to make your deep dish Cast Iron Pan Pizza (K: 16), remove the dough from the fridge and let it come up to room temperature for at least 90 minutes before proceeding with the pan-press stage.
This slow fermentation develops complex, nutty flavors you can't get otherwise.
Maximizing Lift: Achieving that Cloud Like Crumb
The two secrets to lift are high heat and minimal handling. Once the dough has proofed beautifully in the pan, handle it as little as possible before topping and baking. Don't aggressively punch it down or reshape it.
Those tiny air bubbles are gold and help create the light interior of your Cast Iron Pan Pizza (K: 17).
Olive Oil Infusion: Creating the Golden Frico Base
The generous amount of olive oil used in this deep dish recipe is mandatory. It does more than just prevent sticking. It infuses into the bottom layer of the dough while it proofs, and then acts as a deep frying medium when it hits the high heat.
Chef's Note: If you are worried about the amount of oil, consider using a lighter flavored vegetable oil in the pan, but the robust flavor of Extra Virgin Olive Oil truly complements the tomato sauce and cheese in this specific Cast Iron Pan Pizza (K: 18).
Storage & Freezing
This beautiful Cast Iron Pan Pizza (K: 19) actually stores quite well. Keep leftovers tightly wrapped in aluminum foil or an airtight container in the refrigerator for up to 3 days.
To reheat, avoid the microwave it turns the crust into sad rubbery sadness. The absolute best method is placing individual slices back into the cast iron skillet on medium low heat on the stovetop until the bottom recrisps completely. Then, flash it under the broiler for 30 seconds to re-melt the cheese.
You can also freeze whole leftover slices wrapped tightly in foil, but be warned, the delicate crumb texture might suffer slightly upon thawing. Always reheat from frozen in the oven or skillet for best results.
When you realize how easy it is to make something this satisfying and delicious, you’ll never look at takeout pizza the same way again. Mastering the Cast Iron Pan Pizza (K: 20) technique is a foundational skill every home cook should acquire.
Enjoy every perfectly crisp, airy bite of your incredible Cast Iron Pan Pizza (K: 21)!

Recipe FAQs
Why is the bottom of my pizza soft instead of having the crispy 'frico' crust?
This result typically occurs if the pan was not hot enough before the bake or if there was insufficient olive oil used. Ensure you coat the pan very generously with high-quality olive oil before the final proof, as this fat is essential for creating the deeply fried, crispy barrier (frico).
For maximum crispness, you may also preheat the empty cast iron pan in the oven for 5-10 minutes just before placing the proofed dough inside.
My pizza stuck badly to the cast iron pan. How can I prevent this in the future?
Sticking is almost always caused by insufficient oil coverage or using a pan that is not properly seasoned. Use a minimum of 2-3 tablespoons of olive oil spread completely across the pan base, ensuring it reaches slightly up the edges of the dough.
Additionally, avoid cutting the pizza directly in the pan, as this can scrape away the seasoning layer that prevents sticking.
Can I proof the dough overnight in the refrigerator instead of at room temperature?
Absolutely, cold fermentation enhances the flavor complexity and structure of the dough significantly. After the initial mixing, lightly oil the pan, place the dough in, cover tightly, and refrigerate for 12 24 hours.
Just remember to allow the dough to sit out at room temperature for 1 to 1.5 hours before stretching and topping, ensuring it is pliable and fully relaxed.
I don't own a cast iron pan. What is the best alternative equipment?
While cast iron is optimal for achieving the crispest base due to its heat retention, a heavy duty, oven safe stainless steel skillet or a dark metal deep dish cake pan can be substituted.
The key is using a vessel that efficiently retains and distributes high heat, though the resulting crust may be slightly less thick and airy than with traditional cast iron.
When should I add fresh or delicate toppings like basil or arugula?
Fresh herbs and delicate greens should always be added immediately after the pizza comes out of the oven. Adding them too early will cause them to burn, dry out, or become bitter during the high heat bake.
The residual heat from the finished pizza will perfectly wilt and release the aromatics of these ingredients without cooking them fully.
What is the best way to store leftovers and reheat the pizza for maximum crispness?
Store cooled leftovers tightly wrapped or in an airtight container in the refrigerator for up to three days. To reheat, the best method is placing individual slices in a dry skillet over medium high heat until the bottom is crispy again and the cheese is melted.
Avoid microwaving, as this will ruin the crispy crust texture.
Can I use store-bought pizza dough for this recipe?
Yes, you can use high-quality store-bought dough, though the exact texture may vary depending on its hydration level. Ensure the dough is properly thawed and allowed to come fully to room temperature before attempting to stretch it into the oiled pan.
If the store-bought dough is very dense, you may need a longer final proof time in the pan.
Cast Iron Pan Pizza Recipe
Ingredients:
Instructions:
Nutrition Facts:
| Calories | 380 kcal |
|---|---|
| Protein | 20.0 g |
| Fat | 11.0 g |
| Carbs | 50.0 g |
