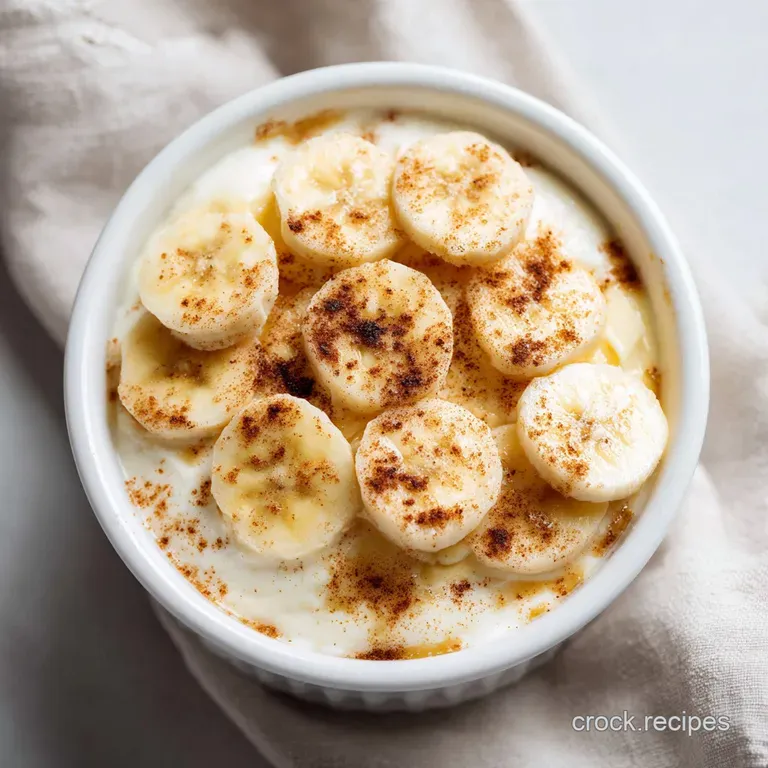
Classic Banana Pudding Recipe
- Time: Active 20 minutes, Passive 4 hours, Total 4 hours 20 mins
- Flavor/Texture Hook: Velvety vanilla cream with softened, cake like wafers
- Perfect for: Family potlucks, hearty Sunday dinners, or ultimate comfort food cravings
- The Physics of the Pudding Set
- Quick Look at the Timings and Texture Map
- The Simple Pantry Elements for Maximum Flavor Impact
- Kitchen Essentials for Achieving That Cloud Like Consistency
- Layering Success: The Master Method for Creamy Results
- Avoiding Sogginess and Perfectly Setting Your Pudding Layers
- Adding Crunch and Personality to the Traditional Build
- Preserving the Texture and Freshness for Days Ahead
- Plating This Southern Staple for Crowds or Quiet Nights
- Recipe FAQs
- 📝 Recipe Card
The Physics of the Pudding Set
The secret to this texture lies in the interaction between the cold water and the instant pudding starch. By using ice cold water, we slow down the initial hydration of the cornstarch in the mix, allowing it to blend smoothly with the thick, sugary condensed milk before it fully thickens.
Chef’s Tips:Freeze the Bowl: Place your mixing bowl and whisk attachment in the freezer for 10 minutes before whipping the heavy cream to ensure the fat stays stable and the peaks stay stiff.
The Banana Acid Bath: If you aren't serving this immediately, toss your banana slices in a tiny bit of lemon juice or pineapple juice to prevent oxidation and keep them from turning grey.
Quick Look at the Timings and Texture Map
Before you start peeling those bananas, it helps to understand how the texture changes over time. This isn't a "make and eat immediately" situation. The magic happens during the long rest.
| Time in Fridge | Wafer Texture | Pudding Consistency | Best For |
|---|---|---|---|
| 1 Hour | Still crunchy | Soft and saucy | People who hate "soggy" cookies |
| 4 Hours | Tender/Cake like | Fully set and scoopable | The classic experience |
| 24 Hours | Melt in-mouth | Dense and rich | Deeply infused flavor lovers |
Choosing the right banana is equally important for the flavor map of this dish. You want yellow skins with just a few brown spots too green and they are starchy; too black and they become "slimy" within the cream layers.
This balance of bright fruit and rich cream is what makes this banana pudding recipe so addictive.
The Simple Pantry Elements for Maximum Flavor Impact
Getting the ingredients right is the difference between a "good" dessert and one people talk about for years. We aren't going for anything fancy here, just high-quality basics used correctly.
- Sweetened Condensed Milk (14 oz): This provides the "hearty" backbone and sugar. Ensure it is chilled before starting. Why this? It creates a much denser, richer mouthfeel than regular milk or sugar.
- Ice Cold Water (1.5 cups): This is non negotiable for the texture. Why this? It controls the hydration rate of the instant pudding mix.
- Instant Vanilla Pudding Mix (5.1 oz): Use the large box. Why this? It acts as the stabilizer and primary flavoring agent.
- Heavy Whipping Cream (3 cups): Must be ice cold. Why this? This provides the volume and "cloud" texture that lightens the whole dish.
- Vanilla Wafers (11 oz): The classic Nilla style is best. Why this? They absorb moisture better than other cookies, turning into little sponge cakes.
- Ripened Bananas (600g/4-5 large): Sliced into 1/4 inch rounds. Why this? They provide the natural "bright" contrast to the rich pudding recipe.
| Ingredient | Science Role | Pro Secret |
|---|---|---|
| Heavy Cream | Air Entrainment | Don't over whip; stop just as you hit stiff peaks to avoid making butter. |
| Instant Pudding | Starch Gelatinization | Whisk vigorously for 2 minutes straight to ensure no gritty starch clumps remain. |
| Condensed Milk | Viscosity Control | Always chill the can; it helps the pudding set faster and firmer. |
If you happen to have leftover bananas that are a bit too ripe for this pudding, you might want to use them in a Paleo Banana Oatmeal recipe instead, which thrives on that extra sugar content.
Kitchen Essentials for Achieving That Cloud Like Consistency
You don't need a professional pastry kitchen, but a few specific tools make the process of creating this banana pudding recipe much easier.
- Stand Mixer or Hand Mixer: Essential for achieving the volume needed in the heavy cream.
- Large Glass Trifle Bowl: Using glass allows you to see the beautiful layers of wafers and fruit.
- Offset Spatula: Great for smoothing out the pudding layers without deflating the cream.
- Whisk: A sturdy wire whisk for the initial pudding and condensed milk blend.
Right then, let's talk about the base. While we are using an instant mix for stability here, if you ever want to try a completely cooked from scratch chocolate version, you should check out this Sinfully Smooth Homemade recipe for a different kind of satisfying treat.
Layering Success: The Master Method for Creamy Results

1. The Pudding Emulsion
In a large bowl, whisk together the 14 oz of chilled sweetened condensed milk and 1.5 cups of ice cold water until perfectly smooth. Sprinkle the 5.1 oz of instant vanilla pudding mix over the top. Whisk aggressively for about 2 minutes. You’ll feel it start to thicken.
Cover this and pop it in the fridge for at least 5 minutes. Note: This "pre set" ensures the pudding is strong enough to hold the whipped cream.
2. Achieving Stiff Peaks
In a separate chilled bowl, pour in your 3 cups of heavy whipping cream. Start on low speed and gradually increase to medium high. Whip until the cream holds its shape firmly on the whisk. If it looks grainy, you've gone too far; if it slumps, keep going.
3. The Folding Technique
Take your set pudding mixture out of the fridge. Gently fold about 1/3 of the whipped cream into the pudding to lighten it up. Then, add the remaining whipped cream and fold with a large spatula using a "figure eight" motion.
Stop as soon as no white streaks remain.Note: Folding prevents the air you just whipped in from escaping.
4. Strategic Layering
Grab your 11 oz of wafers. Start with a thin layer of the pudding mixture on the bottom of your dish. This acts as "glue." Add a single layer of vanilla wafers, followed by a layer of the 600g of sliced bananas.
5. Continuing the Build
Repeat the layers: pudding, wafers, bananas. End with a thick layer of pudding on top. Save a few wafers to crush for the garnish later.
6. The Essential Chill
Cover the dish tightly with plastic wrap. Refrigerate for at least 4 hours, though 6 to 12 hours is even better. Wait until the wafers have softened significantly before serving.
7. The Final Garnish
Just before serving, crush those remaining wafers and sprinkle them over the top. You can also add fresh banana slices right then so they look bright and "perfect".
Avoiding Sogginess and Perfectly Setting Your Pudding Layers
The most common heartbreak with this dish is a watery consistency or bananas that look like they’ve seen better days. But what about the brown bananas? We'll get to that.
Why Your Pudding Is Runny
If your pudding doesn't set, it's usually because the water wasn't cold enough or the cream wasn't whipped to stiff peaks. This recipe relies on the fat in the cream to provide structure.
| Problem | Root Cause | Solution |
|---|---|---|
| Watery Base | Water was room temp | Always use water with ice cubes in it (strain cubes out before measuring). |
| Gray Bananas | Air exposure | Press plastic wrap directly onto the surface of the pudding to seal out air. |
| Crunchy Wafers | Short chill time | Let it sit at least 4 hours; the cookies need time to absorb moisture. |
Common Mistakes Checklist
- ✓ Never use "Cook and Serve" pudding mix for this specific method; it won't set without heat.
- ✓ Don't use low-fat condensed milk; the fat content is what makes it satisfying and thick.
- ✓ Avoid over ripe bananas that are mushy to the touch; they release too much liquid into the cream.
- ✓ Ensure you whip the cream separately; don't try to whip it into the pudding mix from liquid form.
- ✓ Use a deep enough dish so you can get at least three full layers for the best ratio.
Adding Crunch and Personality to the Traditional Build
While the classic is a comfort food staple, you can definitely tweak this to suit your mood. Honestly, don't even bother with low-fat substitutes here the richness is the whole point.
For the Texture Enthusiast
If you want more of a "shatter" in every bite, try adding a layer of toasted pecans or crushed pretzels between the banana layers. The saltiness of the pretzels against the sweet pudding recipe is absolutely brilliant.
A Tropical Variation
Substitute the vanilla wafers for shortbread cookies and add a handful of toasted coconut flakes to the whipped cream. It stays hearty but feels a bit more like a vacation.
The Budget Shortcut vs. Premium Build
Sometimes we want the fancy version, and sometimes we just need it done fast.
| Ingredient | Shortcut Version | Premium Version | The Trade off |
|---|---|---|---|
| Cream | Frozen Whipped Topping | Fresh Heavy Cream | Topping is sweeter and more stable; Fresh is richer and less "oily." |
| Flavor | Vanilla Extract | Vanilla Bean Paste | Paste adds beautiful black specks and a deeper, floral aroma. |
| Cookies | Store Brand Wafers | Butter Shortbread | Shortbread stays crunchy longer but doesn't get that "cake" texture. |
Preserving the Texture and Freshness for Days Ahead
This is one of those rare dishes that actually improves after a few hours in the fridge. However, there are limits to its glory.
- Storage: Keep the pudding in the fridge for up to 3 days. After day 3, the bananas will start to release liquid, and the pudding may become slightly "weepy."
- Freezing: I generally don't recommend freezing this. The emulsion of the cream and the texture of the bananas don't survive the thaw well they often become grainy and mushy.
- Zero Waste: If you have leftover pudding that’s looking a bit sad, blend it into a milkshake! Add a splash of milk and some ice cream for a "banana pudding shake" that is out of this world. You can also use the leftover wafer crumbs as a base for a cheesecake crust.
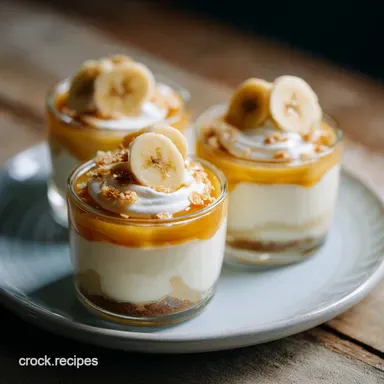
Plating This Southern Staple for Crowds or Quiet Nights
If you're serving this at a party, I love doing individual mason jars. It looks intentional and keeps people from making a mess of the layers when scooping from a large bowl. For a hearty family dinner, just bring the whole trifle bowl to the table and let everyone dig in.
If you want a more "elegant" look, do this: Pipe the final layer of whipped cream using a star tip. Add a sprig of mint for color contrast. Dust the top with a tiny bit of cinnamon or nutmeg to play up the "warming" flavors.
Myths about Banana Pudding: "You must use whole milk." Untrue. The combination of condensed milk and water actually creates a more stable, "mousse like" structure that doesn't soak into the wafers too fast. "Bananas always turn brown." Not if they are fully submerged!
The pudding acts as a vacuum seal. Only the slices on the very top are at risk, which is why we add fresh ones right at the end.
Trust me on this one the patience required for the 4 hour chill is the hardest part of the whole recipe. But when you take that first bite of velvety cream and softened wafer, you'll know exactly why this is the only banana pudding recipe you'll ever need. Let's crack on and get those bananas sliced!

Recipe FAQs
What are the ingredients for banana pudding?
Sweetened condensed milk, instant vanilla pudding mix, ice cold water, heavy whipping cream, vanilla wafers, and fresh, slightly ripened bananas. These six elements combine to create the classic layered texture and rich flavor profile.
What are the four ingredients in a banana pudding recipe?
The four main components are the stabilizer (instant pudding), the fat (heavy cream), the fruit (bananas), and the structure (vanilla wafers). While condensed milk is crucial, these four form the primary textural building blocks.
How to upgrade banana pudding?
Fold in a splash of vanilla bean paste and toast your vanilla wafers lightly before layering. For a deeper flavor, you can also substitute half the heavy cream with a slightly sweeter base, perhaps using a technique similar to what we employ in our 7 Up Cake recipe for an added citrus note.
Can you add flavoring to instant pudding?
Yes, you absolutely should add extra flavoring. Instant pudding is primarily starch and sugar, so enhancing it with high-quality vanilla bean paste or a drop of rum extract during the whisking phase makes a huge difference in depth.
Why does my banana pudding turn watery after a day?
The pudding usually turns watery due to banana off-gassing or under whipped cream structure. Ensure your bananas are fully submerged in the pudding layers to prevent oxidation, and confirm your heavy cream reached stiff peaks before folding it in.
How to prevent the vanilla wafers from dissolving completely?
Use the thickest possible pudding and whip your cream stiffly to add maximum air and stability to the mixture. The whipped cream acts as a buffer, slowing the moisture transfer to the cookies; mastering this whipping technique is key, just as it is when learning to stabilize fats in recipes like our Soy Milk recipe.
Is it true I must use canned sweetened condensed milk instead of evaporated milk?
Yes, you must use sweetened condensed milk for the proper texture. Evaporated milk lacks the necessary high concentration of sugar, which is vital for achieving the dense, creamy set required to hold the wafer structure.
Classic Banana Pudding Recipe
Ingredients:
Instructions:
Nutrition Facts:
| Calories | 524 calories |
|---|---|
| Protein | 5.4 g |
| Fat | 29.7 g |
| Carbs | 61.5 g |
| Fiber | 1.3 g |
| Sugar | 45.8 g |
| Sodium | 335 mg |
