Cornmeal Mush: the Classic Recipe for Porridge or Ultra-Crispy Slices
- Defining Comfort: What is Classic Cornmeal Mush?
- Achieving Creaminess: The Science Behind Perfect Mush Texture
- The Essential Components for Classic Cornmeal Mush
- How to Prepare Cornmeal Mush (The Two-Stage Process)
- Troubleshooting: Tips for Avoiding Lumps and Sticking
- Storing and Reheating Cooked Cornmeal Mush
- Delicious Ways to Serve Your Cornmeal Mush
- Recipe FAQs
- 📝 Recipe Card
Defining Comfort: What is Classic Cornmeal Mush?
The best smell on a chilly morning isn't always coffee; it’s often this quiet, comforting warmth. When that earthy, slightly sweet corn aroma starts steaming up your kitchen, you know you’re in for a serious treat.
This humble, historical dish is the ultimate creamy comfort food that sticks to your ribs in the absolute best way possible.
Look, life is expensive, and sometimes you need food that works hard for just a few pennies. This classic Cornmeal Mush recipe uses three basic ingredients and requires minimal active cooking time, making it the perfect budget breakfast solution.
It’s the very definition of humble genius and historical thriftiness.
We are going to master two perfect textures today: the velvety hot porridge version, and the crispy, decadent fried slices you used to get at your grandma’s house. Stop trying to dump dry cornmeal into boiling water, because I’m showing you the foolproof trick that guarantees you will never encounter a single lump.
Let's crack on!
Achieving Creaminess: The Science Behind Perfect Mush Texture
From Humble Beginnings: A History of Mush
Cornmeal mush is one of the oldest, most reliable dishes in American and colonial culinary history, stretching back to Indigenous cooking traditions. It was a staple, often called Hasty Pudding (especially when sweetened), because it was fast, easy, and used readily available ingredients.
People relied on it for sustained energy, and its versatility eaten hot or cooled and fried made it indispensable. This is true heritage cooking, folks.
Hasty Pudding vs. Grits: Understanding the Differences
This is where the confusion starts, so let me set the record straight. While all these dishes rely on ground corn, they are not the same thing. Grits are traditionally made from hominy corn treated with alkali, giving them a distinct flavor and texture, particularly common in the Southern US.
Hasty Pudding is usually mush served hot and sweetened with molasses or syrup. Our Cornmeal Mush is made with standard stone ground cornmeal, either yellow or white, giving it that classic, grainy texture perfect for setting into loaves.
The Core Concept: Porridge Today, Slices Tomorrow
The beauty of this recipe lies in its two-phase life cycle. You cook the hot porridge base, which is amazing served instantly, just like oatmeal. However, when you pour that base into a loaf pan and chill it, the starches set up rock solid, forming a sliceable block.
That firm loaf is then ready for its true glory: sliced thin and pan-fried until crunchy, golden, and ridiculously delicious.
The Golden Ratio: Water Absorption and Cornmeal Consistency
The golden rule for classic, sliceable cornmeal mush is typically a 1:4 ratio of cornmeal to liquid. One part cornmeal to four parts water or milk gives the starches enough liquid to hydrate fully without becoming too runny.
If you use a very fine cornmeal, you might need slightly less water, but for standard medium grind, trust the 1:4 ratio for a thick consistency that will hold its shape when chilled.
Preventing Lumps: The Whisking and Stirring Technique
If you throw dry cornmeal into boiling liquid, the outside starch instantly gelatinizes, creating a hard shell around dry cornmeal pockets, resulting in nasty lumps. The fix? You must create a cold slurry first.
Mixing the cornmeal with one portion of cold water allows the grains to hydrate evenly before they hit the heat. When you pour that slurry into the boiling water, you must whisk vigorously for about 30 seconds to disperse it instantly.
Chef's Note: My biggest cornmeal fail happened when I walked away for "just a minute" during the first few minutes of simmering. I came back to a mushy concrete block glued to the bottom of the pan. Do not skimp on the stirring in the first 10 minutes.
Why Boiling Water is Essential for Fine Cornmeal
While you start the mush with a cold slurry, the remaining liquid needs to be at a rolling boil before the slurry goes in. The intense heat of the boiling liquid immediately activates the starch in the cornmeal slurry, starting the thickening process right away.
This rapid onset of cooking is crucial for achieving that ultimate, creamy texture and shortening the total cook time.
The Essential Components for Classic Cornmeal Mush
This dish is all about simplicity, which means every ingredient plays a critical role. Here’s what you need, and what you can use if you’re out of the primary ingredient.
Choosing the Right Cornmeal: Yellow vs. White and Grind Size
You can use yellow or white cornmeal, though I prefer yellow for its slightly richer color and sweeter, more pronounced corn flavor. Crucially, you need medium or coarse stone ground cornmeal, not instant cornmeal or corn flour. The larger grains need that long simmer time to achieve creaminess.
If you use instant cornmeal, the texture will be gluey and unpleasant.
The Role of Salt: Flavor Amplification, Not Just Seasoning
Cornmeal is inherently bland, like oatmeal. You must use salt, and maybe even a little more than you think is necessary, to amplify the natural sweetness of the corn. Without adequate salt, the mush, whether hot or fried, will taste flat.
It should taste savory sweet, ready to pair with whatever syrups or savory toppings you choose.
Can I Use Instant Grits? (Substitution Notes)
While you can technically make a porridge using instant grits, it will not set properly for slicing and frying. Grits are processed differently and are designed for a fast cook, not structural integrity.
If you want the authentic experience that yields slices perfect for frying, stick to traditional cornmeal.
| Ingredient | My Recommendation | Viable Substitution | Texture/Flavor Impact |
|---|---|---|---|
| Cornmeal (Medium Grind) | Yellow Stone Ground | Medium Polenta | Polenta often needs longer cooking time (35 40 min). |
| Water | Filtered Cold Water | Chicken Stock / Vegetable Broth | Stock adds a savory depth, perfect for serving with cheese. |
| Salt | Kosher Salt | Sea Salt | Adjust volume; sea salt is finer and saltier by volume. |
| Frying Fat | Butter + Oil | Bacon Drippings or Ghee | Bacon drippings are phenomenal for a breakfast fry-up. |
How to Prepare Cornmeal Mush (The Two-Stage Process)
Stage One: Cooking the Hot Porridge Base
- Slurry First, Always: In a separate bowl, whisk 1 cup of cold water into your 1 cup of cornmeal until it is a uniform, lump free mixture. This is your insurance policy.
- Boil: Bring the remaining 3 cups of liquid (water, milk, or a mix) and the salt to a rapid, rolling boil in a heavy bottomed saucepan. This heavy pan is key to avoiding scorching!
- Pour and Whisk: Reduce the heat slightly (to medium high) and slowly pour the cornmeal slurry into the boiling liquid while whisking vigorously and constantly. Keep whisking until the mixture thickens dramatically it will look like very thick gravy.
- Low and Slow: Immediately reduce the heat to the absolute lowest setting to maintain a gentle simmer. Switch to a rubber spatula, cover the pot partially, and begin the simmer.
- Cook Until Tender: Stir every 5– 7 minutes, scraping the bottom of the pot thoroughly each time. Cook for a full 25– 30 minutes until the cornmeal loses its grittiness and takes on a smooth, pudding like consistency. Taste it if it still tastes gritty, keep cooking!
Stage Two: Chilling and Setting the Loaf
If you’re having the porridge now, stop and eat! If you want those amazing fried slices, here’s the next step.
- Prep the Pan: Lightly grease a standard loaf pan (about 8.5 x 4.5 inches). You can also line it with parchment paper for super easy removal.
- Pour and Chill: Scrape the hot mush into the prepared pan and smooth the top with your spatula. Cover the pan loosely and refrigerate for a minimum of 4 hours, though letting it go overnight is truly the best strategy. It must be completely cold and firm.
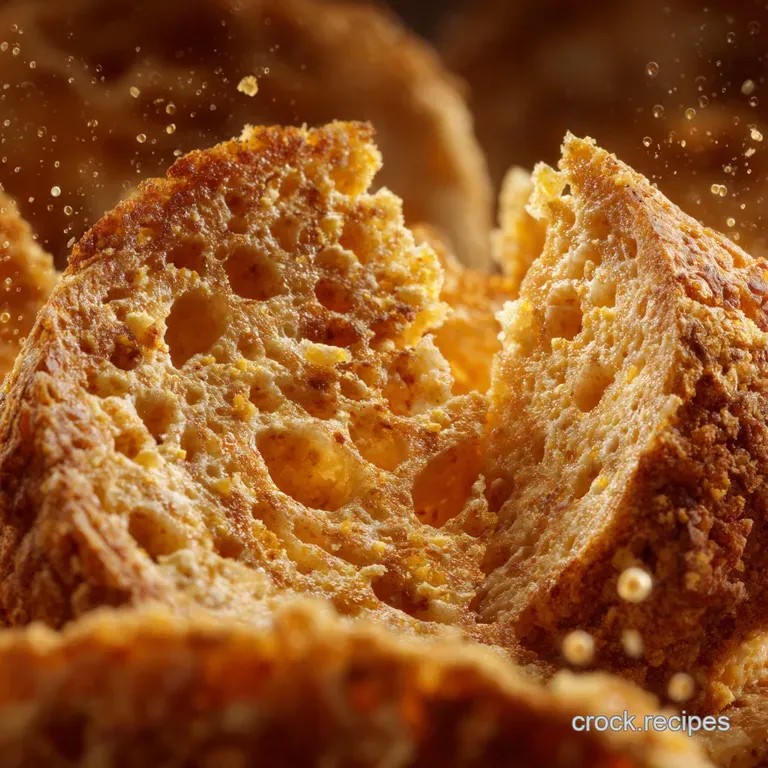
Stage Three: Slicing and Frying Mush Until Golden Crisp
- Slice: Run a knife around the edges and invert the chilled loaf onto a cutting board. Slice the cornmeal into pieces about half an inch thick. I love the beautiful clean lines.
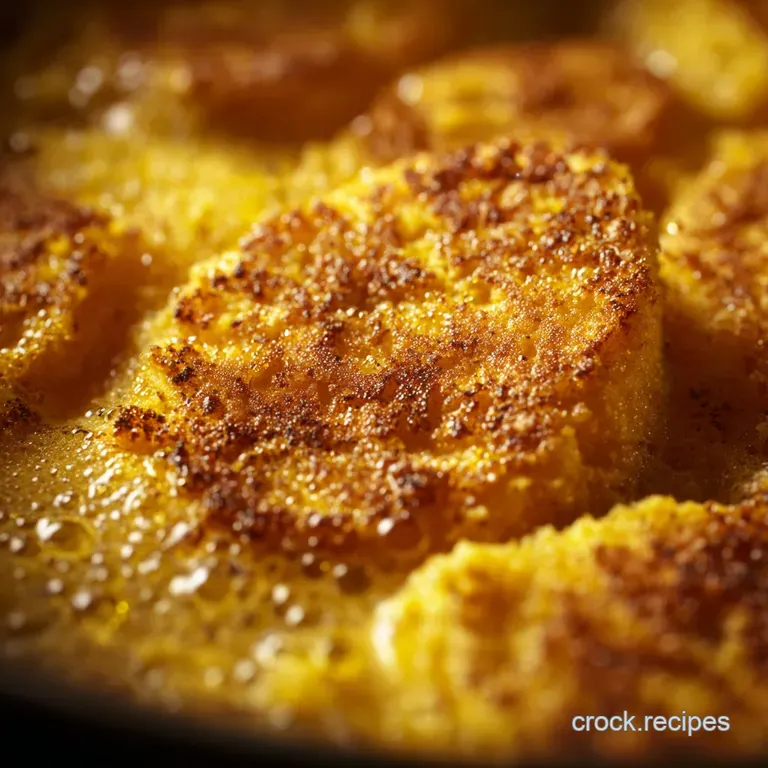
- Fry: Heat 2 tablespoons of butter or oil (or bacon grease!) in a large skillet over medium high heat. Don’t overcrowd the pan, as that lowers the temperature.
- Crisp Perfection: Fry the slices for 4– 6 minutes per side until they are deep golden brown and boast a lovely, crunchy exterior. Drain on paper towels briefly and serve immediately. This transformation from porridge to crisp is pure magic.
Troubleshooting: Tips for Avoiding Lumps and Sticking
My kitchen life has been defined by fixing mistakes, so let me share the top two issues people run into.
1. My Mush is Lumpy and Gritty!
The gritty texture means you didn't cook it long enough; the starch hasn't fully gelatinized. If it's lumpy, you skipped the crucial cold slurry step. The Fix: If it’s gritty, keep cooking it, even if you need to add a splash of boiling water to keep it loose.
If it’s lumpy, there’s no real fix for this batch, unfortunately you just learned why the cold slurry matters for the next time!
2. The Bottom Scorched and Tastes Burnt.
You used too high of heat, or your saucepan wasn't heavy enough. Scorching happens when the moisture evaporates quickly at the bottom of the pan and the direct heat burns the solids. The Fix: Switch to a pot with a super thick base.
Once the mush thickens, ensure the heat is so low that you only see a very gentle burp every few seconds. If you have a scorched layer, transfer the unscorched mush carefully to a clean bowl before chilling or serving, leaving the burned bits behind.
Storing and Reheating Cooked Cornmeal Mush
We don't waste anything in this kitchen, especially not something this delicious. Cornmeal mush stores wonderfully well, particularly in its chilled state.
Storing and Freezing Mush for Future Frying
The chilled, uncooked loaf stores beautifully in an airtight container in the fridge for up to 4 or 5 days. For long term storage, wrap the entire loaf tightly in plastic wrap, followed by a layer of foil, and freeze for up to 3 months.
When you're ready to eat, thaw the loaf overnight in the fridge before slicing and frying. Do not try to slice it frozen, or it will crumble.
Reheating Hot Porridge Mush (Maintaining Creaminess)
If you have leftover hot porridge, store it in the fridge. When reheating, it will be solid and thick. Scoop it into a saucepan and add a generous splash of milk or water about ¼ cup per serving. Heat slowly over low heat, stirring constantly, until it returns to a creamy consistency.
You will be amazed that it retains its texture.
Delicious Ways to Serve Your Cornmeal Mush
This simple base loves both sweet and savory treatments; honestly, you can’t go wrong.
Why Your Mush is Too Runny (Adjusting the Liquid)
If your mush is too thin to hold a slice, or seems soupy right after cooking, it usually means your liquid-to-cornmeal ratio was off, or you didn't cook it long enough. The Quick Fix: If you realize it’s runny halfway through the cook time, dissolve 1 teaspoon of cornmeal in 2 tablespoons of cold water (a quick micro slurry) and stir it into the simmering mush.
Cook for another 5 minutes; it should thicken up nicely.
The Secret to a Perfect, Non-Crumbly Fried Slice
The slices need to be truly cold and firm. If you try to fry them while they are still slightly warm, they will fall apart in the hot pan. Also, don't flip them too soon! Let the slice develop a solid, crispy crust on the first side before you even attempt to turn it.
That crust is the structural support.
Scaling the Recipe: Adjusting Cooking Time for Larger Batches
You can easily double or triple this recipe. Just make sure you use a much larger, very heavy pot (like a 6 or 8 quart Dutch oven) to avoid scorching. The overall cooking time will remain about 25– 30 minutes, but the cooling/chilling time might need an extra hour or two to set fully if the loaf is much thicker.
Best Practices for Chilling the Mush Loaf
To ensure easy release, I always lightly grease my loaf pan with butter, even if I use parchment. This prevents any small sticky edges from tearing the slice when you turn it out. Chill uncovered for the first hour to allow some steam to escape, then cover to prevent a dry surface.
Reheating Hot Porridge Mush (Maintaining Creaminess)
As mentioned above, always use extra liquid (milk or water) when reheating the refrigerated porridge. If you want a fun, related side dish for a slow cooked meal, check out my recipe for [Foolproof Creamy Crock Pot Chicken and Rice No Mushy Rice] it uses similar principles for creating perfect creamy textures without resorting to gluey rice.
Serving Suggestions:
- Sweet Breakfast Slices: Serve the hot, crispy fried slices with a generous pour of pure maple syrup and a sprinkle of cinnamon sugar.
- Savory Side: Serve the hot, creamy mush with a stir-in of sharp cheddar cheese and some freshly cracked black pepper.
- The Classic Pairing: Crisp bacon or ham alongside the fried slices, swapping the syrup for a spoonful of homemade pepper jelly. It's the ultimate salty sweet bite.

Recipe FAQs
Why is my cornmeal mush lumpy?
Lumps almost always occur when the dry cornmeal is added too quickly directly to the boiling liquid. To prevent this, always whisk the cornmeal into a small amount of cold water or liquid first to create a smooth slurry.
Stream the slurry very slowly into the hot water while continuously whisking vigorously for the first minute.
Can I use milk instead of water for this recipe?
Yes, absolutely. Using milk (dairy or non-dairy) instead of water will result in a richer, creamier, and slightly sweeter porridge, which is excellent for breakfast service. If using milk, be sure to cook over slightly lower heat and stir frequently as dairy is prone to scorching on the bottom of the pot.
What kind of cornmeal should I use?
A medium grind yellow or white cornmeal is ideal for this traditional recipe, providing a satisfying, slightly gritty texture that works well both hot and fried. Avoid pre-cooked instant polenta or instant grits, as those products set up too quickly and won't develop the deep, traditional flavor this recipe requires.
My mush is too thin after cooking. How can I fix the consistency?
If your mush seems too watery after the required cooking time, simply continue cooking it, uncovered, allowing the excess moisture to evaporate slowly. For a quicker fix, mix 1 to 2 tablespoons of cornmeal with cold water to form a slurry, whisk it into the mush, and cook for another minute until thickened.
How long can I store the chilled mush before slicing and frying?
Cooked cornmeal mush, once cooled and formed into a loaf, should be wrapped tightly in plastic wrap and stored in the refrigerator. It remains perfectly fresh for slicing and frying for up to 5 days. This makes it a great item for weekend meal prepping.
Can I serve cornmeal mush in a savory way?
Absolutely; cornmeal mush is versatile and works wonderfully in savory preparations, similar to polenta or grits. Try serving the hot porridge topped with a pat of butter, sharp cheddar cheese, and fresh cracked pepper.
The chilled and fried slices are also delicious served beneath a hearty bowl of chili, braised greens, or sausage ragu.
Is it possible to freeze leftover cornmeal mush?
While technically possible, freezing cooked cornmeal mush is generally not recommended, especially if you plan on slicing and frying it later. The freezing and thawing process tends to alter the texture significantly, often leading to a crumbly, grainy, or dry block instead of a firm, smooth consistency.
Classic Cornmeal Mush Recipe

Ingredients:
Instructions:
Nutrition Facts:
| Calories | 213 kcal |
|---|---|
| Protein | 6.9 g |
| Fat | 13.3 g |
| Carbs | 17.1 g |
