Sugar Free Protein Ice Cream: the Creamiest, Low Carb Vanilla Treat
- Achieving The Velvet Scoop: The Ultimate Sugar Free Protein Ice Cream Recipe
- The Science of Smooth: Why This Sugar Free Protein Ice Cream Stays Creamy
- Essential Ingredients and Strategic Substitutions
- The Method: Crafting Perfect Sugar Free Protein Ice Cream
- Expert Ice Cream Maker’s Tips and Troubleshooting Guide
- Storage, Scoopability, and Perfect Pairings
- Recipe FAQs
- 📝 Recipe Card
Achieving The Velvet Scoop: The Ultimate sugar-free Protein Ice Cream Recipe
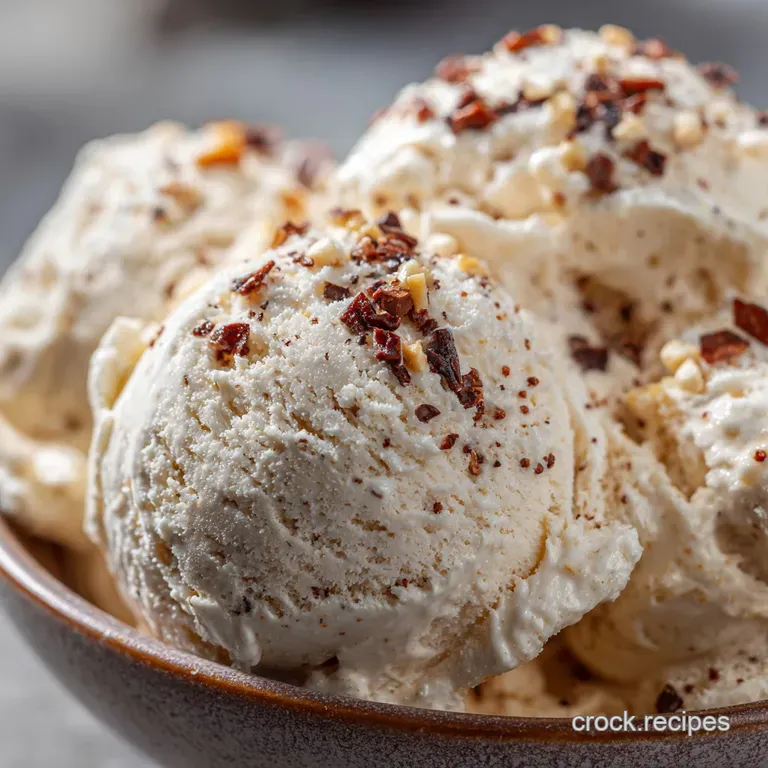
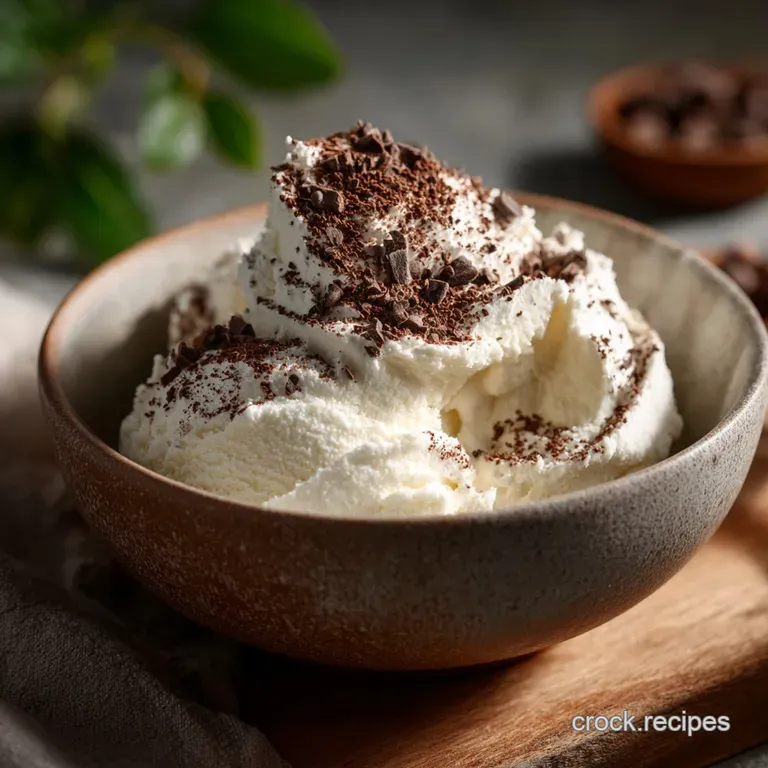
Okay, stop whatever you are doing right now. This high protein ice cream recipe is the absolute definition of a velvet scoop; it’s thick, incredibly creamy, and has zero gritty aftertaste.
When you scoop this, it should glide off the spoon just like proper Italian gelato , certainly not that awful watery stuff you get from the "diet" aisle.
I swear, I used to buy those expensive tubs of store-bought high protein ice cream, only to toss half of them because they tasted vaguely of sadness and freezer burn. Making this [sugar-free Protein Ice Cream Recipe] at home saves so much cash, and honestly, my macros thank me.
It’s a total game changer for dessert freedom and fits perfectly into a low-sugar lifestyle.
The massive challenge with any sugar-free dessert is always texture; without sugar to keep things soft, mixtures usually freeze into a solid, unyielding brick. We cracked the code on high protein mixtures. Ready for the secret weapon and the specific ratios that make this incredibly creamy? Let’s get mixing.
The Science of Smooth: Why This sugar-free Protein Ice Cream Stays Creamy
Bypassing the Sugar Spike: Why Low-Sugar Desserts Fail (and Ours Doesn't)
Sugar is not just for sweetness in baking and desserts; it’s actually a crucial anti freeze agent. When you remove sugar, the freezing point of the liquid rises dramatically, resulting in large, brittle ice crystals.
We successfully navigate this by replacing sugar's function with two helpers: high-quality fat and a highly specialized stabilizer.
Protein Power: Calculating Macros for Your Dessert
This recipe is intentionally dense in protein, usually hitting around 25g per serving, which is great for feeling satisfied. Tip: Always calculate the macros based on your specific protein powder, as sweetness and filler content vary wildly between brands.
Since protein powder thickens upon hydration, we must balance it carefully against the liquid volume.
The Texture Challenge: Solving the 'Rock Hard' Ice Cream Problem
Traditional ice cream relies on sugar to keep it soft; if you’ve tried making basic high protein mixtures before, you know they turn into cement. Our recipe utilizes a tiny, precise amount of stabilizer that prevents large ice crystals from forming during the freezing process.
This gives us that beautiful, pliable texture we are looking for in any great [sugar-free High Protein Ice Cream].
Protein Isolation: Managing Water Content and Ice Crystal Formation
The type of protein you use matters massively here. Whey protein is great for fast absorption but typically holds less water when chilled, making a less stable base. Casein, on the other hand, absorbs liquid much more effectively, creating a thicker, almost pudding like base that translates into superior mouthfeel and greatly reduced crystal formation.
The Specialized Stabilizer: Replacing Traditional Gums and Thickening Agents
Our secret weapon here is Xanthan Gum. It's potent. It traps the water molecules, effectively binding them so they can’t turn into giant, crunchy ice spears. I learned the hard way that a little is plenty; I once made a batch using a full teaspoon and ended up with vanilla flavored slime.
Measure exactly one-quarter teaspoon, trust me.
Fat Ratios and Freezing Point Depression
We use whole milk or half and half specifically for its fat content, even though we're cutting sugar. Fat not only adds richness, improving that 'velvet scoop' quality, but it also coats the water molecules, helping to depress the freezing point slightly.
This strategic blend of fat and liquid is key to achieving a truly creamy final product.
Essential Ingredients and Strategic Substitutions
Getting the right ingredients is half the battle when making low-carb treats. The quality of your protein powder absolutely shines through since the flavor profile is so clean.
| Ingredient | Role | Substitution Strategy |
|---|---|---|
| Vanilla Whey/Casein | Bulk, Flavor | dairy-free? Use Pea or Rice Protein. Just ensure it dissolves well. |
| Whole Milk | Creaminess, Fat | Replace with heavy cream cut with water, or use canned full fat coconut cream for a rich [Low Carb Coconut Cream Ice Cream]. |
| Erythritol/Monk Fruit | Sweetener | Allulose works brilliantly as it helps keep the ice cream softer in the freezer. Use the same volume. |
| Xanthan Gum | Stabilizer (CRITICAL) | Use 1 Tbsp of sugar-free Instant Pudding Mix; it contains stabilizers that function similarly. |
Choosing Your Protein Base: Whey Isolate vs. Casein for Texture
If you can find a blend, that’s ideal. If you must choose just one, Casein will give you the most luxurious, creamy texture. Whey Isolate is fine, but the resulting ice cream might be slightly harder coming out of the deep freeze.
Sweetener Selection: Comparing Erythritol, Stevia, and Monk Fruit
I prefer a blend of Erythritol and Monk Fruit because it minimizes the cooling aftertaste some find off-putting. Stevia is super potent, so you’ll need far less, perhaps 1/4 the volume. Just remember that bulk sweeteners like Erythritol add mass, which also helps with volume.
The Function of Gums and Fiber: Enhancing Creaminess
Using that tiny bit of Xanthan Gum is non-negotiable for this recipe's success. It binds the base mixture so efficiently that even after being churned and frozen, the ice cream resists crystallization.
It’s what gives this high protein mixture that dense, elastic quality similar to proper [sugar-free Protein Ice Cream Ninja Creami] results, even in a standard machine.
Optional Superfood Boosters for Flavor Depth
You can easily add depth! Try adding 1/2 tsp of instant coffee powder for a slight mocha flavor or a tablespoon of unsweetened cocoa powder for a gentle chocolate note. I sometimes stir in a pinch of cinnamon for warmth; it works beautifully alongside the vanilla.
The Method: Crafting Perfect sugar-free Protein Ice Cream
This process is straightforward, but the chilling time is absolutely mandatory. Do not skip the chill phase!
Preparing the Base Mix: Achieving Homogenous Dispersion
- Combine Wet Ingredients: Grab a big bowl or your blender. Pour in the whole milk, almond milk, and vanilla extract. Give it a quick whisk to get things moving.
- Mix Dry Ingredients (The crucial step): In a separate small bowl, measure your protein powder, sweetener blend, and salt. This next part is essential: Sprinkle the measured 1/4 teaspoon of Xanthan Gum directly into this dry mixture.
- Whisk the Dry: Whisk the dry ingredients vigorously for at least 30 seconds. You are essentially distributing the powerful gum amongst the protein powder so it doesn't clump up when it hits the liquid.
- Slowly Add Dry to Wet: While whisking continuously (or blending on the lowest setting), pour the dry mixture into the wet base. Whisk for 1– 2 minutes until everything is completely smooth. You should notice it thicken slightly, almost like a thin, melted milkshake.
The Churning Process: Optimal Speed and Duration
Chef’s Note: The base must be ice-cold, ideally below 40°F (4°C), before churning. If it's even slightly warm, you’ll end up with a slushy, not smooth ice cream.
- Chill Hard: Cover the mixture and refrigerate it for a minimum of 4 hours, though letting it sit overnight ( 12 hours) is truly ideal.
- Churn: Pour the chilled base into your pre-frozen ice cream machine bowl. Churn for 25– 30 minutes, or until the mixture looks like very thick soft serve.
The Crucial Ripening Stage (Hardening)
- Transfer: Quickly scrape the soft mixture into an airtight freezer container. Tap the container lightly on the counter to settle the mix and remove air pockets.
- Deep Freeze: Move it to the coldest part of your freezer for 2– 3 hours. This "ripening" stage locks in the texture we worked so hard to achieve.
Expert Ice Cream Maker’s Tips and Troubleshooting Guide
Avoiding Grittiness: Ensuring Stabilizers Are Fully Hydrated
If your final ice cream feels sandy or gritty, the most likely culprit is either undissolved protein powder or clumped Xanthan Gum. Fix: Use the two-step mixing process outlined above (Step 2 and 3).
If you are worried, use a blender instead of a whisk for the final incorporation, which guarantees a homogenous base.
Adjusting for Different Protein Powder Profiles (Absorption differences)
Some protein powders, especially casein heavy ones, are thirstier than others. If your mix seems too thick before chilling, add 1 2 tablespoons more almond milk until it is easily pourable.
If you find your ice cream is still too soft after freezing, next time, slightly increase the protein powder (maybe 1/4 scoop extra) to absorb more liquid.
What to Do If the Mix Separates Before Churning
If you chill the mixture overnight and notice a slight separation (a thin layer of milk fat settling on top), don't panic! This is totally normal, especially with high fat bases. Simply give the mixture a quick, vigorous whisk (just 10 seconds) right before you pour it into the ice cream maker.
Storage, Scoopability, and Perfect Pairings
Maintaining Texture During long term Freezing
Because we are dealing with a [sugar-free High Protein Ice Cream], it will naturally harden over time more than full sugar versions. For the best long term texture (over a week), press a layer of plastic wrap directly onto the surface of the ice cream before sealing the lid.
This minimizes air exposure and freezer burn.
The Re-Churn Trick: Reviving Hardened Ice Cream
Did you leave the container in the deep freeze for three months and now it's basically granite? Don't toss it! If you have a Ninja Creami or a similar powerful blending device, simply break up the frozen block, add a splash of milk (about 1 tbsp), and re-process it.
This is the secret to reviving any stubborn low-carb frozen dessert.
Low-Sugar Toppings and Superfood Swirls
This vanilla base is the perfect canvas for pairing with other low-carb desserts. We love serving it alongside rich, spiced treats like my Keto Apple Cider Donut Bites: Low Carb Spiced Autumn Treat or drizzled over a warm spoonful of my SugarFree Pumpkin Pudding: Ultra Creamy, Keto Friendly Stove Top Recipe . For a simple swirl, melt a spoonful of sugar-free jam or smooth peanut butter and gently ribbon it through the soft serve stage before final freezing.
If you’re hosting, try serving small scoops in fancy glasses, perhaps paired with a simple low-carb cupcake like the ones in my recipe for Keto Spice Cake Cupcakes: Moist, Low-Carb Recipe with Cream Cheese Frosting . It’s a decadent finish that nobody will believe is sugar-free.
Temper Before Serving
This is the most important serving tip: Never attempt to scoop this straight from the deep freeze. Pull the container out 10– 15 minutes before you plan to serve it.
This allows the ice cream to "temper" slightly, transforming that hard texture into the soft, pliable velvet scoop you’ve been dreaming of.
 : PIN FOR LATER")
Recipe FAQs
Why is my protein ice cream rock solid right out of the freezer?
High protein, low-sugar mixtures naturally lack the depressants (like sugar and fat) necessary to stay soft and pliable, causing them to freeze extremely hard. To remedy this, let the ice cream temper on the counter for 10-15 minutes before serving to soften it slightly, or consider adding a tablespoon of clear alcohol (like vodka) to the base before churning, as this lowers the freezing point.
Is the specialized stabilizer necessary, and can I substitute it?
The specialized stabilizer (like a proprietary ice cream base ingredient or a small amount of xanthan gum) is highly recommended for achieving a truly velvety texture and preventing large ice crystal formation.
While you can omit it, expect a noticeably harder, icier final product, as common kitchen substitutes rarely perform as effectively in low-sugar applications.
What type of protein powder yields the best results for texture?
Whey protein isolate generally provides the smoothest texture and best mixability for ice cream, as concentrates can sometimes lead to a slightly chalky or gritty mouthfeel. Ensure your chosen powder is designed to be cold mix soluble and select a flavor profile that complements the vanilla or cream base.
How long can I store this sugar-free ice cream in the freezer?
When properly stored in an airtight container deep in the back of the freezer, this high protein ice cream will maintain its quality for about 2 to 3 months. To prevent freezer burn and crystallization, press a layer of plastic wrap directly onto the surface before sealing the container.
Can I make this recipe completely vegan or dairy-free?
Yes, you can substitute the dairy components with full fat canned coconut milk or a high-quality cashew cream for maximum richness. Be sure to use a neutral tasting plant based protein powder (like soy or pea isolate) and adjust the liquid levels as needed, since plant proteins absorb moisture differently than whey.
How do I prevent the ice cream base from tasting gritty or grainy?
Grittiness is usually caused by undissolved protein powder or sweetener that has settled out of the liquid base. Ensure you blend the mixture thoroughly on a high setting for several minutes until it is perfectly smooth, and always chill the base for the full recommended time before churning.
How can I adjust the flavor profile to create chocolate or coffee ice cream?
To make chocolate, replace the vanilla extract with 2-3 tablespoons of unsweetened Dutch process cocoa powder blended into the cold base. For a coffee flavor, add 1-2 teaspoons of high-quality instant espresso powder blended with the wet ingredients, adjusting the sweetener if needed to balance the bitterness.
Creamy sugar-free Protein Ice Cream
Ingredients:
Instructions:
Nutrition Facts:
| Calories | 294 kcal |
|---|---|
| Protein | 20.6 g |
| Fat | 17.1 g |
| Carbs | 14.6 g |
