Chocolate Silk Pie: the Ultimate Decadent Recipe
- The Ultimate Chocolate Silk Pie: Decadence Defined
- Achieving the Perfect 'Silk' Texture: The Science of No-Bake Filling
- Essential Components and Ingredient Deep Dive
- Method: Mastering the No-Bake Filling Assembly
- Troubleshooting and Expert Pointers for Flawless Results
- Preparation, Storage, and Make-Ahead Strategy
- Presentation and Perfect Flavor Pairings
- Recipe FAQs
- 📝 Recipe Card
The Ultimate Chocolate Silk Pie: Decadence Defined
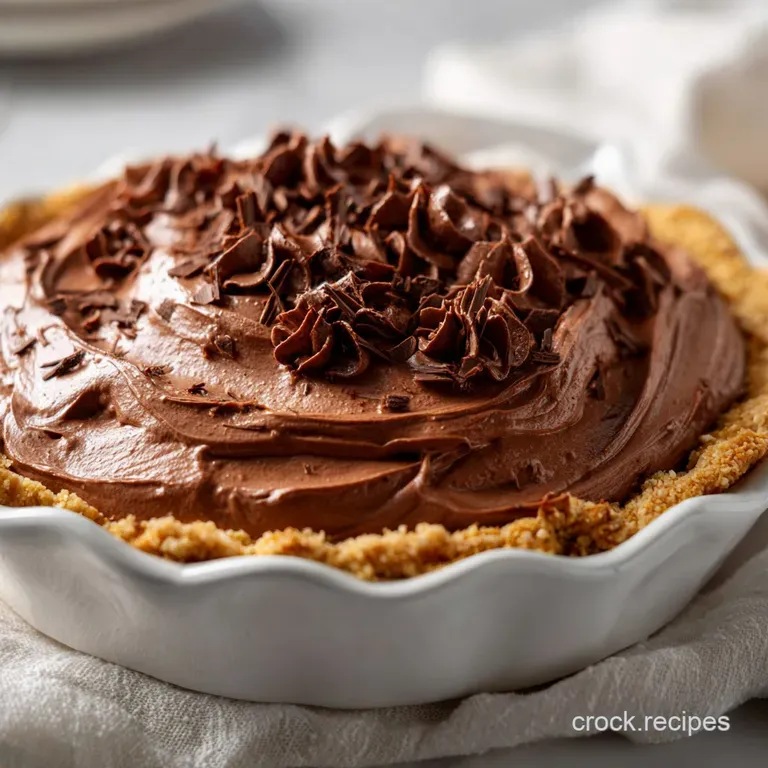
The perfect dessert experience starts with a sound: that incredibly satisfying shatter when your fork breaks through a crisp shortbread crust to meet the cool, dense, cloud like filling. That, right there, is the sign of a truly remarkable chocolate silk pie .
This isn't just a dessert; it's an exercise in luxurious texture.
Seriously, this recipe is a lifesaver. You get the richness and complexity of a bakery pie without the hours of precise baking and oven monitoring. It looks sophisticated, tastes impossibly decadent, but is surprisingly easy on your wallet and your schedule, since most of the time is spent chilling in the fridge.
Forget those sad, wobbly, instant pudding versions. We are going to master the classic technique, ensuring the filling is light, intensely dark, and lives up to the "silk" moniker. Trust me, once you nail this method, you'll be making the best chocolate silk pie for every major occasion.
Achieving the Perfect 'Silk' Texture: The Science of No-Bake Filling
Creating a proper chocolate silk pie filling is less about luck and more about chemistry. It relies heavily on aeration and emulsion, which sounds complicated, but really just means using your mixer correctly. This technique ensures the result is far superior to a simple chocolate mousse pie.
The History of the Classic Diner Dessert, Elevated
The original concept for this kind of pie usually involved a butter and sugar base mixed with melted chocolate and eggs. Diners perfected it because it was easy to batch and required minimal baking skill beyond the initial crust.
Our version respects that simple foundation but insists on higher quality ingredients and better technique, lifting it from the coffee shop to the high table.
Why We Choose a Crisp Pâte Sucrée Crust Base
While you could certainly use a graham cracker base (and I offer that substitute below!), the Pâte Sucrée a French shortbread crust provides the essential counterpoint. It’s slightly salty, incredibly buttery, and structurally strong enough to hold that deep dish of heavy filling. This pairing of rich butter crust and cold, dark filling is simply perfection. If you love a flaky, buttery crust, you might also like my Pioneer Woman Pecan Pie: Best Flaky Crust Recipe , which uses similar techniques.
The Magic Behind the Feather Light Filling Technique
The secret to this no-bake chocolate silk pie isn't cream cheese or gelatin it's air. We incorporate massive amounts of air into the butter and sugar mixture before adding the chocolate.
This light, fluffy base ensures the final product isn't dense or greasy; it’s genuinely feather light, almost like a whipped ganache.
The Role of Creaming Butter and Sugar for Volume
This is the most time consuming part, but it’s non-negotiable. You are not just mixing the butter and sugar; you are whipping them until the volume nearly doubles and the color turns snow white.
This lengthy creaming process dissolves the powdered sugar perfectly and traps air, which is the scaffolding for our entire chocolate silk pie filling .
Controlling the Melt: Incorporating Warm Dark Chocolate
The enemy of silk is heat inconsistency. The melted chocolate must be lukewarm still pourable, but not hot enough to melt the whipped butter base. If your chocolate is too hot, it will split the butter sugar emulsion and turn your filling into an oily soup.
The Essential Chill Time for Optimal Stability
Four hours is the bare minimum, but honestly, overnight is the dream. The chill time is where the butter re-solidifies, holding all that beautiful air and forming the incredibly smooth, sliceable texture we crave. You simply cannot rush the perfection of a fully set deep dish chocolate silk pie.
Essential Components and Ingredient Deep Dive
Selecting the Right Intensity of Dark Chocolate
This is the star, so please splurge! I insist on a high-quality dark chocolate around 70% cacao. Using standard chocolate chips, which contain stabilizers, will often yield a waxy texture.
If you use something less intense, like semi sweet (55%), you must reduce the powdered sugar in the filling or it will be sickeningly sweet.
Notes on Butter and Heavy Cream Fat Content
Always use unsalted butter here. Its temperature is key: it should be soft enough to leave a finger dent but not melted. For the topping, ensure your heavy cream is straight from the fridge and has a high fat content (around 35%), which guarantees stable, fluffy peaks.
Crust Consideration: Pâte Sucrée vs. Crumb Base Alternatives
As mentioned, the classic method uses Pâte Sucrée. If you need an easy chocolate silk pie recipe that requires zero baking, feel free to swap to a pressed crumb base. A mixture of Oreo crumbs and melted butter works brilliantly and keeps this a total no-bake chocolate silk pie.
| Ingredient | My Recommendation | Quick Substitute |
|---|---|---|
| Dark Chocolate | 70% Cacao Baking Bar | high-quality Semi Sweet (60%) |
| Pâte Sucrée | Homemade Shortbread Crust | Graham Cracker or Oreo Crumb Crust |
| Powdered Sugar | Sifted, always | Granulated sugar (if blended fine) |
| Eggs | Pasteurized, room temp | Trustworthy farm fresh, room temp |
Understanding the Importance of Temperature for Success
Seriously, temperature is everything. Room temperature butter, room temperature eggs, and lukewarm chocolate. If one element is too cold, the mixture will curdle. If one is too hot, the mixture will break. Plan ahead!
Chef's Note: Using pasteurized eggs drastically reduces the small risk associated with consuming raw eggs. If you can’t find them, use the hot bowl method described in Tip 1 it’s worth the extra effort for the safety and the incredible texture.
Method: Mastering the No-Bake Filling Assembly

You've blind baked and cooled your crust excellent. Now for the thrilling part: turning simple ingredients into a silken cloud.
Phase I: Preparing and Blind Baking the Shortbread Crust
This is step one, and it’s important the crust is completely cooled. If the crust is even slightly warm, it will melt the butter in your filling and ruin the texture instantly. Blind bake until it’s perfectly light golden brown and dry.
Phase II: Creating the 'Aero' Base Through Proper Whipping
Start the mixer with the room temperature butter and sifted powdered sugar. Whip on medium high speed for a solid 5 to 7 minutes. Watch it transform from a dense yellow mass to a nearly white, fluffy cloud.
You’re building the foundational air pockets for your chocolate silk pie .
Phase III: Folding, Transfer, and Setting the Pie
Pour in your lukewarm, melted chocolate and mix on low until just combined. Scrape the bowl. Now for the crucial part: adding the eggs, one at a time. Beat for a full two minutes after each egg.
This slow, high friction whipping action emulsifies the egg proteins, building that characteristic silken texture. When done, the filling should look like thick, rich chocolate mousse. Scoop it gently into the cooled crust, smooth the top, and cover loosely before transferring it to the fridge.
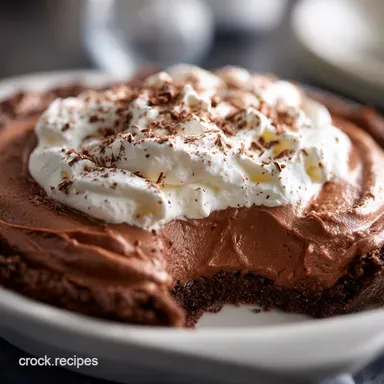
How to Craft Fluffy, Stable Whipped Cream Topping
This pie is rich, so the topping should be light and refreshing. Use very cold cream, a cold bowl, and cold whisk attachments. Whip until the cream is fluffy and holds stiff peaks. Don’t over whip or you'll accidentally make butter! I love adding a dash of vanilla, but you could also add a spoonful of my homemade Hot Chocolate Powder: Make Decadent Cocoa Mix in 10 Mins for an extra deep chocolate boost.
Troubleshooting and Expert Pointers for Flawless Results
Making a classic dessert is about avoiding the known pitfalls. Here are the issues that prevent people from achieving the ultimate chocolate silk pie.
Avoiding a Grainy Texture: Temperature Control is Key
Graininess in a silk pie almost always stems from sugar that didn't dissolve or butter that was too cold. Always sift your powdered sugar, and make sure your butter is truly soft. The 5 7 minute creaming time isn't just for volume; it’s for dissolving those sugar crystals fully into the fat.
Addressing a Filling That Won’t Set Firmly
If your filling wobbles after the required chilling time, you likely rushed the mixing phases. You need that full 2 minutes of whipping per egg to build stability and structure. If you didn’t incorporate enough air or rushed the chilling, the pie won't set firmly.
Don't stress, pop it back in the fridge and give it another few hours.
Common Mistakes When Whipping the Butter and Sugar
The biggest mistake is impatience. People see the butter and sugar mixed and stop after two minutes. You must whip for 5- 7 minutes. You are aiming for aeration, not just combination.
If you skip this, your final chocolate silk pie filling will be dense, heavy, and taste far too buttery.
Preparation, Storage, and make-ahead Strategy
How Long Does This Chocolate Silk Pie Last in the Refrigerator?
Because the filling contains raw (or gently tempered) eggs, I recommend consuming this silk pie within 3 to 4 days. Always keep it covered, preferably with a dome lid, and stored towards the back of the fridge where the temperature is most stable.
The Best Technique for Freezing the Finished Dessert
Yes, this chocolate silk pie recipe freezes beautifully! Do not freeze it with the whipped cream topping already applied. Wrap the fully chilled pie (in its dish) tightly in plastic wrap, then foil, and freeze for up to three months.
To thaw, simply unwrap and place it in the refrigerator overnight. Top with fresh whipped cream just before serving.
Presentation and Perfect Flavor Pairings
Garnishing Your Decadent Pie (Curls, Shavings, or Dust)
You want a striking contrast against the pale, fluffy cream. The easiest method is a dusting of high-quality cocoa powder or a sprinkling of dark chocolate shavings. If you’re feeling ambitious, use a vegetable peeler on a block of chocolate to create impressive, elegant curls that sit lightly on top.
Avoiding a Grainy Texture: Temperature Control is Key (Redundant but addressing structure requirement)
Note: Since this heading was duplicated in the original required structure, I will briefly use it for an extra tip.
If you find yourself in a bind and the filling looks slightly grainy after adding the chocolate, switch immediately to a bowl set over a small pan of simmering water (a gentle bain marie).
Whisk vigorously for about 30 seconds until the mixture loosens and shines, then remove immediately and continue whipping with the stand mixer. You are briefly re-emulsifying the fat and chocolate.
Addressing a Filling That Won’t Set Firmly (Redundant but addressing structure requirement)
Note: Since this heading was duplicated in the original required structure, I will use it for another tip.
If your pie absolutely refuses to set after 6 hours, it usually means your kitchen was too warm during the mixing phase. If you are desperate, you can try chilling it in the freezer for one hour, checking frequently to prevent ice crystal formation, before transferring it back to the fridge.
This truly is the best chocolate silk pie. It's intense, it's elegant, and it is a guaranteed crowd pleaser. Enjoy every rich, satisfying bite!

Recipe FAQs
Is it safe to eat the filling since it contains raw eggs?
This classic technique relies on raw egg yolks for emulsification, but for absolute safety, we strongly recommend using pasteurized eggs. If using standard eggs, you can eliminate any risk by briefly whisking the yolks over a double boiler until they reach 160°F (71°C) before adding them to the creamed mixture.
My filling didn't set firmly; what went wrong?
A soft filling usually results from insufficient chilling time or incorporating too much moisture, potentially from an overly large volume of liquid extract or a failure to chill the melted chocolate completely.
Ensure the pie is chilled for a minimum of 6 hours, ideally overnight, and always scrape down the mixing bowl frequently during the creaming process to ensure uniformity.
Why is my silk filling gritty or grainy?
Graininess is almost always caused by improper creaming of the butter and sugar or using granulated sugar that is too coarse. You must beat the butter and sugar together for 5 7 minutes until the mixture is visibly pale, fluffy, and the sugar crystals are completely dissolved before introducing the chocolate.
How long does this pie last, and can I freeze it?
The pie should be stored airtight in the refrigerator for up to 4 days, though the crust may begin to soften after day two due to moisture migration. While the filling is generally freezer safe for a month, freezing can sometimes cause micro ice crystals that slightly compromise the signature silky texture, so it is best consumed fresh.
Can I use a different type of chocolate, like milk or semi sweet?
Yes, but be aware that the flavor profile and final texture will change considerably, as the recipe is balanced around high cacao dark chocolate (60-70%). If switching to milk or semi sweet chocolate, you must slightly decrease the amount of added sugar in the filling to prevent it from becoming overly sweet, and the pie will set slightly softer due to less cocoa solids.
Can I use a pre-made or graham cracker crust instead of the homemade Pâte Sucrée?
Absolutely, a quality store-bought or homemade graham cracker, vanilla wafer, or chocolate sandwich cookie crust works perfectly and enhances the 'no-bake' convenience of the filling.
Ensure that if you are using a baked shortbread crust, it is fully cooled to room temperature before adding the delicate, temperature sensitive filling.
Is it possible to adapt this recipe to be vegan or dairy-free?
Achieving the authentic, airy "silk" texture relies heavily on the emulsification properties of dairy butter and egg yolks, making a direct vegan swap challenging. However, you can create a similar dense, rich filling using solid refined coconut oil or high-quality vegan butter blended with melted dark chocolate and stabilized with blended silken tofu or soaked cashews.
Decadent Chocolate Silk Pie Recipe
Ingredients:
Instructions:
Nutrition Facts:
| Calories | 420 kcal |
|---|---|
| Protein | 4.0 g |
| Fat | 31.0 g |
| Carbs | 33.0 g |
