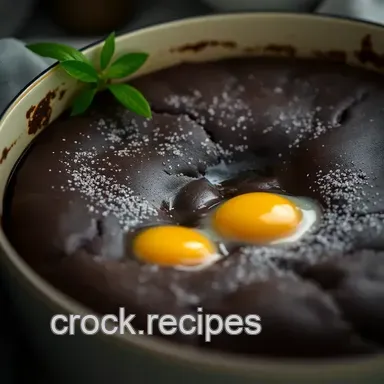
Decadent Dutch Oven Chocolate Lava Cake
Get Ready for Dutch Oven Desserts!
Can You Resist Chocolate Lava Cake?
So, picture this: it’s a friday night, and i’m lounging on the couch, scrolling through netflix. i just finished a long week, right? and suddenly, i’m hit with a craving for something rich and chocolatey.
You know those moments when you're just like, "i need a dessert that hits the spot"? that's when i knew it was time to whip up some dutch oven desserts and trust me, my decadent dutch oven chocolate lava cake was born out of pure necessity!
And oh my gosh, let me just say, this cake is a glorious indulgence! you crack through that outer shell, and boom lava flows out like it’s a mini volcano of chocolatey goodness.
I’m not kidding when i say it’s perfect for impressing your friends or treating yourself after a tough week.
Recipe Rundown: A Sweet Slice of History
Now, let’s get a bit nerdy about this. the chocolate lava cake has roots deep in french culinary tradition and has dashed its way into american hearts.
These oven dessert recipes have really picked up steam in recent years probably because they’re downright swoon worthy. what makes it even better is that you can whip it up in a dutch oven !
Sure, you might think it's a bit like cooking in a fancy kitchen, but trust me, these dutch oven dessert recipes can whip up magic with a casual vibe.
Expect to spend about an hour on this beauty: 15 minutes to prep, a quick chill time, and around 20 minutes of baking.
It’s like having a luxury dessert on standby! plus, if you’re like me and love chocolate, this recipe is totally worth the medium difficulty level.
Remember, timing is everything; we want that gooey center to shine.
Why You Need This Cake in Your Life
Let’s chat health for a second yes, I just said that about a lava cake. Moderation is key, of course, but chocolate is actually packed with antioxidants and can boost your mood, which we all need, right?
What makes this dessert a notable? it’s super versatile. birthdays? check. weekend treat? double check. honestly, anytime is perfect for these dutch oven desserts .
Whether you're camping and tossing this into your dutch oven camping recipes or baking at home, this cake serves up sophistication without the fuss.
Let’s not overlook the personal touches, either. you can jazz it up with flavors like orange or espresso. plus, you could serve it warm with vanilla ice cream or a drizzle of caramel, and boom you’re officially the dessert hero of the night.
Time to Gather Those Ingredients
So if you're ready to dive into this adventure, it's time to grab your mixing bowls and Dutch oven. Just in case you need a hint this chocolate lava cake isn’t just any cake; it’s a celebration of chocolate in all its gooey glory!
Stick with me as we whip up this dessert and I promise you’ll want to savor every moment and bite!
Now, let’s roll into the ingredient list and get those taste buds tingling! Get your apron on; it’s time to bake some magic!
Essential Ingredients Guide for Dutch Oven Desserts

When it comes to baking dutch oven desserts , having the right ingredients on hand can make all the difference.
I remember the first time i attempted to whip up a decadent dutch oven chocolate lava cake . my heart raced, and i was scratching my head wondering if i had the right stuff in my pantry.
So, let's break down the essentials that will help you get your bake on!
Premium Core Components
First, let’s talk measurements . you know how recipes can be a little finicky? that's because precision counts! for instance, you’ll want to use ½ cup (115g) of unsalted butter .
It’s the same for your chocolate 1 cup (170g) of chocolate chips is what you’re looking for. and if you’re feeling fancy, go for chopped chocolate over chips.
Now, about those quality indicators : when you're grabbing eggs, make sure they’ve got that farm fresh vibe. you want to see dates that are as fresh as a long weekend! and for chocolate, opt for brands you know and trust.
As for storage guidelines , keep your baking goods in sealed containers. flour should last about 1 year , while sugar can chill in your pantry for ages.
Chocolate? it can safely sit for more than a year, but we all know that it rarely sticks around that long!
Before you whip up any sweet confections, take a peek at these freshness tips . always check for any weird smells or discolorations.
If eggs are sitting in the fridge for a while, do the float test if they’re bobbing around like they’re on a floatie, toss ‘em!
Signature Seasoning Blend
Ah, the magic of seasoning! while you’re probably thinking sugar, don’t forget your essential spice combinations . for instance, a hint of vanilla extract elevates your chocolate experience to another level.
I couldn’t believe my taste buds the first time i added vanilla to my cake!
Herbs and aromatics , like a whisper of cinnamon or a dash of espresso powder, can bring unexpected depth. how crazy is that? and every region’s got its flair! if you’re feeling adventurous, look into variations!
Cinnamon roll bread pudding is a fantastic twist on traditional oven desserts that’s perfect for those cozy gatherings.
Smart Substitutions
Here’s the scoop on alternatives: maybe you forgot to grab butter? no sweat! you can try canola oil or coconut oil instead.
In need of a dairy-free option ? go for almond milk instead of cream.
Even in a pinch, you can whip up a delicious dessert. if you’re in a dessert emergency, replace chocolate with a carob powder .
Crazy, right? it still delivers a sweet kick that can satisfy your cravings.
And don’t forget about seasonality! In the summer, fresh berries can change the game for your desserts. Throw in raspberries for that lava cake , and it turns a classic into a summer sensation!
Kitchen Equipment Essentials
Let’s not underestimate the importance of tools. your dutch oven is going to be your sidekick. you want a 4-quart dutch oven for our chocolate decadence.
And don’t skimp on your mixing bowls unless you’re into a messy kitchen, which, let's be real, nobody is.
Need alternatives? If you don’t have ramekins, just grab any oven safe bowls you’ve got stashed in the back of your cupboard!
For prep tips , keep your surfaces clean. i mean, you wouldn’t wear dirty socks with your best outfit, right? same goes for your kitchen! and for the love of every dessert, keep your tools organized.
It saves time and heartache.
Your storage solutions should be just as savvy. Use stackable containers to keep your ingredients fresh and within reach when it’s time to bake.
Now that you’re armed with all these essentials, i can’t wait to share the step-by-step instructions for that decadent dutch oven chocolate lava cake .
You’re going to love that gooey goodness! so, let’s dive right in and turn that oven on!
Mastering the Art of Professional Cooking
If you’ve ever watched a chef whip up something magical on tv, you know it looks easy, right? but there’s more to it than just tossing ingredients into a pot and hoping for the best.
Today, i’m here to share some essential prepping tips and a killer recipe for dutch oven desserts that’ll have you shining in the kitchen like a pro.
Let’s dive in!
Essential Preparation Steps
First off, let’s talk about mise en place . this fancy french term just means "everything in its place." before you even think about turning on your oven, get all your ingredients measured, chopped, and ready to go.
Trust me; it saves so much time and lessens the chance you’ll forget that sugar you need for your oven dessert recipes .
Next up, time management . set a timer for each prep task. if you’re like me, you probably get lost in thought (or instagram) when you're cooking.
Having a timer keeps you on track!
Organization strategies are key! Group similar tasks together. Chop all those veggies at once and then slide right into cooking mode. This makes the whole process smoother and way less chaotic.
And, of course, safety considerations are a must! make sure your hands are always clean, and keep those knives sharp.
There’s nothing worse than a dull blade. also, if you're handling hot pans, don’t be that person who thinks they can touch them without oven mitts.
Trust me; it’s not worth it.
Step-by-step Process
Alright, let's get to the nitty gritty. Here’s a step-by-step guide to nail your Dutch Oven Dessert Recipes .
Prepare the Ramekins : Grease four ramekins and align them in your Dutch oven. Oh, and don’t forget to preheat the oven to 425° F ( 220° C) !
Melt chocolate and butter : in a mixing bowl, toss your ½ cup of unsalted butter and 1 cup of semi sweet chocolate chips .
Melt them in the microwave or over a double boiler until everything’s smooth. simple, right?
Whisk eggs : grab a different bowl and whisk together 2 large eggs, 2 egg yolks, and ½ cup of granulated sugar until it’s pale and slightly thick.
It should almost laugh at you, saying “i’m ready.”
Combine Mixtures : Fold that shiny chocolate and butter mixture into the egg mixture. Add 2 teaspoons of vanilla extract and ¼ cup of flour . Mix until everything's just combined.
Chill the Mixture : This part is important; cover and chill your batter for about 30 minutes . Yep, patience!
Fill Ramekins : Pour that goodness evenly into your ramekins.
Bake : Cover your Dutch oven and pop it in the oven for 12- 14 minutes . The edges should be set but the center? Oh, it should still be jiggly.
Cool and serve : let the ramekins cool for just a minute. run a knife around the edges and invert onto your plates.
Dust 'em with powdered sugar and maybe serve with vanilla ice cream. heaven on a plate, right?
Expert Techniques
Now, let’s talk about some pro secrets to elevate your dutch oven desserts . first, always invest in quality chocolate. it makes all the difference.
If the chocolate says, “i’m feeling fancy,” you know you’re in for a real treat!
Timing is crucial with this dessert; too long in the oven, and it's just a cake - no lava action! a minute too late and you’re left with a sad, dry dessert.
Keep your eyes peeled!
Speaking of eyes, visual cues are your best friend. look for that slight jiggle in the center before pulling them out of the oven.
Celebrate when you get it right! if you mess up, don’t stress just think of it as a “different” dessert next time.
Success Strategies
Alright, listen up! Here are some success strategies to avoid those classic cooking blunders.
The number one mistake? Overbaking! Seriously. Those critical steps in timing can make or break your result.
Always do a quality check before serving. If it looks a little off, taste it. You might just surprise yourself.
Not feeling it today? check out some make-ahead options . if you prepare the batter the night before, you can just pop it in the oven when your guests arrive.
Talk about impressing your friends!
In the world of cooking, especially with Dutch Oven Recipes Cast Iron , mistakes are just learning opportunities. Each cook has a story! Just remember: no matter how many times you mess up, you’re still making food and that’s a win!
So what are you waiting for? now that you have the knowledge of how to create dutch oven desserts , you can take that leap into making something incredible like a decadent dutch oven chocolate lava cake.
Stay tuned for more delicious tidbits and extra info in the next section!
Additional Recipe Information for Decadent Dutch Oven Chocolate Lava Cake
When it comes to whipping up some dutch oven desserts , the decadent dutch oven chocolate lava cake takes the cake (pun intended!).
But to really nail it and impress your friends or that special someone, let’s dive into some helpful pro tips, presentation ideas, storage info, and even creative variations.
Are you ready? i know i am!
Pro Tips & Secrets
Let me share a few pro tips that have saved my bacon in the kitchen. first off, precision is key when baking.
Your timing makes all the difference; a minute too long or too short can turn that gooey center into a solid mass.
So, keep that timer handy!
Chilling the batter for 30 minutes isn’t just a suggestion. it actually helps firm up the mix so that the lava effect comes out perfectly.
And trust me, if you want to elevate those flavors, think about tossing in a bit of espresso powder or some orange zest ! instant game changer.
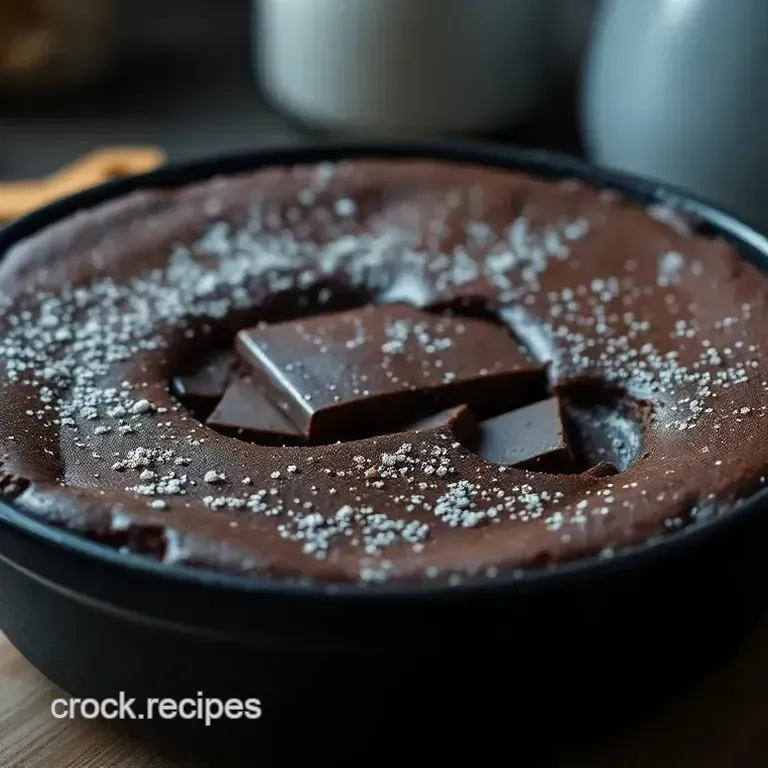
Perfect Presentation
Now, let’s talk about how to make this lava cake look as good as it tastes. plating is where you can really get artsy! after inverting those ramekins onto plates, give them a light dusting of powdered sugar for a classy look.
Top with a scoop of vanilla ice cream and maybe even a drizzle of salted caramel sauce . it’s all about that visual appeal!
When it comes to color combinations, think about contrasting shades. a dark chocolate cake paired with white ice cream creates a stunning plate.
You could even sprinkle some berries around for an extra pop of color and freshness. who doesn’t love a good garnish?
Storage & make-ahead
Let’s be real: life gets busy. if you want to make this delicious dessert ahead of time, you can prepare the batter the day before and just chill it until you're ready to bake.
When it comes to storage, simply keep it in an airtight container in the fridge. but honestly, these oven desserts taste best fresh out of the oven.
If you've got some leftovers (which is a rarity, but still), you can store them in the fridge for about 2-3 days .
When it’s time to eat, just pop them in the microwave for about 20-30 seconds to bring back that luscious gooeyness!
Creative Variations
Tired of the same old chocolate? let’s get creative! you can easily adapt this recipe. want a white chocolate lava cake ? just swap out the semi sweet chocolate with white.
Or how about a raspberry lava cake ? throw in some fresh raspberries into the center before baking. yes, please!
And if you're someone who’s health conscious but still has a sweet tooth, you can try swapping ingredients to make it work for your diet.
Looking for dietary modifications ? use coconut oil instead of butter for a dairy-free option. it’s all about making it your own!
Complete Nutrition Guide
Okay, let’s break it down a bit. this dutch oven recipe packs in about 430 calories per serving. it also has 6g of protein and a touch of that sweet tooth satisfaction with 25g of sugar .
Not exactly a health food, but hey, it’s dessert! just remember these dietary considerations when planning your meals.
For portion guidance, i’d say this cake serves about four people. you can definitely whip out those ramekins for a dinner party or simply treat yourself after a long week.
Because you deserve it, right?
Wrapping It Up
So there you have it a no-fuss guide to making the best dutch oven desserts around. not only is this decadent dutch oven chocolate lava cake a show stopper, but with a few simple tips, it can spark your creativity and make your gatherings that much sweeter.
Whether it’s impressing a crowd or just indulging on your own, you’ll be rocking the dessert game in no time.
Happy baking, friends!
Frequently Asked Questions
What are Dutch oven desserts, and why should I try them?
Dutch oven desserts are sweet treats cooked in a Dutch oven, using its unique heat distribution to create beautifully baked goods. They can range from cakes to cobblers and even puddings.
If you adore comfort food, experimenting with Dutch oven desserts like the chocolate lava cake can elevate your cooking game, much like a cozy night in with a cuppa and your favorite biscuit!
Can I make Dutch oven desserts without ramekins?
Absolutely! While ramekins provide individual servings, you can bake your chocolate lava cake directly in the Dutch oven. Just ensure you line the bottom with parchment paper to prevent sticking, and you may need to adjust the baking time.
It’s a great way to serve a family sized portion, ideal for a casual gathering, akin to sharing a giant pie at a Sunday roast!
How should I store leftovers from my Dutch oven dessert?
If you have any leftovers (which is rare with such a delicious dish!), allow the cakes to cool completely before transferring them to an airtight container. They can be stored in the fridge for up to 2 days but are best enjoyed warm.
A quick reheating in the oven or microwave can revive the gooey centre, much like a good jammy dodger fresh from the package!
What variations can I make to the Dutch oven chocolate lava cake recipe?
You can easily customize the chocolate lava cake by adding ingredients like fresh raspberries or nuts into the centre before baking. For a unique flavour twist, try incorporating orange zest or even a hint of espresso powder.
It’s a fabulous way to impress your mates at a dinner party, like offering a surprise cream tea instead of the standard scone!
What’s the best way to achieve that perfect lava effect?
Precision is key! You’ll want to keep a close eye on your bake time, as even a minute can make a world of difference. Aim for a slightly wobbly centre when you take them out of the oven allowing the cakes to cool briefly will help them set just enough.
Timing it like a good British weather forecast is essential!
Can I convert this recipe to be gluten-free?
Yes, you can easily make gluten-free Dutch oven desserts! Just swap the all-purpose flour for a 1:1 gluten-free baking blend. Many blends contain alternatives like rice flour or almond flour, which can work beautifully in chocolate desserts.
It’s a fantastic way to cater to various dietary needs while maintaining the delicious chocolatey goodness, much like inviting all friends to your curry night regardless of spice tolerance!
Decadent Dutch Oven Chocolate Lava Cake