Enchilada Casserole with Chicken: Ultimate No-Roll Layered Enchilada Bake
- The Ultimate Weeknight "No-Roll" Chicken Enchilada Bake
- The Science of Layering: Why Casseroles Beat Traditional Enchiladas
- Gathering Your Essentials: Ingredients for the Ultimate Enchilada Casserole
- Assembly Guide: Step-by-Step Instructions for Your Enchilada Casserole
- Chef's Troubleshooting: Avoiding the Soggiest Enchilada Casserole
- Storage Solutions: Freezing and Reheating Your Layered Bake
- What to Serve Alongside Your Chicken Enchilada Casserole
- Recipe FAQs
- 📝 Recipe Card
The Ultimate Weeknight "No-Roll" Chicken Enchilada Bake
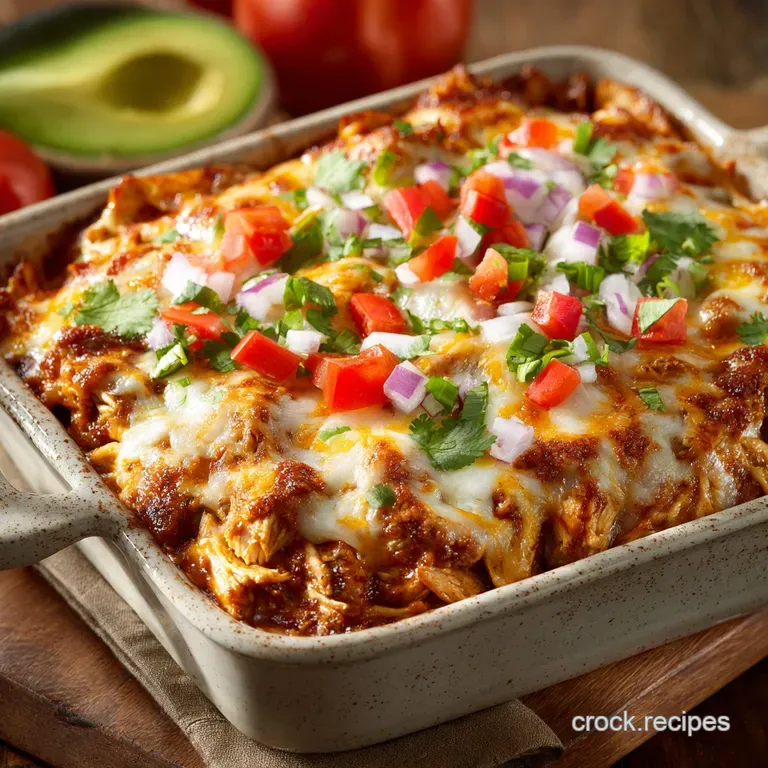
When this Enchilada Casserole hits the oven, the whole house smells like a warm hug and Friday night. The deeply savory chili sauce mingles with melting Monterey Jack, creating a scent that promises the best kind of messy, cheesy comfort food. Seriously, your neighbors will get jealous.
Traditional rolled enchiladas are amazing, sure, but who has the time to stand there rolling 12 separate tortillas after a long day? This incredible layered Easy Enchilada Casserole delivers all the deep Mexican American flavor you crave without any of the fussy assembly, making it a total weeknight lifesaver.
It’s fast, affordable, and easily scales up to feed a crowd or manage your meal prep.
We are diving deep today into what makes this particular enchilada casserole recipe superior, starting with a robust, scratch made red sauce. Trust me, once you master this simple layering technique, you'll never go back to the roll and stuff method again. Let’s get cooking!
The Science of Layering: Why Casseroles Beat Traditional Enchiladas
Why We Love the "No-Roll" Method
Layering is genuinely a stroke of genius, especially when tackling Mexican dishes. It ensures every single bite of the enchilada casserole chicken gets maximum flavor coverage.
Skipping the rolling process not only saves about 30 minutes of frustration but also guarantees a stable, easy-to-slice dish once it’s properly rested.
The Historical Comfort of Layered Bakes
Casseroles, or "stacked" dishes, are the historical backbone of comfort food across many cultures, and the enchilada version is no different. This approach means the tortillas act more like absorbent noodles, soaking up the deep chili flavor of the sauce as they bake. Think lasagna, but with way more spice and cheese.
What Makes This Sauce Truly Rustic?
A proper, rustic enchilada sauce is the backbone of the dish; you simply cannot skip this step. We use a classic roux base (fat + flour) to thicken the sauce perfectly. This allows us to "bloom" the chili powder and spices in the hot oil first, which unlocks their essential oils and intensifies the flavor tenfold.
Achieving Maximum Sauce Saturation
One common failure point in making Easy Enchiladas is dry edges. My secret is ensuring we start with a generous base layer of sauce and finish by absolutely drowning the top tortillas in sauce before adding the final cheese.
This guarantees that those top tortillas stay moist and pliable instead of turning crispy and dry.
The Essential Role of Melting Cheese Texture
We aren't just using cheese for flavor here; we need excellent meltability. Monterey Jack, or a good pre-shredded Mexican blend, contains the right fat content to melt completely and form a sticky, savory glue that holds the casserole layers together.
This structure is what allows you to cut neat, gorgeous slices later on.
Balancing Heat and Acidity in the Red Chili Base
Because we are building this red sauce from the ground up, we have total control. The key is balancing the earthy, robust flavor of the chili powder and cumin with a touch of brightness, often achieved by the acidity naturally found in the tomato paste.
Don't skimp on the salt at the end; the sauce needs to be bold since the tortillas absorb a lot of the seasoning.
Gathering Your Essentials: Ingredients for the Ultimate Enchilada Casserole
I always tell people: quality ingredients make a big difference in a dish this simple. Start with a good, smoky chili powder, not the stuff that’s been sitting in your cupboard since the Stone Age.
If you want this to be one of the Best Casseroles you've ever made, let’s talk sourcing and swapping.
Selecting the Best Tortillas for Layering
You have a choice here, friend, and both are right. I usually use a combination of corn and flour.
| Tortilla Type | Pros | Substitutes |
|---|---|---|
| Flour Tortillas | Easier to layer, softer structure, less likely to tear. | gluten-free wraps or very thin flatbreads (watch the sugar content). |
| Corn Tortillas | Authentic, better flavor, handles the sauce well. | Use smaller tortillas or quickly fry them first to prevent dissolving. |
Shredded Chicken: Cooking vs. store-bought Options
Rotisserie chicken is absolutely your best friend here, okay? It’s already seasoned and super moist, saving you a huge amount of time. If you must cook it yourself, poaching chicken breasts or thighs in seasoned broth results in perfectly shreddable meat.
Chef's Note: If you want a fun alternative, this recipe works just as well with seasoned Ground Beef Recipes Mexican style! Just make sure you drain the fat thoroughly before mixing in the cream cheese.
Key Spices for Our Signature Chili Sauce
We rely on mild chili powder, cumin, and Mexican oregano. If you don't have Mexican oregano, standard Italian oregano is fine, but it has a slightly different, more robust flavor. The biggest non-negotiable step is blooming the spices in the hot oil before adding the liquid.
Smart Cheese Blends and Substitutions
We need volume and melt factor. I recommend a combination of Monterey Jack (for the stretch) and sharp cheddar (for the flavor bite).
| Ingredient | Viable Substitute | Why the Swap Works |
|---|---|---|
| Monterey Jack/Cheddar | Gouda, Pepper Jack, or even Mozzarella. | You need a high fat, high moisture cheese for structure. |
| Cream Cheese (for filling) | Sour cream mixed with 1 tsp cornflour/starch. | Acts as a binder and adds necessary richness to the shredded chicken. |
| Chicken Broth | Vegetable broth or even water (but season heavier). | Chicken stock provides the best base flavor for the red sauce. |
Assembly Guide: step-by-step Instructions for Your Enchilada Casserole

Prep work is over; now comes the fun, messy part. Grab your biggest spoon and your 9x13 dish, because we are creating something epic.
Method 1: Preparing the Deep Red Chili Sauce
Start the sauce by melting the oil and flour to create the roux. Cook it for just a minute until nutty. Next, whisk in all your chili powder, cumin, and oregano, cooking for about 30 seconds until your kitchen smells amazing; that's the spice blooming .
Slowly whisk in the warm broth and tomato paste, simmering until it coats the back of a spoon, about 7 minutes.
Method 2: The Perfect Layering Order
Layering must start with a splash of sauce directly on the pan base. This critical step acts as a buffer and prevents the first layer of tortillas from welding themselves to the glass. Next, arrange four tortillas, then spread half the creamy chicken filling evenly over that.
Top that filling with more sauce and a generous sprinkle of shredded cheese.
Method 3: Bake Time and Rest Period Essentials
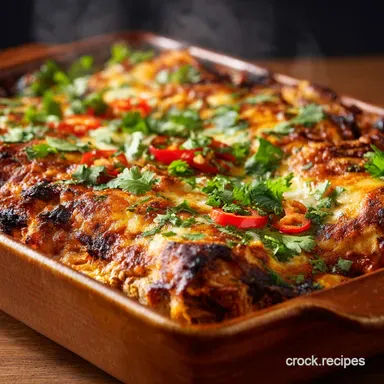
After repeating the layers and ensuring the top layer of tortillas is completely covered in the remaining sauce and cheese, pop it into the oven. Bake uncovered for 25– 30 minutes until bubbling hot and the cheese is golden brown. Do not skip the 10 minute rest!
Resting allows the sauce to settle back into the layers and stops the whole thing from collapsing when you slice it.
Chef's Troubleshooting: Avoiding the Soggiest Enchilada Casserole
The biggest fear when making any layered bake is sogginess. It happens when the ratio of liquid to starch is off, and the liquid overwhelms the tortillas.
Preventing Tortilla Bleeding and Stickiness
If you're using corn tortillas, they can sometimes dissolve into the sauce, creating a mushy texture. My top tip is to quickly flash fry corn tortillas in oil for about 10 seconds per side. This creates a protective barrier.
If you are using enchilada casserole with flour tortillas , you usually don't need this step, which is why many folks prefer them for casseroles.
The Importance of a 15 Minute Rest
Look, I know you’re hungry, but waiting 10– 15 minutes after the casserole comes out of the oven is mandatory. If you cut into it immediately, all the hot, runny sauce will spill out, leaving the dish dry and structurally unsound.
Letting it rest allows the heat to gently redistribute the liquid, firming up the cheese and the tortilla layers.
Adjusting the Heat Level Safely
If you like more heat, do not just add cayenne pepper to the sauce willy nilly. Instead, stir in a small can of diced green chiles or a dash of chipotle powder with the other spices. This adds warmth without overwhelming the deep chili flavor we worked so hard to achieve.
Storage Solutions: Freezing and Reheating Your Layered Bake
This recipe is fantastic for making ahead, which is a massive win for busy families. I often make a double batch when I'm already assembling something similar, like my Texas Hash Casserole: Easy Beef, Rice, and Comfort Dinner .
Can You Assemble This Casserole 24 Hours Ahead?
Absolutely! Assemble the entire casserole in your dish, including the final layer of cheese. Cover it tightly with foil and refrigerate it for up to 24 hours.
When ready to bake, let it sit on the counter for 30 minutes to take the chill off, then bake as directed, adding an extra 10– 15 minutes to the total baking time.
Best Practices for Freezing the Unbaked Dish
You can freeze the casserole before baking, which is ideal. Wrap the dish tightly in two layers of plastic wrap and one layer of foil. It will keep for up to three months. To bake from frozen, remove the plastic wrap, cover the dish with foil, and bake at 350°F (175°C) for 60– 75 minutes, uncovering for the last 15 minutes.
Reheating Strategy for Optimal Texture
Leftovers keep brilliantly in the fridge for up to four days. To reheat, microwave individual portions, or if you have a larger portion, use the oven. Cover the casserole with foil and heat at 350°F (175°C) until heated through, about 20 minutes.
This prevents the exposed cheese layer from drying out or burning.
What to Serve Alongside Your Chicken Enchilada Casserole
While this Enchilada Casserole is certainly a meal in itself, adding a fresh side cuts through the richness beautifully. Think about texture and contrast!
- Bright Salad: A simple slaw or a lime dressed avocado and corn salad provides a crucial acidic crunch.
- Simple Rice: A plain white or cilantro lime rice is a perfect foil for soaking up any extra sauce.
- Hearty Alternatives: If you're looking for other satisfying comfort bakes, you might enjoy trying my recipe for Keto Cheeseburger Casserole Easy Creamy Skillet Bake — it’s a completely different flavor profile but the same cozy feeling.
- Toppings Galore: Always serve with sour cream, fresh chopped cilantro, sliced black olives, or pickled jalapeños.
If you’re hosting a brunch the next day and need another low-effort bake, you might also like the look of this Slow Cooker Keto Breakfast Casserole: The Easiest Overnight Low Carb Recipe . You really can’t beat a good casserole for convenience!

Recipe FAQs
Can I assemble this enchilada casserole ahead of time and bake it later?
Yes, you can assemble the casserole completely, cover it tightly with plastic wrap and foil, and refrigerate for up to 24 hours. Allow the casserole to sit at room temperature for about 30 minutes before baking, and plan to add an extra 10-15 minutes to the total baking time since it will be starting chilled.
Why is my casserole turning out dry or crumbly after baking?
A dry casserole usually indicates insufficient sauce coverage or overbaking. Ensure that every tortilla layer, including the edges, is thoroughly coated with sauce before adding fillings and cheese. If your sauce mixture seems overly thick before assembly, stir in an extra half cup of chicken stock.
I don't have chicken. What other fillings can I use in this casserole?
Shredded beef (like barbacoa) or seasoned ground beef are excellent, rich substitutes for the chicken filling. For a hearty vegetarian option, try a mixture of seasoned black beans, corn, and roasted diced sweet potatoes mixed with a little cheese.
Can I use corn tortillas instead of flour tortillas in this layered bake?
Absolutely, though corn tortillas benefit from a quick, 10-second dip in warm sauce or a brief sauté in oil before layering to prevent them from becoming brittle or cracking during baking. While flour tortillas offer a softer overall texture, corn tortillas deliver a stronger, more authentic enchilada flavor.
What type of cheese melts best for the ultimate cheesy top layer?
A blend of Monterey Jack, Colby, and mild Cheddar offers the best combination of melt and flavor for Mexican casseroles. For superior melt quality, always grate the cheese yourself rather than using pre-shredded options, which often contain anti caking agents.
Can I freeze the leftover baked enchilada casserole?
Yes, cooked enchilada casserole freezes very well. Cool the dish completely, wrap individual portions tightly in heavy duty aluminum foil, and store them in a freezer bag for up to three months. Thaw frozen portions overnight in the refrigerator and reheat thoroughly in the oven until bubbling.
How can I make this recipe gluten-free?
To ensure this recipe is gluten-free, use certified gluten-free corn tortillas for the layers instead of flour tortillas. Additionally, verify that your enchilada sauce ingredients, especially the chicken stock and chili powder blend, do not contain any hidden gluten thickeners or additives.
Easy Chicken Enchilada Casserole Bake
Ingredients:
Instructions:
Nutrition Facts:
| Calories | 489 kcal |
|---|---|
| Protein | 58.8 g |
| Fat | 19.1 g |
| Carbs | 20.7 g |
