Easy Bread Recipe for Beginners
- Time: Active 15 minutes, Passive 3 hours 40 mins, Total 3 hours 55 mins
- Flavor/Texture Hook: Hearty crumb with a golden, crackling crust
- Perfect for: Weekend mornings, beginner bakers, or pairing with thick stews
- Mastering a Hearty Easy Bread Recipe
- Essential Specs for Perfect Loaves
- Core Ingredients for Satisfying Crumbs
- Necessary Kitchen Tools for Baking
- Step-by-Step Baking Guide
- Fixing Common Baking Hurdles
- Creative Flavor Swaps and Twists
- Adjusting for Different Batch Sizes
- Freezing and Reheating Guidelines
- Satisfying Ideas for Serving
- Easy Bread Recipe FAQs
- 📝 Recipe Card
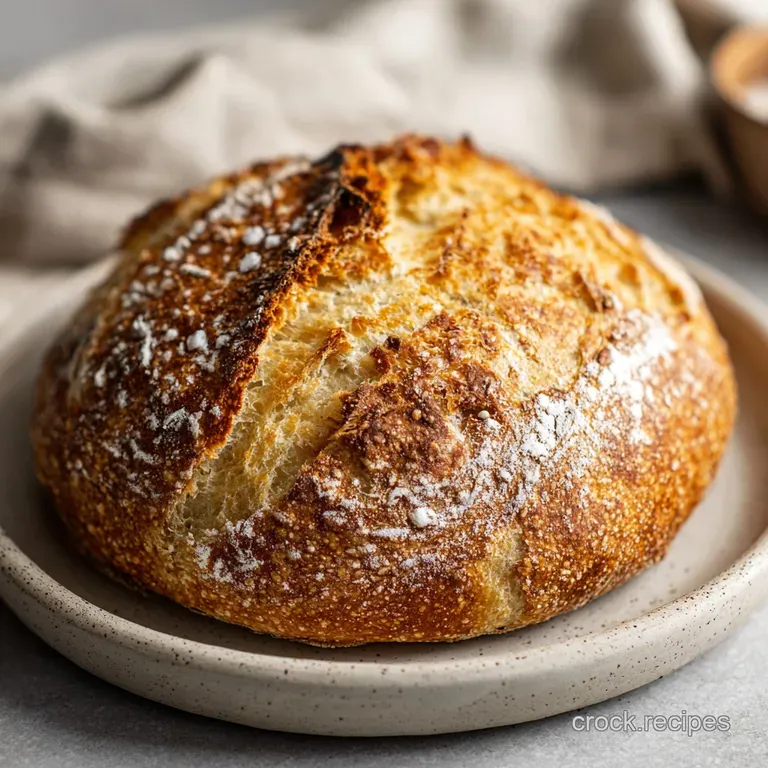
Mastering a Hearty Easy Bread Recipe
There is a specific sound that happens about five minutes after you pull a fresh loaf out of the oven. If you listen closely, you can actually hear the crust "singing." It is a delicate, tiny series of pops and crackles as the cool air hits the hot surface, causing the crust to shatter in microscopic ways.
That aroma, a mix of toasted grain and sweet honey, fills every corner of the house and honestly makes everything feel a bit more grounded.
I remember my first attempt at a homemade loaf. I was so intimidated by the idea of yeast that I basically stared at the bowl for an hour, convinced I would somehow offend the dough. I ended up with something that looked more like a brick than a baguette because I rushed the process.
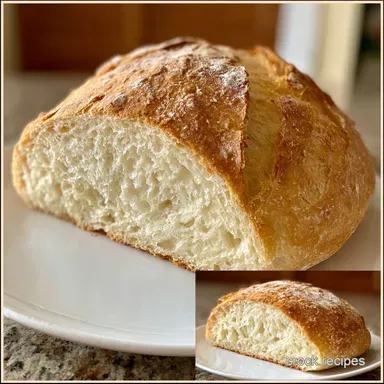
Since then, I have learned that great bread is not about hard work, it is about patience. This easy bread recipe is my go to because it removes the stress of traditional kneading while delivering a crumb that is soft, airy, and incredibly satisfying.
We are going to skip the complicated techniques today. You do not need a culinary degree or fancy machinery to get this right. We are focusing on a high hydration dough that does the heavy lifting for you while you go about your day.
By the time we are done, you will have a loaf that looks like it came from a high end artisan bakery, but we will know it only took a few minutes of actual hands on work.
Essential Specs for Perfect Loaves
Gluten Development: Long fermentation allows flour proteins to link up naturally, creating a strong network without physical kneading. This results in those beautiful, irregular air bubbles we see in expensive artisan breads.
Caramelization: The inclusion of a small amount of honey provides food for the yeast and helps the crust achieve a deep, mahogany color through the Maillard reaction. It adds a subtle layer of sweetness that balances the sea salt perfectly.
Steam Management: Using a preheated vessel like a Dutch oven traps the moisture escaping from the dough. This keeps the surface supple longer, allowing the bread to expand fully before the crust finally sets into a crispy, golden shell.
| Thickness | Internal Temp | Rest Time | Visual Cue |
|---|---|---|---|
| 4-5 inches | 195°F to 205°F | 45 minutes | Hollow sound when tapped on bottom |
| 2-3 inches (Flat) | 190°F to 200°F | 20 minutes | Deep golden brown on all sides |
| 1 inch (Focaccia style) | 185°F to 195°F | 15 minutes | Edges pulling away from the pan |
Getting the internal temperature right is the only way to ensure the middle is not gummy. I always use a digital probe thermometer because "guessing" by the color of the crust can be deceiving, especially with different oven calibrations.
| Ingredient | Science Role | Pro Secret |
|---|---|---|
| All Purpose Flour | Provides structure and bulk | Weigh it (390g) instead of using measuring cups |
| Instant Yeast | Biological leavening agent | Ensure your water is exactly 105°F to 110°F |
| Sea Salt | Regulates yeast and adds flavor | Use fine sea salt for even distribution in dough |
| Warm Water | Hydrates flour and activates yeast | Filtered water prevents chlorine from slowing yeast growth |
Core Ingredients for Satisfying Crumbs
- 3 cups (390g) all purpose flour: The base of our loaf. Why this? AP flour provides the perfect balance of softness and chew for home ovens.
- Substitute: 3 cups Bread flour. This will result in a slightly chewier, taller loaf.
- 1.5 tsp sea salt: Essential for bringing out the nutty flavors of the grain. Why this? Fine sea salt dissolves quickly and evenly throughout the shaggy dough.
- Substitute: 2 tsp Kosher salt. Note: Kosher salt is less salty by volume than sea salt.
- 0.5 tsp instant yeast: The engine that makes the bread rise. Why this? Instant yeast can be mixed directly with dry ingredients without proofing first.
- Substitute: 0.75 tsp Active Dry yeast. Note: Must be dissolved in the warm water first.
- 1.5 cups (355ml) warm water: The lifeblood of the dough hydration. Why this? High hydration (about 90%) creates a more open, airy interior crumb.
- Substitute: 1.5 cups Room temperature beer. Adds a deep, fermented, malt like flavor profile.
- 1 tsp honey: Adds a touch of sweetness and helps with browning. Why this? Honey is hygroscopic, meaning it helps the bread stay moist longer after baking.
- Substitute: 1 tsp Maple syrup. Same sugar content but adds a slight woody note.
Necessary Kitchen Tools for Baking
To get that professional look, you really need a heavy pot. I swear by my cast iron Dutch oven because it acts like a mini oven inside your actual oven. It holds heat beautifully and creates that essential steam chamber. If you don't have one, a heavy ceramic pot with a tight lid works too.
You will also want some parchment paper. Trust me, trying to drop a wet, sticky ball of dough into a 450°F pot without parchment is a recipe for a burnt finger or a lopsided loaf. For another approach to simple baking, you might enjoy The Proper Crumb recipe which uses a standard loaf pan for a more sandwich style result.
| Feature | This Recipe | store-bought Loaf |
|---|---|---|
| Crust Texture | Shatter crisp | Often soft or leathery |
| Preservatives | Zero | Usually contains mold inhibitors |
| Scent | Freshly toasted grain | Neutral or slightly chemical |
step-by-step Baking Guide

1. The Shaggy Mass Phase
Whisk 390g all purpose flour, 1.5 tsp sea salt, and 0.5 tsp instant yeast in a large glass bowl. Stir in 1.5 cups warm water and 1 tsp honey with a sturdy wooden spoon. Note: The dough should look messy and sticky, not smooth.
2. The Patience Phase
Cover the bowl tightly with plastic wrap or a damp kitchen towel. Let it sit at room temperature for 3 hours until the dough has doubled in size and is covered in bubbles.
3. The Heat Up Phase
Place your empty Dutch oven (with the lid on) into the oven. Preheat the oven to 450°F and let the pot get screaming hot for at least 30 minutes.
4. The Shaping and Scoring Phase
Turn the dough onto a piece of parchment paper dusted with flour. Gently fold the edges toward the center to form a round ball. Note: Do not degas the dough; keep those bubbles inside.
5. The Steam Bake Phase
Carefully lift the parchment paper and drop the dough into the hot Dutch oven. Cover with the lid and bake for 30 minutes until the structure is set and pale gold.
6. The Finishing Phase
Remove the lid and continue baking for another 15 minutes. Bake until the crust is a deep mahogany brown and sounds hollow when tapped.
7. The Cooling Phase
Transfer the loaf to a wire rack immediately. Let it cool for at least 45 minutes until the internal steam redistributes. Cutting too early makes the bread gummy.
Fixing Common Baking Hurdles
My Dough Is Too Sticky to Handle
This is actually a good sign! High hydration is what makes this easy bread recipe so light and airy. If you try to add too much flour during the shaping phase, you will end up with a dense, heavy loaf. Instead of fighting the stickiness, use a bench scraper or lightly oil your hands.
The Bottom Is Scorched
Because the Dutch oven sits on the bottom rack, the direct heat can sometimes over cook the base before the top is browned. This often happens in older ovens or if your pot is very thin.
| Problem | Root Cause | Solution |
|---|---|---|
| Burnt Bottom | Excessive direct bottom heat | Place a baking sheet on the rack below |
| Dense Crumb | Water was too hot, killing yeast | Use a thermometer to hit 105°F exactly |
| Pale Crust | Oven temperature was too low | Verify oven temp with a separate thermometer |
Common Mistakes Checklist
- ✓ Never skip the preheating of the Dutch oven (it needs to be heat soaked).
- ✓ Do not use a cold bowl; a slightly warm bowl helps the yeast start faster.
- ✓ Avoid over handling the dough after the rise (you will pop the air bubbles).
- ✓ Use a sharp blade or kitchen shears to score the top (helps the bread expand).
- ✓ Always let the bread cool completely on a wire rack (prevents a soggy bottom).
Creative Flavor Swaps and Twists
If you want to move beyond the basic loaf, you can easily layer in more flavors. I love adding a tablespoon of fresh rosemary and a half cup of roasted garlic cloves during the initial mixing phase. The garlic softens even further as it bakes, turning into little pockets of savory butter. For a different texture, you could try the techniques in my Soft Homemade Naan recipe which uses yogurt for a softer finish.
- If you want a savory kick, add 1 cup of sharp cheddar and diced jalapeños.
- If you want a breakfast loaf, swap the honey for maple syrup and add 1/2 cup of cinnamon soaked raisins.
- If you want a rustic feel, replace 1 cup of all purpose flour with whole wheat flour.
Chef's Tip: To get an even crispier crust, toss two ice cubes into the Dutch oven (between the parchment and the pot wall) right before closing the lid. The extra burst of steam is magic for that bakery style finish.
Adjusting for Different Batch Sizes
When cutting this recipe in half, you can use a smaller 2 quart pot or even bake it in a stainless steel bowl covered with foil. Reduce the baking time by about 10 minutes. If you are doubling the batch to feed a crowd, I recommend making two separate loaves rather than one giant one.
Large loaves often struggle to cook through the center before the outside burns.
When doubling, keep the yeast at 0.75 tsp rather than a full teaspoon. Giving it a slightly longer rise time will yield much better flavor than forcing a fast rise with too much yeast. If you have leftovers, they make the most incredible French toast the next morning.
Freezing and Reheating Guidelines
Fresh bread is best on day one, but it keeps surprisingly well if stored correctly. Once the loaf is completely cool, wrap it in a brown paper bag for up to two days. Avoid plastic bags at room temperature, as they trap moisture and turn your beautiful crust into a soggy mess.
For long term storage, slice the loaf first, then freeze the slices in a heavy duty freezer bag for up to 3 months. When you are ready for a piece, you can pop a frozen slice directly into the toaster.
If you want to reheat the whole loaf, wrap it in foil and bake at 350°F for 10 minutes, then remove the foil for 2 minutes to crisp the crust back up.
Satisfying Ideas for Serving
This loaf is hearty enough to stand up to heavy soups and stews. I personally love it with a thick layer of salted butter and a drizzle of local honey. The contrast of the salty, crunchy crust with the sweet center is hard to beat. If you are looking for something faster but still homemade, check out The Speedy Sourdough recipe for another take on the artisan style.
Don't throw away the crumbs or the stale ends. I like to pulse them in a food processor with some olive oil and herbs to make the best croutons you have ever had. You can also use the leftover heels for a savory bread pudding or a classic Panzanella salad. There is zero waste when the bread is this good.

Easy Bread Recipe FAQs
What is 3 ingredient bread?
Yes, it is a well-known simple bread. This usually refers to a dough made only from self rising flour, salt, and yogurt or buttermilk. The acid in the yogurt reacts with the baking powder in the flour to provide all the lift needed.
What is a 2 ingredient dough?
No, a 2 ingredient dough will not make a traditional loaf. The common two-ingredient dough uses self rising flour and plain yogurt, which results in a soft, dense product suitable for bagels or pizza bases, not an airy bread.
What are the 4 ingredients in bread?
The fundamental four are flour, water, yeast, and salt. While simple recipes might omit yeast or salt, these four components are necessary for standard, flavorful, leavened bread. If you enjoyed mastering the texture of this dough, apply the same hydration principles when making our Homemade Focaccia Recipe No Knead Focaccia Br.
What bread is good for beginners?
This no-knead, slow rise bread is excellent for beginners. It minimizes active work by relying on time for gluten development, which removes the stress of traditional kneading techniques.
How do I make my easy bread rise faster?
Increase the ambient temperature or the amount of yeast slightly. For a faster rise, place the covered bowl in a slightly warm, draft free spot, like an oven turned off with only the light on. However, be careful; too much yeast results in an overly yeasty flavor.
Is it true you need to knead bread for gluten development?
No, this is a common misconception when using long fermentation. While kneading physically aligns gluten strands, a slow, long rise in a wet dough allows those same strands to link naturally. Mastering this slow hydration technique transfers well to other recipes, like getting a proper sear on our pan-fried Cod recipe by controlling surface moisture.
Why did my easy loaf not brown properly?
The crust likely did not receive enough heat or steam during the final bake phase. Ensure your Dutch oven is fully preheated for at least 30 minutes, and make sure to remove the lid for the last 15 minutes to allow direct radiant heat to hit the surface.
Easy Homemade Bread Recipe
Ingredients:
Instructions:
Nutrition Facts:
| Calories | 131 calories |
|---|---|
| Protein | 3.7 g |
| Fat | 0.4 g |
| Carbs | 27.6 g |
| Fiber | 1.0 g |
| Sugar | 0.6 g |
| Sodium | 317 mg |
