The Proper Crumb Nofuss Everyday White Bread for Beginners
- Why This Recipe Crowned Our Best Homemade Bread Yet
- Ditching the Dough Disaster: Your Introduction to Effortless Baking
- Gathering the Building Blocks for Perfect Homemade Bread
- The Step-by-Step Journey to Your Golden-Brown Masterpiece
- Mastering the Mix: How to Achieve the Perfect Dough Consistency
- Troubleshooting & Next-Level Baking Tips
- Recipe FAQs
- 📝 Recipe Card
Why This Recipe Crowned Our Best Homemade Bread Yet
There is an almost primal satisfaction that washes over you when you pull a perfectly formed, deeply golden loaf of Homemade Bread from your own oven. Forget those flimsy, factory made options; this specific formulation has earned its title as our "Best Yet" because it masterfully balances absolute simplicity with unbeatable results.
If you've ever wondered what is the secret to making homemade bread that tastes like it came from a Parisian boulangerie but only required pantry staples, this recipe holds the key.
We’ve stripped away the complicated steps often associated with Bread Baking For Beginners while retaining the essential magic that gives you that signature, chewy crumb. This isn't just bread; it's edible comfort, achievable every single time.
Ditching the Dough Disaster: Your Introduction to Effortless Baking
Many aspiring bakers are intimidated by yeast, fearing they’ll end up with a heavy, inedible brick. This recipe is specifically designed to eliminate that fear. We’re using a straightforward approach that prioritizes time and temperature over brute force kneading, making it the perfect introduction to Beginning Bread Making .
Our goal is to guide you through How To Make Bread For Beginners smoothly, turning a potentially stressful task into a relaxing ritual.
The Irresistible Aroma: Setting the Scene for Baking Glory
The process begins long before the oven heats up. It starts with the blooming of the yeast that crucial first step where dormant granules awaken in warm water sweetened with a tablespoon of sugar. Watching that mixture turn frothy within ten minutes is your first victory!
This confirms the life force of your bake. As the dough comes together, incorporating two tablespoons of softened unsalted butter adds a subtle richness and ensures a tender final product.
Soon, the scent of warm yeast will permeate your kitchen, promising the joy of a fantastic Homemade Bread Recipe Easy bake.
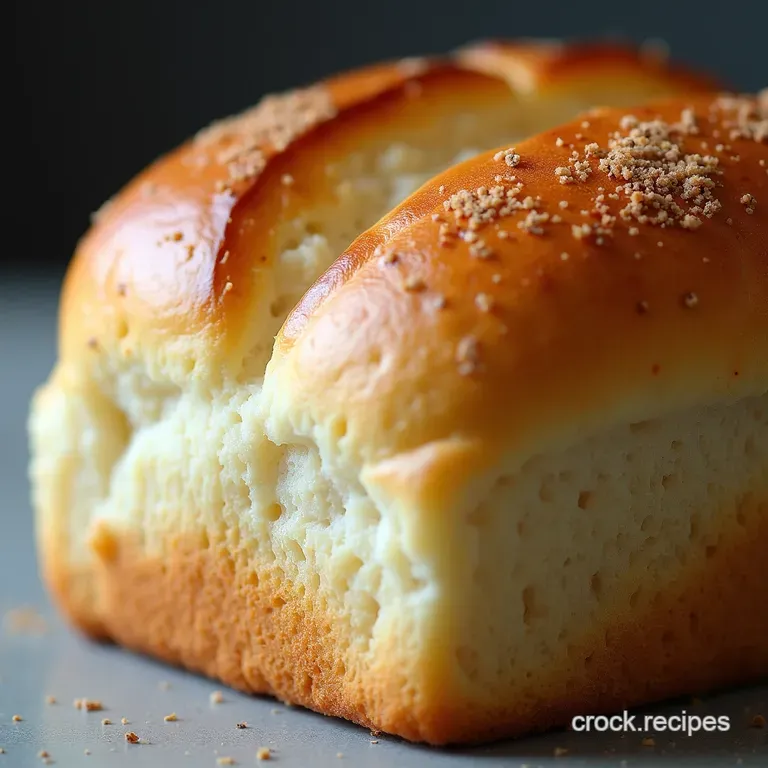
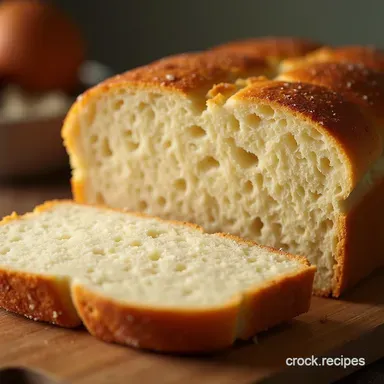
Crust Confidence: What to Expect from This Rustic Loaf
This Homemade Bread Recipe With Yeast yields a loaf we call "The Proper Crumb." You should anticipate a beautifully structured interior soft, airy, yet robust enough to handle a heavy layer of butter or jam. Crucially, the exterior develops a fantastic, crisp crust.
This textural contrast is non-negotiable for a satisfying loaf, achieved through precise oven heat and a final bake time of 30 to 35 minutes until deeply browned.
Your First Foray Into Yeast: Demystifying the Basics
Yeast is the engine of your bread, responsible for leavening and developing complex flavours. For this formula, we use 2 ¼ teaspoons (one standard packet) of active dry yeast.
The golden rule here involves the temperature of your liquid: the 1 ½ cups of water must be between 105° F and 115° F.
If you don't have a thermometer, think "comfortably warm bathwater." Too cool, and the yeast sleeps; too hot, and it dies both scenarios result in a flat loaf.
Gathering the Building Blocks for Perfect Homemade Bread

Every great structure needs quality materials, and your loaf is no exception. For this classic white bread, the ingredients are wonderfully simple, proving that complexity isn't required for flavour excellence.
Precision Proportions: Measuring Dry Ingredients Correctly
The foundation of this loaf rests on the flour. For the Best flour to make bread out of in a standard home setting, we recommend high-quality All-Purpose Flour, though Bread Flour works beautifully if you seek an even chewier texture.
The critical technique here is "spoon and level." Do not scoop the flour directly from the bag, as this compacts it, adding up to 25% more flour than intended. Instead, lightly spoon the flour into your measuring cup and level the top with a knife edge. We call for 3 ¾ cups (460g) for the right hydration level.
The Active Ingredient: Choosing and Activating Your Yeast
As mentioned, using fresh yeast is paramount. If your yeast is old, you'll waste time and ingredients. Always perform the bloom test (water + sugar + yeast) first. Once you see that beautiful foam in about five minutes, proceed confidently to mix the dry ingredients with this activated base.
Beyond Flour and Water: The Secret Role of Salt
While flour, water, and yeast make bread rise, salt is the unsung hero. At 1 ½ teaspoons, it does far more than just add necessary flavour contrast; it controls the rate of fermentation, preventing the yeast from working too quickly, which would otherwise lead to a weak structure and off-flavours.
Salt firms up the gluten network, directly contributing to the final shape and bite of your Homemade Bread .
Related Recipes Worth Trying
- Soft Homemade Naan Bread Recipe RestaurantQuality in Your Kitchen — Whip up the best homemade naan bread using yogurt for incredible softness Forget the curry housethis easy recipe guarantees firekissed pillowy flatbreads...
- Moist Protein Banana Bread HighProtein GuiltFree — Finally a Healthy Protein Banana Bread that stays moist This easy recipe uses Greek yogurt for the perfect texture Try it today
- The Best Homemade Christmas Jam Recipe Spiced Cranberry Orange — Forget the shopbought stuff This foolproof Homemade Christmas Jam recipe is packed with warming spices and bright citrus Perfect for canning or as the best...
The step-by-step Journey to Your Golden Brown Masterpiece
Once your ingredients are gathered, the real magic begins. This Homemade Bread Recipe is a two-stage rise process, allowing time for both flavour development and structure building.
Mastering the Mix: How to Achieve the Perfect Dough Consistency
After mixing the activated yeast mixture with the dry ingredients and the softened 2 tablespoons of butter, you’ll first achieve a "shaggy mass." Use a wooden spoon initially. The dough should be sticky but manageable. Turn this mass out onto a lightly floured surface to begin the shaping phase.
The Gentle Stretch: Simplifying the Kneading Process (No Mixer Required)
For this Easy Homemade Bread , intensive kneading is not required we are aiming for elasticity, not maximum gluten development. Knead gently for approximately 5 to 7 minutes.
The goal is to smooth out the rough edges until the dough feels supple and springs back slowly when poked gently with a finger. If you use a stand mixer, the dough hook will achieve this smoothness in about 5 minutes on medium low speed.
Proofing Perfection: Understanding the Rise Times
The first rise, or bulk fermentation, takes place in a lightly greased bowl, covered, in a warm spot for 60 to 90 minutes, or until doubled. This is where the yeast does its primary flavour work.
After gently deflating the dough and shaping it into a tight log to fit your 9x5 inch loaf tin, it undergoes its second rise (proofing). This second rise is shorter, about 45 to 60 minutes, until the dough crests about one inch over the rim of the tin.
Oven Temperature Tactics: Achieving Maximum Oven Spring
Preheating is vital. Ensure your oven is roaring hot at 375° F ( 190° C) during the last 15 minutes of the second proof.
When the dough hits that initial heat, the rapid expansion of gases creates "oven spring," giving you that wonderful height. Bake for 30– 35 minutes. If you tap the bottom of the finished loaf and it sounds hollow, you’ve nailed it.
Scoring Secrets: How to Slash Your Loaf Before Baking
Though optional for a rustic look, scoring making shallow cuts on the top of the dough just before it enters the oven directs where the loaf will burst open. A single, confident slash down the centre, about half an inch deep, is sufficient for this softer dough, ensuring a pleasing shape rather than uncontrolled tearing.
Troubleshooting & Next Level Baking Tips
Even the best recipes occasionally throw curveballs. Understanding troubleshooting steps separates the novice from the confident baker.
When Your Dough Doesn't Double: Common Yeast Issues Fixed
If your dough hasn't risen after 90 minutes during the first proof, the primary culprits are temperature or dead yeast. If your kitchen is cold, move the bowl to a warmer spot (perhaps resting it on top of your stove while the burner is warming up).
If the kitchen is warm and there is no activity, the yeast was likely old or killed by water that was too hot; there’s no fixing a dead batch start again, ensuring that crucial water temperature check.
Flavor Adventures: Simple Variations for Your Next Loaf
Once you master this basic Homemade Bread Recipe , experimentation is encouraged! Try substituting 1 cup of the white flour with wholemeal flour for a nuttier, heartier texture.
Alternatively, fold in 1 tablespoon of dried Italian herbs and a teaspoon of garlic powder during the final mixing stage for an aromatic, savoury dinner loaf.
Nutritional Snapshot: Understanding What You're Eating
Baking at home gives you total control over your ingredients, which is a huge plus compared to commercial breads. Knowing you’ve used only quality flour, water, yeast, salt, and a mere two tablespoons of butter allows you to track the nutrition accurately.
This simple loaf provides essential energy, relying on whole grains (if using whole wheat) and no artificial preservatives.
Freezing Freshness: Keeping That Just Baked Taste for Later
This loaf freezes exceptionally well. Once it has cooled completely, slice it, place parchment paper between the pieces, and transfer the stack to a freezer safe bag. When you crave fresh bread, pull out a slice or two and pop it directly into the toaster.
The resulting heat reactivates the moisture, giving you that "just pulled from the oven" experience moments later.

Recipe FAQs
Why is my Homemade Bread not rising properly, even after waiting ages?
This is usually down to one of two things: either your yeast wasn't fresh enough or your water temperature was off if it was too hot, it killed the yeast, you see. Give the yeast a proper "bloom" test in warm water and sugar first; if it doesn't froth up within 10 minutes, you need a fresh packet.
Can I use Strong Bread Flour instead of All-Purpose Flour in this recipe?
Absolutely! Using strong bread flour is a brilliant upgrade as the higher protein content develops more gluten, leading to a slightly chewier texture and better oven spring. If you swap, you might notice the dough firms up a bit quicker during kneading, so keep an eye on how much liquid it needs.
How should I store this Homemade Bread to keep the crust crisp?
Once it’s completely cool and this is crucial, don't rush cooling! store it wrapped in a clean, dry tea towel placed in a paper bag at room temperature. Avoid plastic bags, as they trap moisture and turn that lovely crisp crust soggy quicker than a damp sponge.
I’m a beginner; is the kneading stage really necessary for this loaf?
While this recipe is forgiving, a bit of kneading is vital for developing the structure needed for that "proper crumb." Since it's a relatively quick dough, aim for that 5-7 minutes until the dough feels smooth; if you’re absolutely struggling, a 5-minute stint in a stand mixer on low speed will do the trick just
as well.
My loaf has a big hole in the middle, what went wrong?
That big air pocket usually means the final proofing was too short or uneven, or you didn't gently punch down the dough enough between the rises. If the dough isn't deflated properly before the final shape, the gases build up unevenly, leading to a cavernous spot right in the centre.
Can I freeze this bread once it's baked?
Yes, freezing is the best way to preserve that fresh baked taste! Slice the completely cooled loaf first, then wrap the slices tightly in plastic wrap followed by a layer of foil or a zip-top freezer bag to prevent freezer burn. It thaws beautifully on the counter or can be popped straight into the toaster.
Easy Homemade White Bread
Ingredients:
Instructions:
Nutrition Facts:
| Calories | 2526 kcal |
|---|---|
| Protein | 56.2 g |
| Fat | 98.2 g |
| Carbs | 296.1 g |
| Fiber | 26.9 g |
| Sodium | 40479 mg |
