Easy No Knead Bread: Crusty and Golden
- Time: Active 10 minutes, Passive 2 hours 20 mins, Total 3 hours 15 mins
- Flavor/Texture Hook: Shatter crisp mahogany crust with a velvety, open crumb interior
- Perfect for: Lazy Sunday mornings, beginner bakers, and cozy soup nights
- The Best Easy No Knead Bread
- Critical Timing and Recipe Specs
- Ingredient Deep Dive Analysis
- Four Simple Essential Ingredients
- Tools for Crusty Results
- Step-by-Step Baking Guide
- Fixing Common Baking Mistakes
- Flour and Flavor Variations
- Storing and Reheating Tips
- Best Ways to Serve
- Recipe FAQs
- 📝 Recipe Card
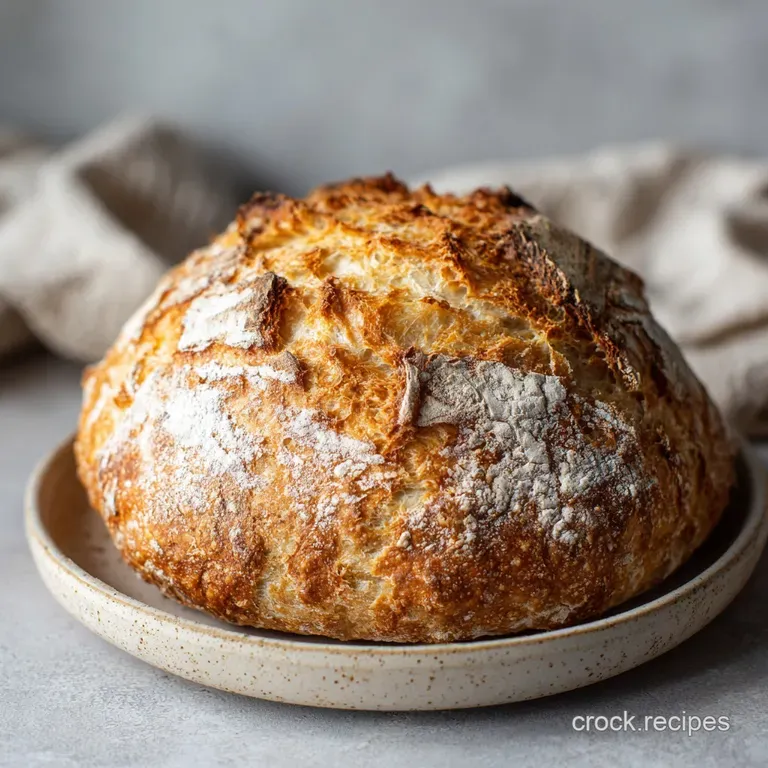
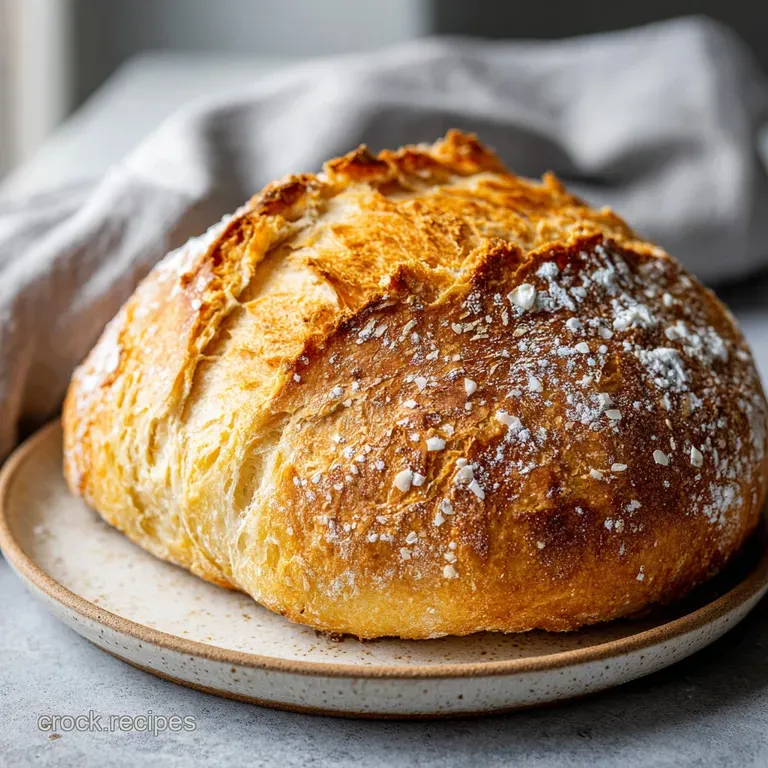
The Best Easy No Knead Bread
Imagine waking up on a rainy Saturday morning, the house still quiet and a bit chilly. You walk into the kitchen, pull a heavy pot out of the oven, and lift the lid to find a burnished, mahogany colored loaf that actually "sings" a soft crackling sound as the crust meets the cool air.
That aroma of toasted grain and fermented yeast fills the room, making the whole house feel instantly warmer and more grounded.
I used to think that baking artisan bread required a chemistry degree and the forearm strength of a professional wrestler. I spent way too much time trying to figure out "windowpane tests" and worrying about my kneading technique.
Then I realized that the best flavor doesn't come from working the dough until your arms ache; it comes from giving the yeast and water enough time to handle the heavy lifting for you.
This easy no knead bread recipe is the one I send to all my friends who are scared of yeast. It is virtually foolproof because the high hydration does all the work. You don't need a fancy stand mixer or a culinary degree just a bowl, a spoon, and a little bit of patience.
We're going for that hearty, comfort food vibe that makes a simple piece of toast feel like a luxury.
Critical Timing and Recipe Specs
The magic of this loaf happens in the silence between the steps. While you’re off doing other things, the water is hydrating the flour and the yeast is creating tiny bubbles of carbon dioxide that stretch the gluten naturally.
It’s a slow motion transformation that creates a much more satisfying texture than any quick rise bread could ever manage.
- Fermentation Strength
- Long room temperature rests allow enzymes to break down starches into flavorful sugars.
- Steam Injection
- The sealed Dutch oven traps the dough's own moisture, keeping the surface supple so it can expand fully before the crust sets.
- Maillard Reaction
- High heat (450°F) browns the proteins and sugars in the crust, creating that deep, complex flavor profile.
- Starch Gelatinization
- The internal temperature must reach about 205°F to ensure the crumb isn't gummy or undercooked.
| Method | Total Time | Crust Texture | Effort Level |
|---|---|---|---|
| Dutch Oven (Fresh) | 3 hours 15 mins | Shatteringly crisp | Very Low |
| Standard Loaf Pan | 3 hours 5 mins | Soft and thin | Low |
| store-bought Loaf | 0 mins | Often chewy/tough | None |
This comparison highlights why the Dutch oven is the secret weapon for this specific recipe. Without that heavy lid, you lose the steam that creates the "artisan" look and feel we're after.
Ingredient Deep Dive Analysis
| Ingredient | Science Role | Pro Secret |
|---|---|---|
| Bread Flour | Provides protein for structure | Use a high protein brand for a taller, airier rise |
| Sea Salt | Regulates yeast and adds flavor | Don't use table salt; the larger flakes meld better |
| Instant Yeast | Creates rise and gas bubbles | Store in the freezer to keep it active for months |
| Lukewarm Water | Activates yeast and hydrates flour | Aim for 100°F; too hot will kill the yeast instantly |
The interaction between these four elements is what creates the "shaggy mass" that eventually becomes your dinner centerpiece. If you find your kitchen is particularly cold, you might need an extra 30 minutes of rest time to see those characteristic bubbles on the surface.
Four Simple Essential Ingredients
- 400g all purpose or bread flour: I prefer bread flour for a heartier chew, but all purpose works beautifully if that's what's in the pantry. Why this? High protein content creates the structural webbing needed for large air pockets.
- 8g sea salt: This might seem like a lot, but bread needs salt for that professional, savory finish. Why this? It strengthens the gluten and prevents the bread from tasting flat or bland.
- 4g instant yeast: Make sure it’s fresh; if it doesn't smell slightly like beer, it might be dead. Why this? Instant yeast doesn't need to be dissolved in water first, saving you a step.
- 300ml lukewarm water: Use a thermometer if you’re unsure it should feel like warm bath water. Why this? This high hydration ratio (75%) is what makes the "no knead" magic happen.
Chef's Tip: If you want a more "sourdough ish" tang without the starter, substitute 50ml of the water with a light beer or add a teaspoon of lemon juice to the mix.
Tools for Crusty Results
The most important piece of equipment is a 4 to-6 quart Dutch oven (such as a Lodge or Le Creuset). You need something heavy that can withstand 450°F and has a tight fitting lid. This pot acts like a miniature professional steam oven, which is how we get that incredible crust.
You'll also need a large glass bowl for mixing and fermenting. I like glass because you can actually see the bubbles forming on the sides, which tells you the dough is happy. A sturdy wooden spoon or a silicone spatula is necessary for stirring that "shaggy" dough, and parchment paper is non negotiable for transferring the sticky dough into the screaming hot pot without burning yourself.
step-by-step Baking Guide
- Whisk the dry ingredients. In a large glass bowl, combine the 400g flour, 8g sea salt, and 4g instant yeast until well combined. Note: This ensures the yeast is evenly distributed before the water hits it.
- Hydrate the flour. Pour in the 300ml lukewarm water (approx. 100°F) and stir with a wooden spoon until no dry flour remains and a shaggy, sticky dough forms.
- The long rest. Cover the bowl tightly with plastic wrap and let it sit in a warm spot for 2 to 3 hours until it has doubled in size and shows bubbles on the surface.
- Preheat the oven. Place your Dutch oven and its lid inside and preheat to 450°F (230°C). Bake 30 mins until the pot is heat saturated.
- Prepare for transfer. Carefully tip the fermented dough onto a piece of parchment paper. Note: Don't worry if it looks messy; it will level out in the pot.
- Load the Dutch oven. Lift the parchment edges and drop the whole thing into the preheated pot. Be careful it’s incredibly hot!
- The steam bake. Cover with the lid and bake for 30 minutes to trap the steam and allow for maximum rise.
- The color bake. Remove the lid and bake for an additional 12-15 minutes until the crust is a deep, burnished mahogany color.
- The cool down. Transfer to a wire rack and let it rest for at least 1 hour. Listen for the "crackling" sound of the crust.
Fixing Common Baking Mistakes
One of the biggest mistakes I made early on was slicing into the bread the second it came out of the oven. I know, the smell is intoxicating, but the bread is actually still cooking on the inside! If you cut it too early, the steam escapes too fast and you end up with a gummy, sticky center.
Trust me, wait the full hour.
Low Hydration Problems
If your dough feels like a stiff ball of clay rather than a sticky mess, you probably added too much flour. This results in a dense, heavy loaf that doesn't have those beautiful air pockets.
Use a scale for the 400g of flour whenever possible, as measuring by volume (cups) can vary wildly depending on how packed the flour is.
The Dead Yeast Trap
If your dough hasn't moved an inch after two hours, your yeast was likely expired or the water was too hot. Always check the date on your yeast packet. If you're unsure if it's active, mix a tiny pinch with warm water and sugar; if it doesn't foam up in 5 minutes, toss it and start fresh.
| Problem | Root Cause | Solution |
|---|---|---|
| Bread stuck to pot | Pot wasn't preheated enough | Preheat for at least 30 mins at 450°F |
| Burnt bottom crust | Heat source too close | Place a baking sheet on the rack below the pot |
| Pale, soft crust | Lid was left on too long | Ensure at least 12 mins of uncovered baking |
Common Mistakes Checklist
- ✓ Never skip the preheating step for the Dutch oven.
- ✓ Don't add extra flour just because the dough is sticky.
- ✓ Always use parchment paper to avoid a sticky disaster.
- ✓ Let the bread cool completely on a wire rack, not a flat surface.
- ✓ Make sure your oven actually reaches 450°F using a thermometer.
Flour and Flavor Variations
If you want to scale this recipe down for a single person, you can halve all the ingredients and use a smaller 2 quart pot. Just reduce the uncovered baking time by about 5 minutes.
If you're doubling it for a crowd, it's actually better to bake two separate loaves rather than one giant one, as the heat penetration is more consistent with the 400g flour ratio.
Whole Wheat Flour Swaps
You can replace up to 150g of the white flour with whole wheat flour for a nuttier, more satisfying flavor. Since whole wheat absorbs more water, you might need to add an extra tablespoon of water to keep that "shaggy" consistency. If you want a different artisan profile, check out this sourdough bread recipe which uses similar over high heat techniques.
Garlic and Herb Twists
Once you've mastered the basic loaf, try folding in roasted garlic cloves or fresh rosemary during step 2. You can also sprinkle the top with flaky sea salt or sesame seeds right before it goes into the oven. For those nights when you want something flatter and faster, this homemade naan bread is my go to alternative for soaking up sauces.
- If you want a crunchier bottom, sprinkle a little cornmeal on the parchment before adding the dough.
- If you want a softer crust, brush the finished loaf with melted butter while it's still hot.
- If you want more air bubbles, let the dough ferment in the fridge for 12-18 hours instead of 2-3 hours at room temp.
Storing and Reheating Tips
Homemade bread doesn't have the preservatives that store-bought loaves do, so it will go stale faster. Store your loaf cut side down on a wooden cutting board for the first 24 hours. After that, wrap it in a paper bag or a linen bread bag.
Avoid plastic bags if you want to keep the crust crispy, as plastic traps moisture and turns the crust soft and rubbery.
For long term storage, this bread freezes beautifully. Slice the loaf completely once it has cooled, then place the slices in a freezer safe bag. You can pop a single slice directly into the toaster from the freezer, and it will taste just as fresh as the day you baked it.
If you have leftovers that have gone truly hard, don't throw them out! They make the best croutons or panzanella salad you've ever had.
Best Ways to Serve
This bread is so hearty and flavorful that it really only needs a thick swipe of salted butter. However, it's also the ultimate vessel for "mopping up." I love serving it alongside a big bowl of beef stew or a spicy shakshuka. The open crumb is like a sponge for flavorful broths and sauces.
Dips and Spreads
Try toasted slices with a drizzle of high-quality olive oil and a sprinkle of za'atar. It’s also the perfect base for avocado toast or a classic bruschetta with vine ripened tomatoes and basil. The structural integrity of the crust means it can handle heavy toppings without folding or getting soggy.
Soups and Stews
There is nothing more satisfying than a thick slice of this bread dunked into a creamy tomato soup. The contrast between the crunchy exterior and the velvety soup is pure comfort food.
Because it's a "no knead" loaf, the slightly irregular shape gives it a rustic, farmhouse look that makes any meal feel a bit more special. Even a simple grilled cheese sandwich is transformed when you use thick slices of this homemade artisan bread.

Recipe FAQs
Do I need to knead the dough?
No, kneading is unnecessary. Simply stir the ingredients until a shaggy, sticky dough forms, then let the fermentation do the structural work for you.
How to achieve a crispy crust?
Bake the loaf inside a preheated 4-to-6 quart Dutch oven with the lid on for 30 minutes. This traps steam, which allows the crust to expand before it sets, then finishing with 12 15 minutes uncovered creates the signature deep mahogany color.
How to tell when the dough is ready for the oven?
Look for the dough to double in size and display visible bubbles on the surface. This proofing stage typically takes 2 to 3 hours in a warm, draft free environment.
Is it true I can use any water temperature?
No, this is a common misconception. You must use lukewarm water at approximately 100°F to ensure the yeast activates properly without being killed by excessive heat.
How to store the bread to maintain freshness?
Keep the loaf cut-side down on a wooden cutting board for the first 24 hours. Avoid plastic bags as they trap moisture and soften the crust; if you enjoyed mastering the texture of this bread, use a paper or linen bag afterward to preserve the quality.
How to freeze the loaf for later?
Slice the bread completely once it has cooled to room temperature. Place the slices in a freezer safe bag, which allows you to take out a single slice and pop it directly into the toaster whenever needed.
How to handle sticky dough?
Use a spatula or wooden spoon to stir until no dry flour remains. Because the hydration is intentional to achieve a light, airy crumb, avoid adding extra flour, as it will make the final loaf dense.
Easy No Knead Bread

Ingredients:
Instructions:
Nutrition Facts:
| Calories | 184 kcal |
|---|---|
| Protein | 6.6 g |
| Fat | 0.5 g |
| Carbs | 38.4 g |
| Fiber | 1.4 g |
| Sugar | 0.1 g |
| Sodium | 380 mg |
