Quick Eerie Graham Cracker Ghosts 10Minute Spooky Treats
- Why These Graham Cracker Ghosts Rule Your Halloween Menu
- The Charm of Minimalist Spooky Baking
- Essential Components for Crafting Your Spooky Shapes
- Step-by-Step Guide to Conjuring Your Confections
- Elevating Your Graham Cracker Ghosts: Creative Variations
- Storage Secrets for Keeping Your Ghosts Freshly Eerie
- Recipe FAQs
- 📝 Recipe Card
Why These Graham Cracker Ghosts Rule Your Halloween Menu
When the calendar flips to October, the pressure to produce impressive Halloween Desserts often mounts. We picture elaborate tiered cakes or painstakingly molded candies. But what if I told you the most charming, crowd pleasing confection requires zero baking and minimal fuss?
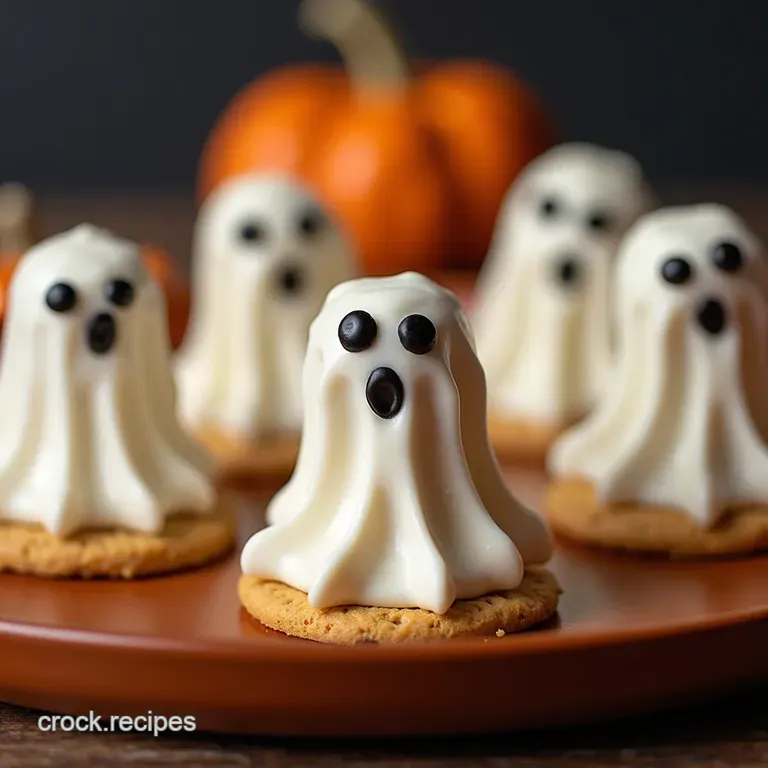
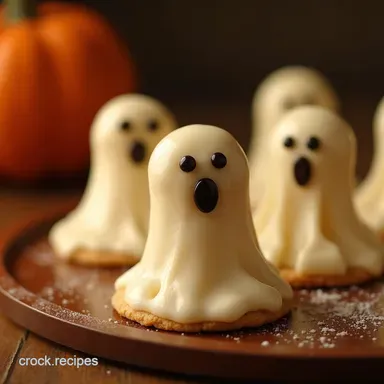
Enter the Graham Cracker Ghosts . These treats capture the essence of the season a little bit spooky, undeniably sweet, and perfectly shareable. They leverage the familiar, comforting crunch of a graham cracker, instantly transporting us back to childhood bonfires, then dress it up in a ghostly white marshmallow cloak.
For anyone planning Halloween Food For Party spreads, these ghostly figures offer maximum visual impact for minimal kitchen time, making them an absolute staple.
The Charm of Minimalist Spooky Baking
The beauty of our Graham Cracker Ghosts lies in their simplicity. This isn't about complex pastry techniques; it’s about transforming humble pantry staples into something delightfully eerie. We are aiming for that perfect balance of nostalgic crunch and creamy, sweet topping.
The entire process is designed to be swift and satisfying, ensuring that even the busiest host can pull off something spectacular.
A 10-Minute Solution for Last Minute Ghoul Greetings
When those unexpected invitations pop up, or you realize the treat table looks a little sparse, these Easy Halloween Snacks save the day. With only about 15 minutes of active assembly time (plus chilling), you can transition from having a stack of crackers to a platter full of spooky figures faster than you can say "boo!" This speed makes them ideal for creating last minute Spooky Snacks without sacrificing quality.
Unpacking the Magic of Simple Ingredients
Forget hunting down specialty flours or extracts. The core components here are wonderfully accessible. We rely on the satisfying base of graham crackers, which we bind together with a touch of peanut butter creating a firm, slightly spiced foundation that holds up beautifully during the dipping process.
The outer shell is a smooth, homemade marshmallow coating, achieved simply by melting down standard mini marshmallows with a splash of butter and milk until glossy and ethereal.
Why We Love This No-Fuss Approach to Holiday Treats
This recipe sidesteps the oven entirely. Not only does that save precious time, but it also means your kitchen stays cool, which is a massive win on a busy holiday prep day. This method results in Graham Cracker Halloween creations that taste vaguely like a S’more that decided to haunt your pantry!
The difficulty level is delightfully easy; since ghosts aren't supposed to be geometrically perfect, any slightly uneven shape adds to their charmingly spooky character.
Essential Components for Crafting Your Spooky Shapes

Before we dive into the melting and dipping, let’s outline the necessary building blocks. Crafting these phantoms involves three distinct phases: creating the firm, textured base; preparing the smooth, coating medium; and finally, adding the defining facial features.
The Core Trio: Cracker Crunch and Creamy Coating
The foundation relies on about nine full sheets of graham crackers, broken roughly in half, which are then combined with about a quarter cup of smooth peanut butter. This mixture becomes pliable enough to shape but firm enough to handle the marshmallow coating later.
The coating itself requires one standard 10-ounce bag of mini marshmallows, balanced with just two tablespoons of butter and a quarter cup of milk to ensure it remains fluid and glossy as it cools slightly. A whisper of vanilla extract and salt rounds out the flavor profile of this sweet, blanket like exterior.
Sourcing the Sweetest Eyes for Your Graham Cracker Ghosts
The personality of our Spooky Treats hinges entirely on their faces. For this, we turn to the classic, reliable route: melted dark or semi sweet chocolate. To achieve a smooth consistency perfect for piping fine details like tiny, watchful eyes and slightly crooked mouths it helps to melt the chocolate chips with about one teaspoon of coconut oil.
This prevents the chocolate from becoming too thick once it cools slightly, ensuring crisp, defined features for our ghostly friends.
Tools Required for Ghostly Assembly
Fortunately, the equipment list is short. You’ll need a microwave safe bowl or a small saucepan for melting the marshmallow coating, a sturdy rubber spatula for mixing, and a baking sheet lined with parchment paper to prevent sticking.
For the final, crucial step of detailing the faces, a piping bag (or even a small zip-top bag with a tiny corner snipped off) is essential for accurate placement of those chocolate eyes.
Related Recipes Worth Trying
- The Ultimate Texas Firecrackers Recipe Easy Baked Snack Bites — Need easy snack recipes that pack a punch These baked Texas Firecrackers are crispy cheesy and ridiculously addictive Find out the secret to keeping them...
- Sweet Southern Pineapple Casserole Cheesy Ritz Cracker Magic — This Southern pineapple casserole recipe is a potluck STAR Sweet pineapple savory cheddar and buttery Ritz topping Its comfort food at its finest Get the...
- Cracker Barrel Fried Apples Recipe Easiest Copycat Ever — Want Cracker Barrel fried apples at home This easy copycat recipe is quicker than queuing at the Old Country Store Sweet cinnamony and ready in 35 Get the...
step-by-step Guide to Conjuring Your Confections
With our ingredients assembled, the magic can begin. The entire active phase moves quickly, so be ready to shape the bases promptly after mixing the cracker crumbs.
First, line your baking sheet with parchment paper. In a separate bowl, combine the broken graham crackers with the peanut butter. Mix thoroughly until the crumbs are uniformly moistened and hold their shape when squeezed together it should feel like coarse, slightly sticky dough.
Using about one tablespoon of this mixture per ghost, gently press and mold the filling into an elongated, slightly uneven oval or tear drop shape in the palm of your hand. Place these solid bases onto your prepared baking sheet.
Next, address the ethereal coating. Combine the mini marshmallows, butter, and milk in your microwave safe bowl. Microwave in short bursts, stirring well after each 30-second interval, until the mixture is completely smooth and shiny. This usually takes 60 to 90 seconds total.
Quickly stir in the vanilla extract and a pinch of salt before the mixture sets.
Achieving That Perfectly Spooky Drip Effect
Working while the marshmallow coating is still warm and perfectly pourable is key to successful dipping.
Preparing the Marshmallow Mixture for Coating
Ensure your butter and milk have fully incorporated into the marshmallows before you start dipping. If the mixture seems too stiff, return it to the microwave for another quick 15-second blast. Remember, a slightly thinner consistency works best for a smooth, even coat on the cracker base.
Dipping and Setting Your Ethereal Shapes
Use a fork or a specialized dipping tool to lower the top two-thirds of each graham cracker ghost into the warm marshmallow mixture. Lift it out slowly, allowing the excess coating to drip back into the bowl.
For a cleaner look, gently tap the fork against the side of the bowl once before setting the dipped ghost back onto the parchment paper. Immediately transfer the sheet to the refrigerator to allow the coating to firm up, which should take about 30 minutes.
This chilling period is vital before we add the faces.
Adding Personality: Positioning the Edible Eyes
Once the marshmallow coating is completely firm to the touch, melt your dark chocolate along with the optional coconut oil in very short increments until it is silky smooth. Transfer this melted chocolate into your piping bag setup.
Gently pipe two small dots for the eyes and a slightly wonky oval for the mouth onto each chilled ghost. These small details truly transform a simple dipped cracker into one of our charming Kids Halloween Food favorites.
Return them to the fridge for a final 10 minutes to set the chocolate before serving.
Elevating Your Graham Cracker Ghosts: Creative Variations
While the classic peanut butter and marshmallow version is fantastic, these Festive Treats are highly adaptable. Feel free to experiment with the base mixture or the coating itself to cater to different tastes or dietary needs.
Flavor Twists: Going Beyond Basic Vanilla Coating
To bring an authentic autumnal flair to your ghosts, consider adding half a teaspoon of pumpkin pie spice directly into the graham cracker filling before shaping. This gives a subtle warmth that complements the sweet marshmallow beautifully.
Alternatively, if you prefer a completely different flavor profile for the coating, you can substitute the marshmallow mixture entirely with melted white chocolate (with a touch of oil for smoothness) to create "White Chocolate Phantoms."
Troubleshooting Common Ghostly Dipping Issues
If your marshmallow coating becomes too stiff midway through dipping, don't panic! A quick 15-second reheat in the microwave will usually restore its dippable texture. If the coating is too thin and won’t adhere well, you may have added too much milk initially; in future batches, reduce the liquid slightly.
A firmer cracker base, achieved by chilling the shaped bodies for 10 minutes before dipping, is also an excellent preventative measure against breakage.
How Long These Treats Last After Decoration
Because these Spooky Treats are essentially set at room temperature (once chilled), they maintain their structural integrity well. Stored in an airtight container, they are best enjoyed within three to four days.
Keep them in the refrigerator if your kitchen is particularly warm, but allow them to sit out for about 15 minutes before serving to ensure the coating is soft and creamy, not brittle.
Storage Secrets for Keeping Your Ghosts Freshly Eerie
Proper storage ensures your Graham Cracker Ghosts remain just as structurally sound and delicious as when they first emerged from the fridge. Since the coating is essentially a marshmallow fluff mixture, humidity is your primary enemy, as it can lead to stickiness.
Flavor Twists: Going Beyond Basic Vanilla Coating
To introduce a new dimension to these simple cookies, try substituting the peanut butter base with Biscoff spread or a seed butter for a nut-free alternative. For a richer coating flavor, swap the plain milk for heavy cream during the melting stage this will result in a thicker, slightly denser, and more decadent shell around your ghost bodies.
Troubleshooting Common Ghostly Dipping Issues
If you find your chocolate faces smudging during the final placement, ensure the marshmallow coating is completely cold and set. If the surface is even slightly tacky, the melted chocolate will slide around. A final, quick 10-minute chill after decorating locks everything into place perfectly.
How Long These Treats Last After Decoration
These are best consumed within 72 hours. While the crackers might slowly absorb moisture and soften over time, the creamy marshmallow coating helps seal in the freshness for a few days.
They are excellent candidates for making ahead, perhaps the day before your Halloween gathering, allowing you to focus on other aspects of your Halloween Food For Party spread. Enjoy these simple, spooky delights!

Recipe FAQs
Are these Graham Cracker Ghosts complicated to make? I’m a bit of a novice cook!
Not at all these are dead simple! They are specifically designed for beginners, requiring no actual baking. It's mostly just mixing, shaping, dipping, and chilling. If you can stir something and have a steady hand for piping tiny eyes, you'll nail these spooky treats.
My marshmallow coating seized up when I melted it. How do I get that smooth, dippable texture?
Ah, the dreaded sticky situation! Marshmallow coating can be temperamental. Next time, try melting it on 50% microwave power in short bursts (30 seconds max), stirring thoroughly between each burst.
If it still seems stiff, add just a tiny splash more milk or butter to loosen it up until it flows nicely, like thick lava.
How long will these Graham Cracker Ghosts last, and how should I store them?
Because of the marshmallow coating, they are best enjoyed within 3 to 5 days. Keep them stored in an airtight container in a cool, dry place, or in the refrigerator if your kitchen is particularly warm. Avoid stacking them directly on top of each other unless you put parchment paper between the layers.
Can I make these nut-free? My little terror has a peanut allergy.
Absolutely, safety first! You can easily make these nut-free by swapping out the peanut butter in the base. Sunflower seed butter (like SunButter) works brilliantly as a direct 1:1 substitute, providing the necessary binding without the allergens. Just ensure your graham crackers are also certified nut-free.
What’s the secret to getting the faces piped on nicely without them looking like blobs?
The key is temperature and consistency. Make sure the white marshmallow coating is fully chilled and firm before you start decorating this provides a stable canvas. For the chocolate, melt it just until it’s fluid, and if it’s too thin, let it cool for a few minutes before piping.
Remember, wonky eyes make them look even spookier!
I don't have time to chill them for 30 minutes. Can I speed up the setting process for the coating?
You can certainly give them a quick blast in the freezer to speed things up, but be careful not to rush it too much. Pop them in the freezer for just 10 15 minutes long enough for the coating to set hard.
Over freezing can sometimes make the marshmallow coating brittle or cause condensation when they return to room temperature.
Graham Cracker Ghosts
Ingredients:
Instructions:
Nutrition Facts:
| Calories | 267 kcal |
|---|---|
| Protein | 2.7 g |
| Fat | 14.7 g |
| Carbs | 17.3 g |
| Fiber | 1.0 g |
| Sodium | 81 mg |
