Apple Pie Cake: Moist and Buttery

- Time: Active 25 minutes, Passive 55 minutes, Total 80 minutes
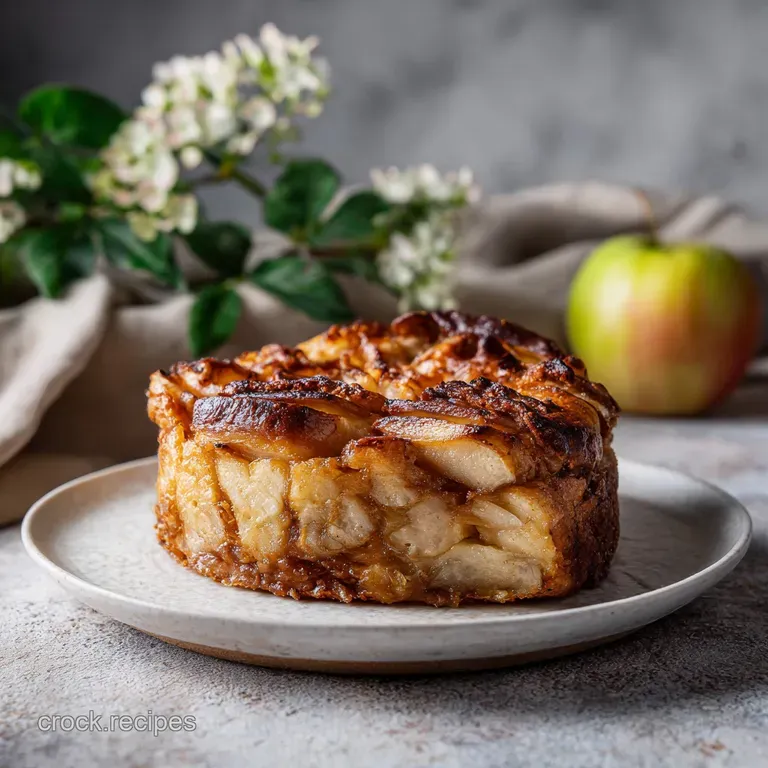
- Flavor/Texture Hook: Jammy cinnamon apples nestled in a velvety, buttery crumb with a shattering sugar crust
- Perfect for: Weekend family gatherings, cozy autumn afternoons, or as a hearty dessert after a Sunday roast
- The Best Warming Homemade Apple Pie Cake
- Why the Crumb Stays Soft
- Selecting Your Key Elements
- The Alchemy of the Batter
- Essential Tools for Success
- Stepping Through the Process
- Solving Common Baking Hurdles
- Adjusting the Recipe Size
- Debunking Common Baking Beliefs
- Keeping Your Cake Fresh Longer
- Perfect Drinks to Serve Alongside
- Recipe FAQs
- 📝 Recipe Card
The Best Warming Homemade Apple Pie Cake
Forget every rule you've heard about needing to choose between a flaky pie or a fluffy cake. There's a common myth floating around that if you put fresh fruit directly into a cake batter, you’ll end up with a soggy, gummy mess that falls apart the second you slice it.
I used to believe that, too, until I realized the secret isn't in reducing the fruit, but in how you treat the flour. You don't need a heavy crust or a separate pastry dough to get that classic flavor; you just need to understand how butter and flour play together.
The moment this hits the oven, your kitchen transforms. There is this specific aroma a heady mix of bubbling brown sugar and warm nutmeg that starts to drift through the house around the thirty minute mark.
It’s the kind of scent that makes you want to wrap your hands around a warm mug and wait by the oven door. The butter sizzles against the edges of the springform pan, creating a golden, slightly caramelized perimeter that protects the soft, velvety center.
I remember the first time I got the texture just right. I had tried shortcut versions with boxed mixes, but they always felt hollow and overly sweet. When I finally committed to doing it from scratch, using the reverse creaming method, the difference was undeniable.
The crumb was tight but tender, holding up the weight of those thick Granny Smith slices without sinking to the bottom. It’s a satisfying, hearty dessert that feels like a hug in a bowl, especially when the steam rises from a fresh slice.
Why the Crumb Stays Soft
Fat Coating: Adding cubed butter directly to the dry ingredients coats the flour particles in fat, which limits gluten development and ensures a tender, velvety texture.
Starch Barrier: Tossing the apples in cornstarch creates a thin gel as they bake, preventing the fruit juices from weeping into the batter and making it gummy.
Acid Activation: The sour cream provides necessary acidity to react with the baking powder, giving the heavy batter enough lift to stay airy despite the fruit topping.
| Method | Cook Time | Texture Outcome | Best For |
|---|---|---|---|
| Standard Oven | 55 minutes | Crispy top, tender crumb | The classic experience |
| Convection Oven | 45 minutes | Extra dark, shattering crust | Those who love crunchy edges |
| Individual Ramekins | 30 minutes | Moist, pudding like center | Dinner parties and portion control |
When you are looking for that specific balance of tart fruit and rich cake, the choice of apple matters immensely. A softer apple like a McIntosh will turn to mush, which is why I always stick to the Honeycrisp or Granny Smith. If you’ve ever made a Caramel Apple Tarte Tatin, you know how important it is for the fruit to hold its shape under heat. This cake follows that same logic, ensuring you get distinct pieces of fruit rather than a fruit sauce.
Selecting Your Key Elements
| Component | Science Role | Pro Secret |
|---|---|---|
| Unsalted Butter | Shortens gluten strands | Use it slightly cool to the touch for a sandy texture |
| Sour Cream | Fat and moisture carrier | Never use fat free; the fat is what keeps the cake soft |
| Granny Smith Apples | Structural acidity | Slice them exactly 1/4 inch to ensure they soften at the same rate the cake bakes |
| Cornstarch | Moisture stabilizer | It acts as a "glue" for the cinnamon sugar to cling to the fruit |
The interaction between the sugar and the apples is where the magic happens. We macerate them for 10 minutes, which sounds like a fancy word, but it just means letting them sit in sugar. This draws out a bit of moisture so the cake doesn't have to deal with that extra liquid during the bake.
The Alchemy of the Batter
For this Apple Pie Cake, we aren't just tossing things in a bowl. Each ingredient has a specific job to do to ensure the final result is satisfying and hearty.
- 3 large Granny Smith apples (approx. 500g): These provide the tart contrast to the sweet cake. Why this? They hold their shape perfectly and don't vanish into the batter during the long bake.
- 250g all purpose flour: This provides the structure. Why this? It has enough protein to support the heavy fruit layer without being tough.
- 170g unsalted butter: Softened but still holding its shape. Why this? It creates the signature "sandy" base during the mixing process.
- 120g sour cream: Room temperature is vital here. Why this? It adds a richness that milk alone cannot provide, creating a dense but soft crumb.
- 2 large eggs: These act as the binder. Why this? They provide structure and a slight golden hue to the cake body.
- 2 tbsp coarse sparkling sugar: For the topping. Why this? It doesn't melt like regular sugar, giving you a distinct, shattering crunch.
Chef Tip: If your butter is too soft (oily), your cake will be greasy. It should be "pliable" meaning you can press a finger into it and it leaves a dent, but it doesn't look shiny or melted.
Essential Tools for Success
You don't need a professional kitchen, but a few specific items make this much easier. A stand mixer, such as a KitchenAid, is ideal for the reverse creaming method because it can steadily break down the butter into the flour without overworking it. You will also need a 9 inch springform pan.
This is non negotiable for me because this cake is heavy and delicate; trying to flip it out of a standard round cake pan is a recipe for disaster.
Make sure you have a good vegetable peeler and a sharp chef's knife. The apples need to be uniform. If some are thick and some are thin, you’ll end up with some crunchy bits and some mushy bits. A simple kitchen scale is also a huge help.
Measuring flour by weight (250g) is the only way to guarantee your Apple Pie Cake isn't dry and crumbly.
Stepping Through the Process
- Heat the oven. Set your oven to 350°F (175°C). Grease your 9 inch springform pan and line the bottom with parchment paper. Note: The parchment ensures the fruit doesn't stick to the base.
- Macerate the fruit. Toss the 500g of sliced apples with 50g sugar, 1 tbsp cornstarch, 1.5 tsp cinnamon, and nutmeg in a medium bowl. Wait 10 minutes until a light syrup forms.
- Mix dry ingredients. Combine 250g flour, 200g sugar, 2 tsp baking powder, and 1/2 tsp salt in your mixer bowl. Mix on low until just blended.
- Incorporate the butter. Add the 170g of cubed butter one piece at a time while the mixer runs on low. Process until the mixture looks like coarse sand.
- Whisk the liquids. In a separate bowl, whisk 120g sour cream, 2 eggs, 1 tbsp vanilla, and 60ml milk. Ensure the eggs are fully broken down.
- Combine and beat. Pour the liquid into the flour butter mix on medium low speed. Beat for 60 seconds until the batter is pale and velvety.
- Layer the pan. Spread the thick batter into the pan. Arrange the apples on top, slightly overlapping them. Press them gently so they "anchor" into the batter.
- Add the crunch. Mix 2 tbsp sparkling sugar with 0.5 tsp cinnamon and sprinkle it over every inch of the top.
- The long bake. Bake for 55 minutes. Check for a clean skewer and a golden, set center.
- Cool and release. Let the cake sit in the pan for 15 minutes. Run a thin knife around the edge before popping the spring.
Solving Common Baking Hurdles
Why is my cake gummy?
This usually happens for two reasons: either the apples were too wet or you overmixed the batter once the liquids were added. When you add the sour cream and eggs, you only want to beat it until a smooth batter forms about a minute.
If you go longer, you develop too much gluten, which leads to a rubbery, gummy texture. Also, don't skip the cornstarch on the apples! It’s the "insurance policy" that soaks up excess juice.
The top is browning too fast
Every oven has its own personality. If you notice the edges or the sugar topping looking dark brown at the 40 minute mark, don't panic. Simply tent a piece of aluminum foil loosely over the top. This allows the center of the Apple Pie Cake to finish cooking without burning the delicate cinnamon sugar crust.
| Problem | Root Cause | Solution |
|---|---|---|
| Sunken Apples | Batter was too thin or over aerated | Ensure butter is "pliable" not melted; don't overbeat eggs |
| Dry, Crumbly Crumb | Too much flour or overbaked | Use a scale for ingredients and check doneness 5 mins early |
| Soggy Bottom | Apples were too juicy | Macerate for the full 10 minutes and drain excess liquid before layering |
- ✓ Always use room temperature eggs and sour cream to prevent the batter from curdling.
- ✓ Pat the sliced apples dry if they seem excessively wet before tossing with sugar.
- ✓ Do not open the oven door for the first 40 minutes to keep the heat consistent.
- ✓ Let the cake cool completely if you want clean, sharp slices.
- ✓ Use a serrated knife to cut through the sugar crust without smashing the cake.
Adjusting the Recipe Size
Cutting the recipe in half If you want a smaller treat, you can halve the ingredients and use a 6 inch round pan. Since you can't easily halve two eggs, beat one egg in a cup and use half of the liquid by weight.
Reduce the baking time by about 15 minutes, but start checking with a skewer at the 30 minute mark to be safe.
Doubling for a crowd For a large party, you can double everything and bake it in a 9x13-inch rectangular pan. I recommend increasing the spices to 1.5x rather than a full 2x to keep the flavors balanced.
The baking time will likely stay around 55 to 60 minutes because the cake is thinner in a larger pan, but always use the "clean skewer" test as your guide.
| Servings | Pan Size | Cook Time | Visual Cue |
|---|---|---|---|
| 6 People | 6 inch round | 35-40 mins | Sides pull away slightly |
| 12 People | 9 inch springform | 55 mins | Skewer comes out clean |
| 24 People | 9x13-inch rectangle | 50-60 mins | Center doesn't jiggle |
This cake is incredibly versatile. If you're feeling adventurous, adding a handful of toasted pecans to the batter provides a wonderful nutty crunch. If you're looking for something even more comforting, this cake pairs beautifully with a side of Classic Shepherd's Pie for a full Sunday dinner vibe.
Debunking Common Baking Beliefs
Fresh apples make the cake soggy. Actually, as long as you use a high pectin, tart apple and a starch binder, the fruit adds necessary moisture rather than unwanted sogginess.
The maceration step is the key here it's not the fruit that’s the problem, it's the uncontrolled release of its juice.
You must cream butter and sugar first. The reverse creaming method used in this Apple Pie Cake (mixing butter into the flour) actually produces a more level cake with a tighter, more "velvety" crumb.
It’s more reliable for heavy, fruit laden cakes because it creates a sturdier structure that doesn't collapse.
Keeping Your Cake Fresh Longer
Storage Guidelines This cake is actually one of those rare bakes that tastes even better on day two. The juices from the apples continue to seep into the crumb, making it incredibly moist. You can keep it at room temperature, covered tightly, for about 2 days.
After that, move it to the fridge for up to 5 days. If you find the sugar crust has softened in the fridge, a quick 5 minute stay in a 300°F (150°C) oven will bring back that satisfying "shatter."
Freezing Instructions Yes, you can freeze this! Wrap individual slices in plastic wrap and then foil. They will stay fresh for up to 3 months. To reheat, thaw at room temperature and then warm in the oven. I don't recommend the microwave as it can make the crust rubbery and the apples a bit too soft.
Zero Waste Tips Don't throw away those apple peels! You can toss them with a little cinnamon sugar and bake them at a low temperature to make apple peel chips. Or, simmer the cores and peels with a bit of water and sugar to create a simple apple syrup that you can drizzle over the cake before serving.
Perfect Drinks to Serve Alongside
To truly enjoy the satisfying flavors of this cake, you need a drink that complements the spices. A dark roast coffee is my personal favorite the bitterness of the beans cuts right through the sweet sugar crust. If you're serving this in the evening, a small glass of tawny port or a spiced cider works wonders.
If you have kids at the table, a cold glass of whole milk is the classic choice. The fat in the milk rounds out the tartness of the Granny Smiths. For a real treat, try serving a slice alongside a scoop of vanilla bean ice cream and a drizzle of salted caramel. The way the cold cream melts into the warm cinnamon apples is something you have to experience to believe. If you're looking for more apple inspiration, you might enjoy checking out an Ultimate Caramel Apple Tarte Tatin for your next baking project!

Recipe FAQs
Can I use a different variety of apple?
Yes, use firm baking apples. Granny Smith or Honeycrisp are the best choices because they hold their shape during the 55-minute bake time without turning into mush.
Why is it important to macerate the apples for 10 minutes?
Macerating releases excess moisture and thickens the syrup. This step prevents the bottom of your cake from becoming soggy and ensures the cinnamon sugar coating adheres perfectly to the fruit.
How to know if the cake is fully baked?
Insert a skewer into the center of the cake. If it comes out clean with no wet batter attached after the 55-minute bake, the cake is ready to be removed from the oven.
Is it true I can substitute the sour cream with milk?
No, this is a common misconception. Sour cream provides the necessary acidity and fat content to create a tender, moist crumb; if you enjoyed how this fat-to-acid ratio creates texture here, see how we use the same principle in our Cinnamon Applesauce Muffins.
How to achieve the "coarse sand" texture when mixing butter?
Add cubed butter one piece at a time on low speed. Stop once the flour is fully coated and the mixture looks like small, uniform crumbs to ensure a light, cake like structure.
Should I release the cake from the pan immediately?
No, let it cool for 15 minutes first. This resting period allows the structure of the cake to set, making it much easier to remove the springform ring without the edges crumbling.
How to store leftovers for the best taste?
Keep in an airtight container at room temperature. It stays fresh for up to two days, but you can refrigerate it for up to four days if your kitchen is particularly warm.
Homemade Apple Pie Cake

Ingredients:
Instructions:
Nutrition Facts:
| Calories | 326 kcal |
|---|---|
| Protein | 3.7 g |
| Fat | 14.7 g |
| Carbs | 46 g |
| Fiber | 1.3 g |
| Sugar | 29.2 g |
| Sodium | 183 mg |
