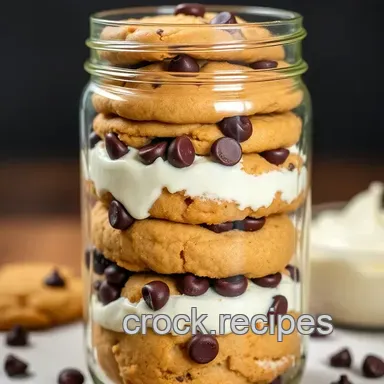
Layered Cookie Mix in a Jar
A Thoughtful Gift or Quick Treat: The Cookie in a Jar Recipe
When it comes to last minute gifts or that surprise bake sale, nothing beats a good cookie in a jar recipe ! i remember the first time i decided to put together one of these layered beauties.
It was for my best friend’s birthday, and i was running out of ideas. but then, voila! i stumbled on this gem.
Talk about a game changer! imagine the joy on her face when she saw that gorgeous jar packed with yumminess, just waiting for her to bake, and it only took me, like, 15 minutes to prepare.
The Scoop on the Jar Mix
Now, let's dive into the juicy details. the layered cookie mix in a jar has roots that remind me of those grandma's-style gifts back in the day.
You know, when everything was homemade, and gifts were packed with love. this diy treat is still super relevant today.
It's now a staple at parties, holidays, and pretty much any occasion where you wanna make someone's day a little sweeter.
Plus, it's just so darn convenient who doesn’t love a quick way to whip up mason jar cookies ?
So, what should you expect in terms of time? well, you’ll spend about 15 minutes putting it together (no baking skills required), and once it’s all mixed up, you just pop it into the oven later.
It’s easy peasy! and it’s budget friendly too. you get about a dozen cookies from one jar perfect for sharing (or not!).
Why You’ll Love This Recipe
Okay, let’s talk benefits. not only are mason jar gifts recipes adorable, but this cookie jar mix comes packed with health benefits worth mentioning (yes, i said health!).
You can easily customize it with healthier alternatives, like oats or nuts, making it a bit more nutritious. plus, let's face it, they’re just plain fun to give or receive.
These layers do more than just look cute; they’re ideal for occasions like birthdays, holidays, or just a simple "thinking of you" gesture.
Ever surprise someone with a homemade jar? instant friend points! and trust me, there's something special about baking with pre-measured, dry ingredients in a jar.
It makes you feel like a baking pro, even if you’re totally winging it.
Time to Get Cooking!
So, are you ready to give this jar cookie recipes idea a try? trust me, you won’t regret it! whether you're gifting it or baking for yourself, it’s a win-win.
Next up, let’s get you prepped with the ingredient list for our layered delight. grab your apron, and let's get jar-ing!
Your Essential Ingredients Guide for Jar Cookie Recipes
Oh my gosh, have you ever gone down the rabbit hole of jar cookie recipes ? they’re not just adorable, but they also make fantastic gifts! seriously, who wouldn’t love a lovingly packed cookie in a jar recipe ? perfect for birthdays, holidays, or just because.
So, let’s not just dive into the jar mix but also cover the essential ingredients you’ll need.
Premium Core Components
When you're getting into the nitty gritty of your mason jar cookies mix , it’s crucial to have the right ingredients.
Grab a measuring cup because precision matters! here’s how to stack up those goodies and ensure everything's up to snuff.
Detailed Measurements: Use 1 cup (125g) all-purpose flour and 1/3 cup (60g) granulated sugar . Respect the metrics, folks!
Quality indicators: always opt for fresh ingredients. check your baking soda old baking soda is like bringing a butter knife to a gunfight; it just won’t do the job.
A quick taste or sniff will tell you if those spices are still flavorful.
Storage Guidelines: Keep flour in an airtight container to maintain freshness. Shelf life? About a year for flour if stored properly. Baking soda? It lasts indefinitely if it's kept dry.
Freshness Tips: Inspect those brown sugar clumps before tossing it in. You want it to be soft and sweet, not hard as a rock!
Signature Seasoning Blend
Next is the fun part: signature spices and aromatics ! These are what transform your basic cookie mix into something extraordinary.
Essential Spice Combinations: Don’t skimp on the vanilla extract! It’s your magic ingredient. Just 1 teaspoon can elevate the flavors.
Herb Selections: While herbs aren't typically in a cookie mix, feel free to throw in a dash of cinnamon or nutmeg for a twist on classic recipes.
Flavor enhancers: chocolate chips are a must! aim for 1/2 cup (90g) or more, depending on how chocolatey you want to get.
And hey, a sprinkle of sea salt on top? total game changer.
Regional Variations: Want something a little more festive? Add some dried cranberries or nuts, and it's suddenly a holiday treat!
Smart Substitutions
Now, life happens! Sometimes you gotta adapt, and that’s where smart substitutions come in.
Common Alternatives: No brown sugar? No worries! Use all granulated sugar instead, or mix in a little molasses for that caramel flavor.
Dietary Modifications: Going gluten-free? Reach for a gluten-free flour blend that measures like regular flour for a one-to-one swap.
Emergency Replacements: Out of eggs? Applesauce can be your secret weapon 1/4 cup can replace one egg!
Seasonal Options: Use pumpkin puree in the fall for a cozy flavor profile!
Kitchen Equipment Essentials
Time to get your tools sorted. You don’t need a fancy kitchen to whip up some Mason jar gifts .
Must have Tools: A solid 1-quart glass jar is your star player. You’ll also need measuring cups, mixing bowls, and a baking sheet. Easy peasy!
Alternative Equipment Options: No mixing bowl? Just use a pot! It's all about being creative.
Preparation Tips: While layering your ingredients in the jar, take your time. Neatly layered ingredients not only look exceptional but are easier for the recipient to follow.
Storage Solutions: Keep the jar sealed until ready to bake! Your cookie mix will be safe.
Once you have your essentials ready, you'll be all set to create those delightful mason jar cookies ! you can in fact whip up a batch in no time, and the scent that fills your kitchen will be dreamy.
Let’s get ready for the fun part! Next up, we’ll go through step-by-step instructions on how to combine all these goodies into a show stopping cookie in a jar! Get your spoons ready, my friend!
Mastering the Art of Professional Cooking: A Friendly Guide
So you wanna step up your cooking game, huh? well, let’s break it down. whether you're prepping for an event, cooking for your family, or just want to impress yourself (we all have those days), professional cooking methods can help you nail it.
Here’s how to get started and ensure your culinary creations shine, just like grandma’s famous cookies like the ultimate cookie in a jar recipe !
Essential Preparation Steps
Alright, first things first: mise en place . french for “everything in its place,” this is the chef's secret sauce. gather all your ingredients before you even think about turning on the stove.
No rummaging through cabinets while your pasta is boiling!
Now, onto time management . i can’t tell you how many times i've burned garlic while trying to chop onions. set a timer for things like sautéing or baking! for instance, those cookies from our layered cookie mix in a jar? bake ‘em at 350° f ( 175° c) for 10- 12 minutes .
Keep that timer close!
Don't forget to organize your space! clear your countertops and have your tools handy. it's like laying out your favorite board game pieces before playtime makes everything smoother.
And always think safety ; keep a clean workspace to prevent accidents. hot surfaces and sharp knives can be a killer combo (figuratively speaking, of course).
Step-by-step Process: Cook Like a Pro
Let’s dive into our structured approach. Follow these steps like it’s a favorite recipe.
- Gather Your Ingredients: Start by collecting everything you need.
- Preheat Your Oven: Seriously, don’t forget this step. For those cookies, get that oven hot at 350° F ( 175° C) .
- Mix Wisely: Cream your butter, sugar, and eggs before adding in dry ingredients. It’s a total game changer.
- Look for Visual Cues: When baking, you want golden edges but soft centers. If they look a bit wobbly in the middle? You're right on track, friend!
Expert Techniques
Let's level up! Check these pro techniques that'll get your cooking on point.
- Layering Flavors: Whether you’re making cookie mixes or savory dishes, each layer adds flavor. That’s how grandma took her soups to the next level.
- Key Temperature Bites: You gotta know your temps like getting that butter to room temperature for velvety cookies. No one likes cold butter lumps. Target: About 70° F ( 21° C) will do.
- Quality Checkpoints: Trust your ingredients! Opt for fresh ones my mouth waters just thinking about using high-quality chocolate in that jar cookie recipe.
Oh, and if something goes wrong? just remember, it’s not the end of the world. if your cookies spread too much, maybe you forgot to chill the dough.
No biggie, you can make cookie bars instead!
Success Strategies
Alright, let’s wrap it up with some golden rules.
- Avoid Common Pitfalls: Don’t skip chilling your cookie dough or mistakenly using baking soda when you should use baking powder.
- Quality Assurance: Always taste your dough! If it’s bland, kick it up a notch with a pinch of salt or more vanilla.
- Perfect Results: The secret? Patience! Sometimes, letting dough sit in the fridge overnight can work wonders.
- make-ahead Options: Bake those cookies, then freeze them for later. We’re talking about cookie magic whenever the craving hits!
And there you have it, folks! a simple guide that turns you into a cooking whiz in the kitchen, ready to whip up everything from mason jar cookie recipes to those famous brownies in a jar.
To wrap up this cooking journey, remember it’s all about practice and having fun. Check out additional materials to dive deeper and continue your culinary exploration! Happy cooking!
Unveiling the Layers of Joy in Your Cookie in a Jar Recipe
Alright, my fellow food lovers, let’s dive into this super exciting journey of making a cookie in a jar recipe .
It's not just about whipping up some delicious cookies; it’s about crafting a heartfelt gift or an easy treat that makes your friends and family smile.
Let me share some pro tips and insights straight from my kitchen!
Pro Tips & Secrets
You know what’s great? this recipe isn't just easy; it’s a serious time saver too! when i'm in a pinch, i whip out my mason jar cookie recipes and assemble them in no time.
Seriously, all it takes is 15 minutes of prep can you believe that?
To enhance those flavors, i like to add a sprinkle of sea salt on top just before baking. oh my gosh, the contrast with the chocolate chips is divine! and for presentation, layer the ingredients neatly in the jar for an eye-catching display.
A little ribbon and a tag with baking instructions, and voilà a perfect gift!
Perfect Presentation
Let’s talk about plating techniques yes, cookies need that love too! once those beauties come out of the oven, allow them to cool for a few.
Then, stack them on a cute plate or even wrap them up in clear cellophane tied with a bow. the visual appeal totally ups the game.
For a fun twist with colors, consider using colorful sprinkles or mixing in some dried cranberries for that pop of red.
Trust me, your jar food gifts will have everyone’s jaw dropping. it’s those little touches that make your cookies memorable!
Storage & make-ahead
Now, if you’re wondering about storage, don’t fret! once baked, your mason jar cookies mix can last about a week, but trust me, they won't last that long.
To keep them fresh, store them in an airtight container hint: cookie tins work wonders!
And if you’re planning on making these ahead, scoop out the dough balls, freeze them on a baking tray, and once they’re solid, transfer them into a zip-lock bag.
It makes for lazy baking days. just pop them in the oven straight from the freezer, and boom you’re ready to impress!
Creative Variations
Who says you can’t have fun with flavors? get wild with the additions! swap chocolate chips for crushed oreos for an oreo cookie jar vibe.
Want something a tad healthier? try dried fruit and nuts instead of the usual chocolate. you could even go for a seasonal twist: think pumpkin spice for fall or peppermint during the holidays!
If you’ve got dietary needs in mind, just substitute ingredients. there are tons of jar cookie recipes out there that cater to gluten-free or vegan lifestyles.
It’s all about making it your own!
Complete Nutrition Guide
Now, i’m sure you’re curious about the nutrition side of things. each cookie is about 150 calories. not too shabby, huh? it's nice to indulge every now and then.
But remember, moderation is key share a few with friends!
That said, these cookies offer some sweet moments without going overboard. They’re perfect for a midday snack or a little pick-me-up in your day.
Wrapping Up With Encouragement
So there you have it, folks! this cookie in a jar recipe is not just about cookies; it’s about love, creativity, and sharing joy with others.
Making jar food gifts takes the pressure off gifts, and they’re so much fun to prepare.
Next time you're looking to bring a smile to someone’s face or maybe just treat yourself remember this recipe. it's straightforward, personal, and versatile enough to fit any occasion.
So grab a jar, layer those ingredients, and let the cookie magic begin! enjoy, and happy baking!
Frequently Asked Questions
What is a cookie in a jar recipe?
A cookie in a jar recipe is a fun way to present pre-measured dry ingredients layered in a jar, making it easy for anyone to bake cookies later. It’s a fantastic gift idea, where the recipient only needs to add a few wet ingredients like butter, an egg, and vanilla to create their delicious cookies!
How can I customize my cookie in a jar recipe?
You can easily swap ingredients to create different flavors! Consider using crushed Oreos for cookies or dried fruits like cranberries instead of chocolate chips. You could also opt for gluten-free flour to cater to dietary needs just make sure to keep those layers looking fabulous!
How should I store my cookie jar mix?
Store your cookie jar mix in a cool, dry place until you’re ready to use it. If properly sealed, it can last for several months. Just make sure not to expose it to moisture, or the ingredients might clump together, and we can't have that now, can we?
Can I make this cookie in a jar recipe dairy-free?
Absolutely! You can substitute the unsalted butter with coconut oil or a vegan butter spread. Just ensure that your other ingredients, like chocolate chips, are dairy-free too, and you’ll have a deliciously buttery cookie without the dairy!
What is the best way to decorate my cookie jar for gifting?
A lovely way to dress up your jar is to add a colorful ribbon around the lid and attach a tag with baking instructions. You can also use stickers or labels that match the occasion think cheerful florals for birthdays or festive designs for the holidays!
Any tips for achieving the best cookies from my cookie jar mix?
To ensure your cookies come out perfectly, remember not to overbake them look for golden edges with soft centers. Also, using room temperature butter and eggs gives a better texture. And don’t forget to let them cool a little before eating; that patience will reward you with gooey deliciousness!
Layered Cookie Mix In A Jar