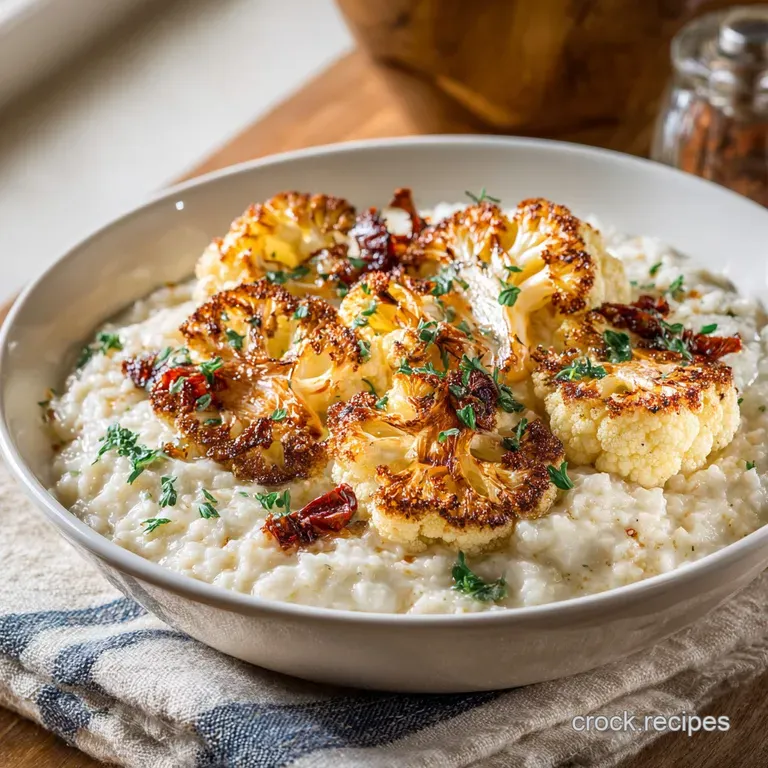
Cauliflower Risotto: the Cheesy, Roasted Brown Butter Comfort Dish
- Mastering the Perfect Cauliflower Risotto
- The Science of Creaminess: Why Roasting and Puréeing Works
- Essential Ingredients for the Best Cauliflower Risotto
- Detailed Roadmap: How to Prepare Your Roasted Cauliflower Risotto
- Chef’s Troubleshooting Guide and Expert Cooking Tips
- Storage and Reheating Cauliflower Risotto
- Perfect Pairings and Suggested Garnishes
- Recipe FAQs
- 📝 Recipe Card
Mastering the Perfect Cauliflower Risotto
You know how some dishes just smell like a big hug? This Roasted Cauliflower Risotto is exactly that, hitting you with the deep, nutty scent of brown butter and savory caramelization the second it leaves the pan.
Forget thin, watery versions; this is true comfort food velvety smooth, deeply flavorful, and shockingly good at hiding its vegetable content. The texture is the real winner here.
I totally get it; traditional risotto is a commitment, requiring 30 minutes of dedicated stirring while you stand guard over the stove. This version is a lifesaver because we cheat, brilliantly.
We leverage roasted cauliflower puree to create instant, luxurious creaminess, meaning less heavy cream and a huge flavor boost. It's an easy cauliflower risotto that tastes like you spent all afternoon cooking.
If you’ve been looking for a low carb comfort food side dish that doesn’t scream "diet," or just want an outrageously delicious weeknight meal, this recipe is for you. We’re covering all the common mistakes I made when I first started, so let’s crack on and nail this velvety bowl of goodness.
The Science of Creaminess: Why Roasting and Puréeing Works
This isn't just about mixing things in a pot; we’re using intentional kitchen techniques to make this rich, cheesy comfort meal. The secret sauce (literally) comes down to three steps: deepening the flavor, achieving perfect rice texture, and finishing like a pro.
The Role of Roasting: Deepening the Cauliflower Flavor
Roasting is non and negotiable for this cauliflower risotto recipe. When you toss those florets in oil and crank the oven, they undergo the Maillard reaction, turning deeply golden brown and nutty. This process concentrates the sugars and eliminates that sometimes sulfurous edge that steamed cauliflower can have.
Trust me, the difference between boiled and roasted cauliflower is night and day.
Why Texture Matters: Achieving the Velvety Finish
The cauliflower puree is the genius ingredient, allowing us to build a rich, almost keto and friendly texture without relying solely on heavy cream or massive amounts of butter. When blended with a little hot stock, the roasted cauliflower creates a smooth, starchy paste that mimics the luxurious mouthfeel of high and fat dairy. It’s the trick I also use in my TwiceBaked Cauliflower: Ultimate Creamy, Cheesy Loaded Casserole .
Quick Overview: The Method Breakdown
The basic steps are simple, even if the result feels fancy. First, you roast the cauliflower to max out the flavor potential. Then, we use the classic risotto method sautéing the aromatics and toasting the rice.
Finally, we stir in the cauliflower puree and finish with a cold, shocking burst of butter and Parmesan.
Transforming Texture with Cauliflower Puree
The puree not only adds volume but also contributes to the desired crema (the creamy sauce). Because cauliflower is so high in fiber and a certain type of resistant starch, blending it introduces structure that binds the risotto perfectly.
This method delivers a truly low carb comfort food experience without sacrificing richness.
The Maillard Reaction: Unlocking Nutty Brown Butter Flavor
We kick off the risotto by melting the first batch of butter for the soffritto (aromatics). Don't just melt it; let it bubble and smell nutty, verging on brown butter. This adds tremendous savory depth that complements the roasted cauliflower beautifully.
This intense nutty flavor is what makes this a standout dish.
Arriving at Al Dente: The Starch Release Mechanism
The gradual stirring and adding of hot broth is essential because it encourages the rice grains to gently shed their starch. You must add the broth slowly, waiting until each ladleful is nearly absorbed before adding the next.
This gentle friction and hydration create the signature creamy suspension around the kernel, ensuring it’s tender but still has a slight bite al dente .
Essential Ingredients for the Best Cauliflower Risotto
Remember, good cooking starts with great ingredients, but sometimes you just have to work with what's in the pantry. Here’s what you need and what you can swap out.
| Ingredient | Role | Substitution |
|---|---|---|
| Arborio Rice | Starch source, texture base | Carnaroli or Vialone Nano (better texture retention); Pearl Barley (if low and carb isn't critical) |
| Vegetable/Chicken Broth | Liquid, depth of flavor | Water + 1/2 tsp bouillon paste (use low sodium if possible) |
| Parmesan Reggiano | Salty, umami finish | Pecorino Romano (sharper); Nutritional Yeast (for vegan options) |
| Dry White Wine | Acidity, flavor lift | Extra broth + a squeeze of lemon juice at the end, or dry sherry |
| Unsalted Butter | Fat, mouthfeel | Olive oil or high and quality vegan butter |
Choosing the Right Rice: Arborio vs. Carnaroli
Arborio is readily available and works wonderfully, but it can turn gluey if you look away for too long. If you can find Carnaroli, grab it; it's often called the "King of Risotto Rice" because it holds its shape better and is harder to overcook.
Either way, never wash the rice , as you’ll rinse away the crucial surface starch needed for creaminess.
Stock Selection: Homemade vs. Boxed Broth Quality
The stock makes up about 80% of the flavor in your final risotto, so don't grab the cheapest stuff. Use a good quality, low and sodium vegetable or chicken broth. I prefer vegetable broth here because I want the cauliflower flavor to shine, not compete with beef or heavy poultry notes.
Cheese and Fat Notes: Developing Savory Depth
We use unsalted butter at two different stages. The first batch, melted early on, acts as the cooking medium. The second batch, added cold right at the end (the mantecaura ), emulsifies the sauce and makes it incredibly creamy.
Use fresh Parmesan; the stuff in the green shaker container just doesn’t melt right and often contains anti and caking agents that ruin the texture.
Key Substitutions for Dairy and Free or Vegan Options
This roasted cauliflower risotto is naturally adaptable. Skip the butter in the soffritto stage and use olive oil instead. For the finishing step, replace the cold butter with chilled olive oil or vegan butter.
Instead of Parmesan, incorporate about a half cup of nutritional yeast with a pinch of extra salt for that umami cheesy flavor.
Chef's Note: If you want that extra richness without dairy, consider blending in a spoonful of cashew cream or even 1/4 cup of good quality, rich coconut milk (from the can, not the carton) into the puree.
Detailed Roadmap: How to Prepare Your Roasted Cauliflower Risotto
This method ensures deep flavor and maximum creaminess. Follow the rhythm!
Stage 1: Roasting and Blending the Cauliflower Base
- Preheat your oven to 400°F (200°C). Toss the cauliflower florets with olive oil, salt, and pepper. Spread them out on a sheet pan, giving them space to breathe. Do not crowd the pan.
- Roast for 20 to 25 minutes until the edges are beautifully caramelized and they smell nutty and sweet. Remove them from the oven.
- While the cauli is roasting, heat your broth and cream/mascarpone in a separate small saucepan and keep it gently simmering. This is one of the most important steps!
- Reserve about one cup of the prettiest, darkest florets for garnish later. Dump the rest into a blender. Add 1/2 cup of the hot broth mixture and blend until totally smooth. Set this velvety puree aside.
Stage 2: Sautéing and Toasting the Rice (Tostatura)
- Melt the first 2 tablespoons of butter in a large, heavy and bottomed pot over medium heat. Let it sizzle gently until the foam subsides and the butter smells nutty hello, brown butter flavor.
- Add the minced shallot and cook until completely softened and translucent, which takes about 3 to 4 minutes. Add the garlic, cooking for only one minute until fragrant; we don't want burnt garlic.
- Add the Arborio rice. Stir constantly for 2 minutes (the tostatura ). The grains should start smelling very nutty, and the edges will look slightly translucent. This toasting step prevents the rice from getting soggy later.
Stage 3: The Slow Simmer: Adding Broth Gradually
- Pour in the white wine. Stir vigorously until the wine is completely absorbed; this usually takes less than a minute. The acidity helps set the starches.
- Begin adding the hot broth, one ladleful (about 1/2 cup) at a time. Stir continuously until the liquid is almost fully absorbed before adding the next ladle. This slow rhythm is critical for starch release.
- Continue this patient stirring process for about 20 to 25 minutes. Keep tasting! You’re looking for al dente —tender outside, with a tiny bit of resistance in the center.
Stage 4: Mantecare: Finishing with Butter and Parmesan
- When the rice is al dente , remove the pot completely from the heat. This stops the cooking immediately.
- Stir in the prepared cauliflower puree. This thickens the risotto dramatically and gives it that glorious color.
- Vigorously stir in the cold cubed finishing butter and the grated Parmesan cheese. The cold fat helps emulsify the sauce, creating the perfect loose, flowing texture (called the onda , or wave). It should look like slow and moving lava.
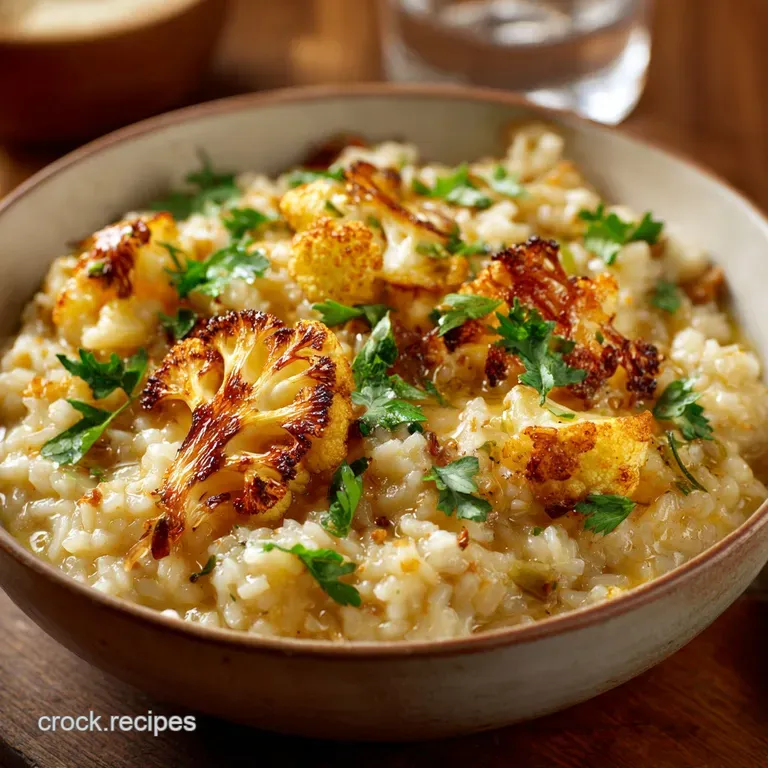
- Stir in the lemon zest, then check for seasoning. Add extra salt and pepper if needed. Cover the pot and let the risotto rest for 5 minutes don't skip this, ever. Serve immediately with the reserved roasted florets and extra cheese.
Chef’s Troubleshooting Guide and Expert Cooking Tips
Making risotto is like riding a bike: it takes practice, but once you get the technique, it’s automatic. Here are the places where most home cooks stumble.
Maintaining the Right Temperature of the Stock
The number one mistake people make is adding cold or room and temperature stock. Cold liquid shocks the rice, forcing the cooking process to pause and hardening the starch on the outside. This results in unevenly cooked rice that tastes less creamy.
Keep that broth gently simmering throughout the entire process!
Preventing Gluey or Overcooked Risotto
If your risotto is looking more like sticky rice pudding than a smooth, flowing dish, you’ve likely overcooked it or stirred too aggressively late in the process. Stop adding liquid the second the rice reaches al dente .
The 5 minute rest (mantecare stage) off and heat is essential for relaxing the starches without dissolving the rice completely.
Adjusting Consistency: Too Thick vs. Too Thin
If you find your risotto is too thick after the mantecare stage, stir in a splash of warm broth until it reaches that beautiful, flowing onda consistency. If it's too thin, you can stir vigorously over low heat for another minute or two, allowing the starch to thicken the sauce, or add a tiny knob of butter and more cheese off and heat.
Storage and Reheating Cauliflower Risotto
Risotto is always best eaten immediately, but life happens. Here’s how to handle leftovers without turning it into a sad, solid brick.
Best Practices for Immediate Refrigeration
Cool the risotto quickly by spreading it out on a sheet pan; this prevents bacterial growth and stops carryover cooking. Once cooled, transfer it to an airtight container. It will keep beautifully in the fridge for up to 3 days.
Be warned: It will become very firm as the starches gelatinize upon cooling.
Freezing Risotto: Yes or No?
You can freeze it, but I don't recommend it if you prioritize texture. When rice thaws, it tends to release water and become mushy. If you absolutely must freeze it, freeze it in small, single and serving portions right after cooling. It will keep for about 2 months.
Reheating Techniques for Optimal Texture
Never microwave a full batch! When reheating, add the cold risotto to a saucepan with a generous splash (about 1/4 cup per serving) of water or stock. Stir gently over low heat, adding more liquid slowly, until it loosens up and regains its creamy, liquid consistency.
It takes 5– 8 minutes, but it's totally worth the effort.
Perfect Pairings and Suggested Garnishes
This rich, creamy Roasted Cauliflower Risotto pairs well with anything bright, salty, or deeply caramelized.
- A Simple Side Salad: A simple arugula salad dressed with lemon and a pinch of salt cuts through the richness beautifully.
- Protein Focus: This makes a phenomenal side for lean grilled fish or a crisp, pan and seared pork chop.
- Vegetable Complement: We love serving this alongside a different preparation of the same vegetable, like my Roasted Cauliflower Steaks: Buttery and Tender and Deeply Caramelized for an elevated vegetarian meal.
- Garnishes That Pop: Freshly chopped parsley, a swirl of white truffle oil (if you’re feeling fancy), toasted pine nuts, or a final grating of lemon zest for brightness.

Recipe FAQs
Why is my risotto dry or not creamy enough?
This often happens if the stock is added too quickly or if the risotto is cooked past the al dente stage. Ensure you are stirring constantly to release the starches, and always finish by stirring in the brown butter and cheese vigorously off the heat (the mantecatura process) to achieve the final emulsification.
Can I make this Roasted Cauliflower Risotto completely vegan or dairy-free?
Yes, substitute the Parmesan cheese with nutritional yeast for a cheesy umami flavor, and replace the brown butter with olive oil or a high-quality vegan butter. Ensure your stock is vegetable based, and increase the amount of cauliflower puree slightly to compensate for the missing dairy fats.
Do I absolutely need to roast the cauliflower, or can I boil it instead?
Roasting is crucial for developing the deep, nutty and caramelized flavour profile that defines this recipe and elevates the dish beyond standard risotto. Boiling the cauliflower will yield a bland puree that lacks the complexity and sweetness necessary to stand up to the richness of the rice base.
What is the best way to store and reheat leftover risotto?
Store leftovers in an airtight container in the refrigerator for up to three days. To reheat, place the risotto in a saucepan with a splash of water or stock, stirring gently over low heat until warmed through; avoid using the microwave, as it tends to make the rice grainy and dry.
Why must I add the stock one ladleful at a time instead of dumping it all in?
Adding stock slowly is essential because the friction created by stirring the grains in minimal liquid releases the necessary starches from the Arborio rice, which is the mechanism that creates the signature creamy texture.
If you flood the rice, it will boil instead of absorbing the liquid gradually, resulting in a bland and watery consistency.
Can I use regular white rice (e.g., Basmati or Jasmine) instead of Arborio?
While technically possible, these types of rice have much lower starch content and will not achieve the desired creamy, slightly sticky texture required for risotto. For a proper, authentically textured dish, always use a high starch short grain Italian rice like Arborio or Carnaroli.
My risotto seems gummy and sticky, what went wrong?
A gummy texture usually indicates that the rice was overcooked or that you used too much heat and stirred too aggressively, causing the starch to break down excessively. Ensure you remove the risotto from the heat immediately when it reaches the al dente stage, where the rice grain still has a slight bite in the center.
Roasted Cauliflower Risotto Comfort

Ingredients:
Instructions:
Nutrition Facts:
| Calories | 732 kcal |
|---|---|
| Protein | 33.2 g |
| Fat | 46.8 g |
| Carbs | 42.7 g |
