Chocolate Covered Strawberries with Secret Snap Method
- Time: Active 20 minutes, Passive 40 minutes, Total 1 hour
- Flavor/Texture Hook: Velvety chocolate with a crisp shatter
- Perfect for: Romantic surprises, bridal showers, or elegant meal prep
- Chocolate Covered Strawberries with Secret Snap Method to Stop Sliding
- The Science of the Snap
- Planning Your Dipping Timeline
- The Essential Component Analysis
- Gear for a Pro Finish
- The Step by Step Process
- Fixing Common Dipping Mistakes
- Creative Flavor Variations
- Storage and Waste Prevention
- Beautiful Ways to Serve
- Recipe FAQs
- 📝 Recipe Card
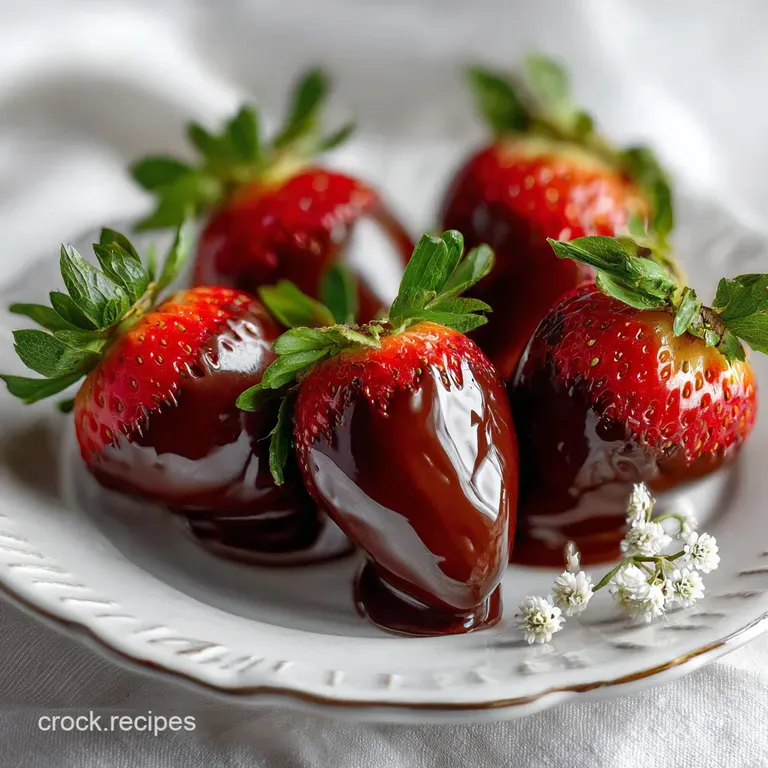
Chocolate Covered Strawberries with Secret Snap Method to Stop Sliding
Imagine the smell of dark, rich cacao melting over a gentle simmer, filling your kitchen with that comforting, heavy sweetness. I’ll never forget the first time I tried making these for a friend's engagement party.
I spent hours dipping, only to watch in horror as the chocolate literally slid off the berries like a wet coat, leaving a sticky, naked mess on the platter. It was a disaster, but it led me to the "snap" technique I'm sharing with you today.
This article unveils the key to flawless Chocolate Covered Strawberries with a Secret Snap Method to Stop Sliding. We aren't just dipping fruit in melted candy; we are creating a structural bond between the juice of the berry and the fat of the chocolate.
You'll get that professional grade crunch that sounds like a tiny glass ornament breaking when you bite into it, and honestly, it's the most satisfying thing you'll make all week.
We have all seen those sad, weeping berries in grocery store plastic bins. You deserve better than that. By the time we’re done, you’ll be the person everyone asks for the "secret" recipe, and you can just smile knowing it’s all about the prep and the temperature.
Let's get into how to make these actually stay together so you can focus on the eating part.
The Science of the Snap
Lipid Cellular Bonding: The addition of butter and coconut oil creates a flexible but firm fat structure that adheres to the microscopic pores of the strawberry skin. This prevents the natural moisture of the fruit from creating a lubricated layer that causes the shell to slide off.
| Method Type | Time Required | Texture Result | Best Use Case |
|---|---|---|---|
| Fresh Snap | 60 mins | Crisp shatter | High end events |
| Quick Shortcut | 20 mins | Soft fudge | Casual snacking |
| Frozen Dip | 45 mins | Hard shell | Summer treats |
Choosing the right method depends on how much you value that "crack." If you are looking for a more relaxed treat, the quick shortcut works, but for that professional finish, the Fresh Snap is the way to go. This reminds me of the texture in my Strawberry Swirl Cheesecake recipe where the balance of fat and fruit is everything.
Planning Your Dipping Timeline
Getting these right is all about the flow. You can't rush the drying phase, or you'll regret it later. I like to start by washing the berries the night before if I can, but if you're in a hurry, a hair dryer on the "cool" setting is a secret trick I've used more than once.
- Prep (20 mins): Wash, dry (triple check this!), and bring all ingredients to room temperature.
- The Melt (10 mins): Gently heating the chocolate with the "secret" fat additions until it's silky.
- The Set (30 mins): Allowing the berries to firm up in a cool, dry place (not the freezer!).
The Essential Component Analysis
| Ingredient | Science Role | Pro Secret |
|---|---|---|
| Strawberries | Cellular Foundation | Choose berries with long stems to use as natural dipping handles. |
| Chocolate | Structural Matrix | Use 60% cacao or higher for a better "snap" than milk chocolate. |
| Unsalted Butter | Emulsion Stabilizer | Room temperature butter ensures it incorporates without seizing the chocolate. |
| Coconut Oil | Gloss Agent | It lowers the melting point just enough to create a velvety mouthfeel. |
For this recipe, you will need 1 lb fresh strawberries that are large and firm. Soft berries will leak juice and ruin the coating. We are also using 10 oz high-quality semi sweet chocolate, which provides the best balance of sweetness.
The 1 tbsp unsalted butter and 1 tsp coconut oil are the non negotiables for the snap method.
If you don't have semi sweet chocolate, you can use dark chocolate for a more sophisticated bite. Just like in my Classic Peanut Butter recipe, the quality of your chocolate determines the final shine.
Gear for a Pro Finish
You don't need fancy machinery, but a few specific items make this much easier. A double boiler is ideal, but a heat proof glass bowl over a pot of simmering water works perfectly. Just make sure the bottom of the bowl doesn't touch the water, or you'll scorch the chocolate and it will turn grainy and bitter.
I often use my Crockpot on the "warm" setting if I'm doing a huge batch for a party. It acts as a perfect temperature controlled fondue pot. You'll also want parchment paper or a silicone baking mat. Don't use wax paper; the chocolate can actually bond to it, and you'll end up peeling paper off your dessert.
1. The Emulsion Bridge
Mixing the butter into the chocolate isn't just for flavor. It creates an emulsion that is more stable than plain chocolate. This bridge allows the fat to cling to the berry’s surface even as the fruit releases tiny amounts of moisture.
2. The Dehydration Phase
The biggest enemy of this recipe is water. Even a single drop in your chocolate will cause it to "seize," turning it into a clumpy, dry mess. I always use paper towels to pat each berry dry individually right before dipping.
3. Temperature Shock Control
We want the chocolate to set at room temperature first before hitting the fridge. If you move them to the cold too fast, you'll get "sugar bloom," those white dusty streaks that make the berries look old when they're actually fresh.
The step-by-step Process
- Wash and dry the 1 lb fresh strawberries. Why this? Even a tiny bit of moisture will cause the chocolate to slide off.
- Chop the 10 oz semi sweet chocolate into uniform pieces. Why this? Small pieces melt evenly, preventing hot spots that burn the fat.
- Set up a double boiler with 1 inch of water in the bottom pot.
- Melt the chocolate and 1 tsp coconut oil, stirring constantly until velvety and glossy.
- Whisk in 1 tbsp room temperature butter until the mixture is completely smooth.
- Hold a strawberry by the stem and dip it into the chocolate, swirling gently.
- Lift the berry and shake it slightly until the excess chocolate drips off.
- Place the berry onto parchment paper with a slight "tug" to the side to prevent a large puddle.
- Rest the berries at room temperature for 15 minutes until the shine starts to matte.
- Chill in the fridge for 20 minutes until the shell is hard and snaps.
Chef's Note: If your chocolate starts to thicken too much while dipping, put it back over the steam for 30 seconds. Never add water to thin it out; use a tiny bit more coconut oil instead.
Fixing Common Dipping Mistakes
Why Your Chocolate Slides
If the chocolate is sliding off, it’s almost always because the berries were too cold or too wet. When a cold berry hits warm chocolate, condensation forms instantly between the skin and the coating. It's like trying to walk on ice with smooth shoes.
| Problem | Root Cause | Solution |
|---|---|---|
| Chocolate sliding | Surface moisture | Pat dry with a fresh towel seconds before dipping. |
| Grainy texture | Overheated chocolate | Use a thermometer; don't exceed 110°F. |
| White streaks | Temperature shock | Let set at room temperature before refrigerating. |
Between these technical fixes, remember that the environment matters. If it's a humid day, your chocolate will take twice as long to set. I usually turn on the AC or a fan to keep the kitchen air dry while I work.
Common Mistakes Checklist
- ✓ Never dip berries straight from the fridge; let them reach room temperature.
- ✓ Use a deep, narrow bowl for dipping to get better coverage with less chocolate.
- ✓ Don't skip the butter; it's the "glue" in this secret snap method.
- ✓ Check that your bowl and spatula are bone dry before starting.
- ✓ Avoid over stirring the chocolate once it's melted to prevent air bubbles.
Creative Flavor Variations
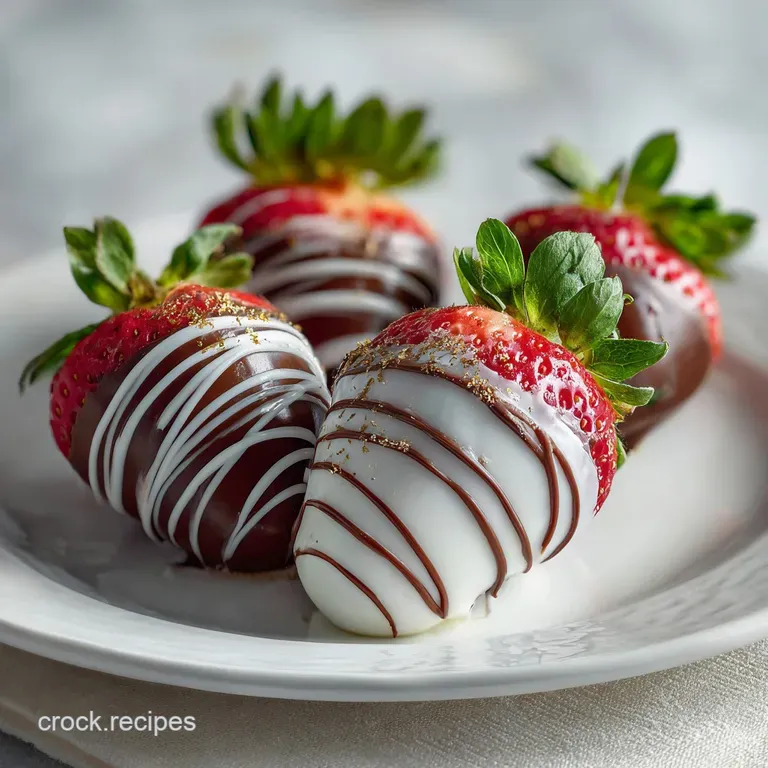
You can really have fun once you've mastered the base. I love rolling the wet chocolate in crushed pistachios or toasted coconut. If you want a "tuxedo" look, dip them in dark chocolate first, let them set, and then do a half dip in white chocolate.
1. The Tuxedo Twist
This is the classic look for weddings. After the dark chocolate has set, use a piping bag with a tiny hole to drizzle white chocolate in a "V" shape. It looks high effort but takes about two minutes once you get the rhythm.
2. Texture Boosting Ideas
Try adding a pinch of flaky sea salt to the chocolate right after dipping. The salt cuts through the richness and highlights the natural tartness of the strawberry. It’s a total game changer for people who don’t like overly sweet desserts.
| Original Ingredient | Substitute | Why It Works |
|---|---|---|
| Semi Sweet Chocolate | Dark Chocolate (70%) | Provides a deeper flavor. Note: May require 1/2 tsp extra coconut oil. |
| Unsalted Butter | Cocoa Butter | More authentic snap. Note: Harder to find in regular grocery stores. |
| Coconut Oil | Vegetable Shortening | Creates a similar gloss. Note: Lacks the subtle flavor of coconut. |
Storage and Waste Prevention
These are best eaten the day they are made. Strawberries are mostly water, and as they sit, that water starts to break down the fruit's structure. If you have leftovers, keep them in a single layer in a container lined with paper towels to absorb any escaping moisture.
Don't throw away the leftover chocolate! I scrape the bottom of the bowl onto a piece of parchment, let it harden, and chop it up for cookies later. Or, better yet, dip some pretzel rods or dried apricots in the remaining warm chocolate so nothing goes to waste.
- Fridge:24 hours (best within 12).
- Freezer: Not recommended for fresh berries (they turn to mush), but frozen chocolate dipped berries are a great "smoothie" base.
- Zero Waste: Use leftover chocolate for a quick drizzle over oatmeal or yogurt.
Beautiful Ways to Serve
Presentation is half the battle. I like to serve these on a white marble slab because it stays cool and looks sophisticated. If you're bringing these to a party, put each berry in a mini cupcake liner.
It prevents them from touching each other and makes them much easier for guests to grab without getting chocolate on their fingers.
If you want to go all out, serve them alongside a glass of dry sparkling wine. The bubbles cleanse the palate between the rich chocolate and the juicy berry. It's a classic pairing for a reason! Just remember to keep them out of direct sunlight, or that "secret snap" will turn into a "secret melt" pretty quickly.
Trust me, once you hear that first "snap" and see the chocolate staying perfectly in place, you’ll never go back to the basic dipping method again. It's a small change in technique that makes a massive difference in the final result. Happy dipping!

Recipe FAQs
Why is my chocolate sliding off my strawberries?
The berries were likely too cold or too wet. Cold fruit immediately creates condensation when dipped, forming a slick barrier that prevents the chocolate's fat from adhering properly.
What is the secret to chocolate covered strawberries?
Adding room temperature butter and coconut oil to the melted chocolate. This stabilized fat mixture creates a stronger, more flexible coating that grips the fruit's exterior better than pure tempered chocolate.
Should I use parchment or wax paper for chocolate covered strawberries?
Use parchment paper or a silicone baking mat. Wax paper can sometimes bond to the cooling chocolate shell, causing you to peel paper off your coating when trying to remove the berry.
What should I absolutely not do when making chocolate covered strawberries?
Do not dip berries straight from the refrigerator. Allowing the berries to come to room temperature prevents the immediate temperature shock that causes moisture seepage and sliding chocolate.
How do I fix chocolate that looks dull or has white streaks (bloom)?
Set the dipped berries at room temperature first before chilling them in the fridge. Rapidly cooling the coated berries causes sugar bloom, leading to that unattractive dusty white exterior.
How do I ensure the chocolate mixture stays perfectly fluid for dipping?
Use a low, controlled heat source, like a double boiler or a Crockpot on "warm." If the chocolate thickens, add a tiny bit more coconut oil never add water, which will cause it to seize.
How long do I have to wait after dipping before I can eat them?
Allow them to set at room temperature for 15 minutes, then chill for 20 minutes. This two-step process encourages the best "snap" texture; rushing them into the fridge causes the sugar bloom effect.
Snap Method Strawberry Dip
Ingredients:
Instructions:
Nutrition Facts:
| Calories | 68 kcal |
|---|---|
| Protein | 0.7 g |
| Fat | 4.2 g |
| Fiber | 1.1 g |
| Sugar | 6.4 g |
| Sodium | 3 mg |
