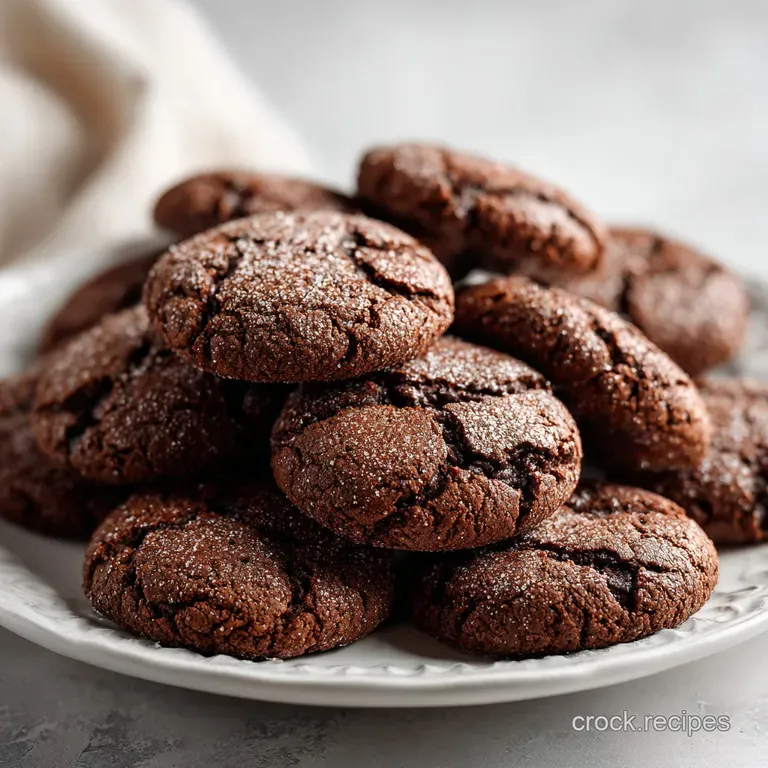
Soft Chocolate Sugar Cookies: Chewy and Velvety
- Time: Active 10 minutes, Passive 8 minutes, Total 18 minutes
- Flavor/Texture Hook: A velvety, melt in-your mouth crumb with a crackly sugar crust.
- Perfect for: Holiday gift boxes, cozy afternoon tea, or satisfying a late night chocolate craving.
- Perfecting These Soft Chocolate Sugar Cookies
- Why This Works
- Vital Stats for This Batch
- Choosing Your Baking Components Wisely
- Must Have Tools for Cookies
- Mastering the Mixing and Baking
- Solving Your Cookie Baking Struggles
- Creative Swaps and Flavor Twists
- Keeping Every Single Bite Fresh
- Serving Ideas for Pure Comfort
- Scaling Your Dough for Crowds
- Debunking Popular Cookie Baking Myths
- Recipe FAQs
- 📝 Recipe Card
Perfecting These Soft Chocolate Sugar Cookies
We have all been there: you pull a tray of dark, promising cookies out of the oven, wait for that first bite, and find yourself chewing on something with the texture of a dry sponge. It is heart breaking. A chocolate cookie should never be "bread like" or dusty.
I remember one specific Tuesday afternoon when I tried a recipe that promised "pillowy" results, only to end up with cookies so dry they practically dissolved into sand in my mouth. That is the exact problem we are solving today. These are not those cookies.
These soft chocolate sugar cookies are designed to be substantial, hearty, and intensely satisfying. We are aiming for a texture that yields easily to the tooth, almost like a truffle in cookie form, but with that classic sugar cookie sparkle on the outside.
The secret lies in how we handle the fats and the specific type of cocoa powder we choose. If you have struggled with cookies that turn into hard hockey pucks the moment they cool down, this method is your targeted fix.
What you can expect here is a recipe that works quickly but delivers professional level flavor layers. We aren't just dumping ingredients into a bowl; we are building a structure that locks in moisture.
By the time that timer dings at 8 minutes, your kitchen will smell like a high end chocolatier's shop. Let's get into why this specific combination of ingredients creates such a consistent, reliable result every single time you preheat the oven.
Why This Works
- Hybrid Fat Stability: Combining 226g of softened butter with 15ml of vegetable oil creates a unique fat structure. The butter provides that hearty, classic flavor we crave, while the oil remains liquid at room temperature, ensuring the cookies stay soft and pliable even after they have cooled completely.
- Alkalized Cocoa Depth: Using 60g of Dutch process cocoa powder is vital because it has been treated to reduce acidity. This results in a darker color and a smoother, more mellow chocolate profile that doesn't compete with the tang of the cream of tartar.
- Texture Modulation: The 1 tsp of cream of tartar acts as a secret weapon. In a sugar cookie context, it prevents sugar from recrystallizing too firmly, which is what gives the center that signature "melt away" chewiness rather than a snappy crunch.
- Aeration Control: Beating the butter and 300g of sugar for exactly 3 minutes creates tiny air pockets. These pockets expand in the heat, giving the cookie a slight lift without turning it into a cake, maintaining that satisfying density.
| Feature | Fresh Homemade Version | store-bought Shortcut |
|---|---|---|
| Texture | Velvety and supple | Often waxy or overly crumbly |
| Flavor Profile | Deep cocoa with vanilla finish | High sugar, muted chocolate |
| Longevity | Stays soft for 4-5 days | Hardens within 24 hours |
The difference between a fresh batch and a shortcut version often comes down to the quality of the fats. While a store-bought mix might rely on hydrogenated oils for shelf life, our use of real butter and a splash of grapeseed or vegetable oil provides a far more luxurious mouthfeel.
Vital Stats for This Batch
When it comes to baking, precision is the difference between a "good" cookie and one people beg you to make every weekend. We are working with a very specific set of numbers here to ensure the crumb is exactly where it needs to be.
For instance, the size of the dough ball directly impacts how the heat penetrates the center. A 1 inch ball is the sweet spot; it's small enough to bake through in 8 minutes but large enough to keep a soft, slightly underdone core.
| Thickness | Internal Temp | Rest Time | Visual Cue |
|---|---|---|---|
| 1/2 inch (baked) | 175°F (79°C) | 5 minutes | Edges set, center looks "dull" |
| 3/4 inch (baked) | 180°F (82°C) | 8 minutes | Slight cracking on the sugar crust |
| 1/4 inch (baked) | 165°F (74°C) | 2 minutes | Very soft, fragile when hot |
Remember that cookies continue to cook on the hot baking sheet once they leave the oven. This is known as carryover cooking. If you wait until they look completely firm in the oven, they will be overdone by the time you eat them.
Trust the 8 minutes timer; it's the golden rule for this specific hydration level.
Choosing Your Baking Components Wisely
The heart of this recipe is the 315g of all purpose flour. It provides just enough protein to give the cookie structure without making it tough. If you were to swap this for cake flour, the cookies would be too delicate to hold their shape; bread flour would make them unpleasantly chewy like a bagel.
We want that middle ground.
| Component | Science Role | Pro Secret |
|---|---|---|
| Dutch Process Cocoa | Provides color and base flavor | Sift it twice to remove stubborn lumps |
| Cream of Tartar | Inhibits sugar crystallization | Keeps the center "fudgy" and soft |
| Granulated Sugar | Sweetens and aids in browning | Use extra fine for a better crust sparkle |
| Vegetable Oil | Moisture retention | Grapeseed oil offers the cleanest flavor |
Ingredient Substitutions
| Original Ingredient | Substitute | Why It Works |
|---|---|---|
| 226g Unsalted Butter | Salted Butter | Adds a savory note; omit the extra sea salt. |
| 60g Dutch Process Cocoa | Natural Cocoa Powder | Note: Result will be lighter in color and more acidic. |
| 15ml Grapeseed Oil | Melted Coconut Oil | Adds a very faint tropical aroma; same fat ratio. |
| 1 tsp Cream of Tartar | 1 tsp Lemon Juice | Provides acidity, though texture may vary slightly. |
I always tell my friends that if you're out of Dutch process cocoa, don't panic, but do expect a different cookie. Natural cocoa reacts differently with baking soda. For the most satisfying, dark as-night look, stick to the Dutch process.
It makes the 300g of sugar pop against the bitterness of the cocoa in a way that feels incredibly balanced.
Must Have Tools for Cookies
You don't need a professional laboratory to make these, but a few specific items make the process much smoother. A stand mixer is your best friend here because beating butter and sugar for 3 minutes by hand is a workout nobody needs.
If you're using a hand mixer, just keep an eye on the clock to ensure you're getting enough air into that butter.
A fine mesh sieve is also non negotiable. Cocoa powder is notorious for clumping in the pantry. If you don't sift it into your 315g of flour, you'll end up with bitter explosions of dry powder in your finished cookies. It only takes a minute, but it changes the entire professional feel of the bake.
Finally, use a parchment lined baking sheet or a silicone mat. Chocolate doughs can be sticky, and there is nothing worse than a cookie that leaves half of its bottom stuck to the metal.
Mastering the Mixing and Baking
- In a large mixer bowl, combine the 226g of softened butter and 300g of granulated sugar. Note: Using room temperature butter is crucial for proper aeration.
- Beat on medium high speed for 3 minutes. Stop when the mixture looks pale, fluffy, and significantly increased in volume.
- Add the large egg, 2 tsp of vanilla extract, and the 15ml of vegetable oil.
- Beat for another 1 minute. Watch for the mixture to become thick, glossy, and fully emulsified.
- Sift the 315g of flour, 60g of cocoa powder, 1 tsp cream of tartar, 1 tsp baking soda, and 0.5 tsp salt into the wet ingredients.
- Fold the mixture using low speed or a spatula. Stop the moment no white streaks remain to avoid overworking the gluten.
- Scoop rounded tablespoons of dough and roll them into 1 inch balls between your palms.
- Roll each ball in the 24g of extra granulated sugar. Ensure an even coating for that signature crackle.
- Place balls 2 inches apart on the prepared sheets and bake at 350°F (175°C) for 8 minutes. Remove when the edges are set but the centers still look slightly soft.
- Allow to cool on the pan for 5 minutes before moving to a wire rack.
Solving Your Cookie Baking Struggles
One of the most common issues people face is the "Greasy Spread." This usually happens if the butter was too warm to start with or if the kitchen is particularly humid. If your cookies look like flat puddles, it's a sign the fat melted before the flour structure could set.
Another frequent headache is a "Cakey Texture." This usually stems from over beating the egg or using too much flour. If you don't have a scale to measure your 315g of flour, make sure you're using the "spoon and level" method rather than scooping directly with the cup.
Why Your Cookies Stay Thick
If your cookies didn't spread at all and stayed in tight little balls, your oven might be too cold, or you may have added too much flour. It could also be that your baking soda is past its prime. Baking is a series of chemical reactions, and if the leavening agent isn't active, the dough won't expand and collapse into that perfect chewy disc. If you want a cookie with more height, you can check out my NY Style Chocolate Chip Cookies which use a completely different temperature strategy to maintain that massive thickness.
| Problem | Root Cause | Solution |
|---|---|---|
| Excessive Spreading | Butter was too soft/melted | Chill dough for 30 mins before baking |
| Dry/Crumbly Texture | Overbaked or too much flour | Reduce bake time to 7 mins; weigh flour |
| Dull Surface | Not enough sugar for rolling | Roll twice in sugar for a thicker crust |
Common Mistakes Checklist
- ✓ Never use cold butter; it won't trap the air needed for a soft crumb.
- ✓ Don't skip the sifting step; cocoa lumps will ruin the texture.
- ✓ Avoid over mixing once the flour is added; this keeps them tender.
- ✓ Check your oven temperature with an external thermometer to ensure it's truly 350°F.
- ✓ Use a cookie scoop for uniform 1 inch balls so they all bake at the same rate.
Creative Swaps and Flavor Twists
While these soft chocolate sugar cookies are incredible on their own, they are also a fantastic canvas for experimentation. If you want to lean into the "flavor layers" aspect, consider adding a pinch of espresso powder to the dry ingredients.
It doesn't make the cookies taste like coffee; it simply intensifies the 60g of cocoa powder, making it taste more like expensive dark chocolate.
Mexican Hot Chocolate Version
Add 1 tsp of ground cinnamon and a tiny pinch of cayenne pepper to the flour mixture. When you roll the dough balls in the extra 24g of sugar, mix a little extra cinnamon into that sugar too.
The heat from the pepper and the warmth of the cinnamon against the dark cocoa creates a complex, satisfying experience that is perfect for cold nights.
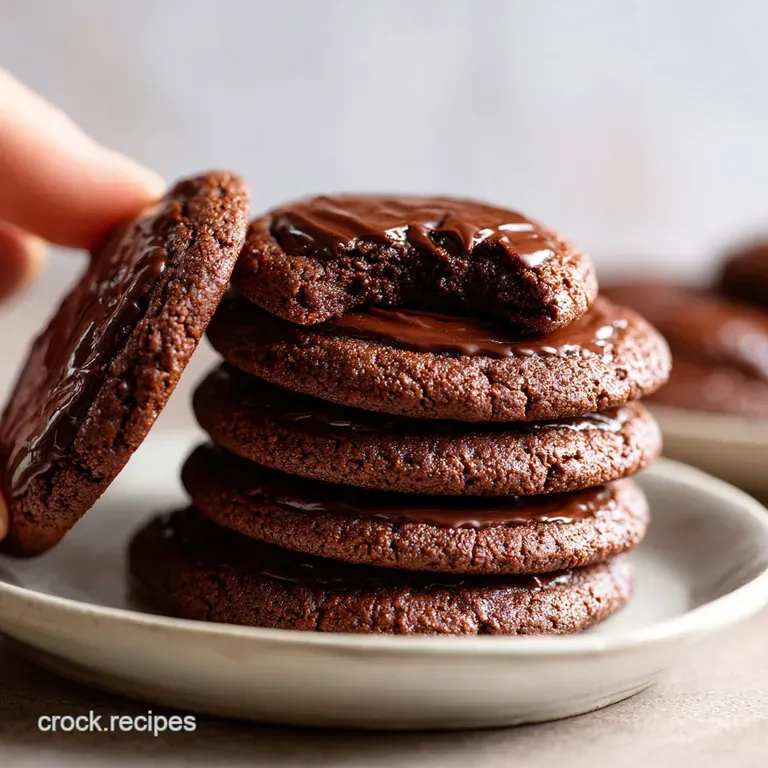
The Double Chocolate Punch
If you are a true chocoholic, fold in 100g of mini semi sweet chocolate chips after you've mixed the dough. Because the dough is already quite rich, the mini chips provide little bursts of melted chocolate without overwhelming the soft sugar cookie base. If you're looking for a different kind of holiday treat, you might also enjoy my Classic Christmas Cookies which offer a more traditional buttery base that pairs well with these chocolate ones on a platter.
Keeping Every Single Bite Fresh
Storing these cookies correctly is the difference between a four day treat and a one day wonder. Because we used 15ml of oil, they naturally hold onto moisture better than an all-butter cookie. However, they are still susceptible to the air.
Always wait until the cookies are completely cool before putting them in a container. If they are even slightly warm, they will create steam, which turns that beautiful sugar crust into a sticky, soggy mess.
For long term storage, these cookies freeze beautifully. You can freeze the baked cookies in a single layer on a tray before transferring them to a zip top bag. They will stay fresh for up to 3 months.
When you're ready to eat one, just let it sit at room temperature for 15 minutes, or give it a quick 10 second zap in the microwave to return it to that "just out-of the-oven" softness.
Zero Waste Tip: If you find yourself with a few cookies that have finally gone stale, don't toss them! Pulse them in a food processor to create chocolate cookie crumbs. These are amazing as a base for a cheesecake or sprinkled over vanilla bean ice cream.
You can also use the leftover 24g of rolling sugar (if any remains) in your morning coffee for a hint of cocoa infused sweetness.
Serving Ideas for Pure Comfort
There is something inherently nostalgic about a chocolate sugar cookie and a cold glass of milk, but we can do better than that. For a more "adult" dessert, serve these warm with a scoop of salted caramel gelato. The contrast between the cold gelato and the soft, dark cookie is absolutely divine.
The salt in the caramel pulls out the hidden notes in the 0.5 tsp of sea salt we added to the dough.
If you are hosting a gathering, these look beautiful stacked on a white ceramic pedestal. Since they are rolled in sugar, they catch the light and look far more sophisticated than a standard drop cookie. You can also turn them into ice cream sandwiches.
Take two cookies, place a scoop of peppermint ice cream in the middle, and gently press them together. The softness of the cookie means you can bite through the whole sandwich without the ice cream squeezing out the sides a common flaw with harder cookies!
Scaling Your Dough for Crowds
Sometimes 24 cookies just aren't enough. If you're baking for a school bake sale or a large holiday party, you'll need to scale this up. When doubling the recipe, you can generally just double all the ingredients, but pay close attention to your mixer's capacity.
A standard 5 quart mixer can usually handle a double batch of this dough, but a triple batch might start to climb up the beaters.
Scaling Down (Half Batch): To make 12 cookies, halve everything. Since the recipe calls for 1 large egg, beat the egg in a small bowl first, then use exactly 25g (about half) of the beaten egg. This ensures your moisture levels remain perfect. Reduce the 15ml of oil to 7.5ml (1.5 tsp).
Scaling Up (Double Batch): For 48 cookies, double all weights. You'll use 630g of flour and 120g of cocoa. I recommend using two separate baking sheets and swapping their positions in the oven halfway through the 8 minutes to ensure even airflow, or better yet, bake one sheet at a time for the most consistent results.
Debunking Popular Cookie Baking Myths
One of the biggest myths in the baking world is that you must chill every cookie dough for at least 24 hours. While chilling does help certain high butter recipes, these soft chocolate sugar cookies are designed to be baked immediately.
The inclusion of the 15ml of oil and the specific ratio of 315g of flour means the dough has enough structural integrity to hold its shape right away. In fact, if you chill this dough too long, the cocoa can make it quite stiff and difficult to roll into those 1 inch balls.
Another misconception is that "more leavening equals softer cookies." Many people think if 1 tsp of baking soda is good, 2 tsp must be better. In reality, too much leavening will cause the cookies to puff up and then collapse, leading to a wrinkled, tough texture.
The balance of 1 tsp soda and 1 tsp cream of tartar is precisely calibrated to give you that "soft set" center without the metallic aftertaste that comes from excess leavening agents. Stick to the numbers, and you'll be rewarded with a satisfyingly chewy, dark chocolate dream.

Recipe FAQs
What is the secret to making soft cookies?
Aeration is the key. You must beat the softened butter and 300g of sugar on medium high speed for a full 3 minutes to trap air, which provides the necessary lift for a tender crumb. If you enjoyed mastering this creaming technique, see how we apply the same fat-sugar balance to create a perfectly soft and chewy texture in our other cookie recipes.
How do I make my sugar cookies softer?
Bake exactly for 8 minutes at 350°F. Removing them while the centers still look slightly soft is critical, as they finish firming up on the hot baking sheet after you pull them out of the oven.
What is the trick to making soft chocolate chip cookies?
Do not overmix after adding the flour. Use a low speed or a spatula to fold the dry ingredients until just combined, as excessive mixing develops gluten that leads to a tough, bready cookie instead of a tender one.
Which cookies are good for diabetics?
No, this is a common misconception. These cookies contain significant amounts of granulated sugar and flour, so they are not suitable for a diabetic diet.
Is it true I can use cold butter to save time?
No, this is a common misconception. Cold butter prevents the proper aeration required for a soft texture and will result in a dense, heavy cookie rather than a light, fluffy one.
How to ensure my cookies don't turn out dry?
Sift your dry ingredients thoroughly. Skipping the sifting step allows cocoa lumps to remain, which creates uneven pockets of dry powder that ruin the final texture of the cookie.
How to keep cookies uniform in size?
Use a cookie scoop to form consistent 1 inch balls. Uniform sizing ensures that every cookie finishes baking at the exact same rate, preventing small cookies from burning while larger ones remain raw.
Soft Chocolate Sugar Cookies

Ingredients:
Instructions:
Nutrition Facts:
| Calories | 181 calories |
|---|---|
| Protein | 2.2g |
| Fat | 8.9g |
| Carbs | 25g |
| Fiber | 1.3g |
| Sugar | 13.5g |
| Sodium | 96mg |
