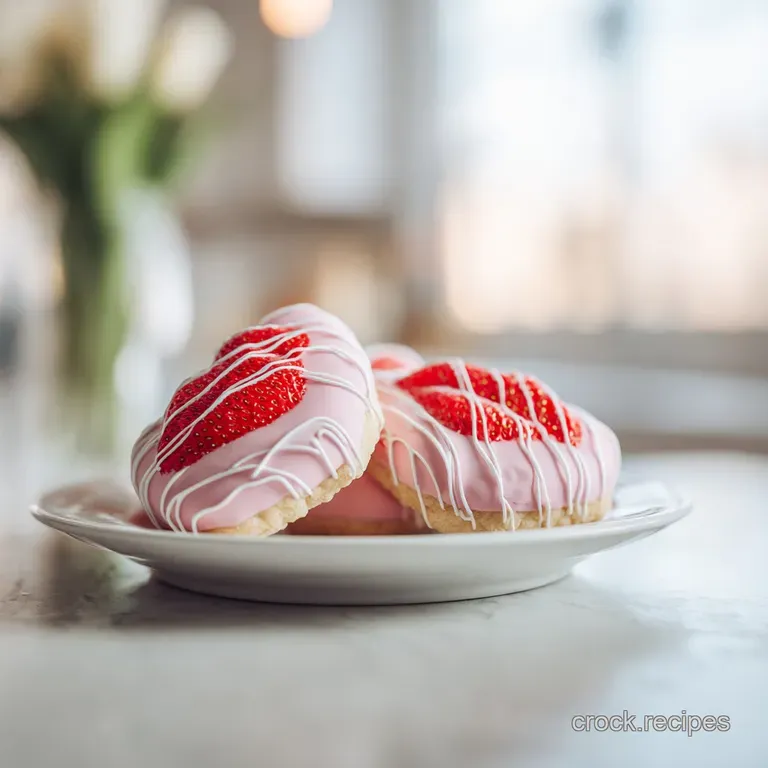
Strawberry Kiss Cookies: Fudgy and Chewy
- Time: Active 45 minutes, Passive 10 minutes, Total 55 minutes
- Flavor/Texture Hook: Fudgy strawberry base with a shatter crisp sugar crust and a velvety chocolate center.
- Perfect for: Valentine's Day parties, spring bake sales, or rainy afternoon comfort bakes.
- Making The Best Strawberry Kiss Cookies
- Why This Works
- Vital Stats and Prep Times
- Choosing Your Vibrant Baking Elements
- Essential Kitchen Tools and Gear
- Steps for Perfect Pink Cookies
- Fixing Common Cookie Baking Flaws
- Creative Swaps and Flavor Variations
- Freshness Tips and Storage Secrets
- Presentation and Pairing Party Ideas
- Recipe FAQs
- 📝 Recipe Card
Making The Best Strawberry Kiss Cookies
There is something truly nostalgic about the smell of strawberry cake mix wafting through a warm kitchen. It reminds me of the first time I tried to bake something for a school fundraiser back in middle school.
I remember the kitchen being covered in a fine dusting of pink powder and the excitement of seeing those bright, sunset pink rounds emerge from the oven. These aren't just cookies; they are a bite sized celebration that brings a splash of color to any dessert table.
When you pull these out of the oven, the aroma is thick and sweet, like a fresh strawberry milkshake. The way the dark chocolate "kiss" sits right in the center, surrounded by a crackled, sugar dusted surface, makes them look much more professional than their simple ingredient list suggests.
I’ve made plenty of mistakes with these over the years, from squashing the chocolate too early to letting the dough get too warm, but those lessons are exactly what make this version so satisfying to bake today.
Getting that signature "crackle" on the top while keeping the inside soft and tender is the real goal here. You want a cookie that feels substantial and hearty, not airy or dry like a piece of actual cake.
We achieve that by tweaking the traditional cake mix instructions, focusing on fat and moisture to transform a box of powder into a gourmet treat. It’s about building layers of flavor, starting with the berry base and finishing with that iconic chocolate peak.
Why This Works
The secret to these cookies lies in the balance of fats and the "shock" treatment we give the chocolate. While many recipes just tell you to "mix and bake," there are a few subtle things happening under the hood that ensure these don't turn into flat pink puddles on your tray.
- Protein Denaturation: The two large eggs provide the structural "net" that holds the heavy strawberry dough together, preventing the cookies from spreading too thin during the 10 minutes of baking.
- The Freeze Barrier: Freezing the chocolate for 30 minutes creates a temperature buffer. This ensures the chocolate softens into a velvety texture without losing its iconic "kiss" shape when pressed into the hot dough.
- The Sugar Shield: Rolling the dough in granulated sugar creates a physical barrier that dries out the surface quickly in the oven, leading to that beautiful, crackled "shatter" texture on the outside while the inside stays moist.
| Cookie Thickness | Internal Setting | Rest Time | Visual Cue |
|---|---|---|---|
| 1 inch ball | Firm edges | 5 minutes | Slight crackle on top |
| 1.5 inch ball | Soft center | 8 minutes | Edges barely golden |
| 0.5 inch ball | Fully crisp | 3 minutes | Deep pink and matte |
Finding the right balance of heat and time is essential for these. If you bake them a minute too long, the vibrant pink starts to turn a dull tan, and you lose that "wow" factor. But when you time it just right, the contrast between the soft berry dough and the snap of the sugar coating is pure comfort.
Vital Stats and Prep Times
When you are planning your baking session, timing is everything, especially since we have a mandatory chilling step for the chocolate. You cannot skip the freezer time for the Hershey's Kisses.
If you try to use room temperature chocolate, it will turn into a messy puddle the second it touches the warm cookie, and you will lose that satisfyng mountain shape.
It is helpful to think of this recipe in phases. First, the "set up" phase where the chocolate chills and you prep your pans. Then, the "mixing" phase where we build the dough. Finally, the "assembly" phase where the rolling and baking happen.
This isn't a recipe you want to rush, even though it only takes about 55 minutes total. The dough is thick and can be a bit sticky, so having your parchment paper ready and your sugar in a shallow bowl will keep things moving smoothly.
One trick I’ve learned is to unwrap the chocolate while the oven is preheating. It’s a tedious task that feels like it takes forever if you do it while the cookies are already baking. Get it out of the way early so you can focus on the dough.
Since this recipe yields exactly 24 cookies, it’s a great standard batch for a medium sized party or a weekend treat for the family.
| Component | Science Role | Pro Secret |
|---|---|---|
| Unsalted Butter | Provides fat for a fudgy, dense texture. | Use softened, not melted, to prevent over spreading. |
| Large Eggs | Acts as the binder and provides lift. | Room temperature eggs incorporate into the mix much faster. |
| Cake Mix | Provides the flour, sugar, and berry aromatics. | Sift the mix first to remove any stubborn lumps. |
| Granulated Sugar | Creates the exterior crunch and "crackle" look. | Use a deep bowl to ensure even, heavy coating. |
Using the cake mix as a base is a brilliant shortcut because it already contains the stabilizers needed for a consistent crumb. However, adding that extra 0.25 tsp of salt is my personal "flavor" secret. It cuts through the sugar and makes the strawberry notes feel much more authentic and less like a candy shop.
Choosing Your Vibrant Baking Elements
You want to use a standard 15.25 oz box of strawberry cake mix for this. I usually reach for a well-known brand like Betty Crocker or Duncan Hines because their moisture ratios are very predictable.
If you use a "moist" or "extra pudding" version of a mix, you might find the dough a little softer, which is where a quick 10 minute chill for the dough can help before rolling.
- Strawberry Cake Mix (1 box): The backbone of the recipe. Why this? It provides the concentrated berry flavor and the iconic pink hue instantly.
- Large Eggs (2 total): Why this? They provide the necessary structure to turn cake batter into a sturdy cookie.
- Unsalted Butter (0.5 cup): Make sure this is softened to room temperature. Why this? Butter adds a richness that oil based cake recipes lack.
- Pure Vanilla Extract (1 tsp): Why this? It rounds out the sweetness and adds a "homemade" floral aroma.
- Salt (0.25 tsp): Why this? A tiny amount balances the sugar and enhances the strawberry profile.
- Hershey’s Kisses (24 count): Why this? The classic chocolate pairing that makes these "blossom" style cookies.
- Granulated Sugar (0.5 cup): Why this? Provides the "shatter" texture and prevents the dough from sticking to hands.
If you find yourself out of unsalted butter, you can use salted butter, but you should omit the extra 0.25 tsp of salt mentioned in the recipe. The goal is a satisfying, balanced sweetness, not a salty cookie.
For the chocolate, while milk chocolate is the standard, dark chocolate kisses provide a wonderful bitter contrast to the sweet strawberry base.
Essential Kitchen Tools and Gear

You don't need a professional laboratory to make these, but a few specific tools will make your life significantly easier. I always recommend using a stand mixer or a sturdy electric hand mixer.
The dough for Strawberry Kiss Cookies is surprisingly thick much thicker than a standard cake batter and trying to mix it by hand with a wooden spoon will give your forearms a workout you didn't ask for.
A cookie scoop is another non negotiable for me. To get that uniform "bakery" look, each ball of dough needs to be the same size. A tablespoon sized scoop ensures that all 24 cookies bake at the exact same rate.
If some are bigger than others, the small ones will get crunchy and brown while the large ones stay raw in the middle. Consistency is the key to that velvety, tender crumb we are after.
I also swear by parchment paper or silicone mats (like a Silpat). Strawberry dough has a high sugar content, which means it loves to stick to bare metal pans. Using a liner not only prevents sticking but also helps the heat distribute more evenly across the bottom of the cookie.
This prevents the bottoms from burning before the centers are set.
| Tool | Recommended Type | Benefit |
|---|---|---|
| Baking Sheet | Heavy duty rimmed sheet | Prevents warping and ensures even heat distribution. |
| Cookie Scoop | 1 tablespoon size | Guarantees all 24 cookies are identical in size. |
| Cooling Rack | Wire mesh | Allows air to circulate, preventing "soggy" cookie bottoms. |
Speaking of heat, a reliable oven thermometer is a great investment. Many ovens run 10 or 20 degrees off the target, and with a delicate 10 minutes bake time, being off can ruin the color of your cookies. If your oven is too hot, the strawberry pink will turn into a toasted orange brown very quickly.
Steps for Perfect Pink Cookies
The process of building flavor in these cookies happens in stages. First, we develop the berry base, then we add the textural sugar layer, and finally, we crown it with the chocolate.
It is a simple progression, but paying attention to the sensory cues in each step will ensure you get that hearty, satisfying result every single time.
- Prep the Chocolate: Unwrap the Hershey's Kisses and place them in a bowl in the freezer for at least 30 minutes. Note: This prevents the chocolate from melting into a puddle when it hits the hot cookie.
- Combine the Base: In a large mixing bowl, combine the strawberry cake mix, eggs, softened butter, vanilla extract, and salt. Use an electric mixer to beat on medium speed until a thick, uniform pink dough forms. Watch for the dough to pull away from the sides of the bowl.
- Heat the Oven: Preheat your oven to 350°F (175°C) and line two baking sheets with parchment paper or silicone mats.
- Roll the Balls: Portion the dough into 1 inch balls using a tablespoon sized cookie scoop. Roll each ball in your hands until smooth, then roll thoroughly in the granulated sugar. The dough should be completely covered in a white sugar "crust."
- Arrange for Baking: Place the sugar coated balls 2 inches apart on the prepared baking sheets. Note: They will spread slightly, so don't crowd them.
- The Quick Bake: Bake for 9 to 11 minutes until the edges are just set and the tops show a slight crackle. Do not wait for them to brown; they should still look bright pink.
- The "Kiss" Moment: Remove the cookies from the oven and immediately press a frozen Hershey's Kiss into the center of each warm cookie. You will hear a soft "squish" as the cookie cracks slightly around the chocolate.
- The Set Stage: Transfer to a wire rack to cool completely. Note: The chocolate will soften from the residual heat and then firm back up as it cools.
When you are pressing the chocolate in, do it gently but firmly. If you press too hard, you might split the cookie all the way to the edge. You want those beautiful "spiderweb" cracks that bloom out from the center. This is the stage where the cookies look their most festive. For another vibrant treat that uses similar flavor profiles, you might enjoy making pink strawberry cheesecake cookies for your next gathering.
Fixing Common Cookie Baking Flaws
Even the most seasoned bakers run into trouble sometimes. The most common issue with this recipe is the dough becoming too soft to handle. If your kitchen is particularly warm, the butter in the dough will start to melt before it even hits the oven.
This leads to cookies that spread into flat, thin pancakes rather than staying as thick, hearty mounds.
Why Your Cookies Spread Too Much
If your cookies look like flat discs, the culprit is usually the temperature of the butter or the dough itself. If the butter was too soft (almost oily) when you mixed it, or if you handled the dough for too long with warm hands, the fat loses its ability to hold air.
This causes the structure to collapse as soon as the oven's heat hits the pan.
Another common reason is the "over beating" of the eggs. While we want the dough to be uniform, whipping too much air into the eggs can cause the cookies to puff up like a cake and then deflate rapidly, leading to a thin, wrinkled appearance.
| Problem | Root Cause | Solution |
|---|---|---|
| Flat Cookies | Dough or butter was too warm. | Chill the rolled dough balls for 15 minutes before baking. |
| Melted Chocolate | Kisses were room temp or added too late. | Always freeze kisses for 30 minutes and add immediately after baking. |
| Tough Texture | Over mixing the dry ingredients. | Mix only until the pink streaks disappear and the dough is uniform. |
Why the Chocolate Is Falling Off
If you find that your chocolate kisses are sliding off or not "sticking" to the cookie once cooled, it’s usually because the cookies cooled down too much before you added the chocolate.
You have a very small window about 60 seconds after the pan comes out of the oven to get those kisses pressed in.
The residual heat from the cookie is what slightly melts the bottom of the chocolate, acting like a "glue" as it cools. If the cookie is too cool, the chocolate just sits on top without bonding.
If this happens, you can technically add a tiny dot of melted chocolate to the bottom of the kiss to stick it back on, but it's much easier to just be quick with the initial assembly.
Common Mistakes Checklist
- ✓ Ensure butter is "cool room temperature" (it should dent when pressed, but not be greasy).
- ✓ Don't skip the salt; it's the only thing keeping the sweetness from being overwhelming.
- ✓ Use a cold baking sheet for every batch never put dough on a hot pan from the previous round.
- ✓ Press the chocolate immediately; every second of cooling makes the "glue" less effective.
- ✓ Let them cool on the pan for 2 minutes before moving to the rack so they don't fall apart.
Creative Swaps and Flavor Variations
One of the best things about these Strawberry Kiss Cookies is how easy they are to adapt for different holidays or flavor cravings. While the strawberry chocolate combo is a classic, you can swap out the components to create entirely different experiences. If you love the idea of a berry themed dessert but want something even more decadent, you should try my strawberry angel food dessert which is another crowd favorite.
Seasonal Color Changes
You can easily swap the strawberry cake mix for a lemon mix to make "Lemon Drop" cookies with a white chocolate kiss in the center. Or, for a very hearty autumn version, use a spice cake mix and a caramel filled chocolate kiss. The technique remains exactly the same; only the flavor profile shifts.
dairy-free Alternatives
To make these dairy-free, you can substitute the 0.5 cup of butter with a high-quality vegan butter stick (look for one with a high fat content rather than an oil based spread). Many dark chocolate kisses are naturally dairy-free or you can find vegan chocolate gems to press into the center.
The cake mix itself is often "accidentally" dairy-free, but always check the label for milk solids.
| Premium Ingredient | Budget Alternative | Flavor Impact | Savings |
|---|---|---|---|
| High end European Butter | Store brand Unsalted Butter | Slightly less creamy, still satisfying | Save $3.00 |
| Pure Vanilla Bean Paste | Imitation Vanilla Extract | Less floral depth, but works well | Save $5.00 |
| Special Dark Kisses | Standard Milk Chocolate Kisses | Sweeter profile, less contrast | Save $1.50 |
Textural Additions
If you want even more of a "fudgy" experience, you can fold in a handful of mini chocolate chips into the dough before rolling. This adds tiny pockets of melted chocolate throughout the strawberry base, which contrasts beautifully with the sugar crusted exterior.
Freshness Tips and Storage Secrets
To keep these cookies tasting as satisfying as the day they were baked, you need to protect them from the air. Because they are made with a cake mix, they have a tendency to dry out faster than traditional butter cookies if left on a plate.
The sugar coating helps a little, acting as a barrier, but an airtight container is your best friend here.
Storage: Store the cookies in a single layer in an airtight container at room temperature for up to 4 days. If you must stack them, place a sheet of parchment paper between the layers so the chocolate kisses don't smudge the bottoms of the cookies above them.
I don't recommend the fridge, as it can make the chocolate "bloom" (turn white) and the cookie base become quite hard.
Freezing: These cookies freeze beautifully! You can freeze the finished cookies for up to 3 months. Just make sure the chocolate is fully set and hard before putting them in a freezer bag. When you're ready for a treat, let them thaw at room temperature for about 20 minutes.
They taste almost as good as fresh baked.
Zero Waste Tip: If you end up with broken cookies or "crumbs" at the bottom of the jar, don't throw them away. Those strawberry chocolate crumbs are incredible when sprinkled over vanilla bean ice cream or folded into a milkshake.
You can even pulse them in a food processor to make a "pink crust" for a cheesecake.
Presentation and Pairing Party Ideas
Serving these is all about leaning into that vibrant pink color. If you are making these for Valentine's Day, I love to arrange them on a white platter with a few fresh strawberries scattered around to hint at the flavor inside.
They look very high end when paired with a glass of cold milk or even a glass of sparkling rosé for an adult gathering.
The Classic Dessert Board
Create a "Pink & Chocolate" board by surrounding these cookies with chocolate covered pretzels, fresh raspberries, and some white chocolate bark. The different shades of pink and red make for a stunning center piece that guests can pick at throughout the evening.
The Perfect Gift
Because these are sturdy once the chocolate sets, they are excellent for gifting. I like to put three or four in a clear cellophane bag tied with a red ribbon. They stay soft enough to survive a trip in the mail if you pack them tightly with plenty of cushioning.
They aren't just a treat; they are a little bundle of homemade comfort that shows you took the time to make something special.
Whether you are baking these for a major holiday or just because you had a box of mix in the pantry, the result is always the same: a cheerful, berry scented cookie that disappears in minutes.
Just remember to keep that chocolate in the freezer until the very last second, and you’ll be the hero of the bake sale every single time. Happy baking!

Recipe FAQs
Why is it necessary to freeze the Hershey's Kisses before baking?
Freezing ensures the chocolate maintains its shape. If the kisses are at room temperature, the residual heat from the freshly baked cookie will cause them to melt into a puddle instead of keeping their iconic form.
How to achieve the perfect crackle top on these cookies?
Roll the dough balls thoroughly in granulated sugar before baking. This coating creates a barrier that helps the surface set quickly and creates those signature cracks as the cookie expands in the 350°F oven.
Is it possible to use a different flavor of cake mix for this recipe?
Yes, you can swap the cake mix flavor. If you enjoy the technique of using cake mix to create a dense, chewy cookie base, you might also like the A Slice of Heaven recipe.
Why are my cookies falling apart when I try to move them to the wire rack?
Allow them to rest on the baking sheet for exactly 2 minutes first. Moving them too quickly while the centers are still molten will cause the delicate structure to collapse.
How to prevent the cookies from spreading too thin in the oven?
Use a cold baking sheet for every single batch. Placing dough on a hot pan from a previous round causes the butter to soften prematurely, which ruins the cookie's final texture.
Is it important to use softened butter rather than melted butter?
Yes, the consistency of the butter is critical. Your butter should be at a cool room temperature where it dents when pressed; melted butter will make the dough too greasy and prevent it from holding a round shape.
How to tell exactly when these cookies are finished baking?
Watch for edges that look just set and tops that show a slight crackle. This typically happens between 9 and 11 minutes; pulling them out at this precise moment ensures the center remains soft and chewy.
Strawberry Kiss Cookies
Ingredients:
Instructions:
Nutrition Facts:
| Calories | 142 calories |
|---|---|
| Protein | 1.4g |
| Fat | 6.8g |
| Carbs | 19.8g |
| Fiber | 0.4g |
| Sugar | 14.5g |
| Sodium | 135mg |
