Stuffed Acorn Squash with Ground Beef Pears and Pa: the Ultimate Sweet Savory Roast

- The Quintessential Autumn Meal: Why This Recipe Cracks the Code
- Stocking the Larder: Ingredients for Our Stuffed Acorn Squash With Ground Beef Pears and Pa
- The Cook's Journey: Step and by-Step Directions for a Cracking Stuffed Meal
- Beyond the Recipe Card: Storage, Pairing, and Troubleshooting
- Recipe FAQs
- 📝 Recipe Card
The Quintessential Autumn Meal: Why This Recipe Cracks the Code
Right then. Do you want a recipe that screams "I am competent at autumn" but only takes about 20 minutes of real effort? This Stuffed Acorn Squash With Ground Beef Pears and Pa is it.
It is absolutely proper comfort food, the kind of meal that makes the whole house smell incredible and looks like you spent hours fussing over it. The secret here isn't complexity. It's contrast.
We’re taking humble ground beef and transforming it into a rich, sweet, and savory filling that sits perfectly inside a caramelized, tender squash bowl. Forget complicated casseroles. This is a complete package.
The Surprising Harmony of Beef and Bartlett Pears
I know what you're thinking. Pears? With ground beef? Trust me, this combination is the magic trick of this dish. Most people default to apples when stuffing squash, but apples often break down too much or are too tart.
Pears (specifically the firm Bosc or Bartlett variety) hold their shape just enough and bring a lovely, earthy sweetness that works brilliantly against the savory depth of the seasoned beef. The sweetness isn't cloying; it’s a sophisticated counterpoint.
Think of it like a really great chutney or preserve on a robust cheese plate. It cuts through the richness, giving you a dynamic, unexpected mouthful every single time. That little hit of acid and sweetness is what makes this Acorn Squash With Ground Beef recipe addictive.
An Impressive Centrepiece, Remarkably Straightforward
If you’ve ever felt intimidated by winter squash, stop it right now. Acorn squash are probably the easiest to deal with because they naturally form their own perfect serving bowl. You halve them, you roast them, you fill them. Done. They require almost no tricky knife work (unlike, say, a butternut).
This means that even if you’re pulling together a quick weeknight dinner, this Baked Stuffed Squash Recipes contender makes the table look instantly festive. It’s elegant, rustic, and just so easy. That initial roast of the squash is the longest step, and during that time, you just make the filling.
Simple multitasking, maximum visual impact.
Making the Most of Winter Squash Season
Acorn squash are usually at their best and cheapest in the mid to late autumn, making this an ideal seasonal dish. When they are harvested correctly, their flesh is dense and slightly nutty. Don’t just grab the first one you see, though.
I once grabbed a really pale and skinned squash thinking it was fine, and it was watery and bland. Look for deep, dark green skin, maybe with one small orange patch where it sat on the ground. A good squash will feel heavy for its size.
That heft means flavour and texture that will stand up to the rich Ground Beef And Acorn Squash filling.
Stocking the Larder: Ingredients for Our Stuffed Acorn Squash With Ground Beef Pears and Pa
This recipe doesn't call for anything outrageously fancy, but the quality of a few core ingredients really matters. This is where we elevate a standard stuffed vegetable into a truly great Autumn Acorn Squash Dinner.
Selecting the Perfect Acorn Squash Halves
The sizing is important here because you want four substantial servings. Look for two medium and to-large acorn squash (about 1.2 kg total). The stem should be intact and firm, not soft or mushy. A soft stem means it's been sitting around too long. When you hold it, give it a tap. It should sound solid.
If it sounds hollow or thin, the flesh inside might be stringy. For the best Stuffed Acorn Squash Recipes, ensure the outside skin is firm and unblemished.
The "Pa" Factor: Why Parmesan Makes the Filling Pop
"Pa" stands for Parmesan, naturally! While the beef and pear handle the sweet and savory depth, the Parmesan provides the necessary salty, nutty umami bomb. We divide the cheese: some goes directly into the filling to act as a binder and provide flavor richness throughout, and the rest goes on top to form that crucial, crispy golden crust.
Honestly, don't even bother with pre and grated Parmesan in a shaker bottle here. You need freshly grated good stuff; it melts better, and the flavor is ten times stronger. It makes all the difference when you are aiming for that perfect Sweet and Savory Stuffed Squash.
Required Kit: Tools for Hassle and Free Preparation
You don’t need a gadget graveyard for this, just a few key items.
- A very sturdy chef’s knife is essential for slicing the acorn squash. They are tough!
- A rimmed baking sheet (definitely line it with parchment for a no and fuss cleanup).
- A large skillet is crucial for building the filling, specifically one big enough to let the ground beef brown without steaming itself.
CRUCIAL NOTE: Use an ice cream scoop to remove the seeds and membranes from the squash. It sounds weird, but the curved, sturdy edge gets the cavity perfectly clean much faster and easier than a regular spoon.
Quick Swap Suggestions for the Ground Meat
If you aren't keen on using ground beef, or maybe you just want to switch things up, you have options.
- Turkey Mince: This is a much leaner option. If you use it, be sure to add an extra tablespoon of olive oil or butter when sautéing the aromatics to prevent the filling from tasting dry.
- Mild Italian Sausage: This adds huge flavor right out of the gate. You'll likely need to reduce the amount of added sage and thyme, as the sausage is already seasoned. The fat rendered from the sausage is delicious, but still, drain about half of it off.
- Vegetarian Swap: Cooked lentils or crumbled, seasoned firm tofu sautéed with mushrooms makes a fantastic, earthy vegetarian adaptation.
Related Recipes Worth Trying
- Keto Pumpkin Muffins with Cheesecake Center Low Carb Autumn Treat — Keto Pumpkin Muffins with Cheesecake Center are the ultimate fall dessert. These low carb pumpkin cream cheese muffins hide a creamy, sugar-free filling....
- Shredded Beef Enchiladas with Creamy Sauce Silky White Sauce Recipe — Shredded Beef Enchiladas with Creamy Sauce elevates dinner with tender slowbraised beef and a rich tangy white sauce This Cheesy Beef Enchiladas Recipe is a...
- Fried Baby Potatoes with Garlic Brown Butter The Ultimate Crispy Side Dish — Fried Baby Potatoes with Garlic Brown Butter delivers maximum crunch thanks to our parboil and shake technique Master these brown butter baby potatoes in...
The Cook's Journey: Step and by-Step Directions for a Cracking Stuffed Meal
This process involves two main streams running concurrently: roasting the squash and cooking the filling. Keep track of your time, and you’ll find this flows like poetry.
Prepping and Roasting the Squash Vessels
Preheat the oven to 400°F (200°C). Grab your two beautiful squash. Carefully slice them lengthwise. Remember that ice cream scoop I mentioned? Use it to hollow out the cavity.
Now, this is my favorite trick for tender squash: brush the cut edges with olive oil and season them really generously with salt and pepper. Place the halves cut and side down on your baking sheet. Pour about half a cup of water onto the baking sheet itself (around the squash, not on top of it).
This creates steam. That initial steam bath softens the squash evenly from the outside in. Roast for 40 to 45 minutes until the edges are getting caramelized and the flesh is tender when poked.
Building the Filling Base: Browning the Beef and Aromatics
While the squash is doing its thing, heat your skillet and brown the ground beef. Break it up finely. Once it's fully cooked, stop. Look at all that fat.
MISTAKE I ONCE MADE: I used to think the fat meant flavor and would leave half of it in. Result? A miserably oily, soggy filling that just seeped out onto the plate. You must, absolutely must, drain the rendered fat from the skillet now.
Reduce the heat, then sauté the onions until they're soft. Add your garlic, sage, and thyme and let them cook for just one minute until the air smells amazing. Now introduce the diced pears. Give them three or four minutes, just enough to slightly warm and soften the edges, but don't let them turn to mush.
Pour in the stock and balsamic vinegar, let it bubble and reduce slightly (this concentrates the flavor), and then stir in your Panko and half of your "Pa" (Parmesan). The Panko soaks up any last bit of moisture, giving you a moist but sturdy filling.
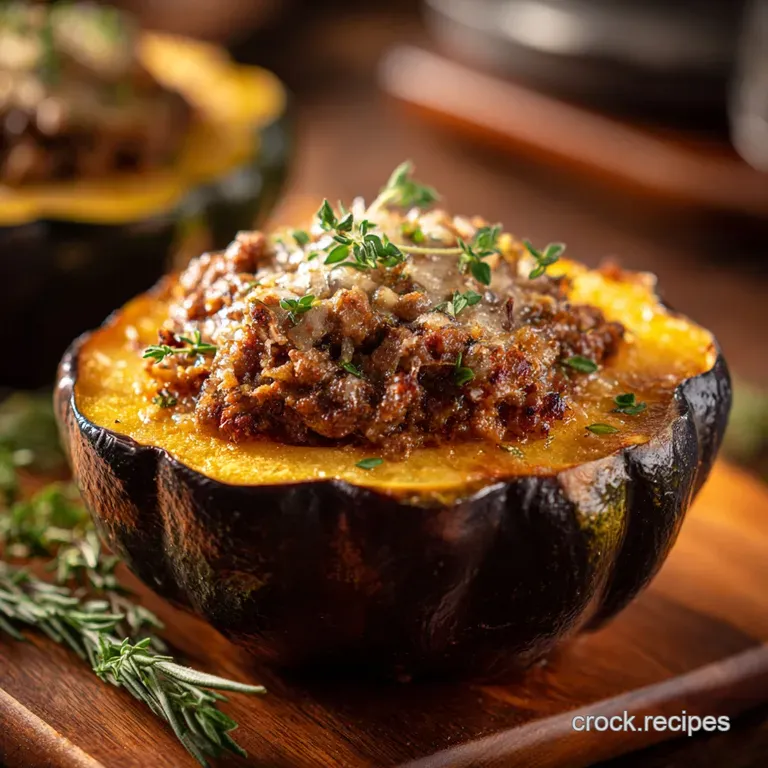
The Grand Assembly: Nesting the Filling and Final Topping
Take the partially roasted squash out of the oven. If they’re very soft, handle them gently. Flip them cut and side up. Now, scoop the rich beef and pear mixture evenly into the four waiting cavities. Press it down gently so it sits snug and high.
If you have a little bit of filling left over, don't worry, just heap it on. We are aiming for generous portions here. Finally, sprinkle the remaining Parmesan over the top of the filling mounds. This is what will give us that gorgeous, crispy, golden crown.
The Crucial Finish: Baking Time and Temperature Check
Slide those beautiful, stuffed acorn squash back into the 400°F (200°C) oven. We are aiming for two things in this final bake: internal temperature and surface crispness. Bake for 25 to 30 minutes.
You know they are ready when the filling is piping hot throughout (steam rising when you cut into it) and the Parmesan topping is bubbly, golden brown, and slightly crispy. Let the finished Stuffed Acorn Squash With Ground Beef Pears and Pa rest for five minutes before serving.
This lets the juices settle and makes them much easier to handle without scorching your fingers.
Beyond the Recipe Card: Storage, Pairing, and Troubleshooting
Making Ahead: Storing Your Stuffed Acorn Squash With Ground Beef Pears and Pa
This dish is a fantastic make-ahead option, which is why it often shows up on my holiday menu.
- Filling Only: You can make the entire beef and pear filling up to two days in advance. Store it in an airtight container in the fridge.
- Partial Assembly: You can roast the squash fully, let them cool, and then stuff them. Cover and refrigerate. When ready to bake, add the Parmesan topping, and bake at 400°F (200°C) for 30– 35 minutes (since everything is starting cold) until heated through.
- Leftovers: Any fully baked leftovers keep well for 3 to 4 days. Reheat them in the oven (350°F/175°C) or slice them and reheat quickly in the microwave.
Wine and Side Pairing Suggestions for a Full Meal
Because the filling has both savory ground beef and sweet fruit, you want a beverage that can bridge that gap. I always suggest a slightly earthy, medium and bodied red.
| Course | Pairing Suggestion | Why It Works |
|---|---|---|
| Wine | Pinot Noir or Chianti | Fruit and forward but earthy notes complement the pear and sage. |
| Side Dish | Arugula Salad with Vinaigrette | The peppery bitterness of the arugula (rocket) and the acid of the dressing cut through the richness of the beef and squash perfectly. |
| Non and Alcoholic | Dry Sparkling Cider | Matches the sweetness of the pear without being sugary. |
Nutritional Snapshot and Dietary Swaps
This is a hearty, robust meal, definitely a satisfying dinner. Because we are using lean ground beef and the squash provides tons of fiber, it's quite balanced.
- Low Carb/Keto Swap: Skip the panko breadcrumbs entirely. Instead, use 1/4 cup of crushed pork rinds or a tablespoon of psyllium husk powder to absorb the liquid and provide binding.
- Dairy and Free: Skip the Parmesan and use 1/4 cup of nutritional yeast stirred into the filling for a cheesy flavor profile, and top with a few breadcrumbs tossed in oil instead of cheese.
Solving Common Roasting Pitfalls
The biggest frustration with Stuffed Acorn Squash Dinner Recipes is often the roast. Here are the two main things that go wrong:
- Soggy Filling: We already addressed this, but if your finished filling looks wet after the final bake, you didn't drain the fat or reduce the stock enough. Next time, cook the stock until it's almost gone before adding the binder.
- Squash Too Hard: If after 45 minutes of initial roasting, the squash is still tough, it usually means your oven temperature is off, or you didn't use the steaming trick. The water on the tray is a game and changer. If they’re still hard when you go to stuff them, just stick them back in for 10- 15 minutes more before adding the filling. Better to wait than to eat undercooked squash!

Recipe FAQs
Cutting acorn squash is a bit of a nightmare any tips to stop me losing a finger?
Safety first, old chum! Use a sharp chef’s knife (a dull one is actually more dangerous) and pierce the squash near the stem, working slowly and steadily. Alternatively, prick the squash all over with a fork and microwave it for 3 4 minutes; this slightly softens the skin, making the cut an absolute treat.
Is the sweet and-savoury flavour profile of the Stuffed Acorn Squash With Ground Beef Pears and Pa really going to work?
Absolutely, it’s just the ticket for a sophisticated autumn meal! The earthiness of the squash and the rich ground beef are perfectly balanced by the subtle sweetness of the pears and the salty, sharp 'Pa' (Parmesan), delivering proper comfort food that works an absolute charm.
Can I make the beef and pear filling ahead of time if I'm short on prep time later?
You certainly can, which is a cracking job for a busy weeknight! Prepare the filling completely, allow it to cool fully, and store it in an airtight container for up to 3 days in the fridge; then simply stuff the pre-roasted squash and finish baking as directed.
I haven't got any pears on hand; what's a good alternative for that hint of sweetness?
If pears are out, try dicing a firm Granny Smith apple for a slightly more tart bite that still complements the beef beautifully, or fold in a 1/4 cup of dried cranberries along with the Panko breadcrumbs for a chewy, sharp fruit element.
How do I store the leftovers, and will they taste rubbish the next day?
Not at all, they're spot on for lunch! Store leftover stuffed squash halves tightly wrapped in the fridge for up to 4 days, and reheat them slowly in an oven at 350°F (175°C) for about 15 minutes to keep the squash from drying out.
Stuffed Acorn Squash With Beef Pear Parm

Ingredients:
Instructions:
Nutrition Facts:
| Calories | 610 kcal |
|---|---|
| Fat | 30 g |
| Fiber | 9 g |
