Sushi Rice Rice Cooker Method: the Cornerstone Recipe
- Mastering Shari: Why the Rice Cooker Reigns Supreme
- The Science of Perfect Grains: Why This Method Works
- Essential Components for Authentic Sushi Rice
- Step-by-Step: The Sushi Rice Rice Cooker Method
- Chef's Corner: Tips for Flawless Rice
- Storage and Longevity of Cooked Sushi Rice
- Beyond the Roll: Serving Suggestions and Pairings
- Recipe FAQs
- 📝 Recipe Card
Mastering Shari: Why the Rice Cooker Reigns Supreme
If there’s one smell that screams "perfection" in my kitchen, it’s that slightly sweet, vinegary steam rising off freshly made Shari (sushi rice). Mastering the Sushi Rice Rice Cooker Method is genuinely the secret weapon in your Japanese culinary arsenal, and trust me, it changes everything about making home sushi.
Forget the myths about needing ancient Japanese cedar boxes or perfect atmospheric pressure; all you need is that humble kitchen workhorse, the rice cooker.
I spent years getting this wrong, ending up with rice that was either a gluey, mashed mess or crunchy in the middle. Turns out, the rice cooker isn't the problem it’s the cook skipping the crucial prep steps.
This straightforward Sushi Rice Rice Cooker Method takes the heat management totally off your plate, leaving you to focus on the essential, non-negotiable stages: rinsing, soaking, and seasoning.
This isn’t just a recipe; it’s a detailed blueprint for consistency. We are aiming for grains that are sticky enough to clump for rolling, yet distinct and separate enough that you can still appreciate their structure.
Let’s dive into the foolproof, no-stress way to achieve perfect Shari every single time, making the Sushi Rice Rice Cooker Method your new favorite kitchen hack.
The Science of Perfect Grains: Why This Method Works
The difference between mediocre, gummy rice and truly phenomenal sushi rice is rooted in chemistry and physics. When we talk about the Sushi Rice Rice Cooker Method , we are exploiting the machine’s ability to maintain a perfectly consistent temperature and pressure environment that the stovetop simply cannot replicate without constant intervention.
The Fundamental Difference: Sushi Rice vs. Standard Grains
Sushi rice, or short grain rice, is naturally high in amylopectin, a type of sticky starch. That stickiness is exactly what we want, but too much starch on the exterior of the grain leads to a mushy final product a mistake I made constantly when I started.
Long grain rice, like Jasmine, stays fluffy and separate because it has less amylopectin; that's why you can't just substitute it here. The integrity of the Sushi Rice Rice Cooker Method relies specifically on the high starch content of the short grain, balanced by aggressive rinsing.
The Genius of the Rice Cooker: Consistent Heat and Steam
Rice cookers work by bringing the water to a boil, holding it there until all the water is absorbed, and then switching to the "Keep Warm" phase based on internal temperature sensors. This passive steam rest is absolutely vital.
Using the Sushi Rice Rice Cooker Method means you benefit from the cooker’s precise timing, guaranteeing that every grain is cooked thoroughly without sticking or burning on the bottom, something that often happens on the stove.
Achieving the Signature Sticky Yet-Firm Texture
The signature texture requires two things: enough hydration before cooking and a short, aggressive cool down after cooking. The 30 minute soak allows the water to penetrate the center of the grain, preventing that annoying hard, white core.
The quick fanning step, a core part of the Sushi Rice Rice Cooker Method , chills the surface of the rice rapidly, giving it that classic, glossy sheen and slight chewiness while preventing over hydration.
How Rinsing Removes Excess Starch
The rinsing step is the difference between sticky but-defined rice and literal paste. You must rub the grains gently under running water to physically remove the pulverized starch dust that coats them. If you stop rinsing when the water is only cloudy , you're setting yourself up for failure.
When preparing for the Sushi Rice Rice Cooker Method , the rinsing water must be almost transparent, indicating that the bulk of the free floating starch is gone.
The Crucial Resting and Steaming Periods
I know you want to peek, but please resist! After the cooking cycle is done, the 10 minute steaming rest is non-negotiable. The trapped steam finishes cooking any grains at the top of the pot and redistributes the internal moisture perfectly.
Immediately opening the lid causes a rapid temperature drop and releases necessary moisture, often leaving the rice sticky on the surface but dry underneath. Patience is key to this successful Sushi Rice Rice Cooker Method .
Acidity Balance: The Vinegar Mixture’s Role
The sushi-zu (the seasoning mixture of vinegar, sugar, and salt) is what transforms plain cooked rice into Shari . Rice vinegar is milder than standard white vinegar, providing a gentle acidity that brightens the flavor profile without being overpowering.
The sugar and salt are essential for balancing the sharpness, creating a sweet and sour depth that is the hallmark of authentic Sushi Rice Rice Cooker Method preparations.
Essential Components for Authentic Sushi Rice
Getting the ingredients right is half the battle. You need specific items for the Sushi Rice Rice Cooker Method to truly shine. Don't cheap out on the rice, and definitely don't try to use apple cider vinegar it won't end well.
Short Grain Japanese Rice (Koshihikari or Calrose)
Look for varieties like Koshihikari, Nishiki, or Tamaki Gold. These are specifically bred for sushi and have the perfect starch profile. Calrose is a widely available, reliable substitute, often labeled simply as "Sushi Rice." If your packaging doesn't specify "short grain," double check the appearance; the kernels should be plump and almost round.
Preparing the Sushi Vinegar Mixture (Sushizu)
We heat the vinegar mixture gently just to dissolve the salt and sugar. Don’t boil it! Boiling changes the acetic acid structure and makes the seasoning sharper. You want the seasoning to be warm, not scorching hot, when it hits the rice.
Preparing the sushi-zu before the rice cooker cycle finishes means it’s ready to go the second the rice is done cooking a key efficiency hack for the Sushi Rice Rice Cooker Method .
Water Ratios: Getting the Measurement Exact
The golden rule for the rice cooker is usually 1 part rice to 1 part water, measured volumetrically (e.g., 2 cups of rice to 2 cups of water). Unlike stovetop methods where you often add a little extra, the sealed environment of the rice cooker means we can stick to a near perfect 1:1 ratio because minimal steam escapes.
Use the measuring cup that came with your cooker, as these are often slightly smaller than standard US cups, ensuring precision for the Sushi Rice Rice Cooker Method .
Ingredient Substitutions and Sourcing Notes
Sourcing the right ingredients ensures the success of the Sushi Rice Rice Cooker Method . Here are my tested alternatives, just in case you’re in a pinch:
| Ingredient | Primary Use | Viable Substitute | Notes on Substitution |
|---|---|---|---|
| Japanese Short Grain Rice | Texture/Structure | Italian Arborio Rice | Use slightly more water (1:1.1 ratio); texture is slightly chewier. |
| Rice Vinegar (Unseasoned) | Acidity | Distilled White Vinegar | CRITICAL: Use 10% less quantity; white vinegar is much stronger. |
| Granulated Sugar | Balance/Sweetness | Fine Acacia Honey | Use 3 tablespoons instead of 1/4 cup; stir until fully dissolved. |
CHEF'S NOTE: Never use vinegar labeled "Seasoned Rice Vinegar" for the sushi-zu . It already contains sugar and salt, and adding our measured amounts on top will make the rice overwhelmingly sweet and salty.
step-by-step: The Sushi Rice Rice Cooker Method

This detailed guide will take you from dusty raw grains to glossy, seasoned perfection. Following the steps precisely ensures your Sushi Rice Rice Cooker Method results are consistently excellent.
Stage 1: Rinsing and Soaking the Rice
This is where you earn your Shari . Measure the rice precisely and place it into a large mixing bowl. Now, cover it with cold tap water. Gently but firmly agitate the rice with your hand, tumbling the grains and slightly rubbing them together; you will see the water immediately turn opaque white.
Pour this milky water away. Repeat this process, adding fresh water, swirling, and draining, for at least five to seven cycles until the water runs almost entirely clear. This commitment to the clean rinse is the backbone of the perfect Sushi Rice Rice Cooker Method .
Next, transfer the thoroughly rinsed rice to the inner pot of your rice cooker. Add the cold, filtered cooking water. Set a timer: the rice must soak for 30 minutes before cooking.
This pre-hydration phase ensures the cooking is uniform, delivering fluffy interiors and preventing the rice from fracturing during the cooking cycle.
Stage 2: Cooking Cycle and Post Cook Resting
Place the inner pot into the cooker, close the lid, and select the "White Rice" or "Sushi" setting. Start the cycle and then walk away! Do not open the lid. Once the cooker switches to "Keep Warm" (or signals it’s finished), immediately leave it alone for another 10 minutes.
This mandatory rest period lets the steam redistribute the moisture evenly through the pot. Cutting this short ruins the grain consistency and compromises the success of the Sushi Rice Rice Cooker Method .
I learned this the hard way: I once got impatient and opened the cooker right away, and the rice was wetter on top and still a little hard at the bottom. The steam rest is pure magic.
Stage 3: Seasoning and Cooling (The Cutting Motion)
While the rice rests, quickly dissolve the sugar and salt in the rice vinegar in a small saucepan over low heat. It should be warm enough to dissolve the crystals, but not hot enough to steam aggressively.
Once the rice has completed its 10 minute steam rest, quickly transfer it to your large, non-metallic mixing bowl or Hangiri . Spread the rice out thinly. Pour the slightly cooled sushi-zu evenly over the entire surface of the rice. Now, grab your wooden spatula.
The action here is key for the Sushi Rice Rice Cooker Method —it is a gentle "cutting" or "folding" motion.
Slice down through the rice vertically, then turn the rice over gently to expose the unseasoned layers. Do not stir or mash. Stirring breaks the grains, releasing starch and turning your beautifully cooked rice into a soupy mess.
While you are folding and cutting, use a second hand (or a helper!) to fan the rice aggressively. This rapid cooling creates the characteristic glossy finish and sets the texture. Continue folding and fanning until the rice is shiny and cooled to slightly above room temperature (body temperature).
Troubleshooting: Too Sticky or Too Hard?
If your rice is too sticky, you likely skipped the full 5 7 rinses. More starch remained, leading to a gluey result. Fix: Next time, rinse until the water is completely clear, almost like washing pebbles.
If your rice is too hard or has a crunchy white core, you likely didn't soak the rice for the full 30 minutes, or you opened the rice cooker lid too early during the steaming rest.
Fix: Always pre-soak and always allow the full 10 minute rest after the cooking cycle for a flawless execution of the Sushi Rice Rice Cooker Method .
Chef's Corner: Tips for Flawless Rice
Making sushi rice requires attention to detail, but these simple tricks will elevate your results dramatically. The small things really matter when executing the Sushi Rice Rice Cooker Method .
The Importance of a Non-Metal Mixing Bowl
Using a wooden Hangiri or a large glass bowl is not just tradition it’s practical science. Vinegar reacts with metal, which can impart a metallic, off-putting taste to your carefully seasoned Shari .
Stick to glass, wood, or food grade plastic when performing the seasoning stage of the Sushi Rice Rice Cooker Method .
Avoid Over Stirring When Seasoning
Seriously, I can’t stress the cutting motion enough. Every professional sushi chef uses this gentle folding technique to distribute the liquid evenly without crushing the delicate rice grains. Once the seasoning is mixed in, stop.
Overworking it will ruin the texture you achieved through the careful Sushi Rice Rice Cooker Method .
The Ideal Temperature for Rolling Sushi
You should use your Shari when it is just slightly warm to the touch, or what chefs call "body temperature." If the rice is too hot, it will wilt the nori (seaweed) sheets and fillings like avocado or cucumber.
If it’s too cold (i.e., straight from the fridge), it becomes hard and difficult to shape. Cover the finished rice with a damp cloth and store it at cool room temperature for up to two hours until you’re ready to roll.
Storage and Longevity of Cooked Sushi Rice
You’ve mastered the Sushi Rice Rice Cooker Method ; now how do you handle the leftovers? The rules for storing sushi rice are very specific because of the seasoning and the need to maintain that perfect texture.
Safe Storage Duration and Temperature
Cooked and seasoned sushi rice is best consumed the day it is made. If you absolutely must store it, wrap it tightly (or place it in an airtight container) and leave it on the counter at cool room temperature for a maximum of 4– 6 hours, covered with a damp tea towel.
Do not refrigerate it unless absolutely necessary for safety, but understand that refrigeration is the enemy of perfect texture. The cold temperature causes the starches to recrystallize rapidly, resulting in hard, unappetizing rice.
Can You Freeze Sushi Rice? (Spoiler: Avoid it)
In short, no. Freezing dramatically changes the texture of the seasoned rice. When thawed, it often becomes crumbly and wet, losing the essential stickiness required for rolling. If you have leftover cooked, unseasoned rice, however, you could transform it into something wonderful like my Rice Pudding: Best Creamiest Leftover Rice Recipe . But for sushi rice specifically, make only what you plan to eat that day.
Reheating Methods for Day-Old Rice
If you have refrigerated day-old rice (perhaps you only made plain rice with the Sushi Rice Rice Cooker Method to season later), the best way to reheat it is not the microwave. Microwave reheating creates hot spots and dries out the grains.
Instead, place the hardened rice in a bowl and steam it gently over a simmering pot of water until it softens and warms through. A bamboo steamer basket works brilliantly for this! Once warmed, you can quickly attempt to restore the seasoning and texture.
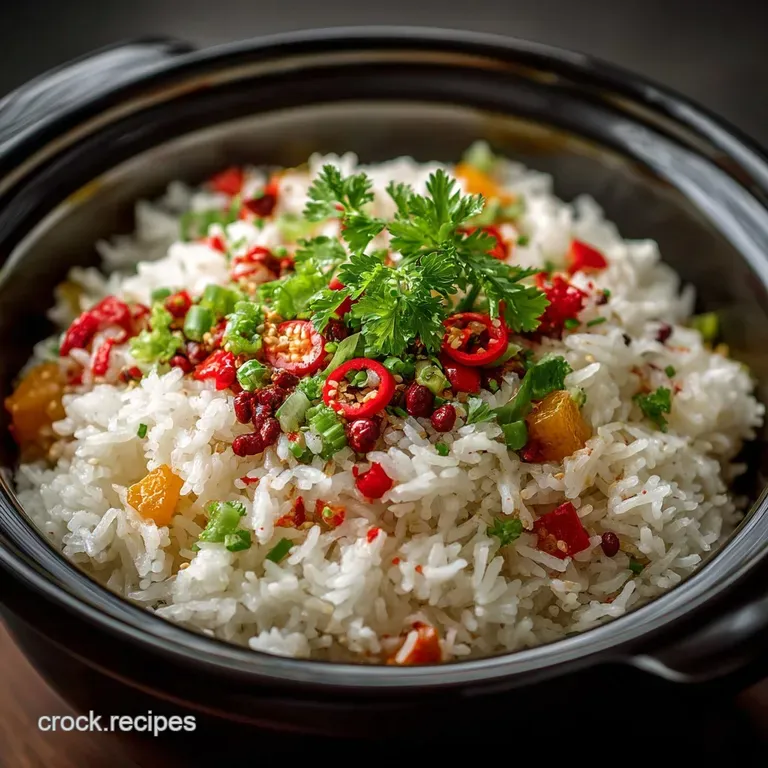
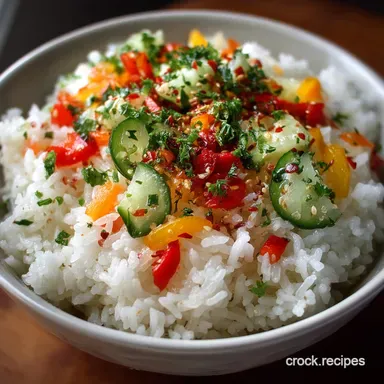
Beyond the Roll: Serving Suggestions and Pairings
While the obvious use for the product of the Sushi Rice Rice Cooker Method is maki and nigiri, don't limit yourself! This tangy, slightly sweet rice is fantastic in bowls and salads.
It's the perfect base for Chirashi bowls think beautiful bowls of scattered sashimi, creamy avocado, and thinly sliced cucumber over the seasoned Shari . This is one of my favorite, low-effort ways to use rice prepared using the Sushi Rice Rice Cooker Method .
Another fantastic pairing? Serve a scoop of warm sushi rice alongside savory, saucy dishes that need something bright to cut through the richness. It would make an amazing complement to something like a rich, comforting bowl of Slow Cooker Beef Short Ribs: Fall Off-The-Bone Recipe , absorbing all those lovely braising liquids. The sweet acidity of the Shari cuts through the fat beautifully.
And finally, if you love that vinegary tang, make a batch of Simple Pickled Red Onions while your rice is cooking. Those bright pink strips add perfect color and crunch to any roll or poke bowl made with rice from the successful Sushi Rice Rice Cooker Method .
You’ll feel like an absolute pro, and your friends will never believe this perfect, glossy rice came from your home kitchen. Happy rolling!

Recipe FAQs
Why is my sushi rice dry or too firm in the center?
This is usually due to insufficient rinsing or not allowing the rice to rest after cooking. Ensure you rinse the starches thoroughly until the water runs clear, and crucially, let the cooked rice steam in the cooker for 10-15 minutes before opening the lid to distribute residual moisture.
My rice came out mushy or gloopy, what went wrong?
Mushy rice is typically caused by too high a water-to-rice ratio or using the wrong type of rice. Always use Japanese short grain rice (Japonica) and measure the water precisely according to your rice cooker's internal markings for white rice.
How should I store leftover sushi rice, and can I freeze it?
You should avoid refrigerating sushi rice, as the cold temperature causes the starches to crystallize, making the grains hard and flavorless. Freezing is also not recommended for seasoned sushi rice intended for traditional rolls, as the texture deteriorates significantly upon thawing.
How long can I keep prepared sushi rice at room temperature?
For food safety and best texture, seasoned sushi rice should be used within 4 hours of preparation if kept at a warm room temperature (around 70°F/21°C). If it must be stored slightly longer, cover it with a damp cloth and keep it away from direct heat or drafts to prevent drying out.
Can I substitute the short grain rice with standard long grain white rice?
No, you cannot achieve the correct texture using long grain varieties like Basmati or Jasmine. Sushi requires high starch, short grain rice because its sticky, plump nature is necessary for the rice to hold together when rolled.
Is it mandatory to fan the rice while mixing in the seasoning?
Yes, fanning is a critical technique often overlooked by home cooks. The rapid cooling simultaneously stops the cooking process and allows the seasoning vinegar to absorb quickly without turning the rice gummy.
Can I prepare the sushi rice seasoning (sushi-zu) ahead of time?
Absolutely, the sushi vinegar seasoning mixture made of rice vinegar, sugar, and salt can be prepared days in advance and stored in an airtight container at room temperature. Ensure the sugar and salt are fully dissolved by gently warming the mixture before using it.
Sushi Rice Rice Cooker Method
Ingredients:
Instructions:
Nutrition Facts:
| Calories | 317 kcal |
|---|---|
| Protein | 5.9 g |
| Fat | 0.7 g |
| Carbs | 70.7 g |
