Keto Magic Cookie Bars the Ultimate Sevenlayer Low Carb Decadence
Why These Keto Magic Cookie Bars Are Your New Obsession
I’m going to be straight with you: the classic seven and layer bar is a messy, gooey nightmare of sugar and sticky condensed milk. It tastes amazing, yes, but two hours later, you’re staring at the ceiling wondering why you crashed so hard.
Who decided that pure joy had to include a sugar spike that requires a nap? Not us, obviously.
This recipe, my friends, is The Great Escape. We keep all the flavor, all the texture, and all the soul of that incredible dessert, but we ditch the carbs and the processed sugar. These aren't just a substitution; they are the main event. People who don't even eat low and carb will fight you for the last square.
They are that good. The secret, as always, is mastering the binder. Everything else is just layering.
The Culinary Alchemy: Deconstructing the Perfect Chewy, Creamy, Crunchy Texture
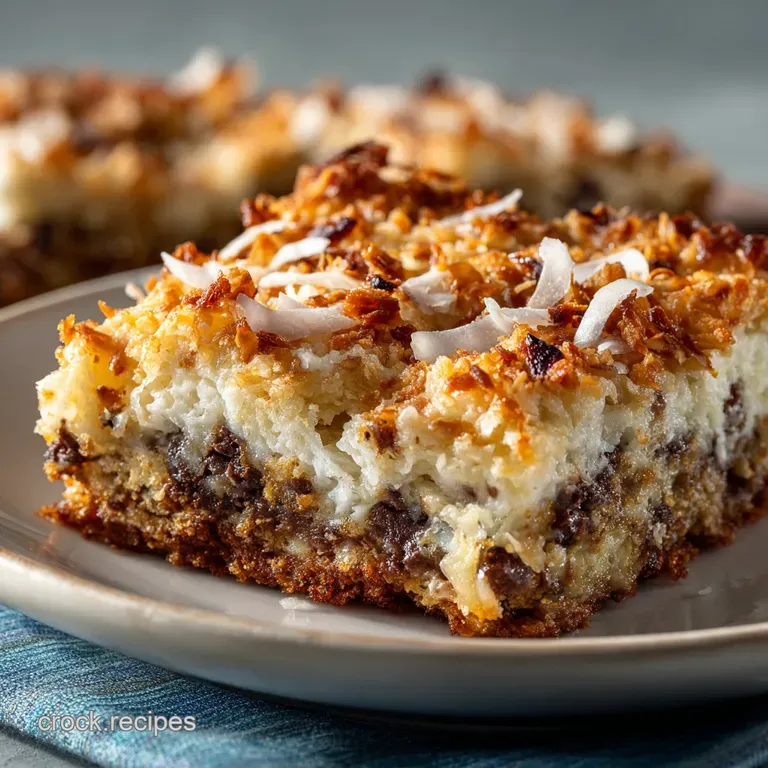
The magic of these bars isn't just in the sweetness; it’s in the incredible interplay of textures. Think about it: you need a firm, shortbread and like foundation, a molten, gooey caramel and ish centre, and a crisp, nutty topping. We nailed all three.
That perfect chewiness comes entirely from our homemade, zero and sugar "condensed milk." When you reduce that heavy cream and butter with the right powdered sweetener, it creates a thick, sticky goo that caramelizes slightly while baking.
This creamy glue locks the nuts and coconut into place, guaranteeing that perfect resistance when you take a bite. It’s brilliant. The crunch? That’s the toasted pecans and the shredded coconut doing heavy lifting.
Saying Goodbye to Graham Crackers: A Keto Crust Revolution
If you’re sticking to a low and carb lifestyle, graham crackers are, frankly, out of the question. They are delicious, but they are pure carb fuel. So, we pivot to the trusty almond flour crust. Now, listen up, because I’ve failed this many times.
The mistake I once made was just slapping the dough in and hoping for the best. Nope.
You need a par and bake . This short blast in the oven sets the butter and firms up the almond flour, transforming it from a fragile sandy layer into a robust, golden foundation that can actually hold up to the weight of that sweet, sticky binder we’re about to drown it in. Don't skip this step.
Seriously.
Beyond Baking: Achieving True Sugar and Free Decadence
Look, I started baking low and carb because I wanted dessert without the guilt, but if the dessert tastes like cardboard or desperation, what's the point? Decadence is a feeling, right? It’s that moment you take a bite and everything else stops.
These bars achieve true decadence because they don’t rely on artificial aftertastes. They rely on real butter, real nuts, high and quality dark chocolate, and a perfectly caramelized binder. It’s comforting. It’s rich. And you get to have two without feeling terrible. That, my friends, is winning.
Essential Components for Layered, Low and Carb Success
The ingredients here are simple, but their quality matters. Since we are using fewer components than traditional baking, each one has to pull its weight. This isn't the time to pull out that dusty bag of cheap, waxy chocolate chips from the back of the pantry. We are aiming for buttery richness.
Building the Foundation: Choosing the Perfect Almond Flour Base
You need finely ground almond flour for this crust. The coarse stuff will result in a crumbly mess that refuses to press together properly. If you can find 'super fine' almond flour, grab it. We want the texture of shortbread, not wet sand.
And use room temperature butter that you melt gently; scorching the butter changes the flavour profile (and not for the better).
Crafting the Zero and Sugar Condensed Milk Substitute
This binder is the heart and soul of the Keto Magic Cookie Bars recipe. It requires patience. We are effectively making a thick, sugar and free caramel sauce using heavy cream, butter, and powdered sweetener.
A critical warning: You absolutely MUST use a powdered sweetener, especially for the binder. Granular versions (like plain erythritol) have a nasty habit of refusing to dissolve fully and crystallizing back into hard sugar pebbles once the mixture cools.
Trust me, biting into a crunchy sugar rock when you’re expecting soft caramel is heartbreaking. Allulose is my top pick here because it resists crystallization almost entirely.
You are reducing the volume by about a third. You need the sauce to coat the back of a spoon thickly. If it still runs like milk, keep simmering slowly.
The Crunch Factor: Optimal Topping Selections
We are using pecans and unsweetened shredded coconut. Why unsweetened? Because the binder is already doing all the sweet work, and those sugary shredded coconut bags are unnecessary carbs.
- Pecans: Chop them roughly. Big chunks are too hard to slice through later. If you have five minutes, give them a quick toast in a dry pan before layering. The aroma and flavor that toasting adds? Unbelievable.
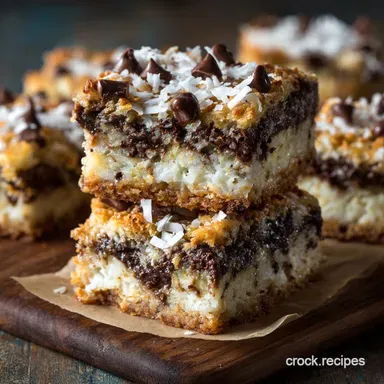
- Chocolate: Go dark. We need sugar and free chips that are 70% cacao or higher. This cuts the sweetness and adds a crucial bitterness that balances the incredible richness of the condensed milk.
Pans and Prep: Ensuring Easy Release
We are using an 8x8 inch metal baking pan. Don't even think about using glass; it just heats too unevenly. The most important tool here isn't a measuring cup; it's the parchment paper sling.
You line the pan, letting the paper hang over two opposite sides. This creates handles. Once the bars are chilled and set, you use those handles to lift the entire slab out of the pan cleanly. Trying to cut them while they are still in the pan is a recipe for ragged edges and frustration.
Related Recipes Worth Trying
- Air Fryer Keto Cookies Quick Chewy Chocolate Chip Recipe — Air Fryer Keto Cookies are a gamechanger for Low Carb Sweets Get perfectly chewy air fryer keto chocolate chip cookies in 8 minutes This Keto Dessert Easy...
- Keto Peanut Butter Pie UltraCreamy NoBake Cloud Pie Recipe — Master the ultimate Keto Peanut Butter Pie This UltraCreamy Keto Peanut Butter Pie is a guaranteed showstopper It is a simple nobake recipe with a rich...
- Keto Peanut Butter Cookies Chewy 3Ingredient Base Recipe 2g Net Carbs — Keto Peanut Butter Cookies are the ultimate low carb comfort food This easy chewy recipe uses a 3ingredient base requires no almond flour and yields soft...
The Witchcraft in Action: A Step and by-Step Baking Guide

Phase 1: Preparing and Setting the Golden Crust
Mix your crust ingredients (almond flour, granulated sweetener, salt, melted butter). It should look like very wet sand. Use the back of a spoon or a small offset spatula to press this firmly and evenly into the prepared pan. Get it tight.
Then, bake it for about 10 minutes at 325°F (160°C). It should just be setting around the edges and smell wonderfully buttery. Pull it out and leave the oven on.
Phase 2: Layering the Sweet Keto Goo
While the crust is warming up, you should be making your condensed milk. Remember that slow reduction. While the binder is still warm (this helps it seep into the layers), you need to assemble the toppings on the crust.
Layer in this order for stability:
- Pecans (or walnuts/macadamias)
- Chocolate Chips
- Shredded Coconut
Pat them down gently. Don't press hard, or you’ll crack the par and baked crust. Once the layers are set, pour that warm, thick keto condensed milk slowly over everything. Make sure it reaches the edges. Give the pan a tiny shimmy to settle the liquid.
Phase 3: Achieving Golden Brown Perfection
Bake for about 25 to 30 minutes. You are looking for visual cues here: the edges should be bubbling vigorously, and the coconut on top should be turning a deep golden brown (not just pale yellow, we want color!).
If the edges are browning too fast, you can cover the pan loosely with foil for the last 10 minutes.
The Critical Cooling and Slicing Process
This is where the less experienced baker rushes and regrets everything. The condensed milk is still liquid and soft when it comes out of the oven. If you try to slice them warm (and trust me, I’ve been there), you get a messy pile of sweet despair.
- Let them cool completely on the counter for at least an hour.
- Transfer the pan to the fridge.
- Chill for a minimum of 2 hours, but 3 hours is better.
Chilling solidifies the butter and the sweetener in the binder, allowing the whole structure to set up properly. Once chilled, lift the entire block out using the sling and slice them up.
Mastering Your Keto Magic Cookie Bars
These are ridiculously rich, which means small servings are usually enough, making that 4g net carb per square feel even lower. If you find the recipe too sweet (some folks are sensitive to certain sugar alcohols), slightly reduce the sweetener in the crust, or use 90% cacao chocolate chips.
Troubleshooting and Optimization FAQs
Nutritional Snapshot: Carbs and Calorie Breakdown
| Nutrient | Estimate Per Serving (1/16th) |
|---|---|
| Net Carbohydrates | 4g |
| Protein | 4g |
| Fat | 28g |
| Total Calories | 280 320 kcal |
Note: The net carbs here are wonderfully low for a dessert of this magnitude. But remember, they are dense, so pacing yourself is key.
Flavor Twists and Dietary Adaptations (Dairy and Free Options)
We’re not locked into these flavors. Get weird with it, honestly.
- Dairy and Free: Swap the heavy cream for full and fat canned coconut cream (the thick stuff at the top of the can) and the butter for coconut oil or a quality vegan butter stick. You’ll get a slight coconut undertone, but the texture remains fantastic.
- Mexican Mocha Twist: Add 1 teaspoon of instant espresso powder and a pinch of cayenne pepper to the condensed milk binder before simmering. It gives a wonderful warmth.
- Salty Kick: Sprinkle flaky sea salt over the bars right when they come out of the oven. It is divine against the sweet caramel.
Shelf Life and Best Storage Practices
Because of all that glorious butter and cream, these bars store very well. Keep them refrigerated in an airtight container for up to 7 days. If you want to freeze them, wrap individual bars tightly in plastic wrap, then store them in a freezer bag. They freeze beautifully for up to 3 months.
Thaw them overnight in the fridge before serving.
Preventing Sticky Slicing Disasters
Even when chilled, the binder can sometimes stick to the knife, dragging the layers and creating a mess. The pro trick? Fill a tall glass with hot water. Dip your sharp knife into the hot water, wipe it completely dry (critical: moisture is the enemy), and slice.
Repeat this process dipping and wiping after every cut. It melts the binder just enough for a clean pass.
What If My Allulose/Erythritol Crystallizes?
If you notice your cooled binder is gritty, it means your sweetener didn't fully dissolve or you reduced the mixture too quickly. The fix is usually easy: pour the mixture back into the saucepan, add a splash (maybe 1 tablespoon) of extra heavy cream, and bring it back to a gentle simmer.
Stir constantly until all the granules are dissolved, then reduce it down slowly again. If you keep the heat low and stir often, the granules won't have a chance to clump up. Slow and steady wins the condensed milk race.

Recipe FAQs
My keto condensed milk didn't thicken properly. Is it ruined?
A touch of patience is needed here! If it's too runny, simmer it gently for a few more minutes until it visibly coats the back of a spoon; remember, it must reduce by about a third to set up correctly when chilled.
I'm desperate to try these Keto Magic Cookie Bars do I really have to wait 3 hours for them to chill?
Absolutely essential, mate! That chilling time (2-3 hours minimum) is the key stage where the keto binder firms up; trying to slice them too early is like trying to make tea without boiling the water a gooey disappointment.
How long will these glorious traybakes keep for, and should they go in the cupboard?
These bars store beautifully due to the high fat content! Keep them in an airtight container in the fridge for up to 7 10 days, or individually wrap and freeze them for a quick low-carb treat lasting up to three months.
Can I swap the pecans for other nuts or maybe make them nut-free?
Certainly! Feel free to substitute the pecans with walnuts, macadamia nuts, or hazelnuts for a similar profile, or use pumpkin seeds if you need a proper nut-free option; just ensure everything is roughly chopped to maintain the characteristic crunch.
My crust came out a bit crumbly after the par-bake. What went wrong with the base?
The trick to a sturdy base is firm compression; ensure you press the almond flour mixture down tightly into the pan (perhaps using the flat base of a glass or measuring cup) before the par-bake, and always let it cool slightly before layering.
Ultimate Keto Magic Cookie Bars Recipe
Ingredients:
Instructions:
Nutrition Facts:
| Calories | 240 kcal |
|---|---|
| Protein | 4.2 g |
| Fat | 21.8 g |
| Carbs | 6.5 g |
