Chicken Breast Recipe with Garlic and Herbs: Juicy Results

- Time: Active 10 mins, Passive 15 mins, Total 25 mins
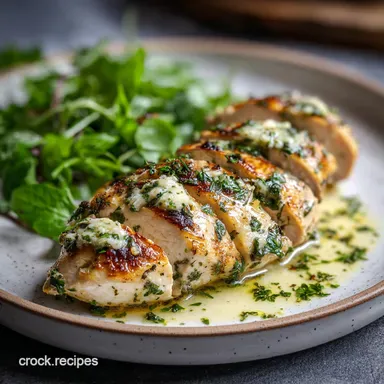
- Flavor/Texture Hook: Savory garlic infused butter with a golden, crispy mahogany crust
- Perfect for: Quick weeknight dinners or high protein meal prep
- Effortless Chicken Breast Recipe with Garlic and Herbs for Busy Nights
- Understanding the Thermal Principles Behind Juicy Pan Seared Poultry
- Decoding the Component Analysis of Aromatics and Poultry
- Gathering Your Pantry Essentials and Fresh Garden Herbs
- Minimalist Kitchen Tools for Maximum Flavor Impact
- Step-by-Step Guide to Pan Searing and Butter Basting
- How to Avoid Common Pitfalls and Dry Meat
- Smart Dietary Swaps for Every Lifestyle and Kitchen
- Adjusting Portions for Groups or Solo Cooking
- Debunking Common Kitchen Myths About Poultry
- Practical Storage Solutions and Zero Waste Kitchen Tips
- Perfect Side Dish Pairings for a Complete Meal
- Recipe FAQs
- 📝 Recipe Card
Effortless Chicken Breast Recipe with Garlic and Herbs for Busy Nights
Have you ever stood in your kitchen, staring at a pack of chicken breasts, and felt that Wave of Boredom hit? I've been there more times than I can count. For years, I thought "healthy" meant "dry," and I'd choke down rubbery, flavorless meat just to get the protein in.
Then, one Tuesday night when I was too tired to even look at a cookbook, I decided to treat a humble breast like a high end steak. I threw a big knob of butter into the pan with some smashed garlic and watched it foam up, smelling like a dream.
The result was a total revelation. The house smelled like a French bistro, and the first bite actually had that satisfying "shatter" on the crust while the inside remained tender and dripping with juice.
This chicken breast recipe with garlic and herbs delivers a flavorful, simple dinner that feels fancy but takes less time than ordering takeout. We’re moving away from the "sad chicken" era and moving into the "butter basted glory" era, and I promise you won't look back.
Honestly, the secret isn't in some expensive gadget or a 20 ingredient spice rub. It is all about the technique of using fresh herbs and real garlic to perfume the oil. If you have a heavy skillet and 25 minutes, you have everything you need to change your weeknight routine forever.
Let's get into the nitty gritty of why this works so well.
Understanding the Thermal Principles Behind Juicy Pan Seared Poultry
- The Maillard Reaction: High heat transforms the surface proteins and sugars into a complex, savory crust that provides a deep umami base.
- Aromatic Fat Infusion: Since garlic and herbs are fat soluble, the avocado oil and butter act as a delivery system, carrying flavor deep into the meat fibers.
- Carryover Cooking: Internal temperature continues to rise after removal from the pan, ensuring the meat reaches safety without becoming stringy.
- Surface Dehydration: Searing on high heat quickly evaporates surface moisture, allowing the skin like exterior to crisp rather than steam.
| Chicken Thickness | Internal Temperature | Rest Time | Visual Finished Cue |
|---|---|---|---|
| 0.5 inch | 160°F | 3 mins | Opaque throughout, firm touch |
| 1.0 inch | 160°F | 5 mins | Juices run clear, no pink |
| 1.5 inch | 160°F | 8 mins | Springy resistance when pressed |
Understanding the thickness of your meat is the biggest hurdle to success. Most people overcook chicken because they are afraid of it being raw, but if you pull it at 160°F and let it rest, it will hit that safe 165°F naturally.
This prevents the muscle fibers from tightening up and squeezing out all the moisture, which is the main cause of that "woody" texture we all hate.
Decoding the Component Analysis of Aromatics and Poultry
| Ingredient | Science Role | Pro Secret |
|---|---|---|
| Avocado Oil | High Smoke Point | Use this for the initial sear to prevent bitter, burnt oil flavors. |
| Grass fed Butter | Flavor & Emulsification | Add this only at the end to create a nutty, velvety finishing sauce. |
| Fresh Garlic | Sulfuric Aromatics | Smash the cloves rather than mincing to avoid burning and provide a mellow sweetness. |
| Rosemary/Thyme | Volatile Oil Release | The heat "pops" the herb cells, releasing woody and citrusy notes into the fat. |
For a slightly different flavor profile that still uses these classic techniques, you might love the richness of my Creamy Sun Dried recipe, which builds on this same garlic base.
Gathering Your Pantry Essentials and Fresh Garden Herbs
To get started, you will need 4 boneless skinless chicken breasts, ideally around 7 oz each. If they are uneven in thickness, do yourself a favor and pound them out slightly so they cook at the same rate. You will also need 6 cloves of fresh garlic, which we are going to smash and peel but leave whole.
For the herbs, grab 4 sprigs of fresh rosemary and 4 sprigs of fresh thyme. Don't even think about using the dried stuff here - the fresh sprigs are what create that "woodsy" aroma.
For the seasoning and fats, you'll need 1 bunch of fresh Italian parsley (finely chopped for the finish), 2 tbsp of avocado oil, and 3 tbsp of unsalted grass fed butter. The spice mix is simple: 1 tsp sea salt, 1/2 tsp cracked black pepper, and 1/2 tsp onion powder.
| Original Ingredient | Substitute | Why It Works |
|---|---|---|
| Avocado Oil | Ghee | Ghee has a high smoke point and a rich, buttery flavor profile. |
| Fresh Rosemary | Fresh Sage | Sage provides a similar earthy, robust flavor that stands up to high heat. |
| Grass fed Butter | Coconut Oil | Use refined coconut oil for a dairy-free option. Note: Adds a very faint tropical note. |
The key to this dish is the balance between the over high heat oil and the finishing butter. If you swap the avocado oil for extra virgin olive oil, it might smoke too much and leave a bitter taste on your meat. Stick to high smoke point fats for the first five minutes of cooking to keep things clean.
Minimalist Kitchen Tools for Maximum Flavor Impact
You really don't need much to make this happen, which is why I love it. A heavy bottomed skillet is your best friend here. I personally prefer a cast iron skillet because it holds onto heat like nothing else, giving you that gorgeous mahogany sear.
If you don't have one, a heavy stainless steel pan works too, but avoid thin non stick pans as they can't handle the heat required for a proper crust.
You will also need a pair of sturdy tongs for flipping and a large spoon. The spoon is for the "basting" phase, where we tilt the pan and spoon that liquid gold (the garlic butter) over the chicken repeatedly. A reliable meat thermometer is the only "tech" I insist on.
It takes the guesswork out of the equation and guarantees you never serve a dry meal again.
step-by-step Guide to Pan Searing and Butter Basting

1. Prepping the Poultry
Pat the 4 chicken breasts completely dry with paper towels. Note: Surface moisture creates steam, which prevents a crispy crust. Season both sides generously with the 1 tsp sea salt, 1/2 tsp black pepper, and 1/2 tsp onion powder.
2. High Heat Searing
Heat the 2 tbsp avocado oil in your heavy skillet over medium high heat. Place the chicken in the pan, laying it away from you to avoid splatters. Cook for 5 to 6 minutes until a deep golden crust forms and the meat releases easily.
3. Creating the Infusion
Flip the chicken over. Immediately drop in the 3 tbsp grass fed butter, the 6 smashed garlic cloves, and the sprigs of rosemary and thyme. Note: The butter will foam and pick up the herb oils quickly.
4. The Basting Phase
Tilt the pan slightly so the melting butter pools at the bottom with the garlic and herbs. Use a spoon to continuously pour the hot butter over the chicken for 3 to 4 minutes until the butter smells nutty and the garlic is soft.
5. Monitoring the Finish
Continue cooking until the internal temperature reaches 160°F. The exterior should look glistening and mahogany colored.
6. Mastering the Rest
Transfer the meat to a cutting board and pour the remaining pan juices over the top. Let it rest for at least 5 minutes until the juices redistribute and the temperature hits 165°F.
7. The Final Touch
Sprinkle the bunch of chopped Italian parsley over the warm meat. The residual heat will wake up the parsley's brightness without wilting it completely.
How to Avoid Common Pitfalls and Dry Meat
Preventing Bitter Burnt Garlic
One of the biggest mistakes is adding the garlic too early. If you put it in the pan at the start with the oil, it will turn black and acrid by the time the chicken is done. By adding it halfway through with the butter, you allow it to confit in the fat, turning it sweet and mellow instead of burnt.
Stopping the Rubbery Texture
If your chicken feels like a sponge, it likely steamed rather than seared. This happens when the pan is overcrowded. If your 4 breasts don't fit with at least an inch of space between them, cook them in two batches. This keeps the pan temperature high and ensures a "shatter" on the crust rather than a soggy surface.
| Problem | Root Cause | Solution |
|---|---|---|
| Chicken is tough/dry | Overcooked past 165°F | Use a thermometer; pull at 160°F and rest. |
| Butter is smoking/black | Heat too high for basting | Lower heat to medium once butter is added. |
| No golden crust | Pan was not preheated | Wait until oil shimmers before adding meat. |
If you find yourself struggling with the pan searing method, you might find the consistency of a Creamy Chicken Breast recipe more forgiving since the sauce helps retain moisture.
Common Mistakes Checklist
- ✓ Skipping the paper towel step (dry meat = better sear).
- ✓ Using cold chicken straight from the fridge (let it sit out 15 mins).
- ✓ Forgetting to rest the meat (the juices will run out if you cut too soon).
- ✓ Moving the chicken too much (leave it alone for the first 5 mins!).
- ✓ Crowding the pan (work in batches if your skillet is small).
Smart Dietary Swaps for Every Lifestyle and Kitchen
Making it Keto and Paleo
This recipe is naturally very low in carbs (only 1.2 g per serving), making it perfect for keto. To make it strictly Paleo or Whole30, swap the grass fed butter for ghee. The flavor remains nearly identical, but you remove the milk solids that can cause issues for some.
Garlic and Herb Chicken Breast Air Fryer Version
If you're in a rush, you can adapt this for the air fryer. Rub the chicken with the oil and spices, then air fry at 375°F for 12 to 15 minutes.
To get that "basted" feel, melt the butter with the garlic and herbs in a small bowl and brush it on during the last 3 minutes of cooking. It won't have the same heavy crust, but it's a great shortcut.
- If you want Maximum Crunch: Use a cast iron skillet and don't touch the meat for 6 minutes.
- If you want Lower Calorie: Reduce butter to 1 tbsp and add a splash of chicken broth for the baste.
- If you want Extra Brightness: Squeeze half a fresh lemon over the pan right before serving.
Adjusting Portions for Groups or Solo Cooking
Scaling Down for One or Two
When cooking for just yourself, you can easily use 1 or 2 breasts. Still use at least 2 cloves of garlic and a full sprig of each herb to ensure the butter gets enough flavor. You can reduce the butter to 1.5 tbsp, but keep the oil the same to ensure a good sear in the pan.
Scaling Up for a Crowd
If you are doubling the recipe, do not crowd the pan. Cook 4 breasts, move them to a warm plate, and then cook the next 4. You can make a large batch of the herb butter in the second round and pour it over all the chicken at once.
Note that when doubling, you only need about 1.5x the salt and spices, as they go a long way.
Debunking Common Kitchen Myths About Poultry
Myth: Searing meat "seals in" the juices. This is actually false. Searing is entirely about flavor and texture through the Maillard reaction. Moisture loss actually increases at high temperatures, which is why the resting period is the most critical step for keeping the chicken juicy, not the sear itself.
Myth: You must wash chicken before cooking. Please, don't do this! Washing chicken in the sink actually spreads bacteria around your kitchen via water droplets. The heat of the pan is what kills any bacteria, and patting it dry with paper towels is the only "cleaning" step you need for a better crust.
Practical Storage Solutions and Zero Waste Kitchen Tips
Storage Guidelines: Store leftovers in an airtight container in the fridge for up to 4 days. When reheating, do it gently in a pan with a splash of water or broth to prevent the meat from becoming "rubbery." In the freezer, these breasts will stay good for up to 3 months.
I recommend slicing them before freezing so you can grab just what you need for salads or wraps.
Zero Waste Tips: Don't throw away those herb stems! The woody stems of rosemary and thyme hold a ton of flavor. Throw them into a freezer bag to use the next time you make a stock or soup. If you have leftover garlic herb butter in the pan, don't wash it down the drain.
Toss some leftover rice or a handful of spinach into the warm pan to soak up all that seasoned fat. It’s basically free flavor for your side dish!
Perfect Side Dish Pairings for a Complete Meal
Since this chicken is so savory and rich from the butter baste, I love serving it with something that has a bit of acidity or crunch. A simple arugula salad with lemon vinaigrette cuts through the fat beautifully.
If you want something heartier, roasted baby potatoes are a classic choice because you can drizzle that extra garlic butter from the pan right over them.
Another great option is steamed asparagus or sautéed green beans. If you’re looking for a more traditional comfort food vibe, this pairs excellently with a Mums Magic Chicken recipe inspired side, like a simple bed of polenta or buttered noodles. The herbs in the chicken will complement almost any Mediterranean or European style side dish you can dream up. Just remember to keep the sides relatively simple so the garlic and herb infusion remains the star of the show.

Recipe FAQs
How to make garlic and herb chicken breast?
Pat the chicken dry, season well, and sear in high heat oil for 5-6 minutes per side until golden brown. Reduce heat, add butter, crushed garlic cloves, and fresh herb sprigs (rosemary/thyme), then continuously spoon the foaming butter mixture over the chicken for the remainder of the cooking time.
What herbs go with chicken and garlic?
Rosemary and thyme are the best classic pairings for this preparation. Their woody, robust essential oils infuse beautifully into the butter fat without burning during the high heat sear phase.
What herbs and spices go well with chicken breast?
For flavor depth, use sea salt, black pepper, and onion powder alongside fat-soluble fresh herbs. For a brighter finish, stir in fresh parsley right before serving to add fresh green notes.
What is the best way to cook chicken breasts to keep them moist and tender?
The best method involves a hot sear followed by basting and a mandatory rest period. Pull the chicken off the heat when the internal temperature hits 160°F, then let it rest for at least 5 minutes to allow the muscle fibers to relax and reabsorb the juices.
How long do I sear the chicken breast before adding the butter?
Sear for 5 to 6 minutes on the first side until a deep mahogany crust forms. This step is crucial for developing surface flavor; do not move the chicken during this time or you will interrupt the Maillard reaction and prevent crisping.
Can I use dried herbs instead of fresh for the butter basting?
No, using dried herbs for basting is strongly discouraged. Dried herbs are more likely to burn quickly in hot butter, resulting in a bitter taste; fresh sprigs release their oils slowly, perfuming the fat effectively.
Is it true that I must let the chicken rest after cooking?
Yes, resting is non-negotiable for tender chicken. If you cut into it immediately, all the pressurized moisture flows out onto the board, leaving the meat dry. If you master the sensory doneness cues here, apply them to similar quick cooked proteins for perfect results.
Garlic Herb Chicken Breast
Ingredients:
Instructions:
Nutrition Facts:
| Calories | 388 calories |
|---|---|
| Protein | 46.2 g |
| Fat | 19.4 g |
| Carbs | 1.2 g |
| Fiber | 0.3 g |
| Sugar | 0.1 g |
| Sodium | 615 mg |
