Keto Fluffernutter Bars: Nostalgic Low Carb Sweets with Toasted Fluff
- Keto Fluffernutter Bars: The Cracking Good Low-Carb Comfort Treat
- Mastering Texture and Flavour: The Science Behind These Keto Bars
- Essential Ingredients for the Three Magical Layers
- Step-by-Step Guide to Baking Perfect Keto Fluffernutter Bars
- Troubleshooting and Expert Secrets for Success
- Storing Your Peanut Butter and Marshmallow Magic
- Pairing and Serving Suggestions
- Recipe FAQs
- 📝 Recipe Card
Keto Fluffernutter Bars: The Cracking Good Low-Carb Comfort Treat
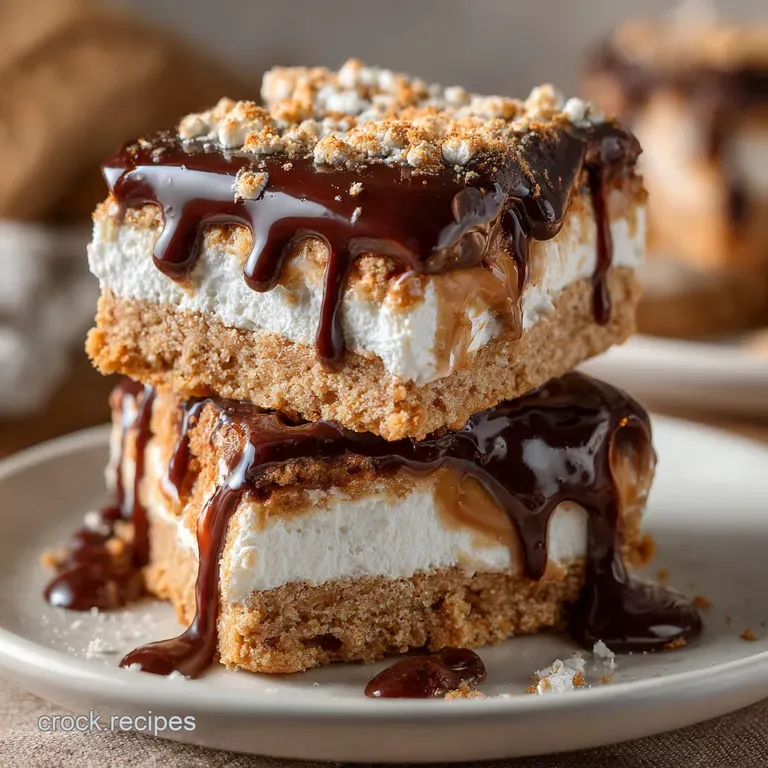
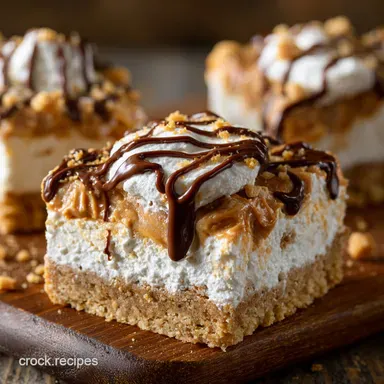
You remember that sticky, sweet cloud of fluff mixed with salty, dense peanut butter, right? It’s pure childhood comfort food. These Keto Fluffernutter Bars capture that exact feeling, but with a satisfying, crunchy base and the most divine, toasted meringue topping. The aroma alone when you pull them from the oven is totally addictive, smelling exactly like a campfire dessert.
Look, low-carb baking can be a total faff, but this one is surprisingly straightforward once you nail the meringue. You get three distinct layers of flavour and texture in under an hour of active time.
It’s perfect for afternoon snacking, prepping desserts for the week, or when you need a sneaky crowd pleaser that fits the keto life perfectly.
I’ve spent months tweaking this recipe trust me, I’ve had many weeping meringue fails so you don't have to deal with gritty topping or crumbly bases. I’m giving you the real world tricks that actually work for this low-carb treat. Let’s dive into how we create this magic.
Mastering Texture and Flavour: The Science Behind These Keto Bars
Decoding the Fluffernutter: What Makes This Treat Iconic?
The classic Fluffernutter is all about the contrasting textures. You have the soft bread meeting the thick, creamy peanut butter, which is then topped with ultra light, sugary marshmallow fluff. Recreating that structure in a low-carb context is the challenge, but we absolutely smash it here.
The Keto Transformation: Why Peanut Butter and Meringue Work So Well
Our almond flour base provides the necessary structural crunch, much like a proper shortbread cookie. The key is using cream cheese in the filling; this gives the peanut butter layer stability so it doesn't just run everywhere when you cut it.
The keto meringue uses stabilizers like cream of tartar, which ensures it stands up tall and glossy, mimicking real marshmallow fluff beautifully.
Recipe Difficulty and Preparation Timeline
I rate this a medium difficulty recipe, mostly because of the meringue stage. You need to be focused during the broiling step, too. The active prep is quick, about 20 minutes total, but you absolutely must allow proper chilling time. Don't rush the chill if you want clean, beautiful slices.
Achieving the Perfect Low-Carb Base Crunch
We use a combination of almond flour and a touch of coconut flour for the perfect crumb. The real secret weapon is xanthan gum. Just a small amount mimics the binding quality of gluten, stopping the base from being overly crumbly a common issue when working strictly with nut flours.
Stabilizing the 'Marshmallow' Keto Meringue Fluff
Traditional marshmallow fluff relies heavily on corn syrup and sugar to keep its shape. Since we banned those, we need careful technique. Room temperature egg whites, a meticulously clean bowl, and gradually adding the finely powdered sweetener are non-negotiable steps.
If you want extra insurance, the optional collagen powder helps prevent that dreaded "weeping."
Balancing Sweetness Without the Sugar Crash
We rely on erythritol/monk fruit blends, which provide great bulk and sweetness without affecting blood sugar. Since some keto sweeteners can have a cooling effect, I recommend using Allulose if you have it for the meringue. It dissolves so smoothly, leaving no aftertaste whatsoever.
Essential Ingredients for the Three Magical Layers
Quick Tip: Make sure all your ingredients are measured precisely. Baking, especially low-carb baking, is science!
Building the Crust: Choosing the Right Almond Flour
You want fine, blanched almond flour for the best texture; coarse almond meal will give you a grainy mouthfeel. Coconut flour is essential here because it helps absorb excess moisture from the melted butter.
Peanut Butter Filling: Smooth vs. Natural Varieties
Always choose a natural, unsweetened peanut butter for this recipe. Read the label! It should contain only peanuts and maybe salt. The overly stabilized, sugary supermarket brands will make the filling too runny and oily. Use smooth it integrates better with the cream cheese.
Crucial Components for the sugar-free Meringue
Cream of Tartar is your friend. It lowers the pH of the egg whites, helping them hold air and volume. If you don't have it, a tiny bit of lemon juice will work, but Cream of Tartar is definitely better. Remember to use only powdered sweetener here.
Granulated will make the meringue crunchy and grainy.
Sourcing Approved Keto Sweeteners and Sugar Alternatives
This is where planning helps. Powdered erythritol/monk fruit is easy to source now, but Allulose is truly superior for the meringue layer. If you are having trouble finding it, simply blitz your granulated sweetener blend in a coffee grinder or food processor until it is dust fine.
| Ingredient | Why We Use It | Viable Substitution |
|---|---|---|
| Almond Flour | Structure, low carb base | Finely ground pecan or walnut flour |
| Peanut Butter | Flavour, density | Almond butter or sunflower seed butter (watch for green discoloration) |
| Erythritol/Monk Fruit (Granulated) | Sweetness in the base | Xylitol (toxic to pets!) or Allulose |
| Cream of Tartar | Meringue stabilizer | 1 teaspoon of fresh white vinegar or lemon juice |
| Xanthan Gum | Binding agent | Psyllium husk powder (may change texture slightly) |
step-by-step Guide to Baking Perfect Keto Fluffernutter Bars

Phase 1: Preparing and Baking the Almond Flour Base
- Prep: Preheat your oven to 175°C (350°F). Line your 8x8 inch pan with parchment paper, leaving enough overhang to use as a "sling." This is key for easy removal!
- Combine Dry & Wet: Whisk together all the dry ingredients for the base (flours, gum, salt). Pour in the melted butter and vanilla. Mix until a proper dough forms it will look heavy.
- Bake: Press the dough evenly into the prepared pan. Bake for about 12 minutes. You want the edges to be lightly golden and the middle set. Let it cool slightly while you move on.
Phase 2: Whipping Up the Rich Peanut Butter Center
- Cream Cheese First: Ensure your cream cheese is soft; it needs to be pliable. Beat it until it's completely smooth before you add anything else. This prevents lumps.
- Mix Filling: Add the peanut butter, powdered sweetener, and vanilla. Mix only until just combined and gloriously creamy. Overmixing here can make the peanut butter separate and become oily.
- Spread and Chill: Carefully spread this filling over the warm crust, making sure to spread it right to the edges. Now, put the pan in the fridge for a solid 30 minutes. Don't skip this chilling step! A firm filling is crucial for a clean layering with the fluff.
Phase 3: Creating and Toasting the Airy Meringue Topping
- Meringue Prep: The stand mixer bowl must be spotless. Add the room temperature egg whites and cream of tartar. Start whipping on medium.
- The Fluffing: Once the whites are foamy (like bubble bath), turn the speed up to medium high and gradually stream in the powdered sweetener. Keep whipping. We are looking for stiff, glossy peaks that hold their shape proudly. You should be able to turn the bowl upside down without anything moving.
- Top and Swirl: Retrieve the chilled bars. Gently spoon the meringue over the peanut butter layer. Use the back of a spoon or a spatula to create lovely peaks and swoops these high points are what will toast beautifully.
- Broil Time (Danger Zone!): Switch your oven to Broil (High) and move the rack down low (6 inches from the element). Put the pan in and WATCH CONSTANTLY. This takes 30 to 90 seconds, maybe less. The tips should turn golden brown instantly. Pull them out immediately.
Proper Cooling and Cutting Techniques
Let the bars cool completely at room temperature, then transfer them back into the refrigerator for a minimum of 2 hours, or until they are firm throughout. Use a large, sharp knife, running it under hot water and drying it between each slice.
This keeps the meringue from tearing and makes your cuts absolutely perfect.
Troubleshooting and Expert Secrets for Success
Avoiding a Runny Peanut Butter Layer
If your peanut butter layer is too soft, it usually means your cream cheese wasn't cold enough initially, or you used a peanut butter with extra oil stabilizers. Next time, use slightly less melted butter in the base, and ensure the filling chills until firm before topping. If you need a gorgeous peanut butter layer for other desserts, you could even try adding a bit of my Keto Caramel Sauce Silky, sugar-free Salted Drizzle (1g Net Carbs) into the mixture for fudgier texture.
The Meringue Test: How to Tell When it's Stiff Enough
You know it’s ready when the mixture is glossy, and when you lift the whisk, the peak holds its shape without collapsing or drooping. It should look like snowy mountains. If it’s weeping or soft, you need to keep whipping, or you may have incorporated fat (like a tiny bit of yolk) into the whites.
Start over if you suspect contamination!
Chef's Note: If your meringue still feels slightly gritty, it’s a sure sign your sweetener wasn't powdered finely enough. Next time, use Allulose or blitz your granulated sweetener longer.
Getting That Signature Toasted Top (Broiler vs. Torch Method)
The broiler is fast but terrifying. If you are nervous, use a small kitchen torch instead! You get much more control and can precisely hit those peaks without risking the entire batch. I usually pull the bars out, use the torch for a minute, and then serve.
Preventing the Crust from Sticking to the Pan
That parchment paper sling is your best friend. Always leave enough paper hanging over the edges so you can lift the entire, chilled block right out of the pan before slicing. Trying to cut them in the pan always results in a mess.
Storing Your Peanut Butter and Marshmallow Magic
Shelf Life and Refrigeration Best Practices
Because of the cream cheese filling and the egg white meringue, these bars must be refrigerated. Store them in an airtight container for up to 5 days. The meringue will soften slightly over time, so they are always best within the first three days.
Freezing Keto Fluffernutter Bars for Later Indulgence
Do these low-carb treats freeze well? You bet. Cut the bars fully, then place them on a parchment lined tray and flash freeze them for an hour. Once solid, transfer them to a freezer safe zip-top bag or container, separating layers with wax paper. They will last up to 2 months.
Thaw overnight in the refrigerator for the best texture.
Pairing and Serving Suggestions
These Keto Fluffernutter Bars are rich and definitely count as a celebratory dessert. They pair wonderfully with a strong, unsweetened coffee.
If you are hosting, consider serving these alongside something equally decadent but totally different, like my recipe for Keto Vanilla Bean Scones Crumbly, Creamy Low Carb Scone Recipe for an elevated brunch spread. They also make a fantastic counterpoint to something fruit forward, like a bowl of fresh raspberries or tart blueberries, which cut through the richness of the peanut butter.

Recipe FAQs
Why is my homemade keto meringue topping weeping or collapsing?
Weeping is often caused by residual fat on the mixing equipment or excessive humidity in the environment. Ensure your mixing bowl and whisk attachment are perfectly clean before starting, as any trace of fat prevents the egg whites from stiffening correctly.
Additionally, make sure the peanut butter base is thoroughly chilled before applying the meringue fluff.
Can I use almond butter or another nut butter instead of peanut butter?
Absolutely; almond butter, cashew butter, or even sunflower seed butter are suitable substitutes, though they will subtly change the classic Fluffernutter flavor profile. Ensure the consistency is smooth and natural avoid very oily or dry nut butters to maintain the desired creamy texture in the filling layer.
Adjusting the sweetener might be necessary depending on the inherent sweetness of the butter used.
My crust came out too crumbly and dry. What should I check?
A crumbly crust usually indicates an imbalance in fat content or insufficient moisture in the mixture. Ensure you measure the almond flour accurately and melt the butter fully before incorporating it.
Crucially, press the crust mixture extremely firmly into the pan using the bottom of a measuring cup or glass before chilling and baking.
How should I store the Keto Fluffernutter Bars, and can I freeze them?
Due to the stabilizing properties of the meringue topping, the bars must be stored in an airtight container in the refrigerator for up to 5 days. Freezing the finished bar is generally not recommended, as the delicate structure and texture of the meringue fluff will deteriorate significantly upon thawing.
It is best to enjoy these chilled.
Which type of keto sweetener works best for the meringue fluff?
For the best texture, powdered erythritol blends (such as Swerve or Lakanto) are highly recommended, as granulated varieties can leave a gritty, crystallized mouthfeel in the soft fluff.
Allulose is also a superior choice if available, as it dissolves completely and helps the meringue remain soft and pliable even when refrigerated. Start with a conservative measurement and taste before stabilizing the meringue.
I don't have a kitchen torch. How else can I toast the marshmallow fluff?
You can achieve a similar toasted effect using the broiler function in your oven. Place the fully chilled bars on the top rack, setting the oven to high broiler, and watch them very closely this process takes only 30 to 60 seconds.
Remove the bars immediately once the tips of the fluff turn golden brown to prevent burning the meringue or melting the entire bar.
Can this recipe be made dairy-free while remaining keto?
Yes, the recipe is easily adaptable to be dairy-free. Simply substitute the butter required for the base and the peanut butter filling with solidified coconut oil or a high-quality vegan butter substitute.
The meringue topping itself is naturally dairy-free, but confirm that your preferred peanut butter does not contain added milk solids.
Keto Fluffernutter Bars Recipe
Ingredients:
Instructions:
Nutrition Facts:
| Calories | 186 kcal |
|---|---|
| Protein | 8.6 g |
| Fat | 14.3 g |
| Carbs | 7.6 g |
