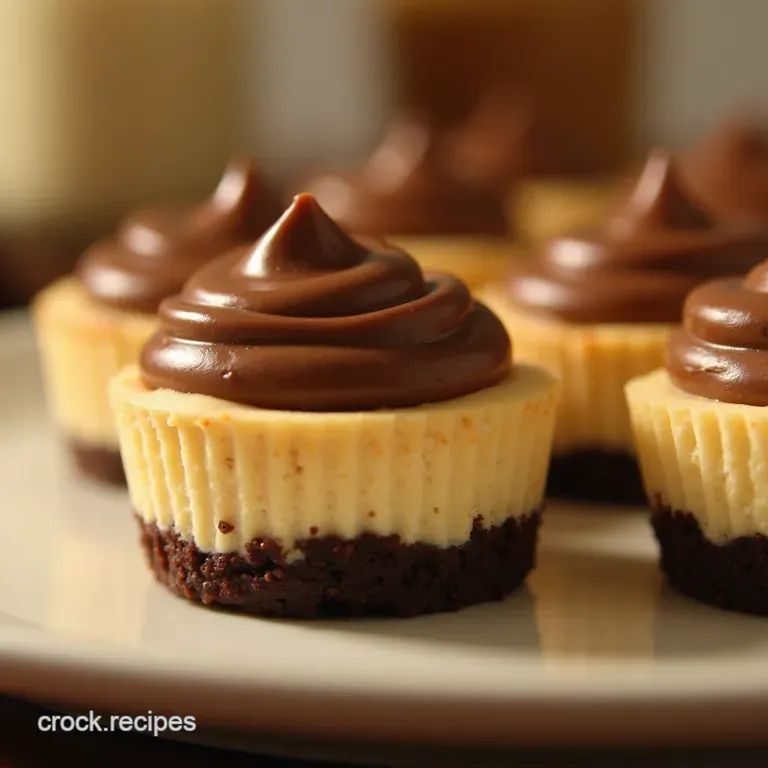
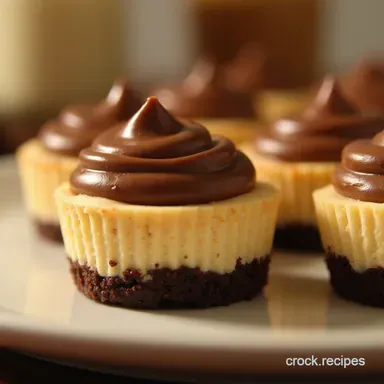
Nofuss Fudge Bottom Decadent Mini Peanut Butter Cup Cheesecakes

- Why These Single-Serving Delights Triumph Over Full-Sized Desserts
- The Ultimate Peanut Butter and Cream Cheese Collision
- Assembling Your Cupcake Components: What You Need
- Essential Tools for Perfect Mini Peanut Butter Cup Cheesecakes
- Step-by-Step Guide to Crafting Your Miniature Masterpieces
- Baking and Cooling Protocols for Optimal Texture
- Pro Baker Secrets: Troubleshooting and Texture Tips
- Serving Suggestions and Creative Variations for Your Batch
- Recipe FAQs
- 📝 Recipe Card
Why These Single Serving Delights Triumph Over Full Sized Desserts
There is something inherently satisfying about a perfectly portioned treat. While a full sized cheesecake offers grandeur, these Mini Peanut Butter Cup Cheesecakes bring accessibility and elegance to the forefront.
When you’re faced with a towering dessert, the first slice is always a commitment; with these miniature versions, however, portion control becomes a delightful formality rather than a restriction.
They are the ideal star for any dessert spread, ensuring that every guest gets a pristine, perfectly formed specimen without the messy slicing required by a traditional Peanut Butter Cup Cheesecake .
Plus, they bake faster and chill quicker, meaning your craving satisfaction window is drastically shortened.
The Ultimate Peanut Butter and Cream Cheese Collision
This recipe masters the iconic sweet and salty profile by marrying the creamy tang of classic cheesecake with the rich, familiar flavour of peanut butter cups. Our goal here is textural brilliance a firm, slightly fudgy base giving way to a silken, smooth filling, all crowned with a luxurious chocolate finish.
These Mini Peanut Butter Chocolate Cheesecakes manage to feel both nostalgic and gourmet simultaneously, making them a showstopper at parties or a decadent end to a quiet evening.
Bypassing the Springform Pan Headache
One of the greatest advantages of this Mini Cheesecake Cups Recipe is the elimination of the dreaded springform pan. Anyone who has meticulously prepared a water bath only to have a cheesecake stick to the sides knows the anxiety involved.
By utilizing a standard 12-cup muffin tin lined with paper liners, we sidestep that drama entirely. The liners act as natural parchment, ensuring easy release and pristine sides every single time you pull one of these gorgeous Mini Desserts out of the pan.
The Allure of Bite Sized Indulgence
The smaller format means the structural integrity of each bite is maximized. Instead of a large wedge where the crust risks crumbling, each Mini Peanut Butter Cup Cheesecake is a self contained unit.
You get a consistent ratio of crust to filling, delivering that perfect textural contrast exactly where it belongs. This format is also fantastic for gifting or packing up no need for special carriers, just pop the lid on the tin!
Flavor Profile Breakdown: Salty, Sweet, and Tangy Perfection
The success of any great Peanut Butter Cup Recipe adaptation lies in balancing those core flavour notes. We achieve this through three layers: a deep, dark chocolate crust made from crushed wafers; a filling where the richness of quality peanut butter is lifted by the essential tang of cream cheese; and a final ganache topping that ties the chocolate and peanut elements together seamlessly.
The hint of chopped peanut butter cups mixed directly into the batter adds pockets of melting chocolate and peanut butter throughout the bake.
Assembling Your Cupcake Components: What You Need
To create these flawless Mini Peanut Butter Cup Cheesecakes Recipe , we need three distinct component groups: a chocolate foundation, a luscious filling, and a glossy, appealing topping.
Proper preparation hinges on using ingredients at their ideal temperatures; cold cream cheese leads to lumps, and cold eggs can shock the batter. For the base, we rely on rich chocolate wafer crumbs, butter, and a touch of sugar to create a dense platform.
The filling must incorporate full fat cream cheese, sugar, smooth peanut butter (avoiding oily natural varieties here for consistency), room temperature eggs, vanilla, and a splash of heavy cream for extra silkiness.
Finally, the topping requires simple semi sweet chips, cream, and a final flourish of chopped full sized peanut butter cups for that final, irresistible crunch.
Essential Tools for Perfect Mini Peanut Butter Cup Cheesecakes
While this recipe avoids complex equipment, a few tools are indispensable for achieving professional results. A sturdy electric mixer (handheld or stand) is vital for properly creaming the cream cheese until utterly smooth.
You will also need a standard 12-cup muffin tin, and crucially, good quality paper or foil cupcake liners paper generally peels away the cleanest after chilling. A food processor makes quick work of crushing the chocolate wafers for the base, though a strong Ziploc bag and a rolling pin work perfectly well in a pinch.
Sourcing the Ideal Cookie Crumble Base Ingredients
For the crust, think intensely chocolatey. Chocolate wafer cookies, often found near graham crackers, offer a deeper, less sweet base than chocolate sandwich cookies, especially if you scrape out the cream filling first.
The melted unsalted butter binds these crumbs tightly, while the small measure of added granulated sugar ensures a slight crispness that holds up beautifully against the moist filling.
Securing the Silky Smooth Cheesecake Batter Elements
The secret to a lump free Cheesecake Recipes filling is patience with your cream cheese. It must be softened fully, allowing the mixer to incorporate it into a cloud like texture before any sugar or wet ingredients are added.
Eggs should also be at room temperature to blend seamlessly without requiring over mixing, which introduces air bubbles that can later lead to cracks or a spongy texture.
The Non-Negotiable Toppings and Peanut Butter Cup Selection
When selecting the peanut butter cups for mixing into the batter, use the mini variety for easy dispersal. For the final garnish, using larger cups, roughly chopped, provides a more substantial textural element on top.
The chocolate ganache topping requires quality semi sweet chips, as they provide the best balance against the sweetness of the peanut butter filling below.
Related Recipes Worth Trying
- Easy Cheesecake Cups Foolproof NY Style in Muffin Tins — Stop wrestling with springforms These Easy Cheesecake Cups deliver rich tangy flavour in a perfect portion A simple recipe for No Bake Cheesecake Cups fans
- NoBake Peanut Butter Oreo Cookie Balls Recipe Easy 3Ingredient Treat — Whip up these easy Peanut Butter Oreo Cookie Ballsa delicious nobake dessert that tastes gourmet Ready in minutes these truffles are dangerously addictive...
- Kentucky Butter Cake Cookies Glazed MeltInYourMouth — Tired of crumbly cookies Our Kentucky Butter Cake Cookies recipe delivers that signature rich crumb soaked in bourbon glaze Easy to make Get the secret...
step-by-step Guide to Crafting Your Miniature Masterpieces
The journey to these delectable Peanut Butter Cup Cheesecake bites is straightforward, broken down into preparing the base, whipping the filling, and executing the final decorative touches. Achieving the right texture in each stage is what separates a good dessert from a truly memorable one.
Baking and Cooling Protocols for Optimal Texture
The baking process for these small treats requires a moderate oven temperature— 325° F ( 160° C) is ideal. This lower temperature allows the filling to set gently from the edges inward without cooking the centre too quickly, which is the main cause of cracks in any cheesecake preparation.
Pressing the Fudge Infused Crust into Liners
Begin by combining your 1 ½ cups of chocolate wafer crumbs with the 5 tablespoons of melted butter and 1 tablespoon of sugar until uniformly damp. Divide this mixture evenly, using about 1 ½ tablespoons per liner, and press it firmly into the bottom of each paper cup nestled in your muffin tin.
A flat bottomed measuring cup or a small shot glass makes an excellent tamper for achieving a flat, compact base. The crust is then chilled for a minimum of 30 minutes in the freezer while you prepare the filling; this ensures it stays put during baking.
Whipping Up a Lump Free Filling
In your mixer, beat the 16 oz of softened cream cheese on medium speed until it is absolutely smooth this might take three to four minutes. Gradually beat in the ¾ cup of granulated sugar until just combined, then incorporate the ½ cup of peanut butter, 1 teaspoon of vanilla extract, and 1 tablespoon of heavy cream.
The eggs (2 large, room temperature) must be added one at a time, mixing only until the yolk disappears after each addition. Finally, use a rubber spatula to gently fold in the ¼ cup of roughly chopped mini peanut butter cups.
The Art of the Water Bath (Optional but Recommended)
While this Mini Peanut Butter Cup Cheesecake recipe is designed to be sturdy enough without one, an optional water bath (bain marie) can guarantee the silkiest texture. If opting for this, place the muffin tin inside a larger roasting pan.
Carefully pour boiling water into the roasting pan until it reaches halfway up the sides of the muffin tin. This method introduces gentle, moist heat.
Chilling Time: Patience for the Firmest Set
Bake for 18 to 22 minutes. You are looking for set edges with a slight, barely perceptible wobble in the very centre. Crucially, once done, turn the oven off, crack the door open, and allow the cheesecakes to cool inside the residual heat for 30 minutes.
This slow transition prevents thermal shock. After this initial cooling, transfer the tin to a wire rack to cool to room temperature before moving them to the refrigerator to chill for a minimum of four hours, though overnight yields the best result for these treats.
Pro Baker Secrets: Troubleshooting and Texture Tips
Achieving that perfect, creamy texture requires respecting the chemistry of cheesecake. The most common pitfall is lumpy batter caused by cold cream cheese, which prevents proper emulsion. Always ensure your cream cheese is truly soft. On top of that,, never rush the chilling stage.
Cheesecake relies on that prolonged cold period to fully crystallize its structure; trying to rush the chilling will result in a soft, almost pudding like texture that doesn't slice or serve well.
Serving Suggestions and Creative Variations for Your Batch
Once fully chilled and topped with the glossy chocolate ganache (made by stirring 2 tablespoons of heavy cream and 1 tablespoon of smooth peanut butter into ½ cup of melted semi sweet chips), these Mini Peanut Butter Cup Cheesecakes are ready to impress.
Maximizing Flavor: Storage Advice for Leftovers
If, by some miracle, you have leftovers, these store beautifully. Keep them tightly covered in the refrigerator for up to five days. For longer storage, they freeze exceptionally well; place them on a tray in the freezer until solid, then transfer them to an airtight container.
Thaw overnight in the fridge for best texture retention.
Scaling Up: Converting to a Full Sized Cookie Cheesecake Bar
Should you decide to tackle a larger format, these components translate perfectly. Simply use a 9 inch springform pan. Increase the crust ingredients by about 1.5 times and press it into the base.
For the filling, double the recipe, pour it over the crust, and bake at the same temperature ( 325° F/ 160° C) for approximately 45 to 55 minutes, utilizing the water bath method for guaranteed smooth results.
Elevating These Bites with Next Level Garnishes
To truly elevate these little creations, consider adding a sprinkle of flaky sea salt immediately after topping with the ganache. The salt crystals catch the light beautifully and amplify the salty sweet dynamic.
A final, delicate drizzle of melted white chocolate in a crisscross pattern also adds a professional touch to your Mini Peanut Butter Chocolate Cheesecakes .
Achieving Peak Creaminess: Common Baking Pitfalls Avoided
Remember that over mixing the batter after the eggs are added is the primary enemy of creaminess. Once eggs are incorporated, mix on the lowest speed possible and only until streaks disappear.
This technique ensures a dense, smooth mouthfeel, showcasing the luxurious qualities inherent in the best Cheesecake Recipes .

Recipe FAQs
My cheesecake batter looks lumpy after mixing the cream cheese what did I do wrong?
Ah, that’s a classic baking blunder! Nine times out of ten, it means your cream cheese wasn't truly at room temperature it was still a bit cold from the fridge. For a silky smooth texture, you need to let the cream cheese sit out for at least an hour until it’s soft to the touch, otherwise, no amount of beating will get rid of those lumps.
Give it another good beat on medium speed, but try not to incorporate too much air.
How do I prevent my Mini Peanut Butter Cup Cheesecakes from cracking on top?
Cracking is the bane of every baker’s existence, but fear not! The two golden rules are: first, don’t overmix the batter once the eggs are in, as air pockets cause structural failure.
Second, cool them gently; once baked, turn the oven off, crack the door, and let them sit inside for about 30 minutes before moving them to the counter. This gradual cool down stops them from shrinking too quickly.
Can I make these ahead of time, and how long do they last in the fridge?
Absolutely, they are miles better when made ahead chilling is essential for setting the texture! You can bake them up to two days in advance and keep them covered tightly in the refrigerator.
They freeze brilliantly too; pop them in an airtight container for up to two months, defrosting overnight in the fridge for the best results.
I don't have chocolate wafer cookies; what's a decent substitute for the crust?
No worries, you can easily improvise! The best swap is regular Graham Crackers, but make sure you add about one tablespoon of unsweetened cocoa powder to the mix to keep that essential chocolate hit.
If you’re in a real pickle, even digestive biscuits will do the trick, though the flavour profile will be slightly different still rather tasty, though!
Are these Mini Peanut Butter Cup Cheesecakes suitable for a bake sale or large party buffet?
They are practically tailor made for parties! Because they are baked in muffin liners, they are perfectly portioned, easy to serve (no slicing required), and transport like a dream. Just remember to keep them well chilled until serving time, especially if you've loaded them up with that lovely ganache topping.
Mini Pb Cup Cheesecakes
Ingredients:
Instructions:
Nutrition Facts:
| Calories | 536 kcal |
|---|---|
| Protein | 5.9 g |
| Fat | 20.4 g |
| Carbs | 40.2 g |
| Fiber | 1.4 g |
| Sodium | 140 mg |
