Nofuss New York Style Cheesecake Cups 7 Blissful Bites to Savor
- The Genius of Portion Control: Why We Love Individual Cheesecake Servings
- Decoding Delight: What Makes These Easy Cheesecake Cups Unforgettable
- Assembling Your Dream Team: Components for Rich Individual Cheesecakes
- Essential Toolkit for Baking Miniature Marvels
- The Master Sequence: Step-by-Step Guide to Crafting Your Easy Cheesecake Cups
- From Oven to Chill: Crucial Curing Periods for Setting Perfection
- Elevating Your Dessert Presentation: Topping and Flavor Twists
- Recipe FAQs
- 📝 Recipe Card
The Genius of Portion Control: Why We Love Individual Cheesecake Servings
There’s something inherently satisfying about perfectly portioned desserts. A full sized cheesecake, while magnificent, often presents logistical challenges slicing, serving uniformity, and the inevitable fear of cracking the pristine surface before it even reaches the table.
That’s where the magic of individual servings shines. Creating Easy Cheesecake Cups transforms this notoriously fussy dessert into a straightforward triumph.
By baking them in muffin tins, we bypass the drama of springform pans and water baths, guaranteeing a beautiful, controlled bake every single time. This approach simplifies the process significantly, making that decadent, creamy texture accessible even to novice bakers.
Decoding Delight: What Makes These Easy Cheesecake Cups Unforgettable
These miniature marvels capture the essence of a New York style treat rich, dense, and wonderfully tangy but wrap it up in a conveniently sized package. We’re looking at a 1-hour active prep time to achieve a dessert that feels like it took all day.
The success lies in breaking down the traditional steps into manageable, individual units, each designed for optimal cooking speed and texture retention.
Escape the Springform Struggle: Baking Brilliance Achieved
The biggest hurdle in classic cheesecake making is managing the environment to ensure even heating and prevent surface fissures. By using standard muffin tins, we introduce much more surface area relative to volume. This means the baking process is faster and more forgiving.
There is no need for the complex, often intimidating water bath; the individual liners provide enough buffer against direct heat on the base, resulting in beautifully set sides and creamy centers without the structural integrity stress of a large cake.
Perfect for Parties: Instant Gratification Without the Wait
When hosting, efficiency is king, and these Simple Cheesecake Cups deliver excellence with minimal last minute fuss. They can be assembled, baked, and chilled ahead of time, removing stress from the event day itself.
Guests appreciate the self contained nature of the dessert no messy slicing required and the uniform presentation is always aesthetically pleasing. They are, quite frankly, the ultimate grab and-go indulgence.
A Texture Triumph: Achieving Creamy Perfection Every Time
The goal here is that melt-in-your mouth consistency that defines great cheesecake. Achieving this relies heavily on two factors: using room temperature ingredients to ensure smooth incorporation and, critically, avoiding over aeration during the mixing phase, especially once the eggs are added.
When handled correctly, these Easy Cream Cheese Cups set up with a density that honors the classic profile while remaining unbelievably smooth.
Assembling Your Dream Team: Components for Rich Individual Cheesecakes
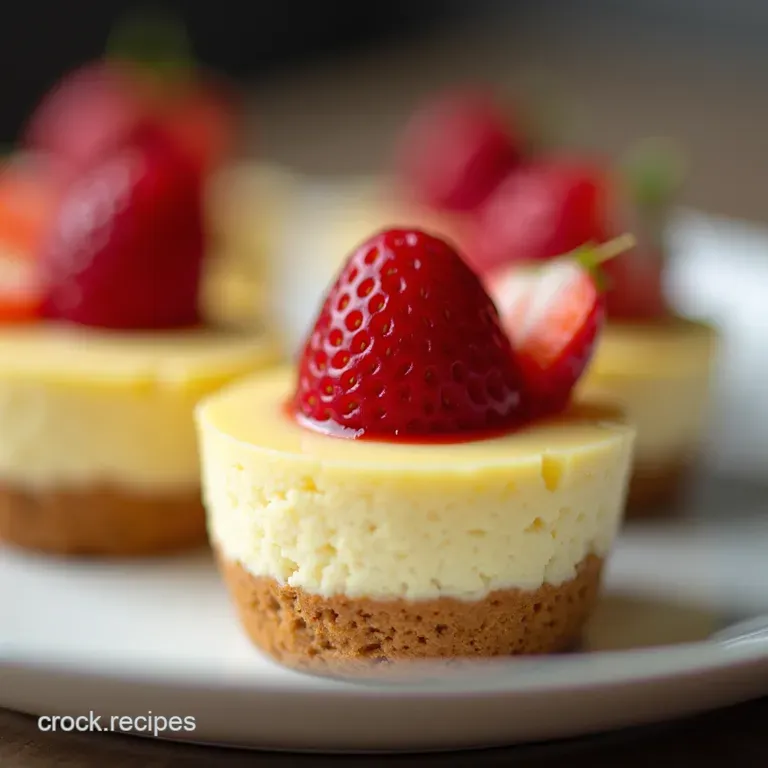
To construct these flawless bites, we need three primary sets of components: the crunchy base, the velvety filling, and optional garnishes. We utilize classic flavors graham crackers, rich cream cheese, and a hint of bright vanilla and lemon to deliver that familiar, comforting taste we all crave in a Cheesecake Cupcakes Recipe .
For the crust foundation, we combine 1 ½ cups of graham cracker crumbs with ¼ cup of granulated sugar. This dry mix is bound together by 6 tablespoons of melted, unsalted butter, creating a mixture that resembles moist sand, ready to be pressed firmly into the bottom of the tin.
The filling requires precision. You will need 16 ounces of full fat cream cheese, ensuring it is completely softened. Sweetness comes from ¾ cup of granulated sugar. To achieve the desirable tang and richness, we incorporate ¼ cup of sour cream or full fat Greek yogurt, along with 1 teaspoon of vanilla extract.
Finally, two large eggs, also brought to room temperature, act as the structure binders, while a scant ½ teaspoon of lemon zest adds a layer of necessary brightness to cut through the richness.
Related Recipes Worth Trying
- The Ultimate Creamy Reeses Cheesecake Recipe Water Bath Guide — Stop settling for dry imitations This Reeses Cheesecake recipe guarantees a velvety crackfree filling loaded with peanut butter cups Learn the water bath...
- The Cheesy Weeknight Wonder Easy Lasagna Casserole with Ricotta — Get all the flavour of a classic lasagna without the rolling This easy Lasagna Casserole with Ricotta Cheese is pure comfort food perfection for busy weeknights
- NoBake Peanut Butter Oreo Cookie Balls Recipe Easy 3Ingredient Treat — Whip up these easy Peanut Butter Oreo Cookie Ballsa delicious nobake dessert that tastes gourmet Ready in minutes these truffles are dangerously addictive...
Essential Toolkit for Baking Miniature Marvels
While these are easy, having the right tools makes the assembly process swift and tidy. Forget the large stand mixer if you’re only making a dozen; a reliable hand mixer or even a sturdy whisk will suffice, provided you give your ingredients a little patience.
The Graham Foundation: Building a Sturdy, Flavorful Crust Base
The key to a crust that stays put even when lifted from its liner is compaction. You must press the buttered crumbs down hard. After placing about 1 ½ tablespoons of the mixture into each liner, use the back of a small spoon or the flat bottom of a shot glass to compact the material until it feels dense and solid.
This forms a dependable platform for the soft filling above it.
Filling Focus: Sourcing the Cream Cheese for Optimal Tang
For the best flavor profile and smoothest texture in your Easy Cheesecake Cups , full fat block cream cheese is the only way to go; avoid whipped or low-fat varieties, which contain excess water and can lead to a grainy or thin consistency.
Remember the room temperature rule here; if the cheese is cold, you’ll inevitably end up with lumps that require overmixing to dissolve, jeopardizing the final texture.
Necessary Equipment for Seamless Cup Preparation
A standard 12-cup muffin tin is your primary vessel. Crucially, line this tin with either high-quality paper liners or, ideally, silicone liners. Silicone liners offer a superior, non-stick release, ensuring that when you peel back the wrapper, the delicate crust of your No Bake Cheesecake Cupcakes remains perfectly intact.
The Master Sequence: step-by-step Guide to Crafting Your Easy Cheesecake Cups
The entire process flows smoothly from crust prep to the final cooling stage. Begin by setting your oven temperature to 350° F ( 175° C) and preparing your muffin tin with liners.
First, mix your crust ingredients crumbs, sugar, and melted butter until thoroughly combined. Press this mixture firmly into the base of each liner, using about 1 ½ tablespoons per cup.
Pop the tin into the refrigerator while you focus on the filling; this quick chill helps the butter firm up slightly, anchoring the base before baking.
When preparing the filling, order matters immensely. Begin by beating the softened cream cheese until it is utterly smooth and devoid of any lumps. Next, introduce the sugar and mix until just incorporated. Then, gently fold in the sour cream, vanilla, and lemon zest.
The final, most delicate step involves adding the two room temperature eggs. Add them one at a time, mixing on low speed only until the yellow yolk disappears before adding the next. Stop mixing the moment the last egg is incorporated. Overmixing here is the gateway to unwelcome air bubbles and subsequent cracks.
Once mixed, divide the batter evenly, filling the cups about three quarters of the way full. They should look attractively full, but leave just enough space for a slight puff during baking.
From Oven to Chill: Crucial Curing Periods for Setting Perfection
The time spent after baking is just as vital as the time spent mixing. Cheesecake needs gentle handling during temperature changes to set properly without distortion.
Crust Compaction: Ensuring the Graham Layers Hold Firmly
As mentioned, the pre-bake chill is key. If the crust is still soft when the batter goes in, the heat will melt the butter too rapidly, causing the crust to become soggy or slump inward, rather than holding a clean edge against the filling of your Vanilla Wafer Cheesecake Cups .
Mixing Methodology: How to Achieve a Lump Free Cheesecake Batter
The secret weapon against lumpiness is patience with the cream cheese. Beat it aggressively on medium speed until it is whipped smooth before adding any other ingredient.
If you start with a smooth base, the subsequent addition of sugar, sour cream, and especially the eggs will blend seamlessly without requiring high speed or aggressive mixing, which preserves the dense, creamy final texture.
Baking Dynamics: Optimal Time and Temperature for Individual Portions
Bake these at 350° F ( 175° C) for approximately 18 to 22 minutes. Because they are small, they cook quickly.
You know they are done when the edges appear firm and set, but if you gently nudge the tin, the very center of the cup still exhibits a slight, gentle wobble like unset gelatin. They will continue to cook and set during the cooling process.
The Final Rest: Understanding the Importance of the Deep Chill
Once baked, resist the urge to rush them directly into the fridge. Sudden cold shocks cause contraction and cracking. Instead, turn the oven off, crack the door open slightly (a wooden spoon handle works perfectly to wedge it), and let the cups temper inside the warm oven environment for 30 minutes.
After this slow transition, remove them to cool completely on a wire rack before transferring the entire tray to the refrigerator. They require a minimum of 4 hours, though overnight chilling yields the absolute firmest, most delicious results for your Easy Cheesecake Cups .
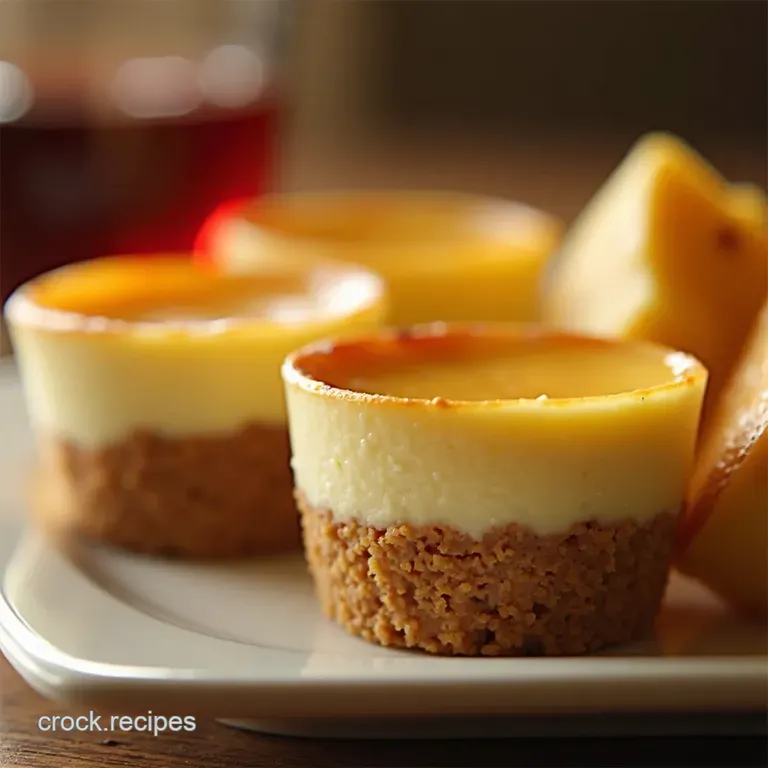
Elevating Your Dessert Presentation: Topping and Flavor Twists
While these No Bake Cheesecake Cups are delicious in their pure form, toppings provide the visual pop and textural contrast necessary for a show stopping finish.
Flavor Fusion: Creative Add-Ins Beyond the Standard Vanilla
If you want to veer from the classic New York profile, consider folding mix-ins into the batter just before spooning it into the tins. For a decadent twist, fold in ½ cup of mini chocolate chips.
Alternatively, if you enjoy a slightly brighter flavor, double the lemon zest in the filling and use a spoonful of tart passionfruit puree instead of the sour cream for a tropical note.
Troubleshooting Common Quirks in Mini Baking
The most common issue in miniature baking is uneven filling height. If your cups are baking unevenly, it often means your oven has hot spots. The solution? Rotate the muffin tin halfway through the bake time (around the 10-minute mark) to ensure all 12 portions receive equal heat exposure.
If you notice slight weeping or moisture pooling on top, it generally means they were slightly underbaked; just return them to the slightly warmed oven for an extra two minutes.
Shelf Life Secrets: Keeping Your Easy Cheesecake Cups Delicious for Days
Stored properly, these individual portions maintain excellent quality. Keep them in an airtight container in the refrigerator. Due to their high fat and dairy content, they are best consumed within 4 to 5 days of baking.
If you add fresh fruit toppings, those should only be added immediately before serving, as the moisture from the fruit will degrade the crust over time.
Make-ahead Magic: Preparing Components in Advance
The beauty of this recipe is its flexibility. The graham cracker crust mixture can be prepared up to 24 hours in advance and stored tightly wrapped in the refrigerator.
You can even press the crusts into the liners and chill them overnight just be sure they are completely cold before pouring the batter on top. The filling should always be mixed fresh, but having the ingredients pulled out early ensures they reach that crucial room temperature state ahead of time, maximizing your efficiency when it comes to final assembly.
Recipe FAQs
Can I make these Easy Cheesecake Cups ahead of time, or do they need to be eaten fresh?
Absolutely, these are fantastic make-ahead treats! For the best texture and flavour, they need a good long chill ideally 4 hours, but overnight is even better. They store brilliantly in an airtight container in the fridge for up to 4 days, making them perfect for prepping before a big gathering.
My cheesecake mix always cracks on top. What’s the secret to keeping these Easy Cheesecake Cups smooth?
The secret lies in two things: room temperature ingredients and a gentle cooling process. Ensure your cream cheese and eggs are fully softened so you don't overmix to smooth lumps.
More importantly, don't skip turning the oven off and letting them cool inside with the door ajar for 30 minutes; that slow temperature drop prevents thermal shock, which causes cracks.
What if I don't have graham crackers? Can I use something else for the crust base?
Not to worry, we've all been there when the cupboard is bare! If you're in the UK or don't have graham crackers, digestive biscuits are a smashing substitute just crush them finely. Alternatively, crushed shortbread cookies or even vanilla wafers provide a wonderful buttery crunch instead.
Do I really need to use silicone liners, or will standard paper ones do the trick?
Standard paper liners will work, but you must be very careful peeling them away, as the cheesecake can easily tear. If you have silicone liners, they are your best mate here; the cheesecake base releases almost effortlessly, keeping your presentation looking utterly professional.
If using paper, chill them thoroughly first!
Can I make these dairy-free or reduce the fat content in the filling?
You can certainly adapt them, though the texture will change slightly as full fat cheese is key to the classic richness. For a reduced fat version, use low-fat cream cheese, but you might need slightly less sour cream.
For dairy-free, look for high-quality, firm vegan cream cheese alternatives; ensure they are well drained before mixing, as they tend to hold more moisture.
Easy Cheesecake Cups Recipe

