The Ultimate Golden Crumb Reeses Peanut Butter Cup Cheesecake
- Unveiling the Epitome of Peanut Butter Decadence
- Why This Reese's Cheesecake Recipe Reinvents the Classic
- The Essential Arsenal for Building Your Dream Dessert
- Sourcing Premium Components for Superior Flavor
- The Step-by-Step Blueprint for Cheesecake Perfection
- Elevating Your Homemade Masterpiece with Pro Tips
- Variations and Storage Secrets for Leftover Glory
- Recipe FAQs
- 📝 Recipe Card
Unveiling the Epitome of Peanut Butter Decadence
Forget everything you thought you knew about dessert indulgence. We are diving headfirst into a creation that perfectly balances salty, sweet, chocolate, and creamy perfection: the ultimate Reeses Cheesecake .
This isn’t just a dessert; it’s a celebration of American confectionery fused with classic baking technique. Our goal today is to guide you through crafting a show stopping, New York style cheesecake that is dense, velvety smooth, and absolutely loaded with those iconic peanut butter cups, layered over a crisp, buttery graham cracker foundation.
This recipe transforms the simple concept into an elevated experience, ensuring every bite of this Reese Cup Cheesecake is pure bliss.
Why This Reese's Cheesecake Recipe Reinvents the Classic
Many attempt to recreate this beloved flavour combination, but often fall short, delivering a texture that is either grainy or too airy. Our approach, rated as a Medium difficulty level, focuses precisely on achieving that dense, rich mouthfeel associated with high end bakeries, ensuring you produce a truly Reese's Cheesecake Factory Style masterpiece right in your own kitchen.
A Culinary Marriage: Chocolate, Salt, and Cream Cheese Bliss
The magic here lies in the carefully calibrated ratio of ingredients. We use full fat, room temperature cream cheese to ensure supreme smoothness, complemented by the natural saltiness of the peanut butter filling.
This isn't just a cheesecake with candy sprinkled on top; we integrate high-quality creamy peanut butter directly into the batter, deepening the flavour profile significantly. This integration ensures that even when baked, the distinctive flavour sings through the rich dairy base, making it a top-tier choice among Candy Cheesecake Recipes .
Setting the Stage for Your Perfect Slice
This comprehensive blueprint is designed to manage the most common pitfalls of baked cheesecake namely, cracking and weeping. By adhering strictly to the equipment list, particularly the reliance on a springform pan wrapped securely in heavy duty foil, we prepare the necessary barriers against moisture intrusion.
The active preparation time clocks in around 45 minutes, but the transformation into this irresistible Reese's Cheesecake requires patience during the crucial cooling and setting phases, culminating in approximately 7.
5 hours total time commitment before you can finally taste the results.
The Allure of an Authentic American Indulgence
There is something fundamentally comforting about the combination of chocolate and peanut butter, a flavour profile deeply embedded in American culinary culture. Whether you plan to serve this as a spectacular birthday centerpiece or perhaps try adapting it into smaller Reese's Cheesecake Bites or Reese's Cheesecake Bars for a gathering, the foundational recipe guarantees a memorable experience.
It’s rich, satisfying, and profoundly decadent the definitive Reese's Cheesecake experience.
The Essential Arsenal for Building Your Dream Dessert
Before we begin assembling, having the right tools is half the battle won, especially when attempting techniques like the water bath. You will absolutely need a standard 9 inch springform pan, as this is essential for easy removal of the finished product.
To manage the water bath, a large roasting pan that comfortably fits the springform pan inside is mandatory. You will rely heavily on your electric mixer (stand or hand) for achieving that perfectly aerated, lump free base.
Finally, a rubber spatula is your best friend for gently folding in the candy additions toward the end, ensuring we don’t deflate the air we carefully incorporated earlier.
Related Recipes Worth Trying
- The Irish Cream Dream Effortless Baileys NoBake Cheesecake — Forget the oven This No Bake Baileys Cheesecake is creamy dreamy and ready tonight The easiest Baileys recipes dessert youll ever make Get the recipe
- Foolproof Air Fryer Strawberry Cheesecake Bites Recipe — Skip the oven drama These creamy Air Fryer Strawberry Cheesecake Bites have a crisp crust and vibrant swirl The perfect simple dessert for any occasion
- The Ultimate NoBake Strawberry Cheesecake Recipe Foolproof — Craving the perfect summer dessert This Strawberry NoBake Cheesecake has a buttery base and creamy filling The best No Bake Cheesecake Recipe youll ever try
Sourcing Premium Components for Superior Flavor
The success of any baked item hinges on the quality and preparation of its components. For a truly superior Reese's Cheesecake , temperature is non-negotiable when it comes to your dairy products.
Mapping Out the Perfect Golden Crumb Base
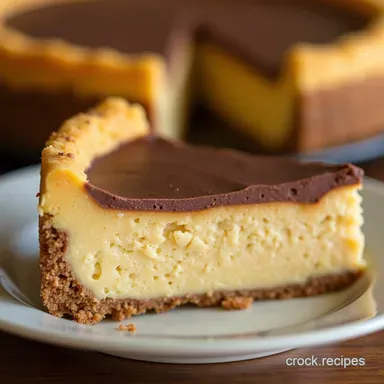
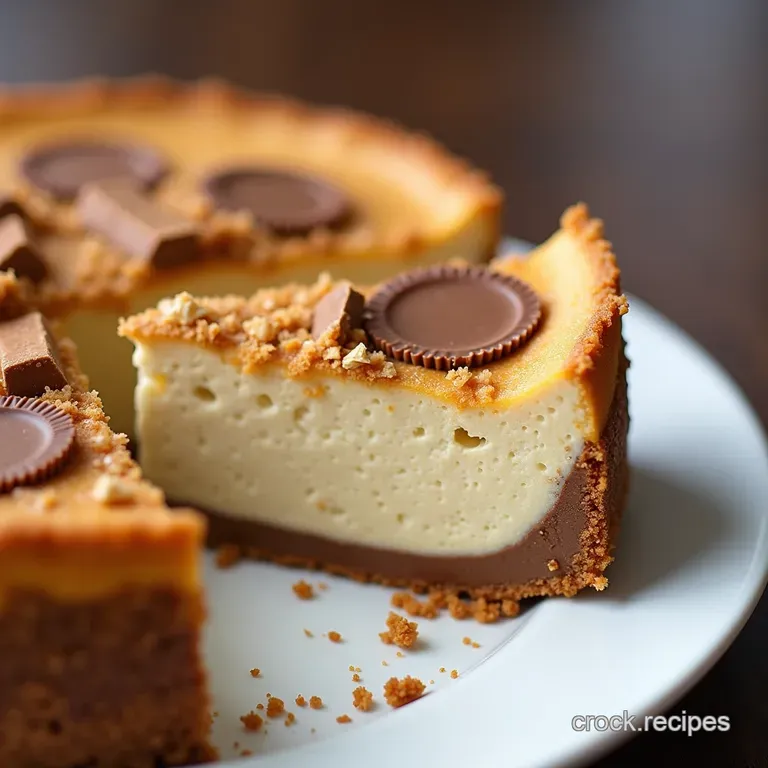
Our foundation starts with 1 ½ cups of graham cracker crumbs, providing that familiar, sandy texture. To achieve a flavourful crunch, we are mixing these crumbs not only with ¼ cup of sugar and 6 tablespoons of melted unsalted butter but crucially, with ½ cup of finely chopped Reese's Peanut Butter Cups.
Baking this base for just 8 minutes at 350° F ( 175° C) sets the structure beautifully, preventing sogginess later on.
Cream Cheese Consistency: Achieving Velvety Smoothness
This is where many home bakers stumble. You must use 3 blocks (24 oz total) of full fat cream cheese, and they must be completely softened to room temperature. Cold cream cheese will inevitably result in a lumpy batter, even with extensive mixing.
Once beaten until silken, we introduce 1 ¼ cups of sugar, followed by room temperature sour cream (or Greek yogurt for a slight tang) to maintain moisture.
The Peanut Butter Quotient: Selecting Your Candy Inclusions
For the primary flavour infusion, we rely on ¾ cup of smooth, conventional creamy peanut butter avoiding natural separation styles for consistency. The final, textural element comes from folding in 1 full cup of chopped Reese’s Peanut Butter Cups after the eggs are added.
These pockets of peanut butter and chocolate will melt slightly during baking, creating pockets of gooey delight throughout the body of the Reese's Cheesecake .
The step-by-step Blueprint for Cheesecake Perfection
Once your crust is baked and cooled, the oven must be reduced to 325° F ( 160° C). Preparation now moves to the filling, where technique dictates texture.
We begin by beating the softened cream cheese until impeccably smooth, then gradually incorporating the sugar. Next, the peanut butter, sour cream, vanilla, and salt are added until just combined.
Constructing the Unshakable Foundation
The structure of this dessert depends on meticulous egg incorporation. We add the 4 large eggs one by one, ensuring each is just mixed into the batter before adding the next. This is a delicate balance: we need the eggs for binding, but adding too much air will cause the cake to rise too quickly and then collapse, leading to cracks.
Immediately after the eggs, gently fold in the remaining chopped Reese’s cups with a spatula this is the last mixing action before pouring.
Whipping Up the Luxurious Reese's Cheesecake Filling
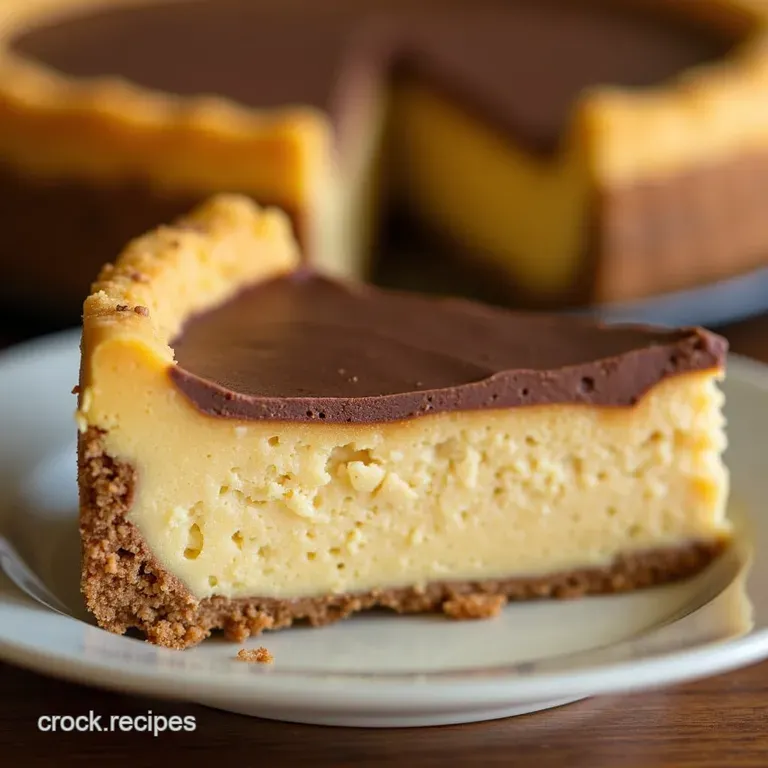
Pour the smooth, peanut butter-infused batter over the cooled crust in your foil wrapped pan. The mixture should flow evenly, ready to embark on its transformation. This rich batter is the heart of the Reese's Brownie Cheesecake experience, delivering intense flavour throughout.
Demystifying the Water Bath Technique for Crack Free Results
The water bath, or bain marie , is essential. It creates a humid, gentle environment that mimics slow cooking, preventing the outside edges from setting before the center, which is the primary cause of unsightly cracks.
Place your foil wrapped springform pan inside the larger roasting pan, then carefully pour boiling water into the roasting pan until it reaches about halfway up the sides of your cheesecake pan.
The Crucial Cooling Sequence: Patience for Perfection
Bake for 60 to 75 minutes. The cheesecake is done when the edges are set and slightly puffed, but the 2 inch centre remains wobbly. Do not remove it immediately! Turn the oven off, prop the door open slightly with a wooden spoon, and let the cheesecake sit in that residual heat for a full hour.
This slow, gradual cooling is non-negotiable for a flawless surface. After the hour, remove it from the water bath, let it cool on a rack for another hour, and then cover and chill for at least six hours, ideally overnight, for the structure to fully set.
Elevating Your Homemade Masterpiece with Pro Tips
To elevate this even further, consider swirling in a ribbon of salted caramel sauce before baking for an extra layer of complexity perhaps hinting at a future Reese's Cheesecake Dip flavour profile in a baked form.
Always use the lowest speed on your mixer when adding eggs, scraping down the sides frequently to ensure no unmixed pockets remain. If you are aiming for small treats, this recipe adapts beautifully into Reese's Cheesecake Bites by using a muffin tin lined with cupcake papers instead of a full springform pan.
Variations and Storage Secrets for Leftover Glory
While this recipe is designed for a full 9 inch round, exploring variations can keep things exciting. If you find yourself with leftovers which is unlikely, given how good this Reese's Cheesecake is storage is straightforward.
Troubleshooting Common Cheesecake Hurdles
If your cheesecake surface begins to look dull or slightly sunken after cooling, it usually means it was removed from the oven or water bath too quickly. The slow cooling method described above mitigates this risk entirely.
If you see any water seepage into the crust, it means your foil wrap failed; next time, use two full layers of heavy duty foil, applied tightly.
Creative Toppings Beyond the Basic Drizzle
While a simple ganache drizzle, made by whisking hot heavy cream into chocolate chips, is a stunning finish, you can go further. Consider creating a thick layer of peanut butter frosting or sprinkling crushed chocolate covered pretzels over the ganache for textural contrast.
Optimal Chilling Times for Maximum Flavor Setting
While 6 hours is the absolute minimum for structural integrity, you will find that the flavours fully marry and the texture achieves its peak density after a full overnight chill.
Rushing this step means sacrificing the dense, satisfying mouthfeel associated with the best Reese's Cheesecake .
Nutritional Snapshot of This Peanut Butter Treat
Be forewarned: this is an indulgence. A single slice of this rich dessert clocks in around 600 calories, packed with satisfying fats and sugars from the cream cheese and candy inclusions.
It’s a treat meant to be savoured responsibly, perhaps paired best with a strong, black coffee to balance the richness of this perfect Reese's Cheesecake .
Recipe FAQs
Why is my Reese's Cheesecake cracking on top, even though I used a water bath?
Ah, the eternal nemesis of the cheesecake baker! Usually, cracks happen because the batter was overmixed after the eggs were added, incorporating too much air, or because the cooling process was too sudden.
Ensure you follow the slow cooling instructions leaving the cheesecake in the turned off oven with the door propped open for an hour is crucial for tempering those temperatures.
Can I skip the water bath (bain marie) for this Reese's Cheesecake?
Technically, yes, but I wouldn't recommend it if you're aiming for that genuinely smooth, New York style velvety texture described in the recipe. The water bath creates a moist, even cooking environment, preventing the edges from setting too fast and drying out before the centre is done, which usually results in cracking or a tough texture.
How long does a leftover Reese's Cheesecake keep fresh in the fridge?
This beauty keeps marvellously well, much like a well aged cheese (though far sweeter!). Covered tightly with plastic wrap or kept in an airtight container, it should stay delicious for up to 5 days in the refrigerator.
Make sure it’s completely chilled before wrapping, as condensation can ruin the ganache topping.
My cream cheese was slightly lumpy when mixing; will this affect the final bake?
If you’re still in the mixing stage, stop and let the bowl sit on the counter for another 20 minutes! Room temperature ingredients are non-negotiable for a smooth batter. Lumps mean the cream cheese hasn't fully emulsified with the sugar and fat, which almost guarantees a grainy or unevenly cooked final product.
Can I make the crust ahead of time, and what if I run out of graham crackers?
Yes, the crust can certainly be made a day ahead; just press it into the pan and store it, wrapped, in the fridge. If you’re out of graham crackers, use digestive biscuits or even vanilla wafers for a brilliant substitute; they provide that essential buttery, slightly salty base needed to balance the richness of the filling.
Reeses Peanut Butter Cheesecake