Twisted Rye Knots: Savory Bread with a Twist
- Look into Into the World of Rye Knots
- Essential Ingredients Guide
- Mastering Professional Cooking: The Essential Guide to Baking Rye Knots
- Pro Tips & Secrets for Rye Knots
- Perfect Presentation for Your Rye Knots
- Storage & Make-Ahead Instructions
- Creative Variations to Try
- Complete Nutrition Guide
- The Conclusion: Get Baking!
- Frequently Asked Questions
- 📝 Recipe Card
Look into Into the World of Rye Knots
Let Me Tell You a Quick Story
Imagine this: i'm sitting at my grandma's kitchen table, a steaming bowl of borscht in front of me and the smell of fresh rye knots wafting through the air.
I'm talking about that chewy, crusty goodness that’s a staple in old-school eastern european kitchens. these savory knots were always my favorite.
I've got memories of helping her knead the dough, laughing and chatting while flour dust filled the air. has anyone else ever lost a battle with rising dough? yup, that’s always me!
Anyway, my love for baking and tradition brings me here, ready to share this rustic bread recipe that’ll make you feel all warm and nostalgic too.
A Little Background on Rye Knots
Rye knots aren't just a recipe; they're a tasty slice of history. originating from eastern european baking , these twisted breads have been a go-to for generations perfect for pairing with soups or snacking on alone.
Today, they’ve found their way into modern kitchens and hearts, thanks to the health benefits of rye and that unique flavor profile.
Seriously, who can resist the nutty taste combined with the aromatic kick of caraway seeds?
So, what’s the deal with this recipe? well, it’s medium in difficulty great for folks ready to tackle some basic bread making techniques .
You’ll spend about 15 minutes prepping, let that glorious dough rise for about 1 hour 30 minutes , then it’s just 25 minutes in the oven.
And guess what? you’ll yield 8 homemade rye knots for your crew (or just for yourself no judgment here!).
Benefits You’ll Love
Let’s talk about why these rye knots are worth your time. first off, if you’re into healthy eating, you’ll dig this: rye is packed with nutrients.
It’s got fiber and lower gluten levels, making it easier on the tummy. plus, it adds a lovely chewiness and depth to the flavor.
Trust me; once you taste it, you’ll never look at store-bought bread the same way!
Now, let’s get real. these little knots are perfect for special occasions. got soup night? check. hosting a charcuterie board party? you bet.
Fancy snack ideas? oh yeah! they not only look fantastic but also outperform typical bread rolls in flavor. plus, you can play around with toppings like flaky sea salt or herbs to amp up the game even further.
Making This Recipe Your Own
Now that you’re sold on the idea, you might wonder how can i switch things up? well, if you’re feeling adventurous, swap out some rye flour for whole wheat for a heartier version.
Or jazz it up with shredded cheese or spices for an unexpected kick. the possibilities are endless!
And don't sweat the small stuff! baking these rye knots is totally doable for beginners. the key is patience watch that dough rise and transform, and enjoy the kneading process.
The satisfaction from pulling your warm, freshly baked bread out of the oven is unmatched. oh, and don't forget the egg wash for bread it gives them that gorgeous golden sheen.
Ready to Gather Ingredients?
Now that you’re feeling pumped to try your hand at these homemade rye knots , let’s dive into the ingredient list.
Trust me, you’ll want to take note of these essentials for the ultimate baking session. so grab your measuring cups and sticky notes, and let's make this dream a reality!
Essential Ingredients Guide
Alright, friends! if you're diving into the wonderful world of baking rye knots, you gotta start with some premium core components .
Think of it as your backbone it supports all that tasty goodness! let's break it down.
Premium Core Components
First off, measurements matter ! Here are the essentials:
- 2 cups (240g) rye flour
- 1 cup (120g) all-purpose flour
- 1 packet (2 ¼ tsp or 7g) active dry yeast
- 1 teaspoon salt
- 1 tablespoon sugar
- 1 teaspoon caraway seeds (optional)
- 1 cup (240ml) warm water (about 110° F/ 43° C)
- 2 tablespoons (30ml) olive oil
Quality indicators? Look for fresh flour and lively yeast. Trust me, you'll know when it's fresh the flour smells nutty, and the yeast bubbles up like a champagne party!
Storage guidelines? Keep your rye flour in a cool, dark cupboard. It can last a few months if you’re lucky. But let’s be real: it’s gonna get used up quicker than that!
As for freshness tips, give your flour a little whiff before using it. no funky smells? you’re good! and about those caraway seeds they're super fragrant and totally elevate your rye bread game.
Signature Seasoning Blend
Now, let’s crank things up with some classic signature seasoning blends .
For these twisted rye knots, you’ll want to stick to the basics, but a dash of creativity can really rock your bread! essential spice combinations include salt and sugar, and don’t skip out on those herb pairings like thyme or rosemary.
It’s all about finding what makes your taste buds sing!
Let’s talk about regional variations . if you’re feeling adventurous, swap your caraway seeds for fennel seeds for a different, yet flavorful twist .
Oh, and if you’re a fan of the whole ‘ eastern european baking ’ scene, you’ll appreciate how simple ingredients can create a masterpiece.
Smart Substitutions
Alright, life happens, right? no caraway seeds? no problem! just grab any of these common alternatives . you can use fennel seeds or even skip them altogether for a more straightforward rye flavor.
And if you're eyeing that dietary modification ? No sweat! Swap half your rye flour with whole wheat flour for some nutty goodness. It’ll still yield a fabulous chewy bread .
Emergency replacements can include, say, oat flour in a pinch or even gluten-free flour if you need a gluten-free homemade rye knots version.
Kitchen Equipment Essentials
Wanna keep your bread game on point? You'll want some must have tools like:
- Mixing bowls (seriously, you can never have too many)
- Measuring cups and spoons
- Baking sheet
- Parchment paper
- A brush for that egg wash goodness (trust me, it’s key!)
Oh, and if you don’t have a fancy mixer? No biggie! Your hands are just as capable. Kneading dough is kinda like therapy trust me, you’ll feel amazing after all that kneading.
A Little Bit of Everything
Baking rye bread can feel like a puzzle, but with these tips, you’re on your way to making those delicious savory knots .
The health benefits of rye include improved digestion and lower blood sugar levels, so you're not just baking for taste; you're baking for your health, too!
Make sure to check the cooking time for rye knots : around 25 minutes should do the trick. and hey, if you’ve got any leftovers, they pair perfectly with a hearty soup or as a delightful snack idea.
So, when you're ready, join me in the next section, where i’ll share step-by-step bread instructions . together, we’ll master the art of making those twisted, crusty bread rye knots that are sure to impress anyone lucky enough to snag one.
Let’s get our bake on, shall we?
Mastering Professional Cooking: The Essential Guide to Baking Rye Knots
Baking can seem overwhelming at first, but once you get the hang of it, it’s like riding a bike fun, freeing, and a little messy! if you’ve ever wanted to whip up some savory rye knots , let’s break down the process together, step by step.
Honestly, nothing beats the smell of freshly baked bread wafting through the house!
Essential Preparation Steps
Mise en Place: Get It Together!
First things first, let’s talk about mise en place . this fancy french term just means “everything in its place.” before you start baking, gather all your ingredients.
For our twisted rye knots , you’ll need rye flour, all-purpose flour, yeast, salt, caraway seeds, and the like. trust me, you don’t want to be scrounging for flour when your dough is ready to rise!
Time Management Tips
Now, let’s not waste any time. prep time for these guys is about 15 minutes , with a rising time of 1 hour 30 minutes .
So, set a timer and don’t wander off too far. you can start tidying up or getting the soup ready!
Organization Strategies
Keeping your workspace organized makes all the difference. use bowls for dry and wet ingredients and keep your tools handy.
This way, you’ll have less chaos and more zen when it’s time to roll out your dough.
Safety Considerations
And a quick heads up: Be careful when dealing with hot ovens and sharp knives. Always focus on safety no need for a mishap while you bake those chewy rye knots !
Step-by-step Process
Alright, let’s get down to the nitty gritty of how to make these bad boys.
- In a mixing bowl, combine 1 cup warm water (aim for 110° F/ 43° C ), your yeast, and a tablespoon of sugar. Let it sit for 5- 10 minutes until frothy.
- While that’s bubbling, mix 2 cups rye flour and 1 cup all-purpose flour in another bowl, along with 1 teaspoon salt and your caraway seeds if you’re using them.
- Pour the yeast mix and 2 tablespoons olive oil into the dry ingredients. Stir it all up until you have a shaggy dough.
- Transfer that dough to a floured surface and knead for about 8- 10 minutes until it’s smooth. You’ve got this think of it as a mini workout!
- Shape it into a ball and toss it into a greased bowl. Cover it with a kitchen towel and let it rise until doubled, about 1 hour .
- When it’s all puffed up, preheat your oven to 375° F ( 190° C) . Line a baking sheet with parchment.
- Punch down the dough and divide into 8 pieces . Roll each into a 12 inch rope , twist it into a knot, and place on the baking sheet. Let them rise for another 30 minutes .
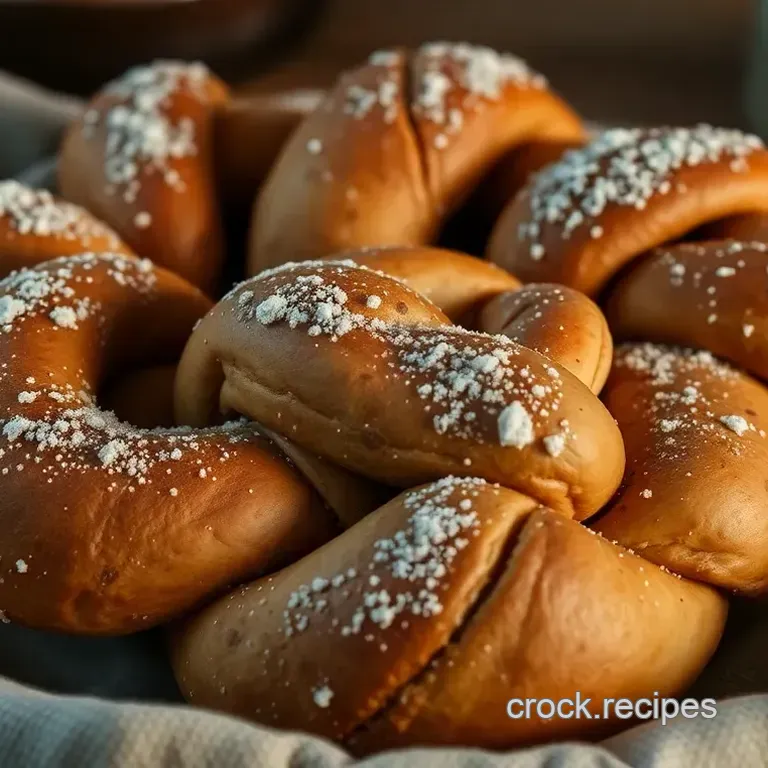
- Brush with a beaten egg and sprinkle on some flaky sea salt for that gourmet touch.
- Bake for 20- 25 minutes until golden brown. They should sound hollow when tapped on the bottom.
Expert Techniques
Okay, let’s talk tricks of the trade.
- Temperature control is key. Too hot, and you’ll kill the yeast. Too cold, and it won’t rise. Aim for that perfect 110° F ( 43° C) sweet spot.
- Pay attention to timing precision and keep an eye on the oven; ovens can be sneaky.
Success Strategies
Now, on to making sure perfect results!
- A common mistake? Not measuring. Use a kitchen scale for bread making techniques —it can change your game.
- For a crunchier crust, consider placing a pan of water in the oven while baking to create a nice steam. Who doesn’t love a crusty bread with that perfect crunch?
- If your knots don’t rise like they should, double check your yeast. Fresh yeast is vital for that airy texture.
These homemade rye knots are the perfect side for soups or can stand proudly on your charcuterie board, ideal for snacking.
You can even customize them with different spices or cheese. how awesome is that?
Additional Information
Why not explore more on baking with rye flour, health benefits of rye, or other creative twists like adding herbs? there’s a whole world of flavors out there waiting for you.
Enjoy the process, and happy baking!
Pro Tips & Secrets for Rye Knots
Oh my gosh, let's talk about making twisted rye knots ! honestly, these bites of goodness are a fantastic way to dive into the world of eastern european baking .
Here’s where i dish out some of my favorite pro tips that’ll not only save you time but also amp up the flavor.
Chef's personal insights
when i first tackled this rye bread recipe , i was amazed at how little tweaks could shift the game's flavor entirely.
For instance, try adding some fresh herbs like dill or thyme into the dough. it gives a killer flavor boost!
Time saving techniques
if you’re in a hurry, mix the dry ingredients and store them in an airtight container. boom! grab it when you need to bake.
And, if you forget to bring your water to the right temperature (you want it about 110° f, right?), heat it up slightly in the microwave just be careful not to overshoot it!
Flavor enhancement tips
thinking of ways to spruce it up? incorporate a handful of shredded cheese or sprinkle in some caraway seeds to really get that savory knot flavor poppin’.
Trust me, your taste buds will thank you.
Presentation advice
a good looking loaf is half the battle! when you’ve twisted your knots, brush them with an egg wash and sprinkle some flaky sea salt on top.
It not only looks fancy but also brings out that crunchy texture we all crave.
Perfect Presentation for Your Rye Knots
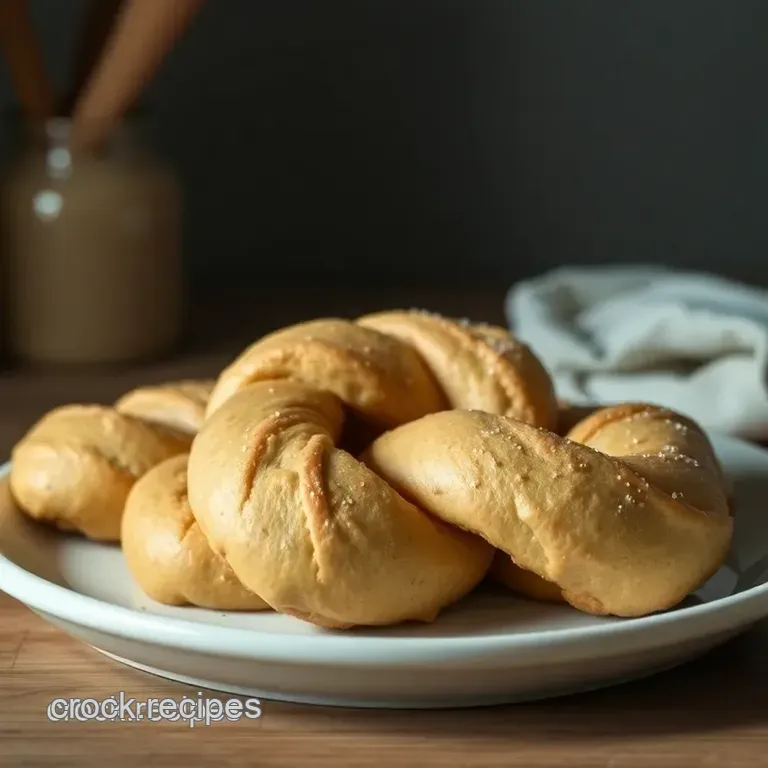
Now, let’s talk about presentation because we eat with our eyes first, right? Here are some plating techniques to elevate your homemade rye knots to superstar status!
Garnish ideas
fresh herbs like parsley or even a sprinkle of sesame seeds can add a pop of color.
Layer them on a wooden board with some butter and jam. it’ll look like it came straight out of a fancy bistro menu!
Color Combinations
Consider pairing your rye knots with a visually striking dip, like vibrant beet hummus or a bright green pesto. The contrast against the rustic, brown bread looks amazing!
Visual Appeal Tips
Arrange knots in a spiral on a serving platter, drizzling them lightly with olive oil. It brings a delightful sheen that’s super inviting.
Storage & make-ahead Instructions
Life gets busy, so if you want to prep these beauties ahead of time, I’ve got your back! Here’s how to keep your twisted bread fresh.
Storage guidelines
once baked, let your rye knots cool completely. store them in an airtight container at room temp for about 2-3 days .
If you need to keep them longer, toss those knots in the freezer for up to a month.
Reheating Instructions
To bring your knots back to life, simply pop them in a preheated oven at
350°
F for about 5-
10
minutes. Warm bread is always a hit, right?
Freshness Duration
Enjoy them while they’re fresh! If you store them properly, they can maintain their taste and
chewiness
for several days. But honestly, I doubt they’ll last that long!
Creative Variations to Try
Feeling experimental? Here are some awesome creative variations for customizing your rye knots!
Flavor adaptations
how about throwing in some sun-dried tomatoes or olives for an italian twist? you could even swap out the rye for a mix of maintenance, say a lighter bread flour for airier knots.
Dietary Modifications
If you’re looking to shake things up for health reasons, try cutting back on the sugar or swap out half of the rye flour for whole wheat to amp up the nutritional value of rye !
Seasonal twists
during the fall, adding in some pumpkin spice can turn these knots into a festive treat. and why not sprinkle some cinnamon sugar on top? you could even enjoy these with your morning coffee.
Complete Nutrition Guide
These rye knots aren’t just pretty; they pack a nutritional punch, too! Here’s your super quick nutrition breakdown .
Health benefits
rye is rich in fiber and has some fantastic health benefits , such as better digestion and heart health.
These knots have about 180 calories each, making them a great snack or bread side.
Dietary Considerations
If you're counting carbs or calories, keep track of how many you devour they're hard to resist! But hey, remember, life is all about balance.
Portion Guidance
Yielding about 8 knots , they make for a perfect side dish or snack idea. Just think of all the ways you can enjoy them soup pairings, charcuterie boards, or on their own!
The Conclusion: Get Baking!
So, what are you waiting for? grab that mixing bowl, and let’s get our hands floury with these rustic bread recipes ! baking doesn’t have to be a daunting task; it can be as fulfilling as it is tasty.
You’ll love the sound of that dough as it rises and the smell of those chewy knots baking away in your oven.
Give it a shot! you’ve got this. and remember, the kitchen is where the magic happens turn up the tunes, make a little mess, and enjoy every single twist in the process.
Happy baking!
Frequently Asked Questions
What is a rye knot, and how is it different from regular bread?
A rye knot is a unique bread shape made primarily with rye flour and often flavored with caraway seeds. They differ from regular bread in texture and taste, providing a nutty flavor and denser chewiness due to the rye flour, making them perfect as accompaniments for various dishes.
Can I make rye knots ahead of time, and how should I store them?
Yes, you can prepare rye knots ahead of time! After baking, allow them to cool completely, then store in an airtight container at room temperature for up to 3 days. For longer storage, wrap them tightly in plastic and freeze for up to a month. Just reheat in the oven before serving.
What are some good variations to try with this rye knot recipe?
You can customize your rye knots by adding shredded cheese or fresh herbs like rosemary or thyme to the dough. For a sweeter option, incorporate dried fruits like raisins or cranberries. Additionally, substituting half the rye flour with whole wheat flour can give a heartier flavor while maintaining good texture.
Are there any nutritional benefits to rye knots compared to other bread?
Rye knots typically retain more nutrients compared to white bread due to the use of rye flour, which is higher in fiber, vitamins, and minerals. The fiber content can contribute to better digestive health and increased satiety, making rye knots a healthier option for your meals.
What should I serve with my rye knots?
Rye knots pair wonderfully with hearty soups like beet borscht or potato leek soup, enhancing your meal experience. They also make excellent accompaniments for charcuterie boards, served alongside cheeses and cured meats. Enjoy them with a beverage like a robust lager or a light white wine for a delightful pairing.
What are some tips for perfecting my rye knot baking technique?
Ensure your water temperature is just right (about 110°F or 43°C) to keep the yeast active. Knead the dough until it's smooth and elastic, and try using a kitchen scale for precise flour measurements. For a crustier texture, place a pan of water in the oven while baking to create steam!
Twisted Rye Knots Savory Bread With A Twist

