Seven Layer Cookies: the Ultimate Magic Bar Recipe

- Unlocking the Magic: What Makes These Bars Legendary?
- Building Your Layers: Essential Components and Smart Swaps
- The Science of Indulgence: Crunch, Chew, and Caramelization
- The Chef's Method: Assembly Guide for Perfect Seven Layer Bars
- Troubleshooting and Expert Hacks for Flawless Slices
- Extending Freshness: Storage, Stacking, and Freezing Options
- Finishing Touches: Pairing and Presentation Ideas
- Recipe FAQs
- 📝 Recipe Card
Unlocking the Magic: What Makes These Bars Legendary?
Let’s be honest. When you crave something sweet, chewy, and totally effortless, you don’t want a fussy three hour ordeal. You want these legendary Seven Layer Cookies .
The moment that pan comes out of the oven, your entire house transforms, filling with the unmistakable aroma of toasted coconut, melted chocolate, and burnt sugar caramel. It's truly a sensory delight.
This isn’t just a simple dessert; it’s a lifesaver. You literally dump the ingredients in a pan, bake it, chill it, and you look like a domestic superhero. I promise, the only thing easier is perhaps my recipe for Chocolate Peanut Butter Cornflake Cookies: Crispy No-Bake Treats . These Seven Layer Cookies —often called Seven Layer Magic Bars or Hello Dolly Bars are inexpensive, fast, and require zero advanced baking skills.
So, ditch the stand mixer and grab a bag of chips, because we are diving deep into how to make the absolute best batch of chewy, crunchy, perfectly set Seven Layer Cookies . Trust me, once you master this basic recipe, you’ll never look at a sheet pan the same way again.
The History of the Hello Dolly Dessert.
These bars have deep roots, dating back to the 1960s, quickly rising to fame under the catchy name "Hello Dolly Bars." The name was inspired by the popular musical of the time. But whether you call them Hello Dolly Bars, Magic Bars, or classic Seven Layer Cookies , the appeal remains the same: it’s the ultimate lazy dessert.
It's a testament to simple chemistry!
Defining the Seven Layers: Texture vs. Flavour.
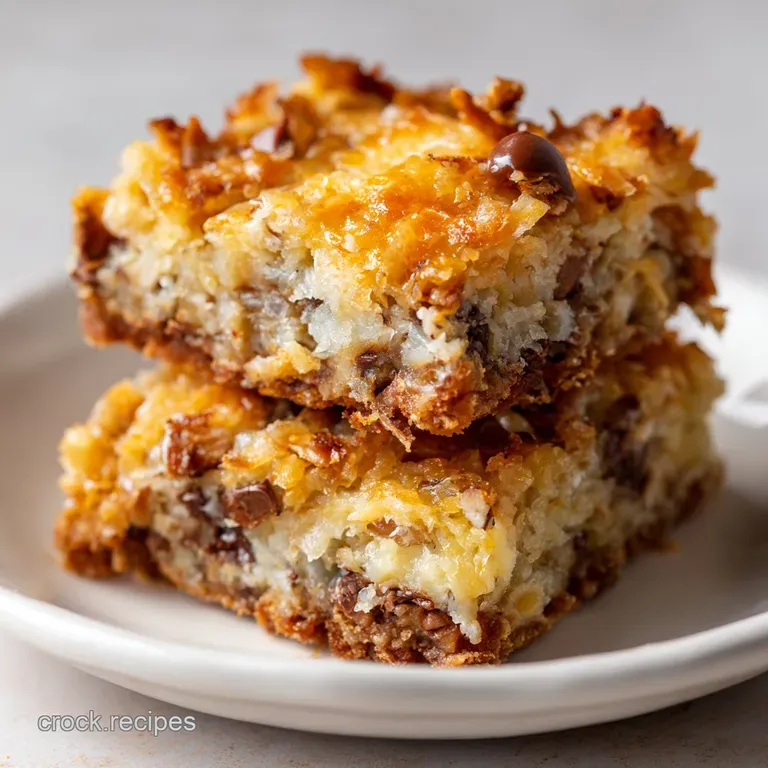
While the name suggests seven distinct, visible layers, it’s actually a little flexible. The seven traditionally counted elements are: the crust, melted butter, condensed milk, chocolate chips, butterscotch chips, nuts, and coconut. The key, however, isn't the count, but the contrast .
You need the hard, salty crunch of the nuts against the gooey chewiness provided by the baked condensed milk. This is how you get truly amazing Seven Layer Cookie Bars .
Why Condensed Milk is the Ultimate Binder.
Sweetened condensed milk is the secret weapon that transforms this recipe from a pile of dry ingredients into decadent Seven Layer Cookies . When baked, the high sugar content caramelizes quickly, creating a sticky, fudgy toffee like substance that glues every crumb, chip, and flake together.
It's chemistry working for your dessert table.
Building Your Layers: Essential Components and Smart Swaps
Getting the right balance of ingredients is what separates a good Seven Layer Cookie Bar from a spectacular one. Don't skimp on quality, especially for the milk and the chocolate.
If you want the title of Best Home Baker, you need to use the best ingredients for your Seven Layer Cookies Recipe .
| Component | Standard Ingredient | Substitution/Swap | Why it Works |
|---|---|---|---|
| Crust | Graham Crackers/Digestives | Vanilla Wafers, GF Biscuits, Pretzels (use less butter) | Provides a sandy, sturdy base. |
| Butter | Unsalted Melted Butter | Coconut Oil (requires slight reduction) | Binds the crust without adding excessive salt. |
| Binder | Sweetened Condensed Milk | Coconut Condensed Milk (Vegan Swap) | Essential for texture; no easy dairy swap exists. |
| Nuts | Pecans or Walnuts | Slivered Almonds or Peanuts | Adds vital crunch and earthy flavour. |
| Chips | Semi Sweet Chocolate | Peanut Butter Chips, Mint Chips | Allows for flavour customization in your Seven Layer Cookies . |
The Science of Indulgence: Crunch, Chew, and Caramelization
This section is for my fellow food nerds who want to know why this recipe is so perfect. It’s all about moisture control and thermal reactions.
Crust Decisions: Graham Crackers vs. Digestive Biscuits.
I lean towards Digestive Biscuits if I can get them, as they have a slightly higher butter content and salt level than standard Graham Crackers. The salt is crucial here; it cuts through the extreme sweetness of the final Seven Layer Cookie Bars .
You are aiming for the consistency of wet sand when mixing the butter and crumbs.
Optimizing the Texture: Choosing Nuts and Coconut Flake Size.
Use shredded or desiccated coconut, not huge flakes. Large flakes tend to dry out and burn on the edges before the milk has fully set. For nuts, I always toast them lightly first. It takes five minutes and seriously amplifies the flavour a simple pro tip for any baked item, especially these dense, layered Seven Layer Cookies .
Chip Choices: From Chocolate to Butterscotch.
The traditional recipe calls for both semi sweet chocolate and butterscotch chips. This combination is non-negotiable for that classic flavor profile. The slight tang of the butterscotch pairs brilliantly with the intense richness of the melted chocolate.
If you hate butterscotch, try peanut butter chips, but I beg you, keep that semi sweet dark chocolate in there for depth. The best Seven Layer Cookies balance these flavors perfectly.
Condensed Milk vs. Evaporated Milk: A Crucial Distinction.
I once made the catastrophic mistake of grabbing a can of evaporated milk instead of condensed milk for a batch of Magic Seven Layer Cookies . Disaster! Evaporated milk is unsweetened and thin; it will not caramelize and will simply steam your crust into a soggy mess.
Sweetened condensed milk is thick, syrupy, and contains roughly 40 45% sugar. Always double check the label.
Achieving the Perfect Base: Butter-to-Crumb Ratio.
When pressing the base, you are looking for stability. If the mixture is too dry, your base will crumble when you try to slice the finished product. If it’s too wet, the bottom will be oily. The sweet spot is a half cup of melted butter for every 1.5 cups of fine crumbs.
Press it down with the base of a measuring cup until it feels solid and compacted.
The Maillard Reaction in Baked Condensed Milk.
The real magic in these bars is the caramelization, known technically as the Maillard reaction. As the high heat hits the sugar and milk proteins, the condensed milk doesn’t just melt it darkens, bubbles, and thickens into a rich, chewy, non-crystalline toffee.
This is why the edges of your Seven Layer Cookies will be chewy and dark, while the center remains slightly fudgier.
The Chef's Method: Assembly Guide for Perfect Seven Layer Bars
The order in which you assemble your layers matters more than you think. It affects how the heat distributes and how the binder sets. Getting the right method for these Seven Layer Cookies is crucial.
Prepping the Pan: Foil, Parchment, and Non-Stick Spray.
Do yourself a huge favor and use parchment paper. Forget the foil; it still sticks sometimes. Line your 9x13 pan, making sure you leave at least a two-inch overhang on the long sides.
These will be your ‘handles.’ Using the handles to lift the chilled block out of the pan is the single easiest way to ensure clean, perfect slices of your finished Seven Layer Cookies .
Layering Strategy: Order of Operations for Optimal Setting.
Once the crust is pressed, pour the condensed milk first (Layer 2). Do not stir it in. The milk needs to contact the crust directly. Then, distribute your chocolate and butterscotch chips (Layers 3 & 4). Next, add the coconut (Layer 5). Finally, scatter the nuts on top (Layer 6).
I know, that sounds like six layers, but the butter mixed into the crust counts as the seventh element! This strategic layering ensures the coconut and nuts toast beautifully on the surface while the chips melt down into the milk below.
The Drizzle Technique: Ensuring Even Milk Saturation.
The key to preventing soggy centers or dry corners is milk distribution. After pouring the entire can of sweetened condensed milk, gently tilt the pan back and forth until the milk has flowed evenly across the entire surface.
If you don't coat the corners, they will be dry and crumbly, while the center of your Seven Layer Cookies may be too wet.
Baking Time Calibration for Golden Edges.
Bake these at 350°F (175°C) for about 25– 30 minutes. You are looking for specific visual cues. The edges should be deeply golden, bubbling aggressively, and the coconut on top should be richly toasted not just yellow, but a deep, nutty brown.
If the center still looks pale or wobbly, give it another three minutes. These Easy Seven Layer Cookies are better slightly browned than underbaked.
Troubleshooting and Expert Hacks for Flawless Slices
I have made so many batches of these over the years, and I’ve learned every possible way to mess them up. Let’s look at the pitfalls that prevent perfect Seven Layer Cookies .
Preventing the Crust from Crumbling (The 'Press Hard' Rule).
If your crust falls apart when you try to slice your Seven Layer Cookies , it means two things: you didn't press hard enough, or you didn't let them cool long enough. Use real muscle when pressing the crust. I use a straight sided heavy glass and lean my body weight into it.
A compact base is your structural integrity.
Handling Soggy Centers: Adjusting Milk Distribution.
Soggy centers are almost always a result of inadequate baking time combined with too much condensed milk pooling in the middle. Ensure your oven rack is in the center position for even heat.
If the edges are getting too dark, but the center is still pale, drop the oven temperature slightly to 325°F (160°C) and bake for another 5– 10 minutes to finish setting the middle of your Chocolate Seven Layer Cookies .
If you are looking for gluten-free Seven Layer Cookies , ensure your baking time remains consistent, as the crumb often holds less moisture.
The Secret to Clean Cuts (Chilling Before Slicing).
Do not, under any circumstances, try to slice these while warm or even just at room temperature. The melted condensed milk remains soft and tacky. Chilling is essential. After cooling to room temperature, chill the pan in the fridge for a minimum of two hours.
Then, lift the entire block out using your parchment handles and cut the Seven Layer Cookie Bars using a long, sharp, non-serrated chef’s knife. Wipe the blade clean with a damp towel between cuts for professional looking edges.
Extending Freshness: Storage, Stacking, and Freezing Options
Room Temperature vs. Refrigerated Shelf Life.
Because these contain a lot of sugar and fat (which are natural preservatives), they are quite stable. If stored in an airtight container at room temperature, they will last 3 4 days, though the chewy texture softens slightly over time.
For maximum firmness and chew, I recommend storing your Seven Layer Cookies in the refrigerator. They last easily up to a week when chilled, and the cold makes them incredibly easy to handle.
Freezing Baked and Unbaked Cookie Bars.
These freeze beautifully!
- Baked: Once fully chilled and sliced, place the bars in a single layer on a sheet pan and freeze for 30 minutes until solid. Then, transfer them to a freezer safe bag or container, separated by small squares of parchment paper to prevent sticking. They last up to 3 months.
- Unbaked: Do not freeze the layers unbaked. The melted butter and condensed milk separate unevenly when frozen raw. Stick to freezing the baked bars for the best results. I prefer to always have a stash of these great Seven Layer Cookies ready to go!
Finishing Touches: Pairing and Presentation Ideas
Perfect Drinks to Complement the Richness.
These bars are intensely sweet, so they demand a sharp counterpoint. A strong, dark roast coffee or a shot of espresso is perfect. Alternatively, pair the richness of the Seven Layer Cookies with a cold glass of milk or a dry sparkling cider.
Chef’s Note: Want to use this method for a completely different flavor profile? The layering technique works just as well for fudgy, moist desserts. If you want something less traditional but equally magical, check out the method used in my Oreo Cheesecake Cookies: The Ultimate, Creamy Indulgence Recipe , which also uses a heavy layer for binding!
I hope you love making these. They are simple, satisfying, and deliver maximum flavour for minimal effort. These iconic Seven Layer Cookies will absolutely disappear faster than you can say "Hello Dolly." Go bake some joy!

Recipe FAQs
Why did my Seven Layer Bars turn out greasy or oily?
Greasy bars are usually caused by using slightly too much melted butter in the crust, or sometimes the butter seeps out if the crust layer is too thin. Ensure you press the crust down very firmly before adding the layers, and let the bars cool completely before cutting to allow the fats to re-solidify.
If you notice pooling halfway through baking, the oven temperature might be too low.
Can I make Seven Layer Bars dairy-free or vegan?
Absolutely, this recipe adapts very well. You must swap the traditional sweetened condensed milk for a dairy-free alternative, such as condensed sweetened coconut milk, which works beautifully and caramelizes well.
Ensure you also use plant based butter for the crust and verify that your chocolate chips are certified vegan.
My bars crumbled when I tried to cut them. What went wrong?
The most common culprit for crumbling is cutting the bars before they have fully set. You must allow the bars to cool completely to room temperature, which allows the condensed milk mixture to transition from liquid to firm caramel.
For the cleanest cuts, chill the entire pan in the refrigerator for at least two hours before slicing.
What are good substitutions for graham crackers or nuts?
Seven Layer Bars are highly adaptable to ingredient swaps. For the crust, you can successfully use crushed vanilla wafers, digestive biscuits, gingersnaps, or shortbread cookies. For the nuts, any combination works, but try pecans, almonds, or even skipping them entirely if dealing with allergies.
How should I store the finished bars, and can I freeze them?
Store the cooled, cut bars in an airtight container at room temperature for up to four days, or refrigerate for up to one week for a firmer, chewier texture. To freeze, wrap individual bars tightly in plastic wrap and then foil; they will keep well for up to three months, provided they are thawed slowly in the refrigerator.
Do I need to pre-bake the crust before adding the layers?
No, pre-baking the crust is not necessary for this particular recipe. The combination of the melted butter and the crumbs, combined with the weight of the sweetened condensed milk poured on top, allows the crust to set perfectly during the main baking time, resulting in a firm base.
Can I use different varieties of chips or ingredients in the layers?
Absolutely; feel free to customize the chip layers to your preference. While traditional bars use semi sweet chocolate, substituting in peanut butter chips, butterscotch chips, or even adding a layer of toffee pieces or small chopped pretzels provides excellent flavor and texture variation.
Ensure the total volume of mix-ins remains roughly the same.
Ultimate Seven Layer Cookies Recipe
Ingredients:
Instructions:
Nutrition Facts:
| Calories | 315 kcal |
|---|---|
| Fat | 20 g |
| Fiber | 1.5 g |
