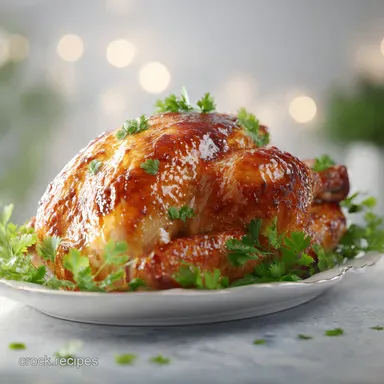
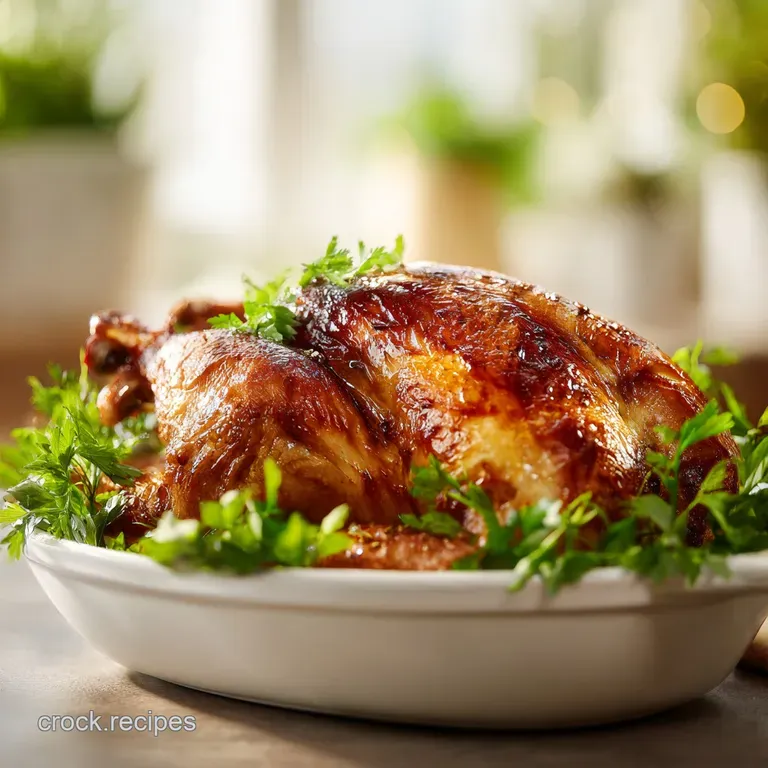
How to Roast a Turkey: Classic and Crisp
- Time: 30 min active + 3 hours roasting = Total 4 hours 15 mins
- Flavor/Texture Hook: Shatter crisp skin with herb infused, velvety meat
- Perfect for: Holiday feasts, family gatherings, first time turkey cooks
The first thing you'll notice is that scent, a heavy, savory cloud of toasted sage and garlic that fills every single corner of the house. It's that specific aroma that tells you the holiday has actually started. I remember my first attempt at this, and honestly, it was a disaster.
I didn't pat the bird dry, and instead of a golden crust, I ended up with a pale, steamed turkey that looked more like a boiled potato than a centerpiece. It was a hard lesson in the power of moisture.
Since then, I've obsessed over the details. I've learned that the secret isn't in some fancy gadget, but in how you manage the heat and the fat. When you get it right, the skin doesn't just break, it shatters, and the meat stays so moist you don't even need a river of gravy to make it work.
If you're wondering how to roast a turkey that actually tastes as good as it looks, you're in the right place. We're going to focus on the contrast between that salty, crisp exterior and the rich, herb laden interior. It's a bit of a process, but once you have the rhythm down, it's actually quite relaxing.
How to Roast a Turkey
Right then, let's talk about the strategy. Most people make the mistake of roasting at one temperature the whole time. But that's how you get a burnt breast and raw thighs. We're using a "heat shock" method.
We start high to lock in the color and then drop the temp to let the heat penetrate the thickest parts of the bird without drying out the edges.
It's all about the layers. We aren't just seasoning the outside, we're building a flavor barrier. By shoving a compound butter directly against the meat, we're essentially poaching the breast in fat while the oven air crisps the skin.
It's a brilliant bit of kitchen physics that ensures you don't end up with that dreaded "cardboard" texture.
Trust me on this, the resting period is not optional. If you carve it the second it comes out of the oven, all those velvety juices will just run across the board, leaving the meat dry. Give it those 45 minutes. The bird will still be steaming hot, and the meat will be ten times more satisfying.
Key Cooking Secrets
To get this right, you have to understand what's happening inside the oven. It's not just about time, it's about temperature curves and moisture management.
The Initial Sear: Starting at 425°F (218°C) triggers the fats in the skin to render quickly, creating that shatter crisp texture.
The Butter Barrier: Placing butter under the skin creates a protective layer of fat that prevents the breast meat from direct exposure to the dry oven air.
Carryover Cooking: The internal temp continues to rise by 5-10 degrees after you pull it out, which is why we pull at 160°F (71°C) for the breast.
The V Rack Lift: Elevating the bird allows hot air to circulate underneath, so the bottom doesn't just stew in its own juices.
| Feature | Classic Roast | Spatchcocked |
|---|---|---|
| Presentation | Traditional whole bird | Flattened, rustic look |
| Cook Time | Longer (3+ hours) | Much faster (approx 90 mins) |
| Texture | Juicier breast | Evenly cooked throughout |
| Best For | "Wow" factor centerpieces | Casual meals or tight schedules |
Detailed Recipe Specs
Before we dive into the ingredients, let's look at the "why" behind the components. Most people just throw salt on the skin, but we're going deeper.
| Ingredient | Science Role | Pro Secret |
|---|---|---|
| Kosher Salt | Moisture draw | Pulls water from the skin for better browning |
| Unsalted Butter | Heat conductor | Carries herb flavors directly into the muscle |
| Chicken Stock | Humidity control | Prevents pan drippings from burning and smoking |
| Aromatics | Steam infusion | Infuses the cavity with scent from the inside out |
Essential Pantry List
Here is exactly what you'll need. Don't bother with low-fat butter here, it won't give you the same velvety mouthfeel.
- 13 lb whole turkey, thawed completely Why this? Standard size for most families and fits most ovens
- 2 tbsp kosher salt Why this? Coarser grains are easier to control than table salt
- 1 cup unsalted butter, softened Why this? Allows you to control the salt level in the butter
- 4 cloves garlic, minced Why this? Provides a pungent base for the compound butter
- 1 tbsp fresh sage, chopped Why this? The quintessential "turkey" flavor profile
- 1 tbsp fresh rosemary, chopped Why this? Adds a piney, earthy depth
- 1 tbsp fresh thyme, chopped Why this? Subtle lemony notes that cut through the fat
- 1 tsp black pepper Why this? Basic heat to balance the rich butter
- 1 large yellow onion, quartered Why this? Adds sweetness to the cavity steam
- 2 large carrots, chopped into chunks Why this? Provides a base for future gravy
- 2 stalks celery, chopped Why this? Essential aromatic for a savory profile
- 2 cups low sodium chicken stock Why this? Keeps the roasting pan moist
Ingredient Swaps
| Original Ingredient | Substitute | Why It Works |
|---|---|---|
| Unsalted Butter | Ghee (clarified butter) | Higher smoke point. Note: Less creamy, more nutty flavor |
| Fresh Sage/Thyme | Dried Herbs (use 1/3 amount) | Concentrated flavor. Note: Lacks the bright, "green" taste of fresh |
| Chicken Stock | White Wine | Adds acidity. Note: More complex flavor but can be sharper |
The Right Gear
You don't need a professional kitchen, but a few specific tools make this way easier. A roasting pan with a V rack is basically mandatory. If you don't have one, you can make a rack out of thick slices of onion and carrots, but a metal rack is more consistent.
I highly recommend a digital meat thermometer. Don't rely on the "pop up" timer that comes with the turkey, those things are notoriously unreliable and often tell you the bird is done way too late. A probe thermometer allows you to check the temp without opening the oven door and letting all the heat escape.
Step by step Guide

Let's crack on. Follow these steps exactly, and you'll avoid the "steamed bird" tragedy I had years ago.
Preparing the Bird
- Remove the giblets and neck. Pat the turkey completely dry with paper towels. Season the cavity generously with salt. Note: Dry skin is the only way to get a shatter crisp result
- Stuff the turkey cavity with the quartered onion, chopped carrots, and chopped celery. Note: This scents the meat from the inside
Applying the Flavor Layer
- Combine softened butter, minced garlic, sage, rosemary, thyme, and black pepper to create a compound butter.
- Carefully loosen the skin over the breast meat using your fingers. Stuff the compound butter underneath the skin, spreading it evenly, and rub any remaining butter over the outside of the skin. Note: Be gentle so you don't tear the skin
Managing the Roast
- Preheat oven to 425°F (218°C). Place the turkey on a V rack in a roasting pan and pour the chicken stock into the bottom of the pan.
- Roast at 425°F (218°C) for 30 minutes until the skin begins to sizzle and brown.
- Lower the oven temperature to 325°F (163°C) and continue roasting until the breast reaches 160°F (71°C) and the thigh reaches 175°F (79°C).
Executing the Rest
- Transfer the turkey to a carving board, tent loosely with aluminum foil, and let rest undisturbed for 45 minutes before carving. Note: This is where the juices redistribute into the meat
Chef's Tip: If you notice the breast skin is getting too dark before the thighs are done, use the trick I picked up from Alton Brown: Fold a large square of foil over the breast to protect it from further browning while the legs finish.
Fixing Common Roasting Issues
Even with a plan, things can go sideways. The most common issue is the "temperature gap" where the breast is dry but the thighs are still pink.
Why Your Skin Burnt
If the skin turns dark brown too quickly, your oven might be running hot, or the butter is scorching. This usually happens if the bird is too close to the top heating element.
Solving Dry Breast Meat
This happens when you roast too long or at too high a temperature. Always pull the bird at 160°F (71°C) for the breast, as the carryover heat will bring it to the safe 165°F (74°C) mark.
Fixing Underdone Thighs
The thighs take longer to cook than the breast. If the breast is done but the thighs aren't at 175°F (79°C), you can carefully carve the breast out and put the rest of the bird back in for another 15-20 minutes.
| Problem | Root Cause | Solution |
|---|---|---|
| Skin is pale/rubbery | Bird was wet when it went in | Pat dry with paper towels more thoroughly |
| Meat is tough/dry | Overcooked beyond 165°F | Use a digital thermometer and pull early |
| Pan drippings burnt | Not enough liquid in pan | Add more chicken stock every hour |
Common Mistakes Checklist
- ✓ Did you pat the skin completely dry?
- ✓ Is the butter actually under the skin?
- ✓ Did you check the temp in the thickest part of the thigh?
- ✓ Did you actually wait the full 45 minutes to rest?
- ✓ Did you thaw the bird completely? Per the USDA guidelines, thaw your frozen turkey in the refrigerator 1 day for every 4 to 5 lbs of turkey.
Adjusting the Bird Size
When you change the size of the turkey, you can't just multiply the time linearly, or you'll end up with a charcoal briquette.
Scaling Down (Small Bird/Breast) If you're only roasting a turkey breast, reduce the roasting time by about 20-30%. Use a smaller pan to keep the heat concentrated. I find that for a breast, you can skip the cavity stuffing and just focus on the compound butter.
Scaling Up (Large Bird) For a bird larger than 15 lbs, increase the roasting time, but don't increase the temperature. Scale your salt and herbs to about 1.5x, rather than 2x, to avoid the seasoning becoming overpowering.
Debunking Roasting Myths
There are a lot of "old wives' tales" in the kitchen. Let's clear some up.
The Basting Myth Many people think basting every 30 minutes keeps the meat moist. In reality, opening the oven door drops the temperature significantly and slows down the skin crisping process. The butter under the skin does all the work for you.
The Room Temp Myth Some suggest letting the turkey sit on the counter for two hours before roasting. This is actually dangerous as it puts the meat in the "danger zone" for bacterial growth. Just take it out 30-60 minutes before you start.
Storing and Reheating Tips
Don't let the leftovers go to waste. Turkey is actually better the next day once the flavors have settled.
Storage Guidelines Store carved meat in airtight containers in the fridge for 3-4 days. If you have more than you can eat, the meat freezes beautifully for up to 3 months. I recommend freezing it with a bit of the pan drippings to prevent freezer burn.
Zero Waste Hacks Never throw away the carcass. Toss the bones, the leftover carrots, and the onion into a pot to make homemade turkey bone broth, which is absolute liquid gold for soups.
Reheating Without Drying To reheat, don't use the microwave on high. Instead, place the meat in a baking dish with a splash of stock, cover tightly with foil, and warm at 300°F (150°C) until just heated through. This steams the meat and keeps it velvety.
The Best Side Pairings
A roast turkey is a blank canvas that needs some bright, punchy sides to balance the richness of the butter. I love serving this with something creamy and earthy, like a roast chicken and polenta style base, though with turkey, a traditional stuffing is a classic for a reason.
If you're looking for a way to use up the leftovers a few days later, you can't go wrong with a cheesy turkey casserole. It's a great way to transform those slices into a completely different, comforting meal. For a bright contrast, I always add a cranberry relish or roasted Brussels sprouts with a splash of balsamic vinegar to cut through the savory weight of the bird.
Recipe FAQs
How many hours does it take to roast a turkey?
About 3 hours of roasting. Total time including preparation and a critical 45-minute rest period is approximately 4 hours and 15 minutes.
Can diabetics eat oven roasted turkey breast?
Yes, it is a lean, high protein option. Because this recipe uses herbs and butter instead of sugary glazes, it fits well into a diabetic friendly diet.
Should you roast a turkey covered or uncovered?
Roast it uncovered. Keeping the bird exposed allows the oven heat to circulate and crisp the skin for a golden brown finish.
Should you roast a turkey at 350 or 325?
Use 325°F for the main roasting phase. Start with a 30-minute sear at 425°F, then lower the temperature to 325°F to ensure the meat cooks evenly.
How to get crispy skin on a roast turkey?
Pat the skin completely dry and sear at 425°F. Eliminating surface moisture and starting with a high heat blast ensures a professional crunch.
Is it true that I need to baste the turkey every hour for moisture?
No, this is a common misconception. Basting frequently lets heat escape the oven and slows cooking; stuffing butter under the skin provides ample moisture.
How to tell when the turkey is fully cooked?
Use a meat thermometer to verify internal temperatures. The breast is done at 160°F (71°C) and the thigh at 175°F (79°C). If you mastered temperature precision here, apply the same focus to our pan seared cod for a professional finish.
How To Roast A Turkey