Cinnamon Rolls: Instant Pot from Scratch

- Time: 20 min active + 45 min proofing = Total 80 minutes
- Flavor/Texture Hook: Velvety, buttery dough with a gooey, cinnamon sugar core
- Perfect for: Weekend brunch or a cozy surprise breakfast for the family
Imagine the smell of warm cinnamon and melted butter filling every single corner of your house. It is that heavy, sweet aroma that practically pulls you out of bed. I remember one winter morning when my kitchen was freezing, and my traditional oven took forever to preheat, leaving my dough cold and stubborn.
That was the day I stopped fighting with the drafts and moved everything into my pot.
The result was a total shift in how I bake. Instead of worrying about whether the center of the pan was cooking as fast as the edges, I got this consistent, steamy heat that kept the dough supple.
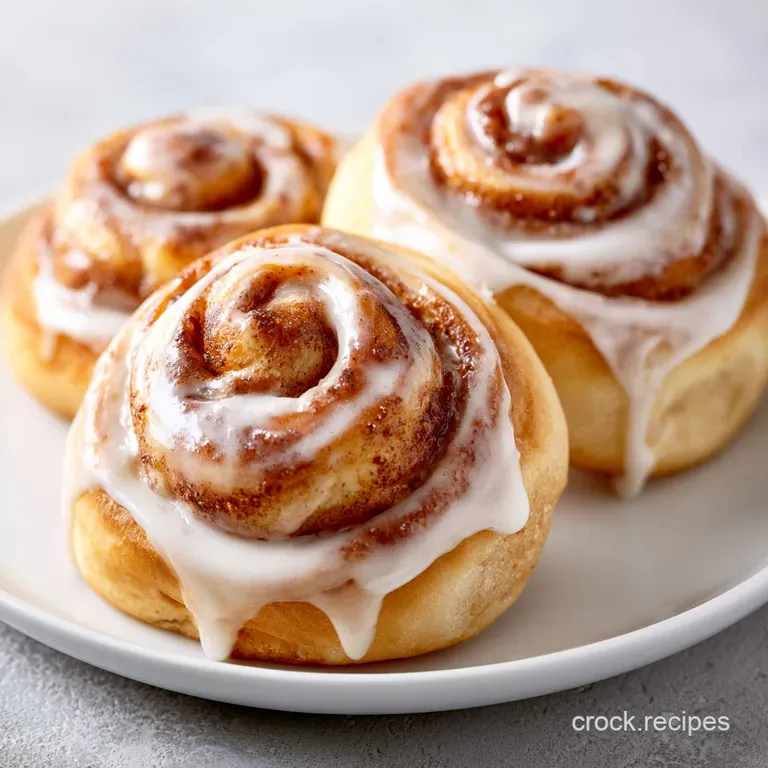
These Cinnamon Rolls aren't just about the sugar, they are about that specific, pillowy texture that only happens when the moisture is locked in.
You can expect a treat that is soft enough to squash between your fingers but sturdy enough to hold a generous amount of glaze. We are skipping the fancy bakery equipment and focusing on a few basic tools to get a result that feels like a hug in food form. Let's get into how to make these right.
The Best Soft Cinnamon Rolls
The secret to getting these just right is the environment. Most people struggle with yeast because their kitchen is too cold or their oven is too dry. By using the "Yogurt" setting or the residual warmth of the pot, we create a mini sauna.
This allows the yeast to thrive, producing the carbon dioxide needed to make the dough airy and light.
When you finally pop the lid, the scent of toasted cinnamon hits you immediately. The rolls shouldn't be dry or bread like, they should have a slight pull to them, almost like a soft brioche.
If you've ever had rolls that felt like dinner rolls with cinnamon on them, it's usually because they were overbaked or under proofed. We avoid that here.
I've found that using a springform pan inside the pot is the way to go. It gives the rolls room to breathe and makes it so much easier to lift them out without ruining the shape. Honestly, don't even bother with low-fat butter here, the fat is what gives the dough its velvety mouthfeel.
Secrets Behind the Rise
Because we are using a closed environment, the physics of the bake change compared to a traditional oven. Here is what is actually happening inside the pot.
- Steam Retention: The sealed lid traps moisture, which prevents the dough from forming a hard crust too early. This allows the rolls to expand fully before the structure sets.
- Consistent Thermal Mass: The pot distributes heat more evenly than air, meaning the rolls in the center are just as fluffy as the ones on the edge.
- Yeast Activation: By keeping the milk at a steady warm temperature, the yeast consumes the sugar more efficiently, leading to a faster and more reliable rise.
- Gluten Relaxation: The gentle heat helps the gluten network relax, which is why the final texture is so soft rather than chewy.
For more on how gluten develops during the kneading process, I always trust the guides at King Arthur Baking, as they break down the protein structures in simple terms.
| Method | Time | Texture | Best For |
|---|---|---|---|
| Pot Method | 80 mins | Velvety & Steamy | Soft, gooey centers |
| Oven Method | 150 mins | Golden & Crusty | Traditional exterior |
| Air Fryer | 30 mins | Crispy Outer | Small batches/Quick fix |
The pot method is definitely the winner for me when I want that "melt in your mouth" feeling without spending the whole morning in the kitchen.
Ingredient Role Breakdown
Understanding why we use specific items helps you make better decisions if you need to swap something out.
| Ingredient | Science Role | Pro Secret |
|---|---|---|
| Active Dry Yeast | Leavening Agent | Bloom in milk first to ensure it's alive |
| All Purpose Flour | Structure | Measure by weight to avoid dry dough |
| Unsalted Butter | Tenderizer | Use softened butter for the filling for easier spreading |
| Heavy Cream | Emulsifier | Adds a richness to the glaze that milk can't match |
It's important to note that the ratio of flour to liquid is where most people go wrong. If you add too much flour, your Cinnamon Rolls will be dense. The dough should be tacky, meaning it sticks to your finger slightly but doesn't leave a mess of paste.
Essential Kitchen Tools
You don't need a professional bakery to pull this off. A few basic items will do the trick, and one of them is probably already in your bathroom.
For the dough and baking, you'll need your Instant Pot (or a similar multi cooker like a Ninja Foodi), a 7 inch springform pan, and a simple kitchen towel. The towel is vital because it prevents condensation from dripping directly onto the dough during the proofing stage.
When it comes to cutting the rolls, put away the knife. I use unflavored dental floss. You slide the floss under the roll, cross it over the top, and pull quickly. This cuts straight through the dough without squashing the beautiful layers we just worked so hard to create.
If you don't have a springform pan, a cake pan that fits inside your pot will work, but you'll have to be more careful when removing the rolls. I've had a few mishaps where I tried to shake them out and ended up with "Cinnamon Roll Mash," so the springform is really the way to go.
Key Steps
Let's crack on with the process. Keep an eye on the cues, as they are more important than the timer.
1. Activating the Yeast and Mixing
Combine 240ml warm milk and 50g granulated sugar in a bowl, then sprinkle 2 1/4 tsp active dry yeast on top. Let it sit for 5-10 minutes until a foamy layer forms. If it doesn't foam, your yeast is dead, and you need to start over. You can find a great deep dive on yeast viability over at Serious Eats.
Stir in 75g melted unsalted butter and 1 large egg. Gradually add 440g to 500g all purpose flour and 5g salt, stirring until a soft, tacky dough forms. Don't over mix here, just stir until the flour disappears.
2. Proofing in the Pot
Place the dough in a greased bowl or directly in your 7 inch springform pan. Cover it with a clean kitchen towel. Place the pan on the trivet inside the pot. Close the lid and use the 'Yogurt' setting for 45 minutes until the dough doubles in size.
3. Rolling and Filling
On a floured surface, roll the dough into a 12x18 inch rectangle. Spread 113g softened butter across the surface. Sprinkle 150g brown sugar and 2 tbsp ground cinnamon evenly over the butter.
Roll the dough tightly from the long edge into a log. Cut into 12 even pieces using your dental floss for a clean cut.
4. Final Cook and Brown
Place the rolls in the pan, ensuring they are snug but have a tiny bit of room to grow. Cook in the Instant Pot for 15 minutes until they are puffed and fragrant.
5. Glazing for Finish
Whisk together 120g powdered sugar, 30ml heavy cream, and 5ml vanilla extract. Drizzle the glaze over the warm Cinnamon Rolls while they are still hot so some of it seeps into the spirals.
Chef Note: If your glaze is too thick, add the heavy cream a teaspoon at a time. It should be pourable but not watery.
Fixing Common Dough Issues
Even for experienced cooks, dough can be temperamental. Most issues come down to temperature or hydration.
Why Your Rolls Are Gummy
If the center feels like raw dough even after the timer goes off, it's usually because the rolls were packed too tightly in the pan. This prevents the heat from reaching the core. Ensure there is a small gap between each roll.
Preventing Flat Rolls
Flat Cinnamon Rolls often happen because the yeast didn't bloom properly or the proofing environment was too cold. Make sure your milk is warm (not boiling) and that the pot is sealed tight during the rise.
Dealing with Dry Dough
If the dough is cracking as you roll it, you've likely added too much flour. Next time, start with the lower end of the flour range. For this batch, you can try adding a teaspoon of warm milk to the dough to loosen it up.
| Problem | Root Cause | Solution |
|---|---|---|
| Dough didn't rise | Dead yeast or cold pot | Check yeast foam; use Yogurt setting |
| Glaze is runny | Too much cream | Whisk in more powdered sugar |
| Rolls are tough | Over kneaded dough | Stir until just combined, don't overwork |
- ✓ Always use a kitchen towel to cover the dough.
- ✓ Use a digital scale for flour for consistency.
- ✓ Ensure butter for the filling is softened, not melted.
- ✓ Let the rolls sit for 5 minutes before glazing.
Fun Flavor Twists
Once you've got the base down, you can start playing with the filling. This is where you can really make these your own.
For a chocolatey version, mix a tablespoon of cocoa powder into the cinnamon sugar. I've also tried adding a pinch of orange zest to the dough, which gives it a bright, citrusy note that cuts through the richness of the butter.
If you're feeling fancy, you can spread a thin layer of Nutella over the dough before adding the cinnamon sugar.
If you love these flavors but want something quicker for a weekday, you might enjoy my Cinnamon Applesauce Cookies, which give you that same cozy vibe without the proofing time.
You can also add chopped pecans or walnuts to the filling for a bit of crunch. Just press them into the butter before rolling so they stay put. Trust me, the contrast between the shatter of a toasted nut and the velvety dough is incredible.
Adjusting the Batch Size
Scaling Cinnamon Rolls requires a few tweaks to make sure the heat distribution stays the same.
Scaling Down (1/2 batch): Use a smaller 5 or 6 inch pan. Reduce the cook time by about 20%, as the smaller mass will heat through faster. If the recipe calls for one egg, beat it in a small bowl and use half of it.
Scaling Up (2x batch): Do not try to double the rolls in one 7 inch pan, or you'll end up with a giant cinnamon cake. Work in two batches. When doubling spices like cinnamon and salt, only increase them to 1.5x the original amount, as they can become overpowering in larger volumes.
Baking Adjustments: If you decide to move these to a standard oven, lower the temperature to 180°C (350°F) and extend the bake time to 20-25 minutes.
The oven lacks the steam of the pot, so you might want to place a small pan of water on the bottom rack to keep the rolls moist.
| Goal | Action | Result |
|---|---|---|
| More gooeyness | Under bake by 2 mins | Softer, more melted center |
| More structure | Add 2 tbsp flour | Sturdier roll, less tacky |
| Lower sugar | Reduce brown sugar 20% | More cinnamon forward flavor |
Debunking Kitchen Myths
There are a lot of old wives' tales about bread and rolls that just don't hold up when you look at the facts.
One common myth is that you need to "punch down" the dough to remove air. In reality, you're just degassing it slightly to redistribute the yeast. Being too aggressive can actually damage the gluten structure we've built. A gentle press is all you need.
Another misconception is that using "warm" milk means "hot" milk. This is a dangerous mistake. If the milk is over 45-50°C, you will actually kill the yeast. It should feel like warm bath water, not a cup of tea.
Finally, some people think you can't use all purpose flour for rolls and must use bread flour. While bread flour has more protein, all purpose is actually better for these because it results in a softer, more velvety crumb. Bread flour can make them too chewy for a dessert roll.
Saving Rolls for Later
Since you probably won't eat 12 rolls in one sitting, you need a plan for the leftovers.
Fridge Storage: Keep your rolls in an airtight container for up to 4 days. To bring back that fresh from the pot feel, microwave a roll for 15-20 seconds. This reactivates the butter and softens the dough.
Freezer Guide: You can freeze these in two ways. For unbaked rolls, flash freeze them on a tray for an hour before moving them to a bag. When you're ready, let them thaw and rise in the pot. For baked rolls, wrap them individually in foil and freeze for up to 3 months.
Zero Waste Tips: If you have a bit of dough left over, don't toss it. Roll it into a small ball and bake it as a "tester" roll to check the doneness. If you have leftover glaze, it makes a great dip for fruit slices or can be drizzled over my Cinnamon Applesauce Muffins for an extra treat.
Perfect Morning Pairings
These Cinnamon Rolls are rich, so they pair best with things that provide a bit of contrast. A strong, bitter black coffee or a sharp espresso is the classic choice because it cuts right through the sugar and butter.
If you want something fresher, serve them with a side of tart berries, like raspberries or blackberries. The acidity of the fruit balances the sweetness of the glaze. I also love serving them with a dollop of salted butter on the side for those who really want to lean into the decadence.
For a full brunch spread, these rolls are the star, but they work well alongside some savory eggs or a fresh fruit salad. Just make sure to serve them warm, as the texture is at its peak right after the glaze has set.
Right then, you've got everything you need to make some incredible Cinnamon Rolls. Just remember to trust the foam on your yeast and don't be afraid of a little bit of tacky dough. Happy baking!
Recipe FAQs
Why did my dough not rise during the proofing stage?
Check your milk temperature. If the milk was too hot, it likely killed the yeast; if too cold, the yeast remained dormant. Ensure a foamy layer forms before adding other ingredients.
How to cut the rolls without flattening the dough?
Use unflavored dental floss. Slide the floss under the log, cross it over the top, and pull quickly for a clean cut that preserves the pillowy shape.
Can I prepare the rolls the night before?
Yes, shape them and keep them chilled. Store the shaped rolls in the refrigerator overnight, then bring them to room temperature before the final cook.
Is it true that I must use a professional proofing oven to get a soft crumb?
No, this is a common misconception. Using the 'Yogurt' setting or residual warmth in an Instant Pot creates a mini sauna that mimics professional equipment.
How to make the cinnamon roll glaze?
Whisk powdered sugar, heavy cream, and vanilla extract. Mix until smooth and drizzle the glaze over the rolls while they are still warm.
Can I use cold milk instead of warm milk?
No, use warm milk. Yeast requires warmth to activate; cold milk will prevent the dough from rising and result in a dense roll.
How to roll the dough for a consistent spiral?
Roll the dough into a 12x18 inch rectangle. Spread softened butter and cinnamon sugar evenly, then roll tightly from the long edge. If you enjoyed mastering the dough handling here, see how the same principle works in my tea cakes recipe.
Instant Pot Cinnamon Rolls

