Old Fashioned Blueberry Cobbler: Golden and Flaky

- Time:20 minutes active + 45 minutes baking = Total 65 minutes
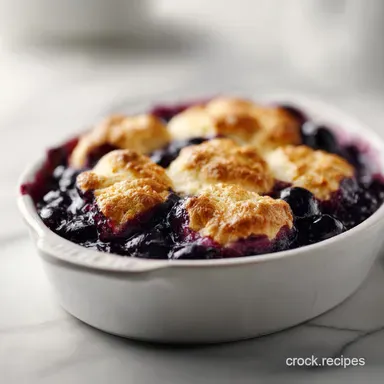
- Flavor/Texture Hook: Syrupy, bursting berries under a shattering golden crust
- Perfect for: Summer family gatherings or cozy Sunday desserts
The Best Blueberry Cobbler
That sound is what gets me every time - the low, rhythmic bubble of thick berry syrup against the sides of the pan. I remember the first time I tried to make this for a neighborhood potluck. I had used room temperature butter, thinking it would be easier to mix. The result?
A flat, dense layer of dough that tasted more like a heavy pancake than a cobbler. It was a total letdown, but it taught me the most important lesson about baking: temperature is everything.
Now, when I pull this out of the oven, the aroma is an instant hit of warm cinnamon and toasted sugar. There's something about the way the blueberries collapse into a deep purple pool that just feels like home. It's the kind of dish where you don't even wait for it to cool completely before grabbing a spoon.
You just want that contrast of the hot, velvety fruit and the slightly crisp, buttery topping.
Trust me on this, the secret isn't in some fancy ingredient. It's all about the process. We're going to build this in layers, starting with a fruit base that's just tart enough to balance the sugar, topped with a biscuit dough that's barely mixed.
It's simple, it's hearty, and it's exactly what a comfort dessert should be. Let's get into it.
Quick Recipe Overview
Before we dive into the details, let's look at the basics. This is a traditional approach where the fruit is prepared first and the dough is spooned over the top. It's a far cry from those cake mix shortcuts, but the effort pays off in the texture.
You get those little craters where the juice bubbles through, creating caramelized edges that are the best part of the whole pan.
The balance here is key. We use a decent amount of lemon juice to cut through the sweetness of the blueberries, and a pinch of cinnamon to add warmth. The topping is a classic drop biscuit style, meaning we don't roll it out. This keeps the butter in small chunks, which is exactly how we get that tender crumb.
| Method | Time | Texture | Best For |
|---|---|---|---|
| Full Oven | 65 min | Consistent rise, golden top | Crowd pleasing, classic look |
| Stovetop Filling | 75 min | Extra thick syrup, deeper flavor | Those who love a jammy base |
The Best Component Choices
Getting the ingredients right is half the battle. For the berries, I usually go with a mix of wild and cultivated blueberries if I can find them. Wild berries are smaller and have a more intense, tart punch, while the larger ones provide those satisfying bursts of juice.
If you're using frozen ones, don't thaw them first - just toss them in. They release more moisture, but the cornstarch handles it.
The butter is where most people trip up. It needs to be cold. Not "chilled for five minutes" cold, but "straight from the fridge" cold. When you cut cold butter into flour, you create tiny pockets of fat. In the oven, that fat melts and creates steam, which pushes the dough up and makes it flaky.
If the butter is too soft, it just blends in, and you lose that shattering texture.
The Magic of the Slurry
Starch Gelatinization: Cornstarch granules absorb the blueberry juices and swell. This turns a watery liquid into a thick, velvety sauce that clings to the fruit.
Acid Balancing: Lemon juice breaks down the pectin in the berries. This ensures the filling isn't too stiff and brightens the overall flavor profile.
Leavening Action: Baking powder reacts with the heat and moisture in the milk. This creates the air bubbles that keep the topping from becoming a brick.
Fat Insulation: Cold butter prevents the flour from absorbing too much liquid too quickly. This keeps the crumb tender and prevents the dough from getting tough.
Component Analysis
| Ingredient | Science Role | Pro Secret |
|---|---|---|
| Cornstarch | Thickening agent | Toss with sugar first to avoid clumps |
| Cold Butter | Structure/Flakiness | Grate it if you don't have a pastry cutter |
| Lemon Juice | Flavor Brightener | Use fresh, not bottled, for a zingy finish |
| All Purpose Flour | Structural Base | Spoon and level to avoid a dry topping |
Necessary Kitchen Tools
You don't need a professional kitchen to pull this off, but a few specific tools make the process way smoother. The most important one is a 9x13-inch baking dish. If you use a deeper, smaller pan, the middle of the topping might stay gummy while the edges burn.
The wide surface area allows the heat to circulate and the juices to reduce properly.
A pastry cutter is a lifesaver for the butter, but if you don't have one, two forks or a sturdy grating tool work just as well. The goal is to get the butter into pea sized crumbs. I also recommend a medium mixing bowl for the fruit; you want enough room to toss the berries without crushing them.
Chef Note: If you're using a glass dish, be careful not to preheat the pan. Glass holds heat differently than ceramic or metal, and you don't want the bottom of your berries to scorch before the top is brown.
Step by step Baking Guide

Now, let's get our hands dirty. This process is pretty straightforward, but pay attention to the sensory cues - the smells and the sights - because that's how you know you're on the right track.
1. Preparing the Fruit Base
Start by gathering your blueberries, 150g sugar, cornstarch, lemon juice, cinnamon, and 1.5g salt. Toss these in a medium bowl. You aren't looking for a smooth paste here, just an even coating. The berries should look glossy and smell like a summer morning.
Pour this mixture into your 9x13-inch baking dish, spreading it out into an even layer.
2. Mixing the Dry Ingredients
In a separate mixing bowl, whisk together the 250g flour, 200g sugar, baking powder, and 3g salt. Make sure there are no clumps of baking powder, as these can create weird, oversized bubbles in your crust. This dry mix is the foundation of your topping, so get it well combined.
3. Incorporating the Butter
This is the critical part. Take your 115g of cold, cubed butter and add it to the flour. Use your pastry cutter to work the butter in until the mixture looks like coarse crumbs. You should still see some visible chunks of butter - about the size of a pea. This is the key to the flaky texture.
4. Bringing the Dough Together
Stir in the 180ml whole milk and 5ml vanilla extract. Use a spatula or a wooden spoon and mix just until the flour is moistened. Stop as soon as the dough comes together. If you overwork it, the gluten develops, and your topping will be tough rather than tender.
5. Topping the Berries
Spoon the dough in dollops over the blueberry mixture. Don't smooth it over like a cake. Leave small gaps between the mounds of dough. These gaps allow the steam to escape and give the fruit a chance to bubble through, creating those syrupy pockets we love.
6. Baking to Golden Perfection
Slide the pan into the oven at 375°F (190°C). Bake for 40–45 minutes. You're looking for two things: the topping should be deep golden brown, and the fruit juices should be bubbling vigorously around the edges.
Precision Checkpoints
- Butter Texture: Should resemble coarse crumbs, not a paste.
- Oven Temp: Constant 375°F (190°C) throughout the bake.
- Visual Cue: Fruit juices must be bubbling, not just simmering.
Fixing Common Cobbler Issues
Even the best of us hit a snag sometimes. Usually, cobbler problems come down to moisture or temperature. If your filling is too runny, it's often because the berries were extra juicy or the cornstarch wasn't distributed evenly. If the topping is too hard, it's almost always a sign of overmixing.
Why Your Filling is Runny
This usually happens when the starch doesn't have enough time to activate or the ratio of fruit to thickener is off. If you use frozen berries that release a ton of water, you might see a thinner sauce.
| Problem | Root Cause | Solution |
|---|---|---|
| Runny Sauce | Not enough cornstarch | Add 1 extra tbsp of cornstarch next time |
| Watery Base | Thawed frozen berries | Use berries straight from the freezer |
| No Thickening | Underbaked | Bake for another 5 mins until bubbling |
Why Your Topping is Tough
Overworking the dough is the number one culprit here. When you stir too much, the flour develops gluten, which creates a bread like texture instead of a biscuit like one.
| Problem | Root Cause | Solution |
|---|---|---|
| Dense Crust | Overmixing dough | Stir only until just combined |
| Pale Top | Oven too cool | Ensure oven is fully preheated to 375°F |
| Gummy Middle | Pan too deep | Use a 9x13 pan for better heat flow |
Essential Mistake Checklist
- ✓ Keep butter in the fridge until the very second you need it.
- ✓ Toss cornstarch thoroughly with the sugar to prevent lumps.
- ✓ Avoid the temptation to "smooth" the dough over the berries.
- ✓ Let the cobbler rest for 15 minutes before serving to let the syrup set.
- ✓ Use a kitchen scale for flour to avoid packing the measuring cup.
Customizing Your Dessert
Once you've nailed the classic version, you can start playing with the flavors. If you want a bit more crunch, try adding 1/2 cup of rolled oats to the flour mixture. This gives it a texture similar to Blueberry Crumble Muffins, which is a great way to add a rustic feel.
For those who want a different fruit experience, the same biscuit topping works wonders with peaches or blackberries. In fact, a Peach Cobbler follows a very similar logic, though peaches often need a bit more cinnamon to bring out their sweetness. If you're feeling adventurous, try adding a tablespoon of orange zest to the blueberry mix for a bright, citrusy contrast.
Substitution Guide
| Original Ingredient | Substitute | Why It Works |
|---|---|---|
| All Purpose Flour | Almond Flour | Low carb option. Note: Denser crumb and less rise |
| Whole Milk | Buttermilk | Adds a nice tang and extra tenderness |
| Granulated Sugar | Coconut Sugar | Earthy flavor. Note: Result will be darker brown |
| Unsalted Butter | Vegan Butter | Similar fat content. Note: May brown faster |
For a gluten-free version, you can swap the all purpose flour for a 1:1 gluten-free baking blend. Just make sure it contains xanthan gum, otherwise the topping might crumble too much.
Since we aren't rolling the dough, gluten-free flour actually works quite well here because we don't have to worry about the lack of elasticity.
Saving and Reheating Tips
Cobbler is great fresh, but it's also a fantastic make-ahead dessert. If you have leftovers, store them in the fridge in an airtight container. It'll stay good for about 3 to 4 days. The fruit will continue to settle, and the flavors will actually deepen as they sit.
For the freezer, I recommend slicing the cobbler into squares and freezing them individually on a baking sheet before transferring them to a freezer bag. This prevents them from turning into one giant block. They'll keep for up to 3 months.
When you're ready to eat, don't use the microwave - that'll make the crust soggy. Instead, pop them in a 350°F (175°C) oven for about 10-15 minutes until the edges sizzle again.
Regarding zero waste, if you have a few stray blueberries that are too mushy for the cobbler, don't toss them. Toss them into a smoothie or simmer them down with a bit of sugar to make a quick syrup for pancakes.
Even the leftover biscuit dough (if you made a double batch) can be baked on its own as small breakfast biscuits.
Best Pairing Suggestions
The gold standard pairing here is a big scoop of cold vanilla bean ice cream. The way the ice cream melts into the hot, purple syrup is just heavenly. If you want something a bit lighter, a dollop of freshly whipped cream with a hint of lemon zest complements the tartness of the berries beautifully.
For those who prefer something less sweet, a drizzle of heavy cream or a side of Greek yogurt provides a nice tang that cuts through the sugar. If you're serving this at a party, I like to put a bowl of fresh mint leaves on the table.
Tearing a leaf over the top adds a fresh, herbal note that makes the whole thing feel a bit more polished.
Right then, you've got everything you need. Just remember: cold butter, minimal mixing, and plenty of bubbling berries. Trust the process, and you'll have a dessert that'll have everyone asking for the recipe. Let's get baking!
Recipe FAQs
Do blueberries make a good cobbler?
Yes, they are an ideal choice. Their natural acidity balances the sweetness of the dough, and they hold their shape well during the 40 45 minute bake.
What's the difference between a blueberry crisp and a cobbler?
A cobbler features a biscuit like dough topping. While crisps use a crumbly mix of oats and butter, this cobbler uses a flour and milk batter spooned in dollops.
What is a 3 ingredient blueberry cobbler?
It is a shortcut version using berries, sugar, and a boxed cake mix. While convenient, it lacks the buttery, flaky texture of a traditional from scratch dough.
What are some common mistakes to avoid when making cobblers?
Avoid overmixing the dough. Stirring the milk and vanilla only until combined prevents the gluten from overdeveloping, which keeps the topping tender.
How to prevent the blueberry filling from being too runny?
Toss the berries with cornstarch before baking. This binds the natural juices as they heat, creating a thick, jammy sauce rather than a thin liquid.
Can I substitute the whole milk with buttermilk?
Yes, buttermilk adds a nice tang and extra tenderness. If you enjoyed the tender crumb produced by buttermilk here, see how a similar dairy rich center works in our strawberries and cream toast.
How to store and reheat leftover cobbler?
Store in an airtight container in the refrigerator for up to 3 days. Reheat in the oven at 375°F for 10 minutes to restore the topping's golden crust.
Old Fashioned Blueberry Cobbler