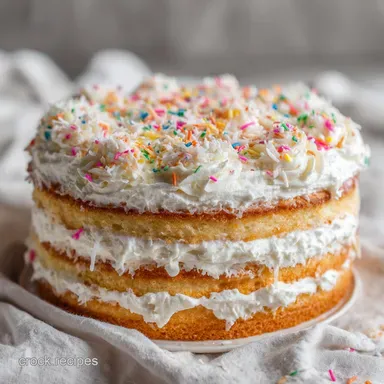
Coconut Cream Cake: Velvety and Rich
- Time:15 minutes active + 30 minutes cook + 2 hours chilling = Total 2 hours 45 mins
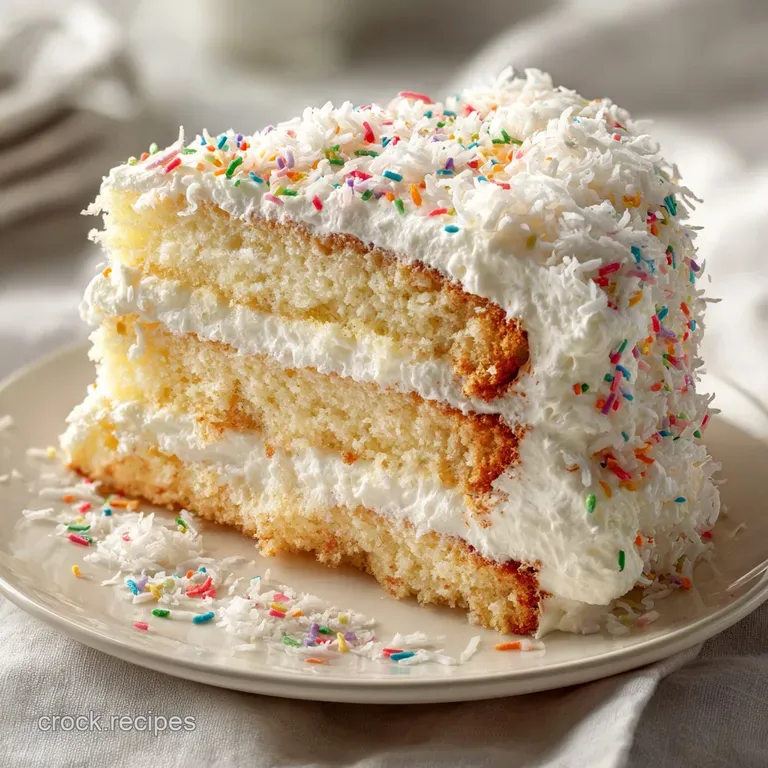
- Flavor/Texture Hook: Velvety, cloud like layers with a nutty, toasted coconut finish
- Perfect for: Birthday celebrations, tropical themed parties, or a comforting weekend treat
- Creating a Dreamy Coconut Cream Cake
- The Secrets Behind the Fluff
- Choosing the Right Elements
- Essential Gear for Baking
- Step by Step Baking Guide
- Fixing Common Baking Blunders
- Flavor Swaps and Variations
- Truths About Coconut Cakes
- Freshness and Waste Tips
- Best Pairings for Dessert
- Recipe FAQs
- 📝 Recipe Card
Creating a Dreamy Coconut Cream Cake
Ever wondered why some coconut cakes taste like cardboard while others feel like a tropical cloud? I used to struggle with this. I remember one specific Saturday where I tried a recipe that called for coconut milk, but the cake came out so dense it could have been used as a doorstop.
The house smelled like coconut, sure, but the texture was a total disaster.
That was the day I realized the secret isn't just the flavor, it's the fat content. I swapped the milk for thick, canned coconut cream and suddenly, everything changed. The batter became silky, and the finished cake had this incredible, melt in-your mouth quality.
It's that specific richness that makes this version a total winner.
In this guide, I'm sharing the exact method I use to get those velvety layers. We'll walk through the creaming process, the toasting of the flakes, and the stabilization of the frosting so you don't end up with a sugary puddle on your plate.
Trust me, once you smell the toasted coconut hitting the frosting, you'll never go back to a box mix.
The Secrets Behind the Fluff
I've spent a lot of time wondering why certain cakes feel "heavy" and others feel "airy." It usually comes down to how we handle the fat and the air. For this cake, we're relying on a few specific tricks to keep it light.
Air Trapping: Beating the butter and sugar for a full 3 minutes creates tiny air pockets. These pockets expand in the oven, giving the cake its lift.
Fatty Moisture: Coconut cream has a higher fat to water ratio than coconut milk. This keeps the crumb velvety and prevents the cake from drying out during the 30 minute bake.
Frosting Stability: Adding cream cheese to the butter provides a structural anchor. This stops the frosting from sliding off the cake when it hits room temperature.
Flour Hydration: Folding in the wet ingredients gently prevents over mixing. This ensures we don't develop too much gluten, which would make the cake tough.
If you're looking for something a bit smaller for a quick treat, you might enjoy my [Strawberry Swirl Cheesecake Cookies](https://crock.recipes/recipes/strawberry swirl-cheesecake cookies/), but for a full on celebration, this cake is the way to go.
| Servings | Ingredient Adjustments | Pan Size | Cook Time |
|---|---|---|---|
| 6 people | 1/2 recipe | One 8 inch pan | 25-30 minutes |
| 12 people | Full recipe | Two 8 inch pans | 30-35 minutes |
| 24 people | 2x recipe | Four 8 inch pans | 30-35 minutes (batches) |
Choosing the Right Elements
Getting the ingredients right is half the battle. I've learned the hard way that "room temperature" isn't just a suggestion, it's a requirement for a smooth batter. If your butter is too cold, it won't trap air; if it's melted, your cake will be flat.
Component Analysis
| Ingredient | Science Role | Pro Secret |
|---|---|---|
| Coconut Cream | Moisture & Fat | Use canned, full fat; shake well before measuring |
| Cream Cheese | Frosting Body | Use full fat blocks, not the spreadable tub version |
| Toasted Coconut | Texture Contrast | Toast in a dry pan until golden for a nutty aroma |
| Baking Powder | Leavening | Sift it with flour to avoid "bitter" clumps |
The Master List
- 2.5 cups (310g) all purpose flour Why this? Provides the necessary structure for layering. (Substitute: Cake flour for an even finer crumb)
- 1.5 cups (300g) granulated sugar Why this? Essential for sweetness and air incorporation. (Substitute: Caster sugar for faster dissolving)
- 1 tbsp (12g) baking powder Why this? Gives the cake its signature lift. (Substitute: 3 tsp baking powder)
- 0.5 tsp (3g) salt Why this? Balances the richness of the coconut. (Substitute: Fine sea salt)
- 0.75 cup (170g) unsalted butter, softened Why this? Creates a tender, rich crumb. (Substitute: Vegan butter sticks)
- 3 large eggs, room temperature Why this? Binds everything and adds structure. (Substitute: 3 flax eggs, though texture will be denser)
- 0.75 cup (180ml) full fat coconut cream (canned) Why this? The key to the velvety texture. (Substitute: Heavy cream + 1 tsp coconut extract)
- 1 tsp (5ml) vanilla extract Why this? Adds depth to the coconut flavor. (Substitute: Pure maple extract)
- 1 tsp (5ml) coconut extract Why this? Intensifies the tropical aroma. (Substitute: Extra coconut cream + zest)
- 1 cup (225g) unsalted butter, softened (for frosting) Why this? Base for the creamy frosting. (Substitute: high-quality margarine)
- 4 oz (115g) cream cheese, softened Why this? Stabilizes the frosting layers. (Substitute: Mascarpone for a milder taste)
- 4 cups (480g) powdered sugar Why this? Provides sweetness and stiffness. (Substitute: Non dairy powdered sugar)
- 3 tbsp (45ml) coconut cream (for frosting) Why this? Adds a silky finish. (Substitute: Heavy cream)
- 1 tsp (5ml) coconut extract (for frosting) Why this? Ensures the frosting tastes like coconut. (Substitute: Coconut syrup)
- 2 cups (180g) sweetened shredded coconut, toasted Why this? Adds a satisfying crunch. (Substitute: Unsweetened coconut + 1 tbsp sugar)
Right then, before we start mixing, let's make sure your kitchen is ready. Baking is as much about the tools as it is about the ingredients.
Essential Gear for Baking
You don't need a professional kitchen to nail this, but a few specific tools make the process much smoother. If you're using a handheld mixer, just be prepared for a little more arm work. I prefer a stand mixer (such as KitchenAid) for the frosting because it really whips that air in.
- Two 8 inch Round Cake Pans: These are standard for a reason. They give you the perfect height for a two layer cake.
- Parchment Paper: Please, for the love of cake, line your pans. It's the only way to guarantee the cake doesn't stick.
- Sifter or Fine Mesh Strainer: Sifting the flour and baking powder prevents those annoying lumps in the batter.
- Offset Spatula: This is a lifesaver for getting that silky, smooth finish on the frosting.
- Wire Cooling Racks: If you leave the cakes in the pan, they'll steam and get soggy. Let them breathe.
Step by step Baking Guide

Let's crack on. The most important thing here is to follow the order of operations. Adding eggs too quickly or over mixing the flour can change the texture from "velvety" to "rubbery."
Preparing the Base
- Preheat oven to 350°F (175°C). Grease two 8 inch pans and line the bottoms with parchment paper. Note: This prevents the cake from sticking to the bottom during the flip.
- Cream the softened butter and sugar on medium high speed until the mixture looks pale and fluffy (approx. 3 minutes). You'll notice the aroma shift from plain butter to a sweet, creamy scent.
Mixing the Velvet Batter
- Add eggs one at a time, beating well after each addition to prevent the batter from curdling. Note: This ensures the fat and water stay bound together.
- Sift in flour, baking powder, and salt. Gently fold in the coconut cream, vanilla, and coconut extract using a spatula until no streaks of flour remain. Avoid using the mixer here; a hand spatula keeps the air in the batter.
- Divide batter evenly between pans. Bake for 30–35 minutes until a toothpick comes out clean and the edges pull away from the pan. Your kitchen should smell like a tropical bakery at this point.
Finishing and Assembling
- Allow cakes to cool completely on wire cooling racks. Note: Frosting a warm cake is a recipe for a melted mess.
- Prepare frosting by beating together softened butter and cream cheese, then mixing in powdered sugar, coconut cream, and coconut extract until the texture is silky and smooth.
- Assemble the cake by layering frosting between cakes and covering the top and sides. Press toasted shredded coconut into the frosting. It should feel like you're decorating a snowy mountain of coconut.
- Chill the assembled cake in the refrigerator for 2 hours to stabilize the frosting before serving. This is the hardest part, but it's non negotiable for a clean slice.
Wait! Before you dive in, let's look at a few common hiccups. Even the best of us hit a snag sometimes.
Fixing Common Baking Blunders
Baking is basically a science experiment you can eat. When things go wrong, it's usually because of a temperature or mixing issue.
Batter Looks Curdled
If your batter looks like cottage cheese after adding the eggs, don't panic. This happens when the eggs are too cold and the emulsion breaks. You can usually fix this by adding a tablespoon of your measured flour and beating it for another minute.
Cake Sinks Middle
A sunken center usually means the oven door was opened too early or the baking powder is old. Make sure your baking powder is fresh (test it in a bit of hot water; it should bubble immediately).
Frosting Too Soft
If your frosting is too runny to stay on the cake, it's likely the butter was too warm. Pop the entire frosting bowl in the fridge for 10 minutes, then whip it again.
| Problem | Root Cause | Solution |
|---|---|---|
| Cake is dry | Overbaked or oven too hot | Reduce bake time by 2-3 mins |
| Frosting is grainy | Butter wasn't softened enough | Beat butter longer before adding sugar |
| Coconut is burnt | Pan was too hot during toasting | Toast over medium low heat, stirring constantly |
Common Mistakes Checklist
- ✓ Pat the cake layers completely cool before frosting (prevents melting)
- ✓ Use a spatula for folding flour, not a mixer (prevents toughness)
- ✓ Ensure cream cheese is truly softened (prevents frosting lumps)
- ✓ Shake the canned coconut cream thoroughly (prevents fat separation)
- ✓ Don't overbake; take them out the moment the toothpick is clean
Flavor Swaps and Variations
This recipe is a great base, but you can easily tweak it to fit your mood. If you're feeling adventurous, try these adjustments.
For a Coconut White Cake: Swap the all purpose flour for cake flour and replace the coconut cream in the batter with a mixture of heavy cream and extra coconut extract. This results in a paler, more delicate crumb.
Creating a Poke Cake Version: Bake a single thick layer. Poke holes across the top and pour over a mixture of condensed milk and coconut milk before frosting. This makes the cake incredibly moist and "syrupy."
Making it dairy-free: Use a high-quality vegan butter and a dairy-free cream cheese alternative. The coconut cream already does most of the heavy lifting for the flavor, so the swap is quite seamless.
Adding a Zesty Kick: Fold in 1 tablespoon of fresh lime zest into the batter. The acidity of the lime cuts through the richness of the coconut and makes it feel more like a tropical cocktail.
When scaling this recipe, remember that baking isn't always linear. If you're making a double batch, don't just double the salt and baking powder; use about 1.5x those instead to avoid a metallic taste.
| Scaling Direction | Adjustment | Pan Change | Time Change |
|---|---|---|---|
| Down (1/2) | Use 1.5 eggs (beat 1, use half) | 6 inch pan | Reduce time by 20% |
| Up (2x) | Salt/Spices at 1.5x | Four 8 inch pans | Same time, bake in batches |
| Up (4x) | Liquids reduce by 10% | Multiple batches | Bake in batches |
Truths About Coconut Cakes
There are a few myths floating around the baking world that I'd like to clear up. I've seen a lot of people get discouraged because they're following "old wives' tales" in the kitchen.
Myth: Coconut cakes must be dense to be authentic. Truth: A great coconut cake should be light and airy. The richness comes from the coconut cream, not from a heavy, dense crumb. Proper creaming of the butter is what makes the difference.
Myth: Using cake mix is the only way to get a consistent rise. Truth: Homemade cakes are more consistent if you weigh your ingredients. Using a scale for the flour (310g) is far more accurate than using cups, which can vary by 20% depending on how you scoop.
Myth: You must use coconut milk for the "authentic" taste. Truth: Coconut milk is often too thin. The "cream" part of the can contains the actual fat and flavor, which is why this recipe insists on coconut cream.
Freshness and Waste Tips
A cake this rich stays fresh for a while, but you have to store it correctly to keep that velvety texture.
Storage Guidelines: Keep the cake in an airtight container in the fridge for up to 5 days. Because of the cream cheese frosting, it needs refrigeration. Before serving, let a slice sit at room temperature for 20 minutes so the butter in the frosting softens back up.
Freezing Tips: You can freeze the un frosted layers for up to 3 months. Wrap them tightly in plastic wrap and then foil. Thaw them in the fridge overnight before frosting. I don't recommend freezing the fully frosted cake, as the coconut flakes can get soggy.
Zero Waste Ideas: Don't throw away the leftover coconut cream in the can! Mix it with a bit of honey and lime for a quick dip, or stir it into your morning coffee for a creamy, tropical latte. If you have leftover toasted coconut, sprinkle it over oatmeal or yogurt.
Best Pairings for Dessert
Since this cake is quite rich and satisfying, it pairs well with something a bit more tart or refreshing to balance the palate.
I love serving this with a side of fresh raspberries or a dollop of mango coulis. If you're hosting a big party and want a variety of treats, this cake pairs beautifully with a scoop of Strawberry Cheesecake Ice Cream. The tanginess of the cheesecake ice cream cuts right through the sweetness of the coconut frosting.
For those who prefer a drink pairing, a chilled glass of sparkling wine or a strong cup of black coffee is the way to go. The bitterness of the coffee complements the creamy, tropical notes of the cake without overpowering them. Trust me on this - a dark roast coffee makes the coconut flavor pop.
Recipe FAQs
Do I really need to chill the cake for 2 hours?
Yes, it is necessary. Chilling stabilizes the butter and cream cheese frosting, ensuring the layers don't slide or collapse when sliced.
How to keep the cake layers from sticking to the pan?
Grease the pans and line the bottoms with parchment paper. This creates a reliable barrier that allows the cake to release cleanly.
Why did my batter look curdled after adding the eggs?
You likely added the eggs too quickly. Beating them in one at a time ensures they emulsify properly with the butter and sugar.
Is it true that beating the flour on high speed makes the cake fluffier?
No, this is a common misconception. Overmixing develops too much gluten, which turns the texture rubbery; always fold the flour in gently with a spatula.
How to achieve a silky texture in the frosting?
Beat the softened butter and cream cheese together thoroughly before adding other ingredients. This eliminates lumps and creates a perfectly smooth base.
Can I substitute the cream cheese frosting for something lighter?
No, the cream cheese is vital for structural stability. If you want to master aeration for a lighter topping on other desserts, see how it works in our homemade whipped cream.
How to tell when the cakes are fully baked?
Insert a toothpick into the center of the cake. It is finished when the toothpick comes out clean and the edges pull away from the pan.
Coconut Cream Cake