Cured Egg Yolks: the Golden Umami Dust Recipe
- Harnessing Umami: The Magic of Salt-Cured Yolks
- The Science of Salt: How Curing Transforms Texture and Flavor
- Essential Components: Just Yolks, Salt, and Sugar
- The Method: Curing Egg Yolks for Perfect Results
- Mastering the Technique: Chef's Tips and Troubleshooting
- Preservation Guide: Maximizing Shelf Life and Storage
- Elevating Dishes: Creative Ways to Use Your Golden Umami Dust
- Recipe FAQs
- 📝 Recipe Card
Harnessing Umami: The Magic of Salt Cured Yolks
Have you ever grated something over your plate that makes your eyes widen? That deeply savory, intensely rich, golden dust that instantly screams "chef"? This Cured Egg Yolk recipe is the secret weapon I keep in my fridge right now.
(Cured Egg Yolk 1) Once you try this method, transforming a fragile yolk into a dense, fudgy, salty coin, you'll never look back.
People think complicated techniques are necessary for great flavor, but this couldn't be easier. It uses two common pantry staples salt and sugar to preserve and concentrate the egg’s natural richness.
The process is almost entirely hands off, providing you with a high end gourmet ingredient for pennies. Making Cured Egg Yolk is truly the ultimate kitchen hack for maximizing flavor with minimal effort.
Ready to turn those humble, yellow orbs into tiny, golden umami bombs? I promise you this will become a staple in your repertoire, elevating everything from pasta to salads. Let's crack on with making the best homemade Cured Egg Yolk you've ever tasted. (Cured Egg Yolk 2)
The Science of Salt: How Curing Transforms Texture and Flavor
This technique relies entirely on preservation, not cooking, which is what gives the finished product its unique density and texture. When you mix salt and sugar, you create the perfect environment for slow moisture extraction. This process is key to successfully making Cured Egg Yolk at home. (Cured Egg Yolk 3)
What exactly is this golden dust?
It looks like hard cheese, but it started life as a raw, runny yolk. Salt and sugar draw out almost all the water content from the egg, concentrating the fat and protein within the yolk. The final result is a beautiful, firm disk that is easy to grate into a delicate, salty, savory powder.
This intense flavor concentration is the primary goal of making Cured Egg Yolk. (Cured Egg Yolk 4)
The historical tradition of preservation and flavoring
Humans have used salt to preserve food for millennia. Curing egg yolk was historically an incredible way to extend the shelf life of a valuable source of protein and fat. Knowing how to cure the egg yolk allowed people to enjoy rich flavors long after the fresh eggs would have spoiled.
Is curing raw yolks safe?
Absolutely, provided you follow two crucial rules. Rule number one: always use the freshest eggs possible . Rule number two: keep the entire setup cold (40°F / 4°C or below) in the refrigerator.
The high salt environment is hostile to bacteria, but temperature control provides an extra layer of safety during the curing phase.
Osmosis and the protein denaturation process
When the yolk is buried in the cure mixture, osmosis forces the water molecules out of the egg through the semi permeable membrane. This sudden loss of water causes the proteins to tighten and rearrange, making the Cured Egg Yolk incredibly dense and rubbery.
This firming is called denaturation, and it's what makes the yolk sliceable or grater ready.
Achieving the perfect translucent texture
The trick to a truly magnificent Cured Egg Yolk is knowing when to stop the salt cure. Too long, and the yolk becomes tough and chalky. I look for a deep orange color and a texture similar to a very firm gummy bear. This beautiful translucent sheen means you’ve captured the richness perfectly.
Flavor comparison: Bottarga vs. Cured Yolks
If you’ve ever had bottarga the compressed, cured fish roe you know that intense, savory, oceanic saltiness. Cured Egg Yolk provides a similar, complex umami bomb but is completely vegetarian. It offers that deep, aged, cheesy depth without the premium price tag or the maritime flavor profile.
Essential Components: Just Yolks, Salt, and Sugar
You literally only need three ingredients, which is fantastic. The quality of these three things, however, is non-negotiable for producing the best Cured Egg Yolk. (Cured Egg Yolk 5)
The best eggs for curing (size and freshness)
Freshness is paramount. Older eggs have weaker yolk membranes, which will rupture when exposed to the salt, dissolving into the cure mixture. Use farm fresh, high-quality eggs for the best results, as their yolks are generally rounder and firmer.
| Component | Why it matters | Substitution |
|---|---|---|
| Fresh Yolks | Strong membrane prevents rupture | No substitute; must be fresh, high-quality. |
| Coarse Salt | Slow, even moisture extraction | Kosher Salt (use 1.5x volume) |
| Granulated Sugar | Balances bitterness and salt punch | Light brown sugar (may slightly darken yolk) |
Choosing the right type of salt (avoiding iodine)
We want non-iodized salt, hands down. Iodine can lend an unpleasant, metallic taste to anything you cure over a long period. I prefer coarse sea salt or high-quality kosher salt when preparing Cured Egg Yolk.
(Cured Egg Yolk 6) Do not use fine table salt ; it pulls moisture too fast and can make the yolks overly rubbery before the cure is complete.
Optimal sugar ratios for balanced flavor
The sugar isn't just a sweetener; it’s an essential part of the curing process that ensures a palatable end result. The 1:1 ratio with salt prevents the final Cured Egg Yolk from being overwhelmingly salty. It creates a subtle sweetness that balances the rich umami beautifully.
Equipment checklist: essential tools for success
You need a container big enough for all the yolks to sit comfortably without touching. A shallow baking dish or a small plastic meal prep container works great. Crucially, you need a fine mesh sieve for the delicate rinsing process.
Chef’s Note: Don’t panic about the egg whites! You can use them right away for meringues, or you can freeze them for later use in a frittata or perhaps my LowCarb Egg Muffins: Easy Keto Breakfast Cups (Spinach Feta) . Never waste those perfectly good whites.
The Method: Curing Egg Yolks for Perfect Results
Preparing the salt sugar bed and container
In a bowl, combine the salt and sugar thoroughly; mix it really well until it looks homogeneous. Pour about 2/3 of this mixture into your chosen container, creating a flat, dense bed. This base layer is where the transformation begins for the Cured Egg Yolk. (Cured Egg Yolk 7)
Gently nesting the yolks for initial curing
This is the most delicate step. Using the back of a spoon or even an eggshell, press eight small indentations into the salt bed. These little nests prevent the round yolks from touching the sides or rolling into each other. Place one carefully separated yolk into each indentation.
The critical rinse and drying preparation
After 4 to 7 days, they should be firm enough to handle gently. Carefully lift them out of the cure mixture and place them in the sieve. Rinse them briefly under the lowest water pressure possible to remove the surface salt.
Do not let them sit in the water , or they will start to dissolve immediately. Pat them completely dry with paper towels; they should feel tacky, but not wet.
Air drying vs. low-temperature oven drying
For the most reliable, safest result, I rely on the oven. We are dehydrating, not cooking, so set the oven to 150°F (65°C), or even lower if your oven allows. Bake the yolks for 90 to 120 minutes until they are opaque, firm, and dense.
This drying step finishes the magnificent Cured Egg Yolk, making it grate able. (Cured Egg Yolk 8)
Mastering the Technique: Chef's Tips and Troubleshooting
Identifying an under cured vs. over cured yolk
If your Cured Egg Yolk feels soft and squishy after rinsing, it needs more time in the salt; put it back for 24 hours. If, however, it feels exceptionally hard and looks almost bleached white, it might be over cured, resulting in a chalky texture after drying.
The ideal texture before drying is firm, bouncy, and slightly rubbery.
How humidity impacts drying time
The weather outside actually affects your curing inside, especially the drying phase. If it’s high humidity, you might need to leave your Cured Egg Yolk in the oven for an extra 30 minutes. Always check for firmness by lightly pressing the center before removing them completely.
Preventing yolks from rupturing during handling
The moment of truth is the separation. I always separate the yolks over a small bowl of reserved whites, so if one breaks, I only contaminate the one white and not the entire batch. Be delicate when scooping the raw yolks into the salt bed. A punctured yolk will result in a messy, salty, unusable scramble.
The best tool for grating the dried yolks
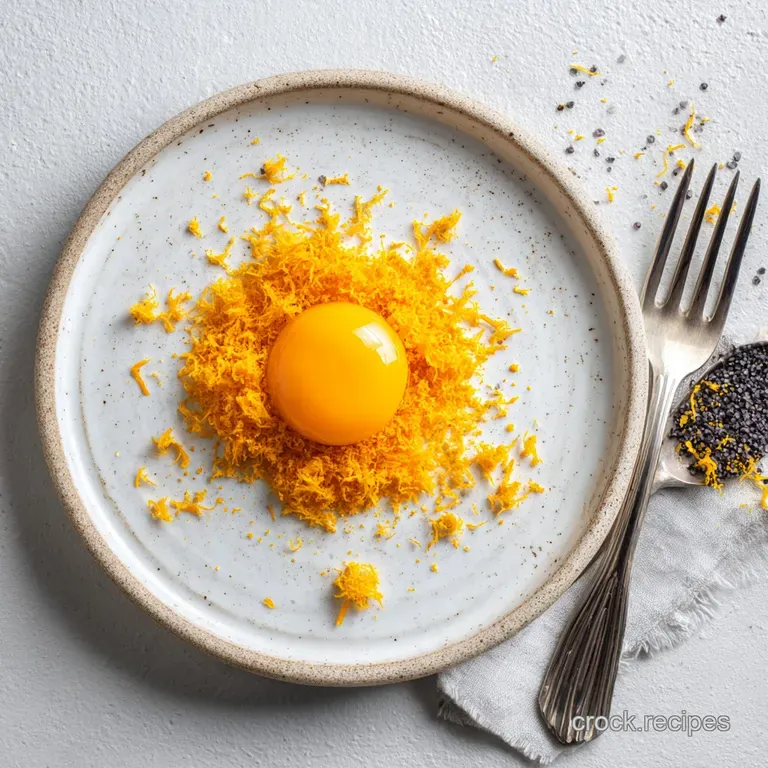
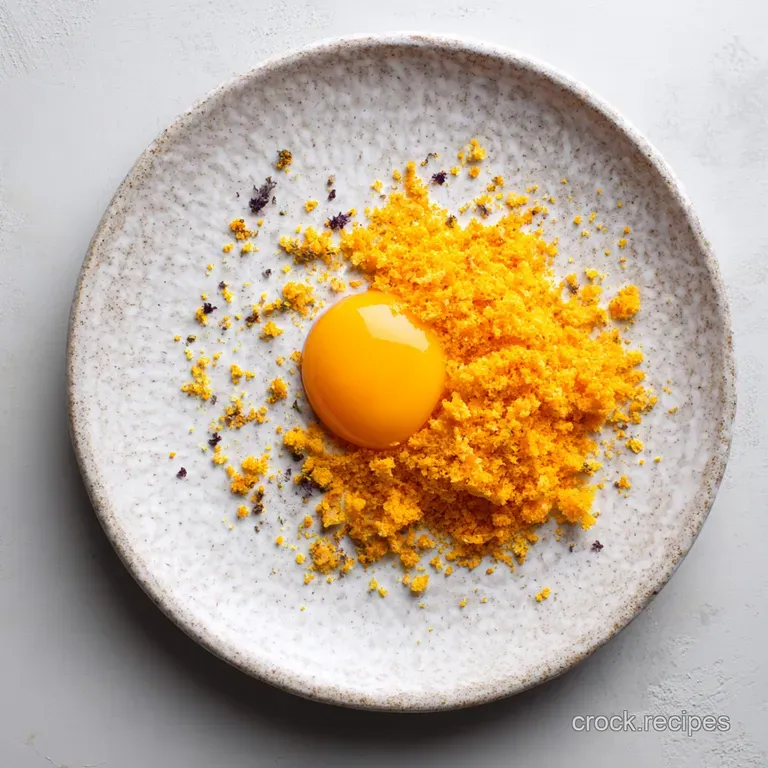
Please, buy a good microplane zester if you don't already own one. Using a regular box grater produces chunky shreds. The microplane creates that ethereal, light, fluffy golden dust that gently settles over your pasta or risotto. This fine grate is essential for properly enjoying homemade Cured Egg Yolk.
(Cured Egg Yolk 9)
Preservation Guide: Maximizing Shelf Life and Storage
Safe storage containers and conditions
Once your Cured Egg Yolk is completely dry and cooled, move it immediately to an airtight container. Because they are dehydrated and salted, they are quite shelf stable. I recommend storing them in the refrigerator to extend their life further, as residual moisture can still promote spoilage at room temperature.
Can you freeze the finished yolks?
Yes, absolutely! The finished Cured Egg Yolk freezes beautifully. Wrap each one tightly in plastic wrap to protect against freezer burn. When you are ready to use them, simply thaw them overnight in the fridge and grate as usual. You can prepare a huge batch of Cured Egg Yolk and store it away for six months or more.
(Cured Egg Yolk 10) This makes meal prep a breeze.
Elevating Dishes: Creative Ways to Use Your Golden Umami Dust
This concentrated savory flavor deserves better than just being sprinkled haphazardly. The finished Cured Egg Yolk is designed to replace aged Parmesan or deliver a profound depth to otherwise simple dishes. (Cured Egg Yolk 11)
The Pasta Revolution
Grate this heavily over simple garlic and olive oil pasta it creates a creamy, salty coating that is ridiculously satisfying. I also love using Cured Egg Yolk to finish off classic rice dishes like a savory risotto.
Salad and Vegetable Upgrade
Shave thin, paper like slices over steamed asparagus, or grate it finely over a classic Caesar salad. It adds a salty, fatty component that takes the place of anchovies or high fat cheese. If you enjoy rich, savory breakfasts, try grating Cured Egg Yolk right over a hot slice of Keto Eggnog Scones: The Best Low Carb Christmas Breakfast Treat to contrast the sweetness.
Final Thoughts on the Magic of Cured Egg Yolk
If you have ever been intimidated by curing, throw those fears away immediately. This process is so simple, requires next to no effort, and delivers a gourmet ingredient every time.
The next time you make a beautiful plate of pasta, try finishing it with a generous dusting of homemade Cured Egg Yolk (Cured Egg Yolk 12) you will instantly see why this golden dust is an essential component in my kitchen.

Recipe FAQs
Why are my cured egg yolks still soft or sticky after the specified curing time?
The total curing time is highly dependent on the ambient humidity of your kitchen and the specific size of the yolks you used. If they are pliable, they need more time in the salt mixture; continue curing for another 1 to 2 days until they feel very firm to the touch.
Additionally, do not skip the drying period after curing; the air-drying stage in the refrigerator is essential for removing residual moisture and achieving that hard, grating texture.
How should I store the finished cured egg yolks, and how long do they last?
Whole, fully dried cured egg yolks should be wrapped tightly and stored in an airtight container in the refrigerator, where they will maintain quality for up to 3-4 weeks.
If you have grated the yolks into "dust," store the grated product in the freezer, which preserves the intense flavor and texture almost indefinitely, though best results are within 6 months.
Can I add herbs, spices, or alcohol to the salt curing mixture for added flavor?
Yes, customizing the curing mixture is highly recommended to create signature flavors. Try mixing in finely minced dried chili flakes, black peppercorns, smoked paprika, or dried citrus zest into the salt and sugar blend before burying the yolks.
For a deeper flavor, some chefs incorporate a few tablespoons of bourbon or sherry, though this can slightly increase the overall curing time required.
Do I need to use sugar, or can I cure the yolks using only salt?
While salt is the crucial agent for dehydration, the sugar is important for balancing the salinity and softening the final texture of the yolk.
Curing with salt only results in a much harsher, intensely salty flavor and a notably firmer texture that might shatter rather than grate smoothly.
I see a white, dusty crust forming on my yolks during the salt bath. Are they safe to eat?
This white crust is typically excess salt that has crystallized on the surface as moisture is drawn out, which is a normal occurrence and does not indicate spoilage.
As long as the yolks smell clean and fresh and do not show any signs of green or fuzzy mold, simply brush off the excess white salt before rinsing and proceeding with the drying stage.
Can I use pasteurized egg yolks or egg whites for this recipe?
No, this technique relies heavily on using fresh, high-quality, unpasteurized raw egg yolks, ideally from trusted local or farm raised sources.
The recipe is designed only for yolks; egg whites have a high water content and chemical makeup that prevents them from curing into a desirable, firm texture.
What is the difference between slicing and grating cured egg yolks, and how does curing time affect this?
Slicing requires yolks that are cured until firm but still slightly pliable (typically 4-7 days total), making them excellent thin garnishes for fish or salads.
For grating, the yolks must be completely dried and hard, requiring 10-14 days of refrigerated air-drying after the salt cure to achieve the rock hard consistency of umami dust.
Perfectly Cured Egg Yolks Recipe

Ingredients:
Instructions:
Nutrition Facts:
| Calories | 70 calories |
|---|---|
| Fat | 5.5 g |
| Fiber | 0 g |
