The Ultimate Stovetop Chocolate Pudding Rich Silky and Simply Perfect
- Unveiling the Decadence: Why This Stovetop Pudding Reigns Supreme
- The Nostalgic Charm of Homemade Chocolate Pudding
- Curating the Components for Luxurious Flavor
- Sourcing Superior Ingredients for Deep Chocolate Notes
- The Alchemy of Heat: Transforming Basics into Rich Dessert
- Achieving Peak Smoothness: Preventing Lumps and Scorching
- Elevating Your Pudding Game: Variations and Troubleshooting
- Storage Secrets for Lasting Freshness
- Stovetop vs. Boxed Mix: The Great Chocolate Pudding Showdown
- The Velvet Secret: How to Nail That Silky Smooth Texture
- Finishing Touches: Elevating Your Chocolate Pudding Experience
- Frequently Asked Questions
- 📝 Recipe Card
Unveiling the Decadence: Why This Stovetop Pudding Reigns Supreme
The aroma hits you first, doesn't it? That deep, intoxicating scent of proper melted chocolate mingling with warm milk. That’s the moment you know you’ve done something right. We are diving headfirst into making the Best Chocolate Pudding you’ll ever whip up at home.
Forget looking at those search results listing everything from avocado nonsense to chocolate bread puddings we need something straightforward, deeply satisfying, and genuinely Creamy Chocolate Pudding .
Trading Packets for Perfection: Our Velvety Promise
Honestly, who has time for anything fussy mid-week? While this recipe offers that Rich Chocolate Pudding flavour profile you usually only get in swanky restaurants, the beauty lies in its simplicity.
This is a Stovetop Chocolate Pudding that comes together faster than you can find a decent takeaway menu. Seriously, we are mixing dry bits, whisking in wet bits, and then we just stand there watching the magic happen on the hob.
My biggest lesson when developing this Chocolate Pudding Recipe ? Don't walk away when it’s thickening. If you do, you risk a scorched bottom, and nobody wants that bitter flavour tainting their smooth dessert. Keep that whisk moving!
It’s the key to achieving that perfect, wobble free set. This isn't just dessert; it's guaranteed Chocolate Pudding Comfort Food .
What Sets This Cacao Pot de Crème Apart
What makes this stand out from the crowd especially when you see things like Chocolate Pudding Pie taking up space online? It’s the texture. We are using a precise ratio of cornstarch (cornflour to my UK readers) alongside real egg yolks.
This combination ensures we get that luxe, velvety mouthfeel, closer to a French pot de crème than anything you’d find in a plastic tub.
This method guarantees an Easy Chocolate Pudding that still feels incredibly special. When you’re done, you’ll have that intensely dark, not-too-sweet flavour that signals quality.
If you're looking for Decadent Chocolate Desserts , this stovetop approach delivers richness without the need for an oven.
The Nostalgic Charm of Homemade Chocolate Pudding
There is something inherently British about a proper steamed pudding or a rich, cold homemade dessert that just screams ‘Sunday dinner finished.’ This Homemade Chocolate Pudding taps right into that feeling.
It’s the dessert you remember from being a nipper but elevated, naturally.
Setting the Stage: Gathering Your Comfort Food Components
Before you even turn the heat on, get everything measured out. I learned years ago that baking or serious custard making hates being rushed. Have your milk ready, your cocoa sifted (vital for zero lumps!), and your butter cubed near the stove.
When I first tried making a similar recipe, I forgot to chop my chocolate finely. It resulted in 10 minutes of frantic stirring trying to get those last few stubborn chunks to melt into the base. Now, I chop the chocolate small and keep the heat low when adding it back in. This ensures a seamless integration.
Remember, the goal here is simple, reliable, utterly delicious Chocolate Pudding . Serve it warm if you are in a rush, but trust me, chilling it makes it intensely better.
Related Recipes Worth Trying
- Easy Homemade Chocolate Turtles with Salted Caramel — Create the ultimate Chocolate Turtles This easy recipe uses storebought caramels for foolproof homemade Turtle Desserts dripping in dark chocolate and sea...
- Gooey Chocolate Peanut Butter Poke Cake Recipe — This foolproof Chocolate Peanut Butter Poke Cake is incredibly moist thanks to a gooey peanut butter filling that seeps right in A rich chocolate dessert...
- The Best Old Fashioned Rice Pudding SlowBaked Creamy Classic — Get that proper nostalgic taste This traditional British baked rice pudding is slowbaked for a luxurious creamy custard beneath the perfect golden brown...
Right then, let's get this chocolate pudding sorted! We’re aiming for something utterly decadent, the kind that transports you straight back to your nan’s kitchen on a Sunday afternoon proper comfort food, but with a bit of chef finesse, naturally.
This recipe will focus on a rich, stovetop method that yields that perfect, velvety texture. No dusty packets in sight, I promise! This Chocolate Pudding Recipe is all about getting that deep, satisfying flavour.
Curating the Components for Luxurious Flavor
When you’re making a Rich Chocolate Pudding , the quality of your base ingredients shouts loudest. It’s not a complicated bake, so every spoon counts. I learned years ago that if you try to cut corners here, you end up with something that tastes… well, a bit sad.
We want joy in a bowl, don’t we?
The Core Cast: Milk, Sweeteners, and Thickeners
Our liquid base needs punch. We’re using 2 cups (475 ml) of whole milk. Don't even think about semi skimmed; we need the fat for that unctuous mouthfeel. Sweetness comes from ½ cup (100 g) of standard granulated sugar.
The crucial element, the backbone of our structure, is the thickener: 3 tablespoons (25 g) of cornstarch (or cornflour, if you're reading this across the pond). This does the heavy lifting, turning hot liquid into something spoonable.
If you're out of cornstarch, arrowroot powder is a decent stand-in, but you might need slightly less.
Choosing Your Chocolate Intensity: Cocoa Powder vs. Solid Bars
This is where we build the soul of this Creamy Chocolate Pudding . We need two forms of chocolate working in harmony. First, ⅓ cup (30 g) of unsweetened cocoa powder. I strongly recommend Dutch process here; it tastes darker, smoother.
Second, for sheer luxury, we melt in 2 ounces (56 g) of finely chopped bittersweet chocolate (60-70% cacao). The solid chocolate adds body and that wonderful, melt-in-your mouth quality that makes this Homemade Chocolate Pudding so addictive.
If you only have bittersweet, skip the extra cocoa, but use just a tiny pinch more salt to balance it out.
Sourcing Superior Ingredients for Deep Chocolate Notes
The secret weapon in any great dessert is often something tiny. For this Stovetop Chocolate Pudding , don't forget the supporting actors; they make the star shine.
Essential Utensils for Silken Results
You don’t need fancy gear for this Easy Chocolate Pudding , but you do need the right saucepan. Get out your medium, heavy bottomed saucepan. Seriously, this is crucial.
A thin pan will scorch the milk on the bottom faster than you can say "Good grief!" Use a good sturdy whisk you’ll be whisking constantly over the heat. I also insist on using a fine mesh sieve to pour the finished mixture through.
Trust me on this one; it catches any tiny bits of cooked starch or cocoa that didn't dissolve properly, guaranteeing that perfect, silken result. This step separates a decent pudding from the Best Chocolate Pudding you’ve ever made.
This is the recipe for true Chocolate Pudding Comfort Food .
Right then, let's get this chocolate pudding sorted! We’re aiming for something utterly decadent, the kind that transports you straight back to your nan’s kitchen on a Sunday afternoon proper comfort food, but with a bit of chef finesse, naturally.
This recipe will focus on a rich, stovetop method that yields that perfect, velvety texture. No dusty packets in sight, I promise! We are making the Velvet Cacao Pot de Crème , and trust me, once you try this Homemade Chocolate Pudding , you won't look back.
The Alchemy of Heat: Transforming Basics into Rich Dessert
This section is where the magic happens. We take simple pantry staples and transform them using controlled heat. Getting the dry ingredients perfectly mixed first is vital. If you skip this, you’ll end up with lumps and nobody wants a lumpy Chocolate Pudding Comfort Food .
Warming the Dairy Base and Tempering the Yolks
First things first, grab your saucepan. This needs to be heavy bottomed; thin pans burn food instantly, and we don't want that scorching on the bottom, thank you very much. (1) In your dry saucepan, whisk the sugar, cocoa powder, cornstarch, and salt together until they look homogenous, like fine potting soil.
This ensures the cornstarch is evenly distributed, which is key for a smooth set.
Next, the yolks. You need three lovely, rich yolks for this, so save those whites for a meringue later! (2) Gently whisk the yolks in a separate bowl. Now, temper them. This is just a fancy way of saying: don't shock the eggs! Slowly drizzle about half a cup of the cold milk into the yolks while whisking like mad.
This gently raises their temperature. If you dump the hot milk straight onto them, you'll have sweet scrambled eggs instead of the Best Chocolate Pudding . Once tempered, pour that lovely yolk mixture back into the main saucepan with the rest of the cold milk. Give it one final stir.
Achieving Peak Smoothness: Preventing Lumps and Scorching
This is the part that requires your full attention, like watching the telly when the fate of the nation hangs in the balance! We need steady heat and non-stop movement.
The Crucial Whisking Stage Over Gentle Heat
(3) Place the pan over medium heat. From this moment until the pudding is thick, you must keep whisking. I mean it don’t pop off to check your phone! You need to scrape the bottom and the edges constantly. You’ll notice the mixture start to steam, then bubble lazily.
Keep going for about a minute or two after it starts simmering thickly. Sensory Checkpoint: The mixture should be thick enough that when you drag the whisk through it, the line it leaves stays put for a second or two before closing up. That’s the cornstarch doing its job.
(4) As soon as it hits that thick consistency, yank the pan off the heat immediately. This prevents overcooking, which can make the pudding taste dusty. (5) Stir in your chopped chocolate until it melts entirely into the hot liquid it should turn glossy. Then, knock in the butter cubes and vanilla.
Stir until that butter melts in, resulting in an unbelievably glossy, Rich Chocolate Pudding base. I always taste it here. If it tastes a bit flat, I sometimes throw in an extra tiny pinch of salt.
The Immediate Chill: Setting the Pudding’s Structure
This is where we seal the deal for that velvety texture. (6) For the smoothest texture imaginable truly restaurant quality pour the hot mixture through a fine mesh sieve into your final serving dishes (ramekins work great). This catches any tiny bits of uncooked yolk or stray cocoa bits.
My personal lesson learned? Never skip the straining step if you want truly Creamy Chocolate Pudding .
(7) Now, cover them. Crucial Tip: Press a piece of plastic wrap directly onto the surface of the pudding. If you leave a gap, a horrible skin forms the ultimate disappointment in the world of Decadent Desserts ! Pop them in the fridge.
You need a minimum of three hours, but four is better, and overnight is best. Patience yields the perfect set.
Serving Suggestions for the Ultimate Chocolate Pudding Experience
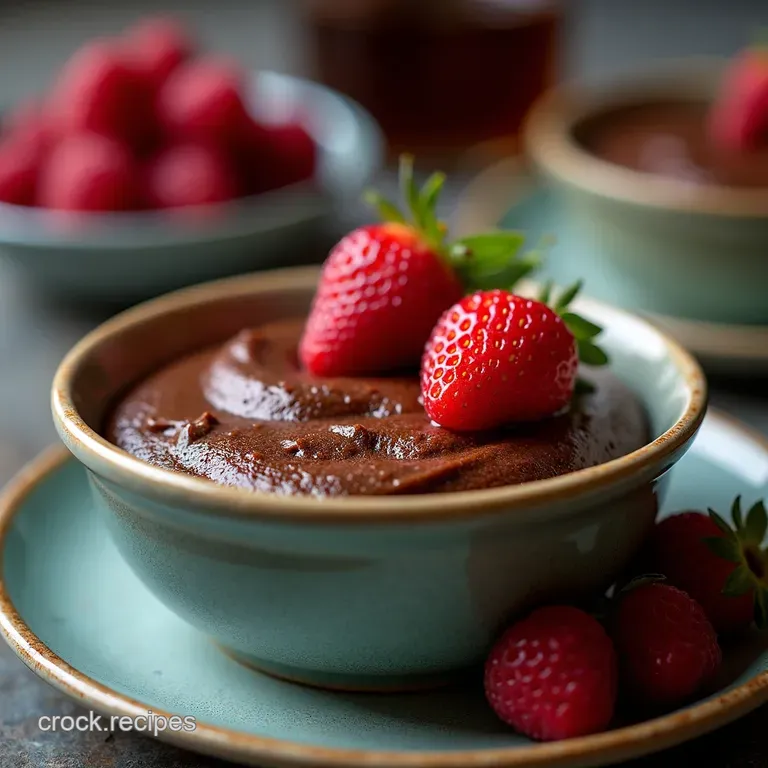
Once fully chilled, remove that plastic film. If you've done it right, the surface will be perfectly smooth. This Stovetop Chocolate Pudding is fantastic on its own, but why stop there?
A dollop of freshly whipped cream, perhaps a sprinkle of flaky sea salt, or some sharp raspberries on the side brings it to life. This recipe makes a fantastic make-ahead dessert for any dinner party; just whip them up the day before and keep them chilling.
Enjoy every spoonful of this incredibly Easy Chocolate Pudding !
Right then, let's get this chocolate pudding sorted! We’re aiming for something utterly decadent, the kind that transports you straight back to your nan’s kitchen on a Sunday afternoon proper comfort food, but with a bit of chef finesse, naturally.
This recipe will focus on a rich, stovetop method that yields that perfect, velvety texture. No dusty packets in sight, I promise!
Here is the comprehensive outline for what I’m calling the "Velvet Cacao Pot de Crème."
Elevating Your Pudding Game: Variations and Troubleshooting
Making this Stovetop Chocolate Pudding is brilliant because it’s already so reliable, but that doesn’t mean we can’t tinker. You know how it is; once you nail the basic Homemade Chocolate Pudding recipe, you start wondering what else it can do.
This section is for those moments when you want to push the boundaries or, heaven forbid, things go a little sideways during cooking.
Flavor Twists: Adding Espresso or Spices
Honestly, a bit of coffee is my secret weapon for making any chocolate taste more… well, more . If you want your Rich Chocolate Pudding to sing, try dissolving a teaspoon of good quality instant espresso powder right in with your dry ingredients (that’s Step 1 in the instructions).
It doesn't make it taste like coffee; it just deepens that dark cacao note. It's magic, really.
For something warmer, especially now the nights are drawing in, I often play with spices. A quarter teaspoon of ground cinnamon alongside the cocoa powder is classic. If you're feeling bold, like you want to channel some Aztec goodness, add the tiniest pinch of cayenne pepper.
Just a little tickle at the back of your throat when you swallow. I learned that lesson the hard way once too much cayenne makes it taste like a bonfire, not a dessert! This little tweak turns it into one of those Decadent Chocolate Desserts you dream about.
Fixing Common Texture Issues in Stovetop Desserts
The main worry when making any custard or thick pudding on the hob is the dreaded scramble. If you look down for two seconds, you might find bits of cooked egg floating in your beautiful base. This happens because the eggs cook too fast when they hit the heat.
The temper (Step 2) is your shield here. You must introduce that hot liquid slowly to the yolks while whisking like you mean it. If you end up with a few small lumps anyway, don't panic!
This is why Step 6, straining the finished mixture through a fine mesh sieve, is mandatory for this Creamy Chocolate Pudding . It catches any little rogue bits of cooked egg or undissolved cocoa.
If your pudding is too thin overall, it usually means it didn't cook long enough for the cornstarch to fully hydrate. You need to bring it to a proper, rolling simmer for a minute or two after it thickens, whisking constantly.
If it’s too late, and it’s already cooled down thin, you can try reheating it gently while whisking in half a teaspoon of extra cornstarch mixed with cold milk. But usually, chilling fixes a minor thinness anyway.
Storage Secrets for Lasting Freshness
Nobody makes this Chocolate Pudding Recipe and has leftovers, trust me, but if you're sensible (unlike me sometimes), you might want to know how to keep it fresh. This is the benefit of making a Stovetop Chocolate Pudding rather than a baked one; it stores like a dream.
The Life Span of Your Homemade Cacao Creation
When stored correctly, this Best Chocolate Pudding will hold its silky texture beautifully in the fridge for up to four days. The key phrase here is "stored correctly." Remember that bit about pressing plastic wrap directly onto the surface? Do that!
If you don't, the cool air dries out the top layer, and you get that skin that feels like eating rubber. We want velvet, not a duvet cover.
For reheating, I generally don't bother unless it’s absolutely freezing outside and I need instant gratification. This dessert shines served chilled. If you absolutely must warm it up say you want it closer to a warm sauce consistency take a small portion out, put it in a microwave safe bowl, and heat it in 10-second bursts, stirring well between each burst.
It will loosen up quickly. However, this is generally best served cool as the quintessential Chocolate Pudding Comfort Food .
Serving and Pairing Notes
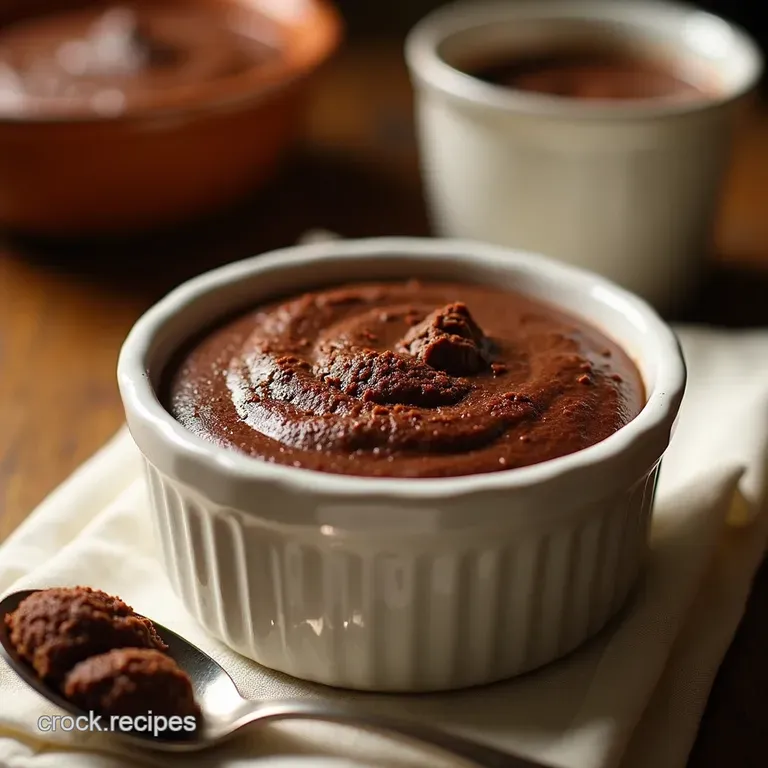
For serving this incredibly Easy Chocolate Pudding , I usually go for the simplest approach: a sprinkle of high-quality flaky sea salt on top just before serving. It just pops the flavour, honestly.
If you’re having guests over and want to make it look posh, a swirl of freshly whipped cream I mean proper double cream, whipped until it just holds a soft peak and maybe a grating of dark chocolate over the top works wonders.
If you’re after something truly show stopping, serve a small portion alongside a crisp biscotti for dipping. It provides a lovely textural contrast to the pudding’s smoothness. Nutrition wise, it’s rich, as you can see from the estimates; it’s a treat, not a diet food!
But a small, perfect portion of this Velvet Cacao Pot de Crème is often more satisfying than a huge slice of something less flavourful. Enjoy every spoonful!
Stovetop vs. Boxed Mix: The Great Chocolate Pudding Showdown
Right then, we need to talk honestly about the elephant in the room. When the chocolate craving hits, and I mean the proper craving the one that demands rich, deep, soul soothing flavour where do you turn?
Do you reach for that cardboard box, or do you fire up the hob for a Stovetop Chocolate Pudding ?
For years, I relied on the dusty packets, you know the ones. They’re quick, I’ll give them that. Pop it in a pan, add milk, boil for two minutes, and Bob’s your uncle, you’ve got something vaguely chocolate flavoured served up.
But let's be real, those mixes taste exactly like what they are: processed powders with artificial vanilla shouting louder than the actual cocoa. They deliver an easy chocolate pudding , sure, but never a best chocolate pudding .
This recipe we are making today, this Velvet Cacao Pot de Crème , is the antithesis of the instant fix. It’s about taking fifteen extra minutes to create something truly spectacular.
Why Stovetop Always Wins for Richness
When you use a boxed mix, the thickener (usually modified food starch) hits the milk and sets almost instantly upon reaching a specific temperature. It often results in a texture that's gelatinous or slightly gummy once chilled not exactly the dream consistency we associate with Creamy Chocolate Pudding .
With our Homemade Chocolate Pudding method, we are harnessing the true power of eggs and cornstarch (or cornflour, depending on where you hail from). We are making a simple custard base. When you cook this mixture on the stovetop, constantly whisking, you are doing two vital things.
First, you are cooking out the starchy taste of the cornstarch, leaving behind pure thickening power. Second, you are slowly incorporating air and dissolving the sugar and cocoa solids into the dairy properly.
This difference in process creates something entirely different on the palate. The Rich Chocolate Pudding you make this way has a mouthfeel that coats your tongue it's weighty, velvety, and utterly decadent.
It’s the difference between buying a high street sandwich and one made by a proper baker; both fill you up, but only one gives you joy.
The Sensory Payoff: Aroma and Texture
If you’ve ever made pudding from scratch, you'll know the moment. As the mixture begins to simmer and remember, we’re cooking this gently over medium heat the aroma that fills your kitchen is intoxicating.
It’s not just sweet; it’s deep, earthy, slightly bitter from the quality cocoa, and warming. That's the smell of genuine Chocolate Pudding Comfort Food .
I remember the first time I truly mastered the texture here. I was rushing, naturally, because who isn't? I pulled the pan off the heat too soon. The resulting dessert was alright, but definitely a bit thin, like a slightly thick sauce rather than a proper set dessert.
That’s when I learned the crucial lesson: Do not stop whisking until the mixture is visibly clinging to the back of your spoon, and it takes a good second or two for the trail you make with your finger to disappear.
That usually means the cornstarch is fully activated and ready to perform its thickening magic.
For true luxury, we always finish by whisking in that butter and the chopped bittersweet chocolate off the heat. This isn't just for flavour; the fat emulsifies into the base, adding body and that incredible sheen. This is what separates a quick dessert from proper Decadent Chocolate Desserts .
Making it Your Signature Chocolate Pudding Recipe
Look, there is absolutely a time and a place for the convenience of the box. If you’ve got toddlers bouncing off the walls or the in-laws unexpectedly arrive, grab a packet. But if you are making this specifically because you want a superb Chocolate Pudding Recipe , stovetop is the only way to go.
The beauty of the homemade version is the control you have over the darkness and sweetness. If you like things intensely dark, load up on that high cacao chocolate (like the 70% in this recipe). If you prefer something sweeter, dial back the dark chocolate by an ounce and increase the regular sugar slightly. It adapts!
That’s something those pre-measured mixes just can’t offer. By choosing the stovetop route, you aren't just making a dessert; you are claiming ownership over the flavour profile. Go on, treat yourself to the real thing. You deserve a proper, velvety Chocolate Pudding .
The Velvet Secret: How to Nail That Silky Smooth Texture
Right then, let's get this Chocolate Pudding sorted! We’re aiming for something utterly decadent, the kind that transports you straight back to your nan’s kitchen on a Sunday afternoon proper comfort food, but with a bit of chef finesse, naturally.
This recipe will focus on a rich, Stovetop Chocolate Pudding method that yields that perfect, velvety texture. No dusty packets in sight, I promise!
We're making what I lovingly call the "Velvet Cacao Pot de Crème." It sounds fancy, but honestly, it’s just about being careful. The main difference between a decent pudding and the Best Chocolate Pudding you’ve ever eaten is texture. Soggy, lumpy, or grainy?
Absolutely not having it. We want silk, pure and simple.
Why Straining is Your New Best Friend
If you skip this step, you’re essentially rolling the dice on the final outcome. I learned this the hard way years ago while trying to rush a batch before a dinner party. I thought I whisked enough, but clearly, I hadn't.
The secret to that professional, Creamy Chocolate Pudding mouthfeel lies in the straining. Think about it: you’ve whisked cocoa powder, which is full of tiny, unrefined particles, and cornstarch, which sometimes clumps if it meets hot liquid too fast.
Even if you think your initial whisking was spot on, those little lumps are hiding, just waiting to spoil your Rich Chocolate Pudding .
When the mixture comes off the heat after it has thickened beautifully (that’s when it coats the back of a wooden spoon nicely, usually after a good simmer for a minute or two) you pour the whole glorious, hot mess straight through a fine mesh sieve.
This is non-negotiable for that truly Silky Smooth Texture . It catches any stray bits of undissolved cocoa or tiny bits of cooked egg that tried to turn scrambled (we don't want those!). Trust me on this one; it’s the difference between "nice enough" and "phoning home about it."
Mastering the Gentle Heat Game
The most common pitfall when making any custard based Homemade Chocolate Pudding is scrambling the egg yolks. Those yolks are the body, the structure, and much of the richness, but they are fragile souls. They hate a sudden shock.
This is where the tempering in Step 2 comes into play. We aren't just adding liquid to eggs; we are gently raising their temperature before they meet the rest of the hot ingredients. Think of it like introducing two people who don't know each other well slow and steady wins the race.
You stream that hot milk in slowly while whisking the yolks like mad. This raises their temperature gradually, conditioning them so they integrate seamlessly.
My personal lesson learned? If you rush tempering, you’ll see those tiny white strings appear in your mixture. That’s scrambled egg, mate. It ruins the smooth texture immediately. If you are cooking over medium heat, you must whisk constantly. Do not get distracted by the telly or a rogue text message.
Keep the whisk moving, sweeping the bottom and corners of that heavy bottomed pan. We need even heat distribution to prevent scorching, which leads to a grainy texture and, frankly, a burnt taste that ruins the whole Chocolate Pudding Comfort Food experience.
The Finish: Butter and Rest
Once everything is combined off the heat the chopped chocolate melted in, followed by that beautiful butter you’ve got a pudding base that is technically cooked but not texturally perfect yet. The butter adds necessary fat and gloss, making the final result shimmer.
But the final magic happens during the chill. This isn't an Easy Chocolate Pudding that you can eat warm (unless you want a thick, rich hot chocolate, which is lovely, but not what we're aiming for here). We need time for those starches and proteins to set up completely.
When you cover it tightly with cling film pressed directly onto the surface to stop that dreaded skin from forming you are locking in moisture and allowing the structure to firm up into that spoonable, jiggly perfection.
Three hours minimum is the rule, but four hours or overnight is when you achieve true bliss. This careful resting period ensures the velvety structure holds firm when you finally scoop into that deeply satisfying Decadent Chocolate Desserts masterpiece.
Finishing Touches: Elevating Your Chocolate Pudding Experience
Right then, we’ve done the hard graft. That glorious, silky Stovetop Chocolate Pudding is chilling in the fridge, promising pure bliss. But before you dive in with a spoon straight from the fridge (which, let’s be honest, we’ve all done!), let’s talk about how to really present this masterpiece.
This Chocolate Pudding Recipe deserves a proper send off. Making something this rich deserves toppings that complement, not compete.
The Great Topping Debate: Sweet or Sharp?
When it comes to serving up a truly Decadent Chocolate Dessert , the toppings are where you can stamp your personality onto the dish. Think of the base Homemade Chocolate Pudding as your perfect canvas.
If you’ve nailed that rich, deep flavour profile, you want something to cut through the sweetness.
I learned early on, after making one too many bowls of plain brown mush, that contrast is king. A simple dusting of icing sugar looks nice, sure, but it doesn't sing . For me, the absolute champion topping for this Creamy Chocolate Pudding is homemade whipped cream.
Not the stuff from a can honestly, it tastes like aerosol and disappointment. Whip heavy cream until it forms soft peaks, and just before it’s done, whisk in a teaspoon of vanilla and a tiny pinch of salt. That salty sweet balance is magic.
It makes this Chocolate Pudding Comfort Food feel instantly elevated.
Another killer combo? Flaked sea salt sprinkled right on top, just before serving. It sounds mad, but that pop of salinity truly wakes up the cocoa. Trust me on this one.
Texture Town: Crunch and Contrast
Texture is what separates good puddings from great puddings. That smooth, velvety texture we worked so hard for in the saucepan needs a counterpoint. We need crunch!
For a bit of texture, try toasting some nuts. Pecans or hazelnuts work brilliantly. Toast them lightly in a dry pan until they smell fragrant, then roughly chop them. Scatter them over the chilled pudding.
If you want something even simpler, a scattering of good quality chocolate shavings (use the same high percentage stuff you chopped for the pudding base) gives a lovely little melt-in-the-mouth element.
If you’re serving this to guests, a small, crisp biscuit alongside works wonders. Think shortbread fingers or a couple of those fancy thin wafer biscuits. It gives them something to scoop up any stray puddles of melted pudding because there will be puddles, mark my words.
This is the secret to achieving the Best Chocolate Pudding experience; it engages all the senses.
Making Ahead: Your Best Friend for Entertaining
One of the best things about this recipe is that it’s fantastic for making ahead. This is where the Easy Chocolate Pudding element really shines. You absolutely must chill it for at least three hours, but honestly, it tastes even better after sitting overnight.
The flavours meld, and the texture firms up beautifully.
When you plan to serve, just pull them out of the fridge about 15 minutes before you want to eat them. This lets the pudding warm up just slightly from fridge cold to perfectly cool, enhancing that luxurious mouthfeel. Then, and only then, add your toppings.
Never top a pudding that’s going back into the fridge, or your lovely cream will weep and your nuts will go soggy. Keep the toppings separate until serving time. This simple rule ensures every bowl of your Rich Chocolate Pudding looks and tastes exactly how you want it to: stunning, decadent, and totally homemade.
Enjoy it!
If you're craving more ideas, explore My Secret for Managed Chocolate Fondant Nail the Molten Middle Every Time , Irresistible Oreo Truffles 7 Easy Ways to Death By Chocolate and Lazy Chocolate Chip Cookies Easiest Recipe EVER .
Frequently Asked Questions
Why is my Chocolate Pudding coming out lumpy or grainy instead of silky smooth?
This is usually down to two things: either the dry ingredients weren't whisked thoroughly enough at the start, or you skipped the straining step. Make sure to combine your cocoa, sugar, and cornstarch completely before adding liquid.
For that professional finish, always push the finished hot pudding through a fine mesh sieve directly into your serving bowls before chilling.
How do I stop that dreadful rubbery skin from forming on my Chocolate Pudding when it chills?
Ah, the dreaded skin a true British pudding tragedy! The only way around this is to create a physical barrier. As soon as the pudding is portioned out, press a piece of plastic wrap directly onto the entire surface of the pudding in each ramekin.
This stops the air from drying out the top layer, keeping the surface beautifully moist.
Can I use something other than cornstarch to thicken this pudding recipe?
Cornstarch (or cornflour, as we call it across the pond) is the traditional and most reliable thickener for this style of custard, giving it that characteristic wobble. If you are absolutely out, you can substitute it with an equal weight of tapioca starch, though the final texture might be slightly softer and more gelatinous rather than purely creamy.
My pudding tastes a bit dull; how can I boost the chocolate flavour in this Chocolate Pudding?
To really make that chocolate sing, quality matters! Ensure you are using a good quality Dutch process cocoa powder, which has a deeper, darker profile. Also, don't forget the pinch of salt mentioned in the recipe it acts like a flavour amplifier, cutting through the richness and making the cocoa notes truly pop.
How long can I safely store the finished pudding in the fridge, and does it freeze well?
This pudding is best enjoyed within 3 to 4 days when stored in the refrigerator with the plastic wrap sealed tightly to the surface. Unfortunately, custard style puddings thickened with eggs and cornstarch don't freeze particularly well; they tend to separate and become watery upon thawing, so it’s best to make it fresh!
I'm worried about scrambling the eggs while cooking what's the key temperature management tip?
The key is steady, continuous whisking over medium heat, especially once the mixture starts to bubble. You must bring it up to a gentle simmer and cook it for a full minute or two after it visibly thickens.
This ensures the cornstarch is fully activated and cooks out any raw starch taste, all without letting the eggs curdle.
The Ultimate Stovetop Chocolate Pudding Rich Sil

