The Bewitching Brew Spooky Greenfilled Halloween Cauldron Cookies
- Unveiling the Magic: Why These Halloween Cauldron Cookies Reign Supreme
- Theatrical Treats: Setting the Scene for Spooky Baking
- Gathering the Concoction: Essential Elements for Your Dark Dough
- The Alchemy of Assembly: Step-by-Step Guide to Perfect Halloween Cauldron Cookies
- Pro Tips for Masterful Execution and Storage
- Variations on the Theme: Twists for Your 'Cauldron Cookie' Creations
- Recipe FAQs
- 📝 Recipe Card
Unveiling the Magic: Why These Halloween Cauldron Cookies Reign Supreme
When the air turns crisp and the moon hangs heavy, it’s time to move beyond the standard pumpkin spice. This year, we are elevating our spooky season with truly show stopping treats: Halloween Cauldron Cookies .
Forget those tired old gingerbread men; this Halloween, we're going full-on spooky chic with these magnificent creations. Imagine a deep, dark chocolate cookie crafted perfectly into the shape of a traditional, smoking cauldron, hiding a glorious, vibrant secret inside. That secret?
A gooey, slightly tangy lime and pistachio crème that perfectly mimics bubbling, magical potion. They are terribly theatrical but, as you’ll soon discover, surprisingly simple to pull off, making them fantastic centerpieces for any Halloween bash.
If you're looking for Fun Halloween Baking Recipes that really impress, you’ve found your new obsession.
Theatrical Treats: Setting the Scene for Spooky Baking
Creating these cookies is less about simply baking and more about engaging in a bit of edible alchemy. The process taps into the fun of Halloween Baking With Kids while still delivering the sophistication required if you are planning to offer these as part of your offerings these are certainly among the Halloween Desserts To Sell that command attention.
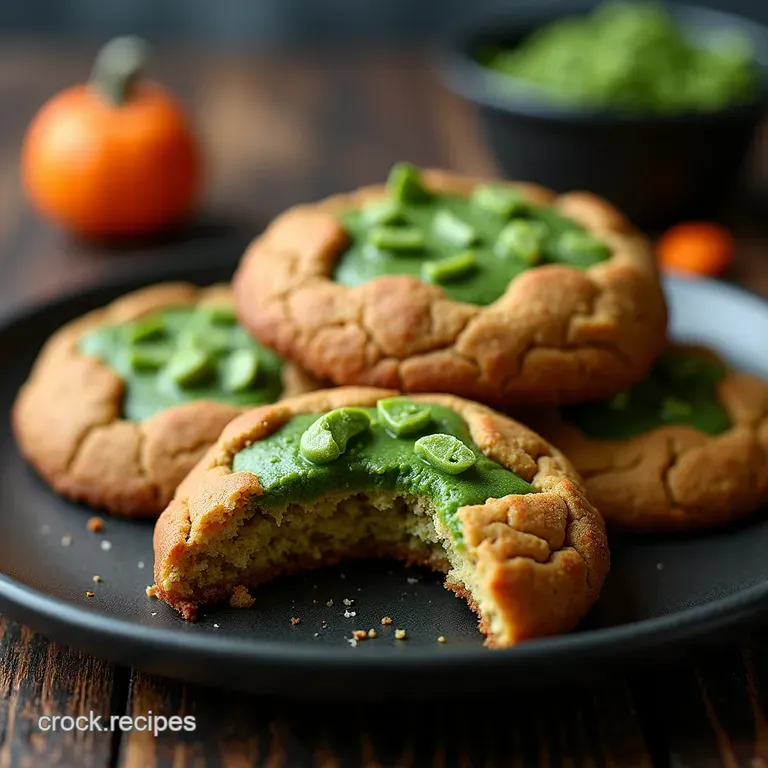
The overall effect relies on the dramatic contrast: the deep, almost black colour of the cocoa cookie vessel against the shocking, bright green filling. It’s a statement piece that tastes as complex as it looks, balancing the bitterness of high-quality cocoa with the bright citrus notes of the potion core.
Beyond the Basic Batch: Introducing the Gooey Green Center
The true star power of these Halloween Cauldron Cookies recipe lies in that unexpected core. We aren't just using vanilla buttercream; we are creating a smooth, slightly sharp filling utilizing cream cheese, fresh lime juice, and zest, bolstered by a touch of pistachio paste.
This combination achieves that perfect ‘potions class’ green while delivering a flavour profile that cuts beautifully through the richness of the chocolate shell. It’s this attention to contrast that takes these Witch Themed Snacks from cute to compelling.
A Quick Glimpse at the Final Bewitching Look
Once assembled, these cookies look like miniature, edible cauldrons ready for brewing. After baking the dark chocolate vessel which, by the way, uses a reliable chocolate sugar cookie base we gently hollow out the centre. Then comes the piping of that luminous green filling.
For the finishing touch, we’ll affix a small, crisp handle made from dark candy melts and perhaps dust the rim with edible silver glitter, simulating the metal lip of the pot. They are genuinely stunning and make for incredible Cookies For Halloween .
Elevating Your Halloween Cookie Game
These require a slightly higher difficulty rating than your average drop cookie we’re classifying this as Medium . Why? Because the shaping requires patience, specifically creating the bowl shape and affixing the handle.
However, for those willing to invest the time, the reward is a cookie that screams quality and creativity, positioning your baking firmly in the professional bracket, even if it's just for your living room party.
Gathering the Concoction: Essential Elements for Your Dark Dough

To begin our spellcasting, we need ingredients that lend themselves to both structure (to hold the heavy filling) and deep colour. The foundation is a sturdy, intensely chocolatey sugar cookie dough.
The Deep Chocolate Base: Dry Goods and Fats Checklist
For the vessel, you will need 3 cups of all-purpose flour, paired with a generous ¾ cup of unsweetened cocoa powder. Dutch processed cocoa is highly recommended here; it yields a darker, less acidic, and more profoundly chocolate flavour, crucial for that authentic cauldron look.
Structure comes from 1 cup of room temperature unsalted butter, creamed with 1 cup of granulated sugar and ½ cup of packed light brown sugar for a hint of molasses depth. Two room temperature large eggs bind everything, complemented by 2 teaspoons of vanilla extract.
For leavening and balance, we incorporate 1 teaspoon of baking soda and ½ teaspoon of salt.
Specialty Items for That Signature Cauldron Look
The handles and the seal require specialty items. You will need approximately 4 oz of black or very dark grey candy melts. These melt smoothly and set quickly, providing the structural integrity needed for the handle and acting as a perfect adhesive.
Finally, for that faint metallic sheen, keep some edible silver or gold dust handy for a final decorative flourish on the rim.
Tool Kit for Perfect Potion Preparation
A stand mixer or electric hand mixer is vital for properly creaming the butter and sugars. For shaping, select a large circle cutter (around 3.5 inches) and a smaller circle cutter (about 2 inches).
The cleverness comes from using the smaller cutter slightly off-centre on the larger shape to create the thick rim needed for the cauldron bowl. A small, sharp paring knife is your best friend for carefully hollowing out the baked cookie bases.
Finally,, a piping bag fitted with a star tip will ensure your green potion filling is dispensed neatly into the well.
Related Recipes Worth Trying
- The Ultimate Chewy Chunky Peanut Butter Cookies with MMs — Ditch the flat supermarket biscuits These thick chewy Chunky Peanut Butter Cookies with MMs are packed with nostalgic flavour and the perfect chocolate...
- The Best Fudgy Cosmic Brownie Cookies Recipe — Recreate those iconic chocolate treats as the Best Cosmic Brownie Cookies Fudgy centres crackly tops and that signature glazeits pure nostalgia
- Marbled Magic Easy NoSpread TieDye Sugar Cookies Recipe — Master the most vibrant Tie Dye Cookies using simple gel colours and a nospread dough These soft sugar cookies are perfect for any party
The Alchemy of Assembly: step-by-step Guide to Perfect Halloween Cauldron Cookies
The creation process moves logically from dough preparation to filling, culminating in the final, theatrical assembly. Remember, the total active preparation time is around 45 minutes, but that critical chilling period ensures success.
Mixing the Sinister Chocolate Dough: Mixing and Chilling Protocol
Start by whisking together all your dry components flour, cocoa, baking soda, and salt in a separate bowl. In your mixer, cream the butter, granulated sugar, and brown sugar until the mixture is pale and fluffy, which should take about 3– 4 minutes.
Beat in the eggs one at a time, ensuring each is fully incorporated before adding the next, followed by the vanilla. Slowly introduce the dry mixture to the wet, mixing only until the dough just comes together.
Divide this dark dough into two flat discs, wrap tightly in plastic, and chill in the refrigerator for a mandatory 1 hour. This chilling stage is non-negotiable; it prevents spreading and allows for crisp, clean shaping later.
Preparing the Bright Green, Gooey Core Mixture
While the dough chills, focus on the potion. In the mixer, beat 8 oz of softened cream cheese with ½ cup of softened butter until utterly smooth, scraping down the sides frequently. Gradually introduce 3 cups of sifted powdered sugar until a thick buttercream forms.
Flavor is added next: incorporate 1 tablespoon of lime zest, 2 tablespoons of fresh lime juice, and 2 tablespoons of pistachio paste for depth. Finally, add the green gel food colouring drop by drop until you achieve a brilliant, almost unnatural, bubbling brew hue. Whip until light and fluffy.
Shaping and Baking: Achieving the Ideal Cookie Structure
Once chilled, roll the dough out evenly to about ¼ inch thickness on a lightly floured surface. Using your large circle cutter, cut out the bases. Then, take the smaller cutter and use it to remove the inner circle from the base, leaving a substantial rim to form the 'bowl' shape.
Simultaneously, cut out thin strips for the handles. If the dough softens while you work, return the cut shapes to the fridge for 10 minutes. Bake these shapes on parchment lined sheets for 10– 12 minutes until they are firm to the touch.
Allow them to cool completely on the sheet before moving them to a wire rack.
Final Assembly: Sealing the Potions and Decorating Details
Once completely cool, use a small paring knife or spoon to gently scrape out a slight well in the centre of the cooked cookie base be careful not to pierce the bottom! Melt your black candy melts.
Dip both ends of each baked handle piece into the melted chocolate and carefully affix them to the sides of the cookie base. Let these set. Next, transfer your vibrant green filling into the piping bag and pipe a generous mound into the hollowed out well.
For a final flourish, lightly dust the dark cookie rim with edible silver dust and perhaps add a few tiny black nonpareils directly onto the green filling to mimic debris from the brew.
Pro Tips for Masterful Execution and Storage
To ensure these Halloween Cauldron Cookies look professionally made, focus on temperature control and quality ingredients. For that signature deep colour that screams 'cauldron,' always opt for Dutch processed cocoa powder over natural.
Remember, the success of the cookie’s shape hinges entirely on the dough being cold; if you feel any softening during the cutting process, stop and chill immediately. When hollowing the baked cookies, a small paring knife provides more control than a spoon, allowing you to define the well without cracking the fragile chocolate structure.
Variations on the Theme: Twists for Your 'Cauldron Cookie' Creations
While the lime pistachio potion is spectacular, there are many ways to interpret the "bubbling brew" for your Fun Halloween Recipes For Kids or adult gatherings.
Troubleshooting Common Baking Anomalies
If your cookies spread too much during baking, it almost always means the dough wasn't cold enough. For next time, roll the dough thinner and chill the cut-outs directly on the baking sheet for 15 minutes before placing them in the oven.
If the green filling seems too soft to pipe, beat it for an extra minute, or briefly chill the entire bowl of frosting before transferring it to the piping bag.
Keeping Your Halloween Treats Fresh Until October 31st
These cookies are best assembled within 24 hours of serving for maximum visual pop. However, the dark chocolate cookies and the cream cheese based frosting can be stored separately. Keep cooled, un-filled cookies in an airtight container at room temperature for up to five days.
Store the piped frosting, uncovered initially to allow the surface to crust slightly, then covered, in the refrigerator for up to a week. Assemble shortly before serving for the freshest experience.
Incorporating Edible Fungi and Other Spooky Garnishes
To push the theme further, consider garnishes that look like they’ve just emerged from the swamp. After piping the green filling, use small white sprinkles dipped in a tiny bit of red food colouring to create miniature, edible toadstools sitting on the "potion" surface.
Alternatively, small edible candy worms crawling over the rim add a wonderfully gruesome touch, cementing these as top-tier Witch Themed Snacks .
Scaling Up for a Hauntingly Large Gathering
If you are planning on selling these or catering a huge event, efficiency is key. Dedicate one day solely to mixing and chilling the dough, and another day to baking and cooling. The filling can be made a day ahead.
Assembly should be done the day before your event, allowing the handles to set firmly and the flavours to meld beautifully, ensuring you have plenty of impressive Halloween Desserts To Sell ready to go.

Recipe FAQs
My Halloween Cauldron Cookies are spreading out flat during baking, how do I get those defined edges?
Ah, that's a classic baking headache, isn't it? The key is keeping that dark chocolate dough nice and firm it's quite high in butter. Make absolutely sure your dough is well chilled, both before rolling and right after you cut the shapes.
If your kitchen is warm, pop the cut-outs onto the baking sheet and chill them for an extra 10 minutes before they even think about going into the oven.
What’s the best way to get that bright, spooky green colour for the filling without making it runny?
You’re spot on to worry about the consistency; we want potion, not soup! Always use a high-quality gel food colouring, not the liquid stuff you get in the supermarket aisle, as the liquid adds unwanted moisture.
A couple of drops of neon or leaf green gel, mixed thoroughly into your already thick cream cheese base, should give you that vibrant, slightly toxic looking brew perfectly.
Can I make these Halloween Cauldron Cookies ahead of time, or do they go stale quickly?
You can certainly prepare components in advance, which is a massive time saver! Bake the empty cauldron shells and store them airtight at room temperature for up to three days. However, I highly recommend filling them no more than 24 hours before serving, as the moisture from the buttercream filling can slightly soften the crisp cookie base over time.
Don't chill the filled ones, or the cookie might get damp.
I’m not keen on lime or pistachio; what are some good flavour swaps for the green filling?
No problem at all; you don't want to be serving up a flavour combination that isn't to your taste! If you want to keep the green hue, you could stick with lime zest but swap the pistachio for a tiny drop of peppermint extract.
Alternatively, for a really rich flavour, ditch the green entirely and make a smooth peanut butter frosting, colouring it black or deep purple instead it’s a classic combination that always goes down a treat.
How tricky is it to cut out the cauldron shape, and are there any shortcuts for beginners?
It requires a steady hand, but honestly, it’s easier than it looks! The main trick is using two different sized circle cutters to create the rim shape on the dough before baking.
If you’re short on time or feeling a bit timid, use a single large circle cutter for the base, and simply use a sharp knife to cut a small semi circle notch out of the top edge to suggest the lip of a cauldron no one will notice!
Cauldron Cookies Recipe

Ingredients:
Instructions:
Nutrition Facts:
| Calories | 398 kcal |
|---|---|
| Protein | 3.9 g |
| Fat | 17.4 g |
| Carbs | 37.8 g |
| Fiber | 2.9 g |
| Sodium | 2397 mg |
