Roasted Chicken Leg Quarters with Crispy Skin the Ultimate Weeknight Hero
- The Magic of High Heat: Unlocking Truly Crispy Chicken Skin
- From Weeknight Budget to Sunday Roast Feel
- Essential Ingredients for Perfect Mediterranean Roasted Chicken Leg Quarters
- Gearing Up: The Only Kitchen Tools You Need
- Step and by-Step Guide to Achieving Gold Standard Roasting
- The Critical Moments: Resting, Carving, and Serving
- Frequently Asked Questions and Expert Troubleshooting
- Adapting the Flavor: Unique Variations on Roasted Chicken Leg Quarters
- Recipe FAQs
- 📝 Recipe Card
The Magic of High Heat: Unlocking Truly Crispy Chicken Skin
Okay, friend, let’s talk chicken. I’ve tried every method for roasting bone and in chicken brining, buttering, boiling (don’t ask, it was a weird phase). I chased that golden, satisfying snap for years, usually ending up with pale, flabby skin that tasted vaguely of sadness.
The secret I finally learned? It’s not about low and slow. That works great for ribs, sure, but not for skin and on chicken quarters. To get that shatteringly crispy skin that makes you feel like a culinary genius, you have to hit it hard and dry with high heat.
We are going to aggressively dehydrate the skin while simultaneously rendering out all the fat underneath, creating a delicious protective shell for the juicy meat inside. Trust me on this: this recipe for Roasted Chicken Leg Quarters is going to change your weeknight life.
From Weeknight Budget to Sunday Roast Feel
Chicken leg quarters are my absolute favorite cut. Why? They’re practically impossible to dry out, they are dirt cheap compared to breasts, and the bone and fat infuse the meat with intense flavor.
When you roast these properly, you get a meal that feels deeply cozy and celebratory a proper Sunday roast vibe but the total cook time is under an hour. It’s brilliant.
The Science Behind the Snap: Maximizing Rendered Fat
When chicken skin is heated slowly, the fat melts gently but never gets hot enough to fully crisp the collagen layer sitting right below the skin. The result? Greasy, rubbery skin. When you blast it at 400°F (200°C), that fat renders out fast, dripping onto the tray below.
This dehydration process leaves the skin tissue exposed to the direct heat, allowing it to become brittle and shatteringly crisp. We use that high heat aggressively, especially at the start.
Ditching the Myth of Low and Slow Roasting
Low and slow roasting for chicken quarters means one thing: soft, floppy skin. Because dark meat has so much connective tissue (which is why it’s so tasty), people worry about drying it out. The truth is, that extra fat protects it! We need the connective tissue to break down, which requires heat.
Aiming for a target temperature of 175°F (80°C) in the thigh ensures the meat is supremely tender, and the high oven temperature gets you there quickly while guaranteeing golden skin.
Maximizing Flavor (and Savings) with Bone and In Cuts
The bone is a flavor powerhouse. I know boneless, skinless is convenient, but you lose so much depth. Cooking with the bone in ensures better moisture retention and a richer overall taste. Plus, when you’re looking at your grocery bill, there’s no contest.
Why Bone and In Roasted Chicken Leg Quarters Are the Ultimate Value
Look, we all want great food that doesn't break the bank. Roasted Chicken Leg Quarters deliver every single time. They provide all the richness of dark meat, they hold up beautifully to the high heat needed for crispy skin, and they are usually the most budget and friendly option in the meat case.
| Cut | Cost (per lb estimate) | Flavor/Texture |
|---|---|---|
| Leg Quarters | Low | Rich, fatty, never dry |
| Boneless Breast | High | Lean, easy to overcook |
| Whole Chicken | Medium | Requires carving/longer cook |
When you’re making Baking Chicken Leg Quarters In Oven , this is the perfect starting point.
Essential Ingredients for Perfect Mediterranean Roasted Chicken Leg Quarters
My version leans into bright, fragrant Mediterranean notes. It keeps things simple but absolutely pops with flavor. You don't need a huge spice rack for this, just quality salt and fresh herbs.
I insist on Kosher Salt for the dry brine. Table salt is too dense and salty, and it doesn't give you that crucial grainy texture needed for proper rub application. Don’t skip the lemon zest, either it brings a brightness that cuts through the richness of the dark meat.
Gearing Up: The Only Kitchen Tools You Need
You don’t need a fancy roasting pan, but there are two non and negotiables: paper towels and a thermometer.
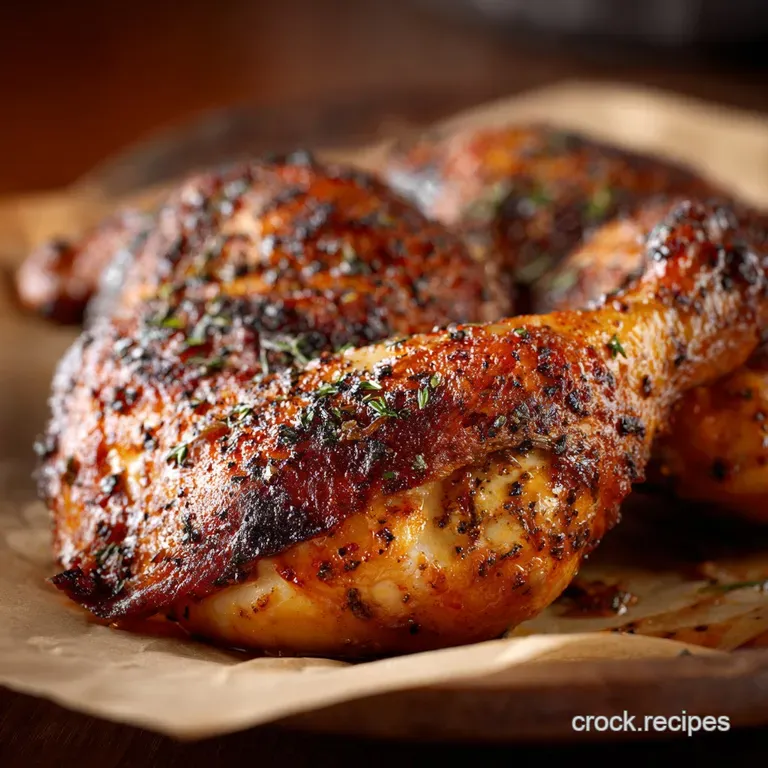
The Secret to Skin Crispness: Salt and Time
This is the real secret ingredient, and it’s actually a technique : the dry brine. We heavily salt the chicken and then let it sit, uncovered, in the fridge. That salt draws moisture out of the skin (dehydrating it) and then dissolves and reabsorbs into the meat (seasoning it deeply).
Even one hour helps, but if you can manage overnight (8 to 12 hours), the skin will feel like parchment paper when you pull it out a sign of guaranteed crispness.
Building the Flavor Profile: Herbs and Citrus Selection
For this recipe, I use rosemary and thyme. They stand up beautifully to the high heat without burning, and their oils infuse the fat as it renders. Don't be shy with the garlic; mince it finely and mix it into the olive oil rub.
Why Patting Them Dry Is Non and Negotiable
If you pull the chicken quarters out of the package and immediately rub them with seasoning, you’re trapping moisture on the surface. That moisture turns into steam in the oven, and steam makes soggy skin. Period. Take five minutes and use half a roll of paper towels if you have to.
Pat the skin until it feels tacky and completely dry. Seriously, this step is more important than the herbs.
Choosing the Right Roasting Pan for Maximum Airflow
The biggest mistake people make is jamming the chicken into a deep casserole dish. That traps steam and makes the bottom side soggy. You need airflow.
The best setup for maximum crispness is a standard metal baking sheet topped with a wire roasting rack. This elevates the chicken off the tray, allowing hot air to circulate completely around the leg quarters.
If you're making Roasted Chicken Leg Quarters and Vegetables , make sure the chicken is still elevated above the veggies.
Digital Thermometers: Your Assurance of Doneness
Guessing is a recipe for disaster (or dry meat). A cheap, instant and read thermometer is your greatest ally here. You insert it into the thickest part of the thigh, avoiding the bone. For dark meat, we’re aiming for 175°F (80°C).
Don't pull it out at 165°F (74°C); that higher temp ensures the dark meat is fall and off-the and bone tender.
Related Recipes Worth Trying
- Spring Roll Meal Prep Bowls Zesty HoneyLime Chicken Lunch — Spring Roll Meal Prep Bowls are the ultimate quick lunch ideas for busy days This robust spring roll in a bowl recipe features fresh herbs and punchy...
- OnePot Slow Cooker Chicken with Potatoes Green Bea Easy Herb Dinner — OnePot Slow Cooker Chicken with Potatoes Green Bea is the ultimate fussfree Crockpot Family Meal This hearty Chicken Green Beans Potatoes Crockpot recipe...
- Sweetheart Chicken Hand Pies Creamy Tarragon Filling in Flaky Crust — Sweetheart Chicken Hand Pies are creamy savory pocket pies encased in a flaky shortcrust These heartshaped Savory Hand Pies are perfect for a cozy...
Step and by-Step Guide to Achieving Gold Standard Roasting
Right then, let's crack on. This is how we get the perfect golden and brown, crispy and skinned result every time.
Prepping the Chicken: Scoring and Seasoning Deeply
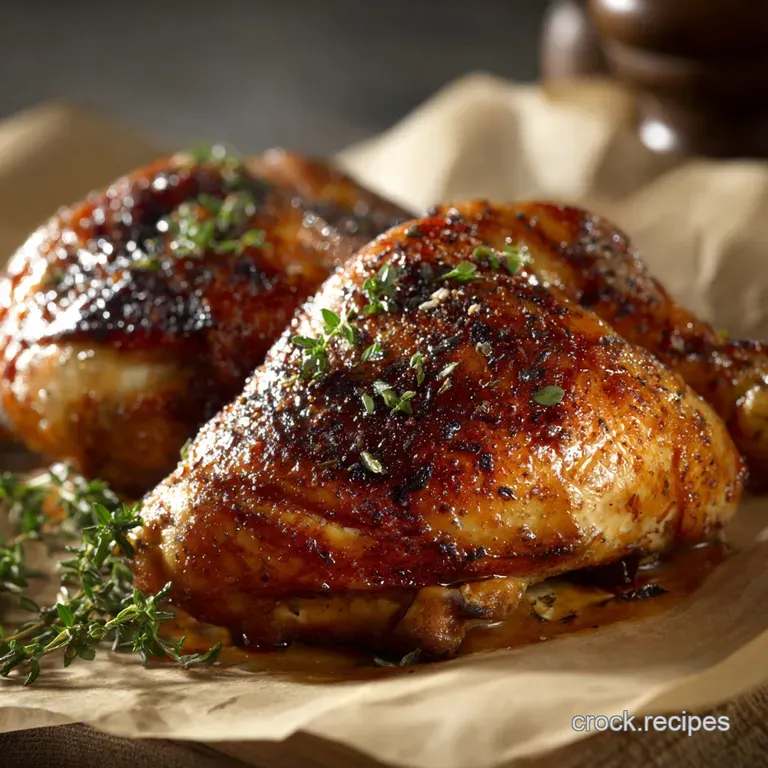
After patting them dry, score the fatty parts of the skin lightly with a sharp knife just two or three shallow lines per quarter. Don't cut into the meat, just the fat layer. This helps the fat render even faster.
Rub on your olive oil first, then aggressively press your dry brine (salt, pepper, herbs, zest) all over the skin. Get a little under the flaps near the thigh joint, too.
The High and Temperature Blast: Initial Oven Strategy
Preheat the oven to a solid 400°F (200°C). Once it’s fully up to temperature, pop the racked chicken in. Set a timer for 30 minutes. Do not open the oven door during this time! We need a consistent blast of dry heat to start the crisping process.
Monitoring Internal Temperature for Juicy Results
After that initial 30 minutes, the skin should be deep golden. Now, reduce the heat to 375°F (190°C) and continue roasting for another 15 to 25 minutes, checking the internal temperature around the 45 minute mark. Your target is 175°F (80°C).
If the skin is getting too dark before the meat is cooked, you can loosely tent the quarters with foil, but usually, this isn't necessary.
The Critical Moments: Resting, Carving, and Serving
You’ve done the hard part. Now you just need patience. Seriously, don’t mess this up by rushing.
The Importance of the Post and Roast Rest
You know how when you cut into a roast straight out of the oven, all those gorgeous juices run onto the board? That’s wasted flavor and moisture.
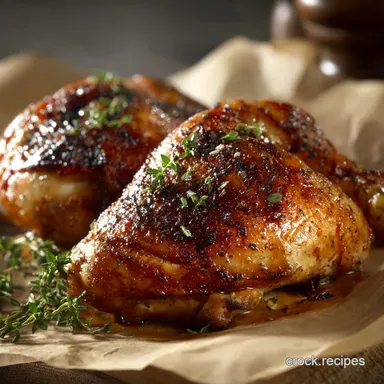
CRITICAL WARNING: After the chicken hits 175°F (80°C), remove it from the oven and let it rest on a clean cutting board or plate for a full 10 minutes.
The resting period allows the muscle fibers to relax and reabsorb all the rendered juices, guaranteeing meat that is insanely juicy.
How to Serve: Perfect Side Dishes and Vinaigrette Salads
My favorite way to serve this Mediterranean and style chicken is simple: with some pan and roasted potatoes (tossed in the rendered chicken fat, naturally) and a simple, sharp salad. The crunch of the chicken skin pairs beautifully with something acidic.
Try a simple arugula (rocket) salad dressed with olive oil, lemon juice, and a pinch of flaky salt.
Frequently Asked Questions and Expert Troubleshooting
How Long Can Cooked Chicken Quarters Be Stored?
If you pack them up quickly and refrigerate them in an airtight container, cooked Roasted Chicken Leg Quarters are safe to eat for 3 to 4 days. I love having these ready for quick weekday lunches!
Reheating Without Sacrificing the Crispy Skin
Never, ever microwave these if you care about the skin. The microwave creates steam and ruins everything. The best way to reheat is in the oven or the air fryer. Preheat your oven to 350°F (175°C) and reheat the quarters on a rack for about 10– 15 minutes until warmed through.
This low heat warms the meat slowly without scorching the already and cooked skin. (Yes, this works for Roasted chicken leg quarters air fryer recipes too.)
Addressing Smoky Kitchens: Troubleshooting High Heat
If your kitchen gets smoky during the roast, it’s usually because the rendered fat is hitting the bottom of the tray and scorching.
- Make sure your pan is clean before starting.
- The wire rack is key; it keeps the chicken out of the rendered fat pool.
- If you see excessive smoking, you can pour off the rendered fat halfway through the cook time (carefully, wear mitts!) and discard it before returning the tray to the oven.
Adapting the Flavor: Unique Variations on Roasted Chicken Leg Quarters
Once you master the over high heat, dry and brine technique, you can change the seasoning to match any cuisine. Roasted Chicken Leg Quarter Recipes are infinitely adaptable.
Spice Rack Overhaul: Moroccan Tagine Adaptation
Ditch the rosemary and thyme. Instead, use a glorious mixture of 1 tablespoon ground cumin, 1 teaspoon turmeric, 1 teaspoon ginger powder, and a generous pinch of cinnamon. Add some diced preserved lemon to the tray during the last 15 minutes of roasting. Serve with couscous.
Adding Zest: A Spicy Lemongrass and Ginger Marinade
For an Asian and inspired twist, create a paste with fresh minced ginger, lemongrass paste, a dash of fish sauce, and a pinch of cayenne. Rub this paste under and over the skin. Skip the chilling step for this one; the marinade works best applied just before roasting.
Meal Planning: Turning Leftovers into Crunchy Wraps or Warm Potato Pavés
If you have leftover Healthy Chicken Leg Quarter Recipes (and that’s a big "if," because they are usually devoured), shred the meat. Use the shredded chicken for crunchy lettuce wraps (perfect with a peanut sauce) or fold it into thinly sliced, layered potatoes (a quick potato pavé) before baking for a rich, satisfying side dish the next night.
If you’re making Roasted chicken leg quarters with potatoes and carrots , make extra veg!

Recipe FAQs
My skin usually turns out rubbery what’s the absolute secret to getting truly crispy Roasted Chicken Leg Quarters?
The secret is two-fold and absolutely crucial for success: Pat the skin bone dry with paper towels, and then use the uncovered dry brine on a wire rack in the fridge. That air exposure is non-negotiable for dehydrating the skin, turning it into pure gold.
I thought all chicken should be cooked to 165°F (74°C). Why does this recipe insist on 175°F (80°C)?
Absolutely spot on 165°F is the standard for breast meat, but dark meat (legs and thighs) contains more connective tissue and fat. This higher temperature (175°F/80°C) is needed to properly break down those elements, guaranteeing the meat is beautifully tender and juicy, not chewy.
I’m having a massive Sunday lunch. Can I prep the chicken ahead of time?
You certainly can, and it's highly recommended! The ideal method here is to complete the full seasoning and chilling step (the dry brine) up to 24 hours in advance. Just leave it uncovered in the fridge overnight, and Bob's your uncle come cooking time.
What’s the best way to store the leftovers and reheat them without losing the crispness?
Store cooled leftovers in an airtight container for up to three days. To reheat, the oven is your best friend: place them back on a wire rack at 350°F (175°C) for 10 15 minutes until piping hot, ensuring the skin snaps back to crisp perfection.
I love the Mediterranean rub, but what other flavour profiles work well with this high heat roasting method?
This high heat method is incredibly versatile! You could swap the rosemary and thyme for a smoky BBQ dry rub, or try going Asian with a blend of ginger, five spice powder, and a touch of brown sugar.
Crispy Roasted Chicken Leg Quarters
Ingredients:
Instructions:
Nutrition Facts:
| Calories | 550 kcal |
|---|---|
| Fat | 40 g |
| Fiber | 1 g |
