The Fiery Fingers Crispy Baked Chicken Tenders with Smoked Paprika Cayenne
- Ditching the Deep Fryer: Mastering Moist & Crispy Chicken
- The Secret Sauce: Why These Spicy Baked Chicken Tenders Work
- Assembling Your Arsenal: What You Need for the Ultimate Bake
- Spice Rack Essentials for Fiery Baked Chicken
- Step-by-Step Mastery: Transforming Tenders into Crispy Gold
- The Baking Process: Ensuring Even, Golden-Brown Results
- Maximising Flavor and Efficiency: Chef's Pro Tips
- Storage, Reheating, and Menu Variations
- Recipe FAQs
- 📝 Recipe Card
Ditching the Deep Fryer: Mastering Moist & Crispy Chicken
The pursuit of truly great comfort food often leads us down the path of greasy, deep fried indulgence. But as modern kitchens evolve, so do our expectations. We want all the satisfaction of that classic crunch without the accompanying oil slick.
These Spicy Baked Chicken Tenders are the definitive answer. They represent the ultimate "fakeaway," engineered to deliver an exterior crispness that stands up admirably to any fried version, all while remaining incredibly juicy inside.
This technique, relying on specific preparation and precise oven management, transforms simple chicken into a standout meal, perfect for hassle free Dinner Ideas any night of the week.
The Secret Sauce: Why These Spicy Baked Chicken Tenders Work
The success of this spicy baked chicken tenders recipe hinges entirely on two complementary systems: superior moisture retention and aggressive breading adhesion.
By using a double dredging technique combined with high heat, we create a thermal environment that seals in the chicken’s juices immediately while simultaneously caramelizing and crisping the outer coating.
This strategic approach ensures the finished product is nothing like the pale, dry baked tenders you might have experienced before.
The Buttermilk Barrier: Ensuring Tender Juiciness
Buttermilk is non-negotiable in this process. Its natural acidity tenderizes the protein in the chicken, breaking down tough fibres gently without requiring a long soak. More importantly, it creates a thick, tacky surface that grips the subsequent layers of flour and Panko.
This initial adherence is vital for maintaining a robust, intact crust throughout the high heat cooking phase.
Panko Power: Achieving Next Level Crunch Without the Oil
Standard breadcrumbs often turn dense and chewy when baked, but Panko (Japanese breadcrumbs) are structurally lighter and flakier. They absorb significantly less moisture and oil during cooking, allowing them to crisp up beautifully in the oven’s dry heat.
When combined with our potent seasoning blend, Panko gives these spicy oven chicken tenders their signature, shatteringly crisp texture.
Comparing the Fakeaway: Beating the Takeout Standard
Why settle for delivery when you can control the quality, freshness, and spice level? Making your own seasoned baked chicken tenders allows you to use premium cuts of meat and dial up the fiery flavour profile with high-quality smoked spices.
On top of that,, these homemade tenders boast a far superior texture and less fat than their commercial counterparts, making them a brilliant addition to your repertoire of Chicken Tender Recipes .
High Heat vs. Low and Slow: Setting the Oven for Success
The key to simulating the speed of deep frying in an oven is to use maximum effective heat. We set the oven to a scorching 425°F (220°C). This high temperature is essential because it immediately attacks the oil-sprayed Panko, promoting rapid browning and crunch before the internal temperature of the chicken has time to spike and dry out the meat.
The combination of heat and oil spray is what delivers that beautiful, golden brown finish.
Assembling Your Arsenal: What You Need for the Ultimate Bake
Preparing for this recipe is about setting up an efficient assembly line. You will require three main component groups: the wet marinade (buttermilk, hot sauce, and fundamental seasonings), the chicken tenders themselves, and the dry coating mixture (flour, Panko, and the powerful cayenne rub).
Having your utensils ready, particularly the three shallow dishes for the dredging process, makes the preparation smooth and tidy, minimizing the chance of cross contamination and maximizing coating adhesion.
Spice Rack Essentials for Fiery Baked Chicken

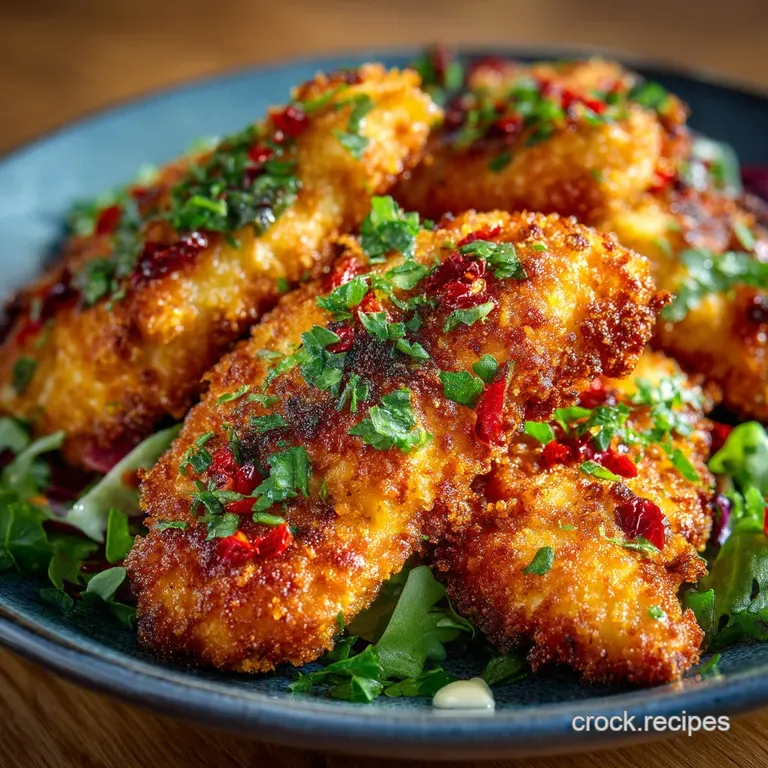
The flavour base for these tenders relies on more than just heat; it needs depth. Our spice blend focuses on smoky, savoury notes that complement the cayenne’s kick, preventing the tenders from being merely "hot." We utilize a precise combination of smoked paprika, cayenne, oregano, and onion powder to create a truly unforgettable crust.
The Dual Coating System: Flour and Panko Setup
To ensure the buttermilk adheres properly, we employ a dual layer system. The first layer involves dredging the marinated tenders in plain all-purpose flour. This acts as a reliable bond to the liquid.
The second, final layer involves pressing the wet, floured tenders directly into the seasoned Panko mixture, securing the crunchy, flavourful crust.
Selecting the Perfect Cut: Chicken Tender Prep
We recommend using 1.5 lbs (680g) of pre-cut chicken tenders, as their slender, uniform size guarantees quick and even cooking. If you only have boneless, skinless chicken breast, simply slice the breast into strips approximately one inch thick.
Regardless of the cut, the most important initial step is to pat the chicken completely dry before it ever touches the marinade. This prevents the liquid from thinning the marinade mixture.
Essential Equipment for Crispness (Racks and Sheets)
The humble wire cooling rack is the unsung hero of this recipe. It must be placed inside the standard large baking sheet. Baking the tenders directly on the sheet pan results in a soggy bottom where the chicken rests.
Elevating the tenders on the rack ensures that the hot air circulates completely around the meat, crisping the entire circumference.
Crafting the Smoky Cayenne Rub
The heart of the spice blend features Spanish smoked paprika, delivering an earthy foundation, coupled with 1 to 2 teaspoons of cayenne pepper, depending on your preferred level of heat. Adding onion powder and dried oregano provides the necessary savoury background notes.
Ensure this mixture is thoroughly incorporated into the Panko before dredging the red, fiery colour should be consistent throughout the crumbs.
Related Recipes Worth Trying
- Foolproof HoneyMustard Glazed Baked Ham Perfect for Christmas Dinner — Our best baked ham recipe guarantees a moist spectacular centrepiece Learn exactly how to cook a ham in the oven with our trick for a sticky lacquered...
- Sticky Fingers Ultimate Crock Pot Honey Bourbon Chicken Recipe — Get the ultimate sticky Crock Pot Honey Bourbon Chicken This slow cooker recipe uses juicy thighs for maximum flavour Foolproof weeknight dinner sorted
- The Ultimate Crock Pot Cheesy Chicken Rice Casserole 10Minute Prep — Meet your new weeknight hero This Crock Pot Cheesy Chicken Rice Casserole delivers deep creamy comfort thanks to a secret ingredient A foolproof Cheesy...
Step-by-step Mastery: Transforming Tenders into Crispy Gold
Once the chicken has marinated and the oven is preheating to 425°F, the focus shifts to the dredging stations. Begin by removing a piece of chicken from the buttermilk and dusting it completely in the flour dish (Station 1). Shake off the excess.
Immediately dip the floured chicken back into the buttermilk bowl (Station 2) for a brief second to moisten the flour. Finally, transition the wet tender to the Panko mix (Station 3) and press firmly. This three step process is crucial for achieving the necessary thickness and adhesion.
Placing the fully coated tenders on a separate plate and chilling them for 15 to 20 minutes afterward is a non-negotiable step that secures the breading before the heat hits.
The Baking Process: Ensuring Even, Golden Brown Results
Preheating your oven to the full temperature is the first step in successful baking. Arrange your breaded and chilled tenders on the oiled wire rack, ensuring they are not touching this allows air to circulate properly.
A light, final misting of oil spray over the tops of the tenders is paramount; it provides the necessary fat for the Panko to achieve that beautiful, dark golden hue.
The Critical Buttermilk Soak: Timing the Marinade
While the minimum suggested marinating time is 30 minutes, you can gain even greater flavour and tenderness by allowing the chicken to soak for up to four hours.
Any longer than four hours, however, and the acid in the buttermilk can start to break down the protein too much, leading to a mushy texture rather than a tender one.
Perfecting the Panko Press: Applying the Crust
The difference between a loosely coated tender and a perfect one is force. When pressing the marinated, floured chicken into the spiced Panko mix, use the palm of your hand to actively push the breadcrumbs into the surface. We want maximum coverage and adhesion.
Following this with the mandatory 15-20 minute chill time ensures the moisture from the buttermilk is absorbed by the Panko, preventing the coating from flaking off during the intense baking cycle.
Prepping the Pan: Preventing Stickage and Promoting Airflow
As mentioned, setting the wire rack into the baking sheet is crucial. Before adding the chicken, spray the wire rack generously with vegetable or olive oil spray. This prevents the raw breading from sticking to the metal and provides the initial fat needed to start the browning process on the bottom side.
Internal Temperature Check: Knowing When Your Spicy Baked Chicken Tenders Are Ready
Bake the tenders for 10 minutes, then use tongs to carefully flip each one. Continue baking for another 10 to 15 minutes. The true indicator of doneness is temperature, not time.
Using an instant read thermometer, pierce the thickest part of the chicken; it must register a minimum of 165°F (74°C). The coating should be visibly golden brown and extremely crisp.
Maximising Flavor and Efficiency: Chef's Pro Tips
To truly master Chicken Tender Recipes , focus on efficiency and texture management. If you are preparing a large batch, you can easily use your air fryer; these are excellent homemade spicy chicken tenders air fryer style, often requiring only 15 minutes at 400°F (200°C).
Always ensure the air fryer basket is not overcrowded to allow the hot air to circulate. On top of that,, do not skip the final step of letting the baked tenders rest on the rack for five minutes after removing them from the oven.
This brief rest period helps the internal juices redistribute while maintaining the crisp exterior.
Storage, Reheating, and Menu Variations
These tenders are fantastic served immediately, but they are also robust enough to be saved for easy lunches the next day. Their excellent structure and powerful seasoning make them highly versatile for various menu applications.
Keeping the Crunch: Best Practices for Reheating Leftovers
Never attempt to reheat crispy chicken in a microwave. The steam will instantly turn the coating soggy. For best results, place the leftover tenders back on a wire rack on a baking sheet and heat them in a preheated oven or air fryer at 350°F (175°C) for about 8 to 10 minutes, or until fully hot and the crust has re-crisped.
Quick Dip Alternatives: Sauces That Elevate the Heat
For those who crave contrasting flavours, a creamy blue cheese dip or cool ranch dressing is ideal against the heat of the cayenne. If you want to lean into the spice, consider whisking up a simple Sweet And Spicy Sauce using honey, soy sauce, rice vinegar, and a touch of extra hot sauce.
Alternatively, a quick brush of Nashville style hot oil after baking adds another layer of fiery complexity.
Making It gluten-free: Substitutions for Panko and Flour
It is surprisingly easy to turn this into a recipe for spicy baked chicken tenders no breading —or rather, no gluten -breading. Replace the all-purpose flour with a 1:1 gluten-free baking blend.
For the Panko, utilize crushed gluten-free cornflakes, or, for an incredibly light and crisp texture, finely ground rice cereal. The key is ensuring the texture of the substitution is coarse, not powdery.
Nutritional Snapshot: Understanding Your Spicy Baked Chicken Tenders
Choosing baked tenders over deep fried options is a significantly healthier choice. Excluding dipping sauces, each serving of these tenders clocks in at approximately 420 450 calories with a robust 45 grams of protein and around 10 grams of fat.
This high protein, relatively low-fat profile makes these richly flavoured, seasoned baked chicken tenders a much more mindful addition to your meal plan compared to traditional fried recipes.
Recipe FAQs
How do I guarantee my tenders are properly crispy and don't end up with a soggy bottom?
Good question! The secret weapon here is the wire rack it’s non-negotiable for achieving that glorious crunch. Placing the tenders on an elevated rack allows hot air to circulate completely around the chicken, preventing steam from trapping moisture beneath the coating.
Also, don't forget that light, final spray of oil before they go in; fat is essential for giving the Panko that golden, 'fried' appearance.
Good heavens, that sounds spicy! Can I tone down the heat in these Spicy Baked Chicken Tenders?
Absolutely, we don't want any melodrama at dinner! The cayenne pepper is the main culprit for the fiery kick. If you prefer less heat, simply reduce the cayenne measurement by half, or swap it out entirely for extra sweet paprika.
You’ll still get that deep, smoky red colour and flavour, just without the aggressive heat.
I’m in a rush can I skip the buttermilk soak or is it absolutely vital?
While you can certainly skip it in a pinch, we strongly advise against it, as the buttermilk is the 'secret sauce' for moisture. It contains gentle acids that tenderise the chicken meat, ensuring your tenders are juicy rather than dry and tough after baking.
If time is genuinely tight, aim for a minimum 30-minute soak, or use the vinegar and-milk substitution if you don't have buttermilk handy.
If I make a huge batch of these tenders, how should I store and reheat the leftovers?
Cooked tenders keep brilliantly! Once they are fully cooled, store them in an airtight container in the fridge for 3 4 days. To reheat them properly and restore that satisfying crispness, avoid the microwave!
Instead, pop them back onto a baking sheet in a 350°F (175°C) oven for about 10 minutes until they are piping hot and re-crisped.
I can't find Panko breadcrumbs in my local shop. Is there a decent alternative for maximum crunch?
Not to worry, we can sort that out. Panko is beloved because its flakes are larger and airier than standard breadcrumbs, meaning it absorbs less oil and stays crisper. The best substitute is often crushed cornflakes or finely crushed pretzels, as both retain a good structural integrity when baked.
Just make sure they are thoroughly processed but still offer a rough, textured surface.
Crispy Spicy Baked Chicken Tenders Recipe

