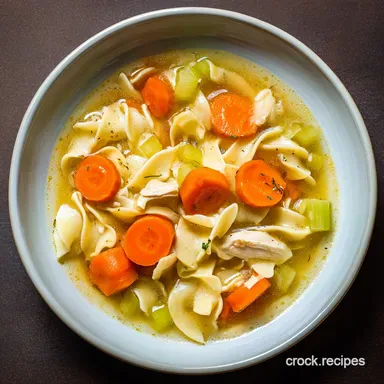
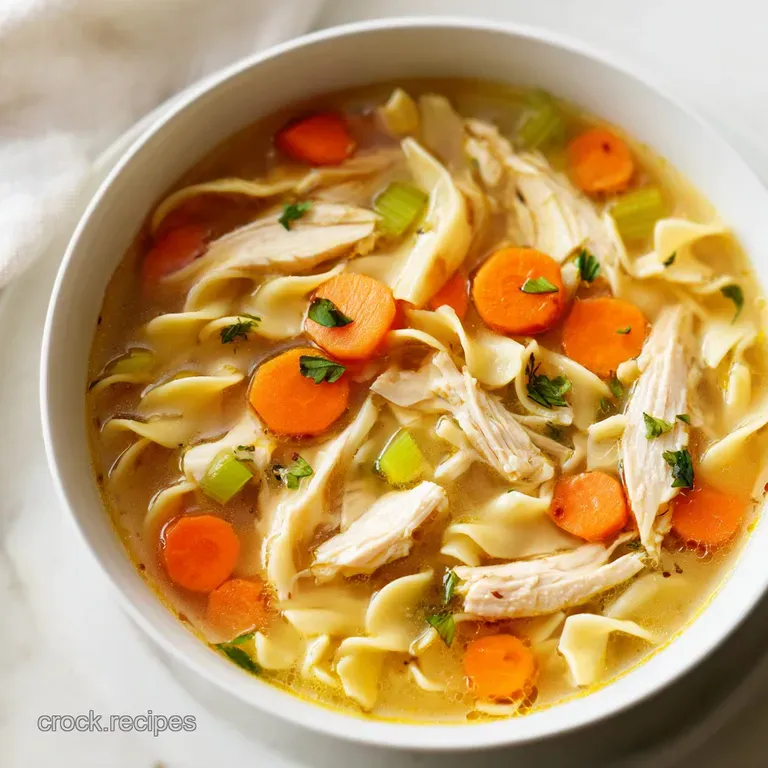
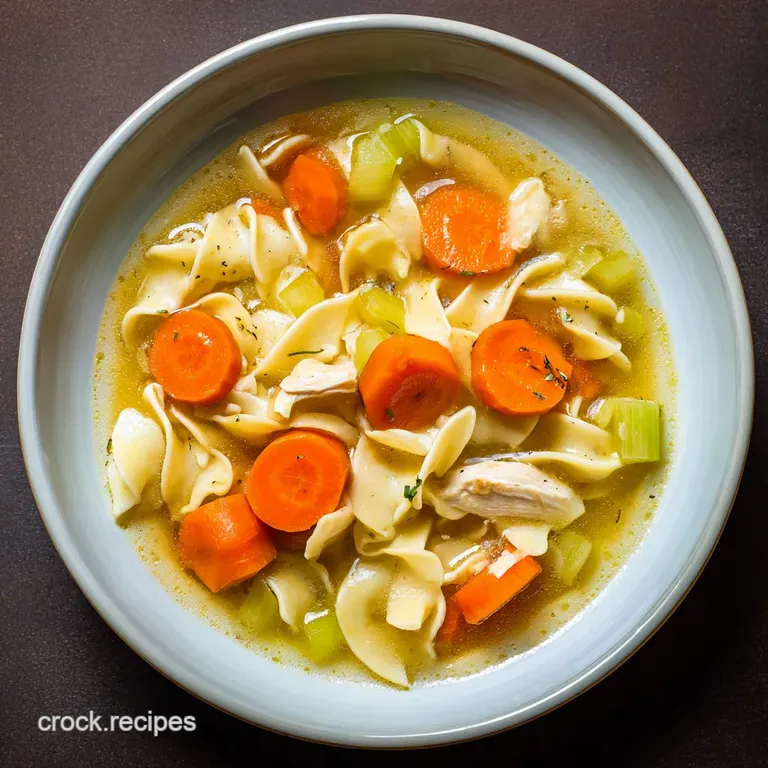
Electric Pressure Cooker Chicken Noodles: Silky
- Time: 10 min active + 15 min cook = Total 25 mins
- Flavor/Texture Hook: Velvety broth with shreddable chicken and silky wide noodles
- Perfect for: Rainy weeknights, cold season comfort, or beginner pressure cooker users
- Making Electric Pressure cooker chicken noodles
- Why the Texture Works
- The Ingredient Deep Dive
- The Ingredient List
- Gear You'll Need
- The Cooking Process
- Troubleshooting Common Issues
- Fun Recipe Variations
- Scaling the Recipe
- Truths About Pressure Cooking
- Storage and Leftovers
- Serving the Dish
- Recipe FAQs
- 📝 Recipe Card
That first sizzle of butter hitting the pot is where the magic starts. I remember this one Tuesday in November when the wind was absolutely howling outside, and I just wanted something that felt like a hug in a bowl.
I had a pack of chicken thighs and some wide egg noodles, and I was determined to make something that tasted like it had simmered for six hours, but I only had about half an hour before the kids were home.
The smell of the onions and carrots softening in that golden butter filled the whole kitchen, and suddenly the house felt warm. If you've ever tried to throw everything in the pot at once, you know the heartbreak of mushy noodles and bland broth.
This version of electric pressure cooker chicken noodles is different because we treat the chicken and the pasta as two separate events, which is the only way to get that restaurant quality consistency at home.
Making Electric Pressure cooker chicken noodles
Trust me, the secret here is all about the order of operations. Most people treat their pressure cooker like a slow cooker on steroids, but that's a mistake. If you cook noodles for the same amount of time as raw chicken, you'll end up with a thick paste.
We're going to use the sauté function to build a flavor base and then run two very short pressure cycles.
It's a brilliant way to get a rich, deep flavor without spending the whole afternoon hovering over a stove. I've found that using boneless, skinless thighs instead of breasts makes a world of difference.
Thighs can handle the pressure without drying out, giving us that shreddable, succulent texture that just melts in your mouth.
You'll notice the broth stays clear and velvety rather than cloudy. By adding a splash of lemon juice at the very end, we cut through the richness of the butter and chicken fat, waking up all the other flavors. It's a simple trick, but it's what makes this recipe feel fresh and vibrant rather than heavy.
Why the Texture Works
The physics of a pressure cooker can be tricky with pasta. Here is the breakdown of why this specific flow works so well.
- Starch Control: Cooking noodles in a second, shorter cycle prevents them from releasing too much starch into the broth, which keeps the soup from getting gummy.
- Protein Breakdown: High pressure breaks down the connective tissue in chicken thighs quickly, making them tender in a fraction of the usual time.
- Aromatics Layering: Sautéing the vegetables first creates a base of caramelized sugars, adding a depth of flavor that you just can't get by steaming them.
- Acid Balance: Adding lemon juice after the heat is off prevents the citrus from turning bitter, providing a bright finish to the savory base.
Since the pressure cooker creates such a sealed environment, the flavors are forced into the meat. If you're looking for other high pressure comfort foods, you might enjoy my Instant Pot Cube Steak which uses a similar tenderizing logic.
| Method | Time | Texture | Best For |
|---|---|---|---|
| Stovetop | 60 mins | Soft/Traditional | Slow Sundays |
| Pressure Cooker | 25 mins | Silky/Tender | Busy Weeknights |
| Slow Cooker | 6 hours | Very Soft | Set and forget |
The Ingredient Deep Dive
Not all ingredients are created equal when it comes to pressure cooking. Some things hold up, and some things disintegrate.
| Ingredient | Science Role | Pro Secret |
|---|---|---|
| Chicken Thighs | Fat/Protein Base | Use thighs for a richer, more forgiving cook |
| Wide Egg Noodles | Starch/Bulk | Add these last to avoid the "mush" factor |
| Low Sodium Broth | Liquid Medium | Use low sodium so you can control the salt |
| Lemon Juice | PH Balancer | Stir in at the end to brighten the flavor |
The Ingredient List
Here is everything you'll need to get this going. I've focused on fresh ingredients because they make the biggest impact on the final taste.
- 2 lbs boneless, skinless chicken thighs Why this? Stays juicy under pressure (Substitute: Chicken breasts, but reduce pressure time by 2 mins)
- 2 tbsp unsalted butter Why this? Richness for sautéing (Substitute: Olive oil for a lighter taste)
- 1 medium onion, diced Why this? Savory base (Substitute: Shallots for a milder flavor)
- 3 medium carrots, sliced into rounds Why this? Sweetness and color (Substitute: Parsnips for an earthy twist)
- 2 stalks celery, sliced Why this? Classic aromatic (Substitute: Bok choy stems for a twist)
- 3 cloves garlic, minced Why this? Pungency (Substitute: 1 tsp garlic powder)
- 6 cups low sodium chicken broth Why this? Liquid base (Substitute: Bone broth for more collagen)
- 1 tsp dried thyme Why this? Herbal note (Substitute: Dried oregano or rosemary)
- 1 tsp salt Why this? Flavor enhancer (Substitute: To taste)
- ½ tsp cracked black pepper Why this? Subtle heat (Substitute: White pepper)
- 1 bay leaf Why this? Depth of flavor (Substitute: A pinch of ground cloves)
- 12 oz wide egg noodles Why this? Hearty texture (Substitute: Rotini or Ditalini)
- ¼ cup fresh parsley, chopped Why this? Fresh finish (Substitute: Fresh cilantro)
- 1 tbsp lemon juice Why this? Brightness (Substitute: Apple cider vinegar)
Gear You'll Need
You don't need a professional kitchen for this, just a few basics. An electric pressure cooker (like an Instant Pot) is the star here. I also recommend a set of meat forks for shredding the chicken and a sturdy wooden spoon that can handle the sautéing without scratching your pot.
If you're feeling fancy, a digital meat thermometer is great to ensure the chicken is at 165°C, though the pressure cycle usually handles this perfectly. According to Serious Eats, managing the starch release in pasta is the biggest hurdle in soup making, which is why the gear's ability to quickly release pressure is so vital.
The Cooking Process
Right then, let's get into it. Follow these steps exactly to ensure your electric pressure cooker chicken noodles come out silky and rich.
- Set the electric pressure cooker to Sauté mode. Melt the butter and add the diced onion, sliced carrots, and sliced celery. Cook for 5 minutes until onions are translucent and vegetables soften. Note: Don't rush this; the browning adds the flavor.
- Stir in the minced garlic. Cook for 30 seconds until it smells fragrant. Note: Garlic burns quickly, so move fast.
- Add the chicken thighs, chicken broth, thyme, salt, pepper, and the bay leaf. Lock the lid and set to High Pressure for 8 minutes.
- Perform a quick release of the pressure immediately. Remove the chicken to a plate and shred using two forks. Note: Let the meat rest for 2 minutes before shredding.
- Stir the shredded chicken back into the pot and add the wide egg noodles.
- Seal the lid and set to Manual/Pressure Cook on High for 2 minutes. Note: If using very thick, homemade style noodles, go for 4 minutes instead.
- Perform a quick release immediately. The noodles should be tender but have a slight bite.
- Stir in the fresh parsley and lemon juice just before serving. Note: This preserves the bright green color of the parsley.
Chef's Tip: If you want an even deeper flavor, sear the chicken thighs on sauté mode for 3 minutes per side before adding the broth. This creates a brown crust that makes the broth look and taste much richer.
Troubleshooting Common Issues
Even with a great recipe, things can go sideways. Here is how to handle the most common hiccups when making electric pressure cooker chicken noodles.
| Issue | Solution |
|---|---|
| Why Your Noodles Are Mushy | This usually happens if you let the pot natural release or if you cook the noodles too long. Pasta continues to cook in the residual heat of the broth. If you leave it for even 5 minutes after the cyc |
| Why the "Burn" Notice Appears | The burn notice is the pressure cooker's way of saying something is sticking to the bottom. This often happens if the butter didn't fully coat the vegetables or if there isn't enough liquid. Make sure |
| Why the Broth Tastes Flat | If the soup feels like it's missing "something," it's usually a lack of acidity or salt. The lemon juice is non negotiable here. If it's still flat, add a pinch more salt or a teaspoon of soy sauce fo |
Common Mistakes Checklist:
- ✓ Did you sauté the aromatics first? (Don't just dump them in!)
- ✓ Did you perform a quick release for the noodles? (Natural release = mush)
- ✓ Did you use thighs instead of breasts? (Breasts can get rubbery)
- ✓ Did you deglaze the bottom of the pot? (Prevents the burn notice)
- ✓ Did you add the lemon juice at the end? (Avoids bitterness)
Fun Recipe Variations
One of the best things about this recipe is how easy it is to tweak based on what's in your fridge. I love playing around with the flavor profiles.
The Reames Style
If you love those thick, hearty noodles found in the deli section, increase the second pressure cycle to 4 minutes. This gives the heavier dough time to soften without breaking apart. It results in a much thicker, more comforting consistency.
The Creamy Twist
For a velvety, bisque like broth, stir in 1/4 cup of heavy cream or a dollop of sour cream at the very end. This pairs beautifully with the thyme and lemon. If you like creamy chicken dishes, you'll love my Dijon Chicken with Mushrooms for a different take on this flavor profile.
Healthy Swap
To make this a bit lighter, swap the butter for olive oil and use whole grain noodles or zucchini noodles. If using zucchini, don't pressure cook them at all - just stir them in at the end and let the residual heat soften them for 2 minutes.
Ginger Garlic Punch
Swap the thyme for 1 tablespoon of freshly grated ginger and a splash of soy sauce. This transforms the electric pressure cooker chicken noodles into a soothing Asian inspired fusion soup that's incredible for fighting off a cold.
Scaling the Recipe
Adjusting the size of this meal is pretty straightforward, but you can't just double everything blindly.
Scaling Down (Half Batch): When making a half portion, use a smaller pot if possible. Reduce the sauté time by about 20% because the smaller volume of vegetables will soften faster.
For the chicken, you can still use the 8 minute cycle, but keep a close eye on the liquid levels to ensure the pot can reach pressure.
Scaling Up (Double Batch): If you're feeding a crowd, don't double the salt and thyme - start with 1.5x the amount and taste at the end. Liquids can be doubled, but you might find that 10-11 cups of broth is plenty for 4 lbs of chicken.
Most importantly, work in batches if your pot isn't huge; overfilling the pot can lead to uneven cooking or the "burn" notice.
Baking Note: While this is a pressure cooker recipe, if you ever decide to transfer the contents to a casserole dish to bake with a cheese topping, lower your oven to 350°F (180°C) and bake for 15 minutes.
This prevents the noodles from overcooking further.
Truths About Pressure Cooking
There are a lot of myths floating around about the electric pressure cooker that can make beginners nervous. Let's set the record straight.
Myth: Pressure cooking destroys all nutrients. The truth is that pressure cooking can actually be better for some nutrients because the cooking time is so short. While some water soluble vitamins might leach into the broth, you're consuming the broth anyway, so you aren't losing them.
Myth: You have to sear meat to "seal in" the juices. Searing doesn't actually seal anything. The moisture loss happens regardless of whether you sear the meat. However, searing creates a crust that adds a massive amount of flavor through browning. We do it for taste, not for "sealing."
Myth: Pressure cookers make everything taste "boiled." This only happens if you skip the sauté step. By browning your butter and vegetables first, you create complex flavors that the pressure then forces into the chicken and noodles.
Storage and Leftovers
This soup keeps remarkably well, provided you handle the noodles correctly.
Fridge Storage: Store your electric pressure cooker chicken noodles in an airtight container for up to 4 days. Note that the noodles will continue to absorb broth as they sit in the fridge, so the soup will become much thicker.
Freezer Tips: I don't recommend freezing the soup with the noodles in it, as they will turn into mush upon thawing. Instead, freeze the chicken and broth base in freezer bags for up to 3 months.
When you're ready to eat, thaw the base, heat it up, and cook fresh noodles in it for 2 minutes.
Zero Waste Ideas: Don't throw away the chicken carcasses or trimmings! If you used bone in thighs, simmer the bones with some onion skins and celery ends in your pressure cooker for 45 minutes to make a rich, homemade stock for your next batch.
Even the leftover carrot peelings can be tossed into a veggie scrap bag in the freezer until you have enough for a stock.
Serving the Dish
To make this feel like a meal and not just a bowl of soup, the presentation matters. I like to serve this in wide, shallow bowls to show off the chunks of chicken and the vibrant orange of the carrots.
Top each bowl with an extra sprinkle of fresh parsley and a crack of black pepper. A side of crusty sourdough bread or a buttery garlic toast is the perfect companion to soak up every last drop of that velvety broth.
For a bit of extra zing, serve a few lemon wedges on the side so guests can add their own final touch of acidity.
Right then, you've got a foolproof plan for the best electric pressure cooker chicken noodles you've ever had. It's fast, it's comforting, and it actually works. Now get in that kitchen and start the sizzle!
Recipe FAQs
Can you cook pasta in an electric pressure cooker?
Yes, it is very efficient. Just ensure you use enough liquid to prevent a burn notice and always perform a quick release to avoid overcooking.
Is chicken noodle soup ok for diabetics?
It depends on your carbohydrate limits. The egg noodles increase the glycemic load, so you may want to swap them for a low-carb vegetable alternative to keep blood sugar stable.
How long for noodles in a pressure cooker?
Cook for 2 to 4 minutes. Use 2 minutes for standard wide egg noodles and 4 minutes if you prefer a thicker style.
Can we make noodles in an electric cooker?
Yes, it's perfect for one-pot meals. If you enjoyed mastering the timing here, see how the same principle works for these homemade noodles.
Why did my noodles turn out mushy?
You likely skipped the quick release. Pasta continues to cook in the residual heat of the broth, so you must release the pressure immediately after the timer ends.
How to store the leftovers?
Place in an airtight container in the fridge for up to 4 days. Note that noodles absorb liquid over time, so you may need to add a splash of broth when reheating.
Can I freeze the soup with the noodles in it?
No, avoid freezing the noodles. They will turn into mush upon thawing; instead, freeze only the chicken and broth base and cook fresh noodles when reheating.
Electric Pressure Cooker Chicken Noodles