The Ultimate Silky Homemade Nutella Spread
- Hold the Sugar! This Homemade Nutella Will Change Your Life
- Ingredients & Essentials: Building Your Dream Chocolate Spread
- Time to Blend: Making Silky Smooth Hazelnut Spread
- Beyond the Jar: Serving Your Silky Smooth Hazelnut Spread
- Keeping the Magic Fresh: Storage Tips and Reheating Hacks
- Make It Your Own: Dietary Swaps and Seasonal Twists
- Fueling Your Day: Nutrition Basics (Keep It Simple!)
- Frequently Asked Questions
- 📝 Recipe Card
Hold the Sugar! This Homemade Nutella Will Change Your Life
Forget the Jar, This is Real Chocolate Bliss
Honestly, who doesn't love the glorious moment of spooning up Nutella ? I know I practically grew up on the stuff! But sometimes, you want something richer something that isn't packed with palm oil and mountains of sugar.
That’s why I finally perfected my own incredible version right here in my kitchen. I’m talking about the ultimate, guilt free treat: the magnificent dairy-free homemade Nutella recipe Vegan .
I spent ages trying to get that perfect consistency. I nearly burned out my blender three times during the testing phase trying to make a truly authentic Dark chocolate hazelnut butter ! My biggest lesson? Patience and a powerful machine are absolutely everything.
When you finally nail it, though, this spread tastes exactly like artisan Chocolate gianduja paste . It’s the definition of a pure product you can feel great about.
This isn't just a chocolate spread; it’s an Italian dream in a jar. It's inspired by the simple, classic Piedmont tradition.
Don't be put off by the "medium" difficulty level that mainly comes down to the required blending time. While roasting the nuts takes a bit of patience, the active prep time is surprisingly quick, only about 15 minutes.
We need about 20 cumulative minutes of blending, but that delivers an impressive 16 servings of heaven. It’s perfect slathered on morning Toast .
And the best bit? This recipe creates a completely Vegan chocolate hazelnut spread . Hazelnuts are full of healthy fats and protein, making this a much smarter choice than the store-bought stuff.
You absolutely need a powerful, High speed blender Nutella setup to achieve that sought after Silky smooth hazelnut spread , but the investment is worth it.
This texture makes all your homemade Desserts feel instantly gourmet.
This is the ultimate kitchen win for anyone wanting control over their ingredients. You can tell your friends you’re serving a decadent treat, but really, you're enjoying a powerful, nourishing snack.
Ready to ditch the preservatives and make this magic happen? Let’s check out what you need!
Ingredients & Essentials: Building Your Dream Chocolate Spread
Right, let's talk shopping. If you want that perfect, luxurious, almost professional grade spread, you can't skimp on quality. We are making a dairy-free homemade Nutella recipe Vegan version here.
This is about creating pure products , honestly, miles better than the sugary gunk from the shop.
The Foundation of Great Chocolate Hazelnut Spread
We need precision here, mate. Forget measuring cups that are "about right." This needs exact amounts for that stunning texture.
First up, the nuts. You need 2 cups (250 g) of raw hazelnuts. Raw is key. Roasting them yourself is non-negotiable for flavour, I promise you.
If you skip this, your Homemade Nutella will taste flat.
Then there's the chocolate. Please, go for high-quality. A minimum of 70% dark chocolate is what gives us that rich, deep dark chocolate hazelnut butter profile.
You need 4 oz (115 g) , finely chopped. Don't use cheap cooking chocolate; it won't melt correctly.
For bulk and sweetness, grab powdered sugar ( 1/2 cup ) and decent cocoa powder ( 1/4 cup ). Sifting these dry bits stops your final spread from being lumpy.
Nobody wants gritty Desserts , you know?
Essential Flavour Notes (and Sneaky Substitutions)
This isn't just sweet goo. We need flavour balance. That half teaspoon of fine sea salt ( 1/2 tsp ) is absolutely essential. It cuts through the richness of the chocolate.
And the vanilla? A proper dose, 1 tsp , makes this truly gourmet.
If you are keeping this strictly a Vegan chocolate hazelnut spread , just skip the optional dairy milk or cream.
If your mix ends up too thick, use a splash of full fat canned coconut milk instead. You're aiming for that classic chocolate gianduja paste vibe, which is all about deep flavour, not just sugar.
Tools: The Non-Negotiable Kit
Okay, real talk time. You absolutely need the right tools for this. I tried to make this once with a rubbish cheap blender.
Oh my gosh, disaster! It took forty five minutes, smelled like burning plastic, and was still granular. Lesson learned!
A High speed blender Nutella machine or a powerful food processor is non-negotiable. This is the only way to achieve that silky smooth hazelnut spread texture.
If you don't have one, please, try to borrow one. Seriously, you cannot make proper, creamy hazelnut butter without powerful motor friction.
You will also need a baking sheet for roasting and a clean tea towel for that slightly tedious but important skinning process.
Grab a spatula, obviously, and some sterilised jars ready for your incredible Nutella ready for your morning Toast !
Time to Blend: Making Silky Smooth Hazelnut Spread
Right, let's get down to the actual making of the spread. This is the fun part. This recipe works beautifully if you remember one thing: patience with your blender.
Achieving that Silky smooth hazelnut spread is all about heat and friction.
The Prep: No Skips Allowed
Before anything else, we must roast those nuts. This isn't a suggestion, mate. It’s essential for flavour. I once thought I could skip it.
Disaster! The resulting Homemade Nutella tasted thin and grassy.
Preheat your oven to a good 350° F ( 175° C) . Spread the hazelnuts evenly. Roast them for 10 to 12 minutes . You want them fragrant and slightly darkened.
Immediately after roasting, here is my top time saving trick. Grab a clean, thick tea towel. Dump the hot nuts onto it.
Fold the towel over them. Now, rub them vigorously! The heat and friction strip away those bitter, papery skins. Getting rid of the skin is vital for achieving that deep, clean hazelnut flavour and helps create Pure Products .
The Heart of the Process: Making Butter
Your high speed blender is the star now. Use the nuts while they are still warm that residual heat helps release the oils faster.
- Initial Grind: Pop the warm, skinned hazelnuts into the blender. Pulse for a minute until they look like coarse breadcrumbs. Stop and scrape down the sides.
- The Wait: Now, blend continuously. You must be patient here. After 4 minutes, it will look clumpy, like wet sand. Don't quit!
- Oil Release: Keep blending for another 5 to 8 minutes . This is where the magic happens. The mixture will suddenly release its oils. It transforms from paste into a smooth, flowing Dark chocolate hazelnut butter . If your blender is screaming, stop and let it rest for a minute .
- Chocolate Integration: Add your melted dark chocolate, powdered sugar, and cocoa right into the butter.
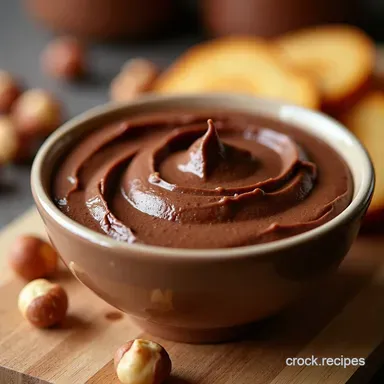
- Final Swirl: Blend for a final 60 seconds until it becomes dark and glossy. It should look like luxurious Chocolate gianduja paste .
Pro Tips for Perfect Texture
If you are aiming for the specific dairy-free homemade Nutella recipe Vegan version, skip any dairy addition. If the spread is too thick after blending, add a neutral oil (like grapeseed), one teaspoon at a time , until it reaches the desired spreadable texture.
Honestly, the biggest mistake people make is quitting the blending too early. If you stop when it's still gritty, your Nutella will never be smooth.
Keep going until it genuinely flows! This spread is incredible on warm Toast or used in simple Desserts . Transfer to jars.
Don't worry if it seems runny; it will thicken beautifully as it cools. A proper job, sorted!
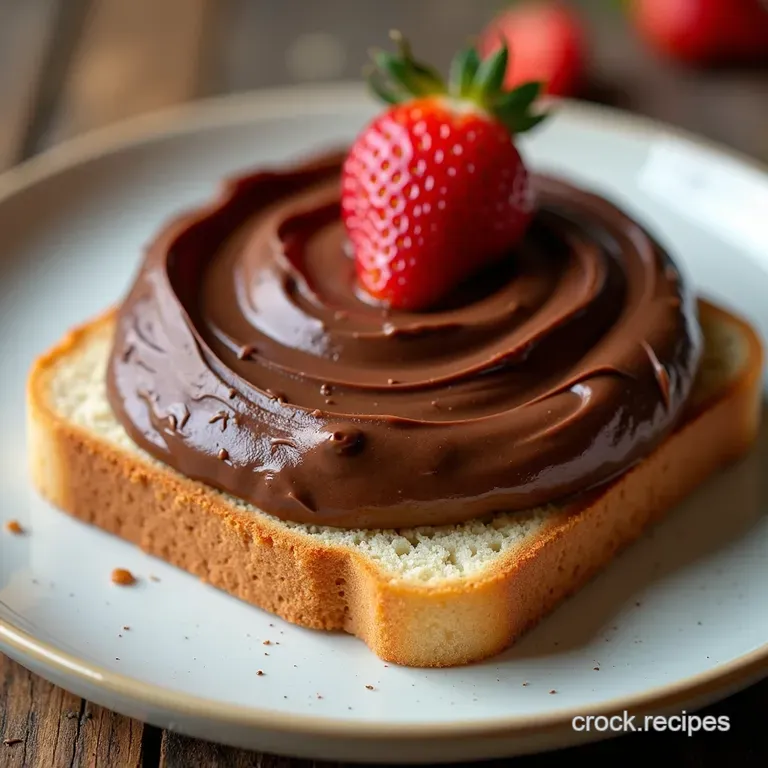
Beyond the Jar: Serving Your Silky Smooth Hazelnut Spread

Honestly, the best way to enjoy this is straight off the spoon. But we are civilised adults, mostly. The warm, runny texture right after blending is like liquid Chocolate gianduja paste .
It’s addictive. If you let it set, the resulting Silky smooth hazelnut spread is spot on for warm crumpets or thick slices of artisan Toast .
For something fancier, try using it as a filling for Desserts . I pipe mine into shortbread cookies after they cool.
It makes for excellent sandwich biscuits. Don't forget the drinks! A spoonful stirred into your morning coffee creates the richest mocha ever.
It's truly a moment of pure bliss.
Keeping the Magic Fresh: Storage Tips and Reheating Hacks
This batch of Homemade Nutella is a fragile masterpiece. Because it uses such Pure Products and zero weird stabilizers, it behaves differently from the jarred stuff.
When warm, it’s loose; once refrigerated, it gets thick almost hard! This is totally normal. I store mine in airtight jars in the fridge for up to three weeks.
If you like it spreadable straight from the cold, just let the jar sit on the counter for 15 minutes.
Or, pop it into the microwave for 15 seconds maximum. Don't overheat it! My first attempt ended in scorched chocolate and I cried a little.
Just warm it gently to get that beautiful spreadable texture back.
Make It Your Own: Dietary Swaps and Seasonal Twists
The beauty of making Nutella at home is the control you have. Making the exact consistency you want takes practice.
If you need a proper dairy-free homemade Nutella recipe Vegan product, just use oat milk or coconut milk to thin it out.
The flavour difference is minimal, promise. It still gives you that rich, dark, luxurious finish.
For those who want a true Dark chocolate hazelnut butter , amp up the cocoa powder slightly. I tried adding a pinch of chilli powder last winter.
Oh my gosh, that was a proper game changer on pancakes! It transforms this from a simple treat into a proper sophisticated Vegan chocolate hazelnut spread .
Just make sure your High speed blender Nutella blending phase is super long for the best result!
Fueling Your Day: Nutrition Basics (Keep It Simple!)
This isn't health food, let's be real. It’s an indulgence. But here’s the cool part: compared to the store brand, this homemade version has significantly less sugar and zero palm oil.
You’re getting healthy fats and fiber from those hazelnuts. Fun fact: Hazelnuts are crammed with Vitamin E, which is great for your skin.
When you use quality ingredients, you feel good about enjoying the treat. Every 1.5 tablespoon serving packs around 170 calories, but it's packed with real goodness.
Go on, dive in! You’ve put in the effort, you’ve used the finest ingredients, and now you have the best Homemade Nutella you'll ever taste. Enjoy every single spoonful!

Frequently Asked Questions
My spread came out a bit gritty how do I get that velvety, artisan texture?
Achieving that beautiful, silky smooth consistency is often down to patience and powerful gear. The key is continuous processing in Step 2; you must keep blending long past the crumbly, chunky stage, perhaps for 15-20 minutes in total, until the natural hazelnut oils fully emulsify and turn into a liquid butter.
If you’re struggling, adding the single tablespoon of neutral oil (like grape seed) can help kickstart the motor and make the process easier for your blender.
I need this to be strictly plant based; how do I ensure this dairy-free homemade Nutella recipe is truly Vegan?
Absolutely no bother! The core recipe is naturally vegan, but you need to be cautious about the optional finishing liquid in Step 4. If you need to thin the mixture, simply swap out the optional dairy milk or heavy cream for a splash of full fat coconut milk (from a can) or a neutral plant milk like oat milk.
Also, double check that your dark chocolate bar contains no hidden milk solids, though 70% minimum bars are usually safe.
What's the shelf life, and do I need to keep this lovely spread in the fridge?
Because this spread lacks the preservatives of the supermarket version, it’s best stored in an airtight container in the refrigerator, where it will last comfortably for about three weeks. It will firm up considerably when chilled don’t panic!
Just take it out of the fridge 15 20 minutes before you plan to serve it so it softens beautifully for easy spreading on toast or crumpets.
I've been blending for ages! Is my food processor up to the job, or do I just need more patience?
Truthfully, this recipe requires a beast of a machine. If your food processor or blender isn't high powered (1000+ watts), it may struggle to break down the nuts into smooth butter before overheating.
If your machine is getting too hot, stop and give it a five minute breather before continuing but never give up on the process! If you stop too early, the result will be more like granular paste than the desired spread.
Can I play around with the sweetness or swap the nuts if I’m having a proper go at customising?
Go on, be a rebel! You can certainly adjust the sweetness by using less powdered sugar, or swapping the powdered sugar for a liquid sweetener like maple syrup or agave, which can actually help with the texture.
For nut swaps, toasted almonds or cashews work wonderfully, but remember that only hazelnuts give that true, iconic Nutella flavour profile. You might end up with a delicious chocolate nut spread, but it won't be quite the same magic.
The Ultimate Silky Homemade Nutella Spread
Ingredients:
Instructions:
Nutrition Facts:
| Calories | 170 kcal |
|---|---|
| Protein | 3 g |
| Fat | 13 g |
| Carbs | 12 g |
| Fiber | 2 g |
| Sugar | 9 g |
