Tropical Twirls of Festive Flavour Chewy Pineapple Christmas Balls Nobake Option Included
- Beyond Mince Pies: Introducing Your New Favourite Festive Treat
- Why These Pineapple Christmas Balls Belong On Your Holiday Table
- Gathering the Bounty: Essential Components for Peak Flavour
- Crucial Considerations for Perfect Pineapple Ball Texture
- Crafting the Concoction: A Step-by-Step Assembly Guide
- The Final Flourish: Rolling, Chilling, and Presentation
- Maximizing Shelf Life: Storage Secrets for Your Pineapple Christmas Balls
- Baking Beyond the Basics: Fun Variations and Dietary Swaps
- Recipe FAQs
- 📝 Recipe Card
Beyond Mince Pies: Introducing Your New Favourite Festive Treat
The holiday season is synonymous with the comforting aroma of baking cinnamon, cloves, and rich pastry usually dominate the air. But what if this year, you welcomed a taste of the tropics into your cosy Christmas kitchen?
We are diving headfirst into a genuinely delightful alternative to the usual fare: our Pineapple Christmas Balls . Forget the soggy bottom for a minute these treats bring a vibrant, sunny twist to your holiday repertoire.
Inspired perhaps by classic tropical confectionary, these bites balance the sweet, tangy punch of caramelized pineapple with rich, buttery coconut and a hint of warming spice. They are delightfully chewy, incredibly addictive, and simple enough to whip up when the Christmas rush hits, making them perfect for gifting or leaving out for Santa.
Why These Pineapple Christmas Balls Belong On Your Holiday Table
This recipe, which we’ve dubbed Tropical Twirls of Festive Flavour, is categorized as Easy , which is music to the ears during December. Why the high praise? Because this creation primarily involves combining, mixing, and rolling ingredients.
There is minimal precise timing required, and the main technique is simply ensuring the mixture binds correctly. Whether you choose the gentle warmth of baking or the speed of the no-bake route, these Pineapple Christmas Truffles offer maximum festive impact with minimal fuss.
A Tropical Twist on Cozy Christmas Confectionery
While many gravitate towards traditional shortbread or dense fruitcake during Christmas, these spheres offer a refreshing counterpoint. The infusion of caramelized pineapple introduces a unique, bright acidity that cuts beautifully through the richness of the butter and coconut.
They manage to feel simultaneously light and satisfying, an essential duality in holiday eating. This isn't just another cookie; it’s a bright moment of sunshine in the middle of winter, a unique entry in the pantheon of Festive Pineapple Desserts .
Effortless Elegance: The Allure of No-Bake Holiday Bites
One of the major draws of this specific Pineapple Christmas Balls recipe is its adaptability. While we suggest a brief bake time to set the structure beautifully, they shine equally well as a no-bake option.
This zero oven-time approach is invaluable when your stove is already monopolized by roasting joints or simmering sauces. These Easy Pineapple Christmas Balls transform into dense, chewy delights that solidify beautifully in the refrigerator, proving that elegance doesn't require complicated oven choreography.
Unpacking the Unique Flavour Profile of Our Pineapple Christmas Balls
The secret sauce here lies in reducing the liquid content of the fruit. We take canned crushed pineapple, drain it with extreme prejudice, and then gently cook it down with sugar and butter until it achieves a jammy consistency.
This concentration process intensifies the pineapple’s natural flavour, turning it deeply sweet yet slightly tart. When combined with warming cinnamon and ginger, the final product echoes the complex profiles found in Old Fashioned Christmas Balls , but with an unexpected, zesty backbone.
Gathering the Bounty: Essential Components for Peak Flavour
To achieve these superior Pineapple Christmas Truffles , sourcing the right components is crucial. We are aiming for a balance of moisture, binding strength, and tropical essence. For the base, you’ll need one 20 oz can of crushed or finely diced pineapple.
Remember, the success of this whole operation hinges on meticulous moisture management we cannot stress enough the need to drain this fruit thoroughly, ideally using a fine mesh sieve lined with cheesecloth.
Complementing the fruit, we use 1/2 cup (one stick) of softened, unsalted butter and 1/2 cup of granulated white sugar to create that rich, sticky foundation.
For structure and binding, the recipe calls for 1 1/2 cups of all-purpose flour, spooned and leveled to ensure we don't add too much structure that prevents chewiness. Two room temperature large egg yolks act as emulsifiers and enrichers, binding the fat and solids beautifully.
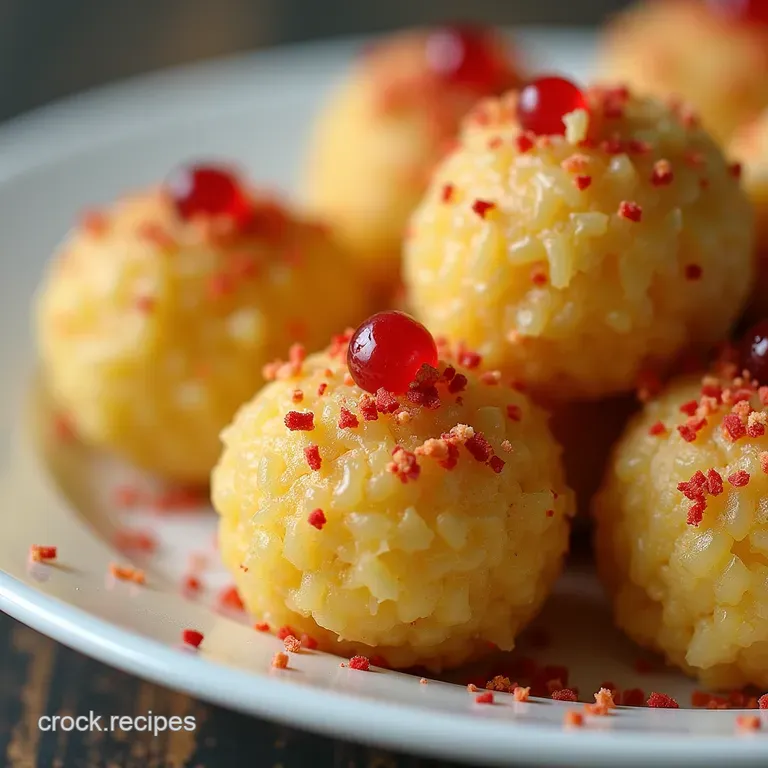
Finally, the aromatic notes come from 1 teaspoon of ground cinnamon, 1/2 teaspoon of ground ginger, and a quarter teaspoon of salt to enhance the sweetness. The mandatory finish involves 1 1/2 cups of finely shredded, sweetened coconut flakes for the external coating.
Crucial Considerations for Perfect Pineapple Ball Texture
Texture is what separates a good holiday treat from a truly memorable one. For these Pineapple Christmas Balls , we want a chew that yields easily but doesn't crumble apart.
This texture is dictated by how carefully we manage the moisture content and the sequence in which we introduce the binding agents.
The Core Four: Measuring the Necessities
The ratio between the drained pineapple solids, the fat (butter), the dry binder (flour), and the emulsifier (egg yolk) must be precise. If you eyeball the flour, you risk an overly crumbly or dense interior.
Always spoon your flour into the measuring cup and level it off, rather than scooping directly from the bag, to prevent compaction. The egg yolks must be incorporated gently once the cooked mixture has cooled slightly, preserving their binding capabilities.
Sourcing Superior Sweeteners and Binders
While the granulated sugar helps caramelize the fruit base, the coconut coating provides crucial texture contrast. Opt for sweetened shredded coconut; the moisture content in sweetened flakes generally rolls better and adheres more evenly than the unsweetened variety.
If you are using coconut, you generally do not need the optional powdered sugar coating unless you prefer a very dusty, sugary exterior on your Pineapple Coconut Christmas Balls .
Essential Kitchen Arsenal: Tools for Effortless Assembly
You will need a medium saucepan for the initial stovetop reduction, a large mixing bowl, and standard measuring implements. However, a rubber spatula or sturdy wooden spoon is essential for folding the flour mixture into the sticky pineapple base without deflating the structure.
For consistency in size vital if you plan to gift these Pineapple Christmas Treats —a small cookie scoop or a teaspoon works perfectly to ensure all balls bake or set uniformly.
Related Recipes Worth Trying
- Simple No Bake Pecan Pie Balls Recipe Holiday Dessert — Ditch the crust These incredibly easy Pecan Pie Balls capture that gooey buttery flavour in a decadent truffle Perfect for your holiday spread Get the...
- The Best Christmas Eve Cinnamon Vanilla Creamy Custard Pie — Bake our signature Christmas Eve Cinnamon Vanilla Creamy Custard Pierich spiced and perfectly smooth This festive pie recipe is truly unforgettable
- The Best Melt in Your Mouth Spaghetti and Meatballs Recipe — Forget dry mince This easy Spaghetti and Meatballs recipe uses a secret panade technique for ultratender meatballs swimming in a rich slowsimmered sauce...
Crafting the Concoction: A step-by-step Assembly Guide
The journey to these marvellous little spheres begins on the stovetop. The goal here is to evaporate enough water from the pineapple to intensify its flavour and create a thicker matrix for the flour to work with.
Preparing the Pineapple Base: Mastering Moisture Control
First and foremost, thoroughly drain your canned pineapple. Squeeze out every last drop you can manage. Next, in your medium saucepan over medium heat, melt the 1/2 cup of butter. Add the painstakingly drained pineapple and the 1/2 cup of granulated sugar.
You will cook this mixture, stirring occasionally, for about eight to ten minutes. What you are looking for is a jammy consistency where the liquid has significantly reduced and the mixture appears thick enough to hold its shape briefly on the back of a spoon.
Remove this from the heat and allow it to cool for about ten minutes so it doesn't immediately scramble the next ingredient.
Mixing Magic: Combining the Binding Agents Seamlessly
Once the pineapple mixture has lost some of its initial scorching heat, whisk in the two egg yolks, one at a time, ensuring each is fully incorporated before adding the next. In a separate small bowl, whisk together the flour, cinnamon, ginger, and salt this pre-mixing ensures the spices are evenly distributed.
Now, carefully fold the dry ingredients into the pineapple base using your spatula until a cohesive, albeit slightly tacky, dough forms.
The Final Flourish: Rolling, Chilling, and Presentation
This dough, rich with fruit and butter, needs structure before it can be shaped.
The Shaping Ritual: Forming Perfect Spheres of Festive Joy
Once the dough is ready, cover the bowl and place it in the refrigerator for a minimum of one hour. This chilling period is non-negotiable; it firms up the butter and allows the flour to hydrate, resulting in less sticky dough that rolls beautifully into those perfect spheres.
Preheat your oven to 350° F ( 175° C) if opting to bake. Prepare a baking sheet lined with parchment paper. Place your shredded coconut in a shallow dish.
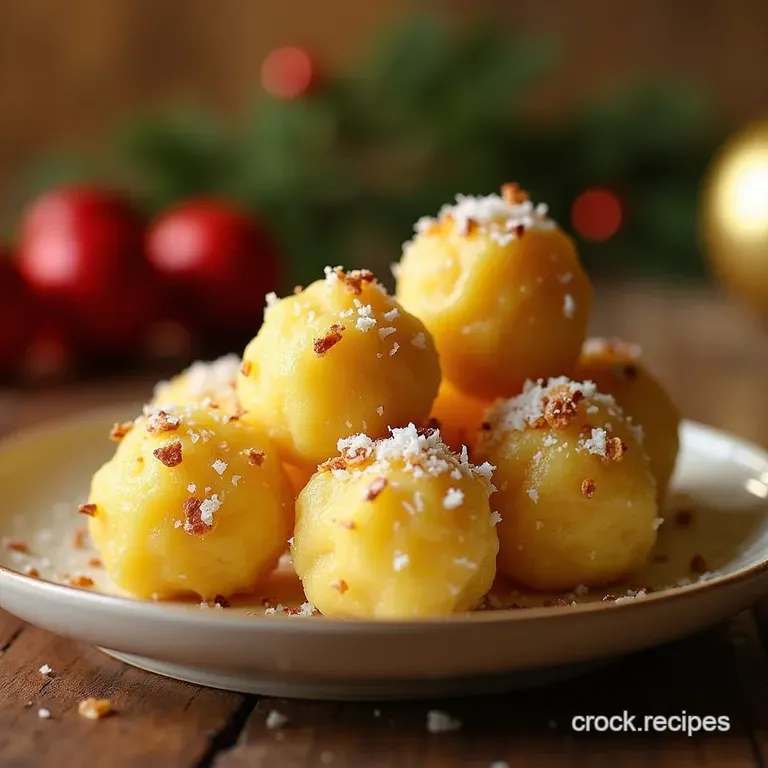
Scoop rounded teaspoons of the chilled mixture and quickly roll them between your palms to form tight 1 inch balls. Roll each ball generously in the coconut until it is fully encased.
Quick Chill vs. Slow Set: Best Practices for Firmness
If you are baking, place the coated balls onto the prepared sheet and bake for just 12 to 15 minutes, or until the edges are set but they remain pale and soft inside. If you are using the no-bake method, skip the oven entirely.
Instead, place the coconut coated balls on the tray and refrigerate for at least 30 minutes to allow the butter to solidify completely before serving.
Maximizing Shelf Life: Storage Secrets for Your Pineapple Christmas Balls
These Pineapple Christmas Treats store wonderfully, often improving slightly in texture after a day or two as the flavours meld. For short term storage (up to one week), keep them in an airtight container at room temperature, ensuring they are well separated by parchment paper if they are very sticky.
For longer periods, move them to the refrigerator.
Freezing for Future Festivities: Extending the Enjoyment Window
These balls freeze exceptionally well, which is fantastic for batch cooking early in the season. After chilling the rolled balls (baking them first is optional but recommended for the no-bake version), arrange them in a single layer on a tray and freeze until solid.
Transfer the frozen spheres to a freezer safe zip-top bag, squeezing out as much air as possible. They will maintain quality for up to three months. Thaw them overnight in the refrigerator.
Baking Beyond the Basics: Fun Variations and Dietary Swaps
While the classic Pineapple Christmas Balls recipe is divine, experimentation is the spice of the holiday season!
Elevating Presentation: Creative Coatings and Garnishes
To truly elevate these, consider a double coat technique: roll them once in the coconut, let them rest for five minutes, and then roll them again for a thicker, more textured exterior.
Alternatively, for a more sophisticated look, roll half the batch in finely chopped pistachios or toasted macadamia nuts instead of coconut. A light drizzle of white chocolate after they have completely cooled also looks incredibly festive.
Making Them Merry: gluten-free and Vegan Adaptations
If you need a gluten-free option, substitute the all-purpose flour with an equal amount of fine almond flour. Be aware that almond flour absorbs moisture differently, so the dough might feel slightly softer; be sure to chill it adequately.
For a vegan version, swap the butter for a high-quality vegan butter block and substitute the egg yolks with 1 tablespoon of flaxseed mixed with 3 tablespoons of water (let it sit for five minutes to gel) to provide necessary binding. These adaptations ensure everyone can enjoy these tropical delights.
Troubleshooting Common Hurdles in Ball Formation
The most common issue encountered when making Christmas Ball Cookies of this style is excessive tackiness. If your dough is too soft to roll even after the initial chilling, do not be tempted to add too much extra flour, as this ruins the chewiness.
Instead, return the entire batch to the refrigerator for an additional 30 minutes. If they are crumbling during rolling, it usually means you did not drain the pineapple sufficiently, or you need to work the dough a little longer in your hands so the residual warmth softens the fats just enough to adhere without being greasy.
Recipe FAQs
What is the secret to making sure my Pineapple Christmas Balls aren't too sticky to roll?
The absolute key lies in the pineapple preparation you must drain it as thoroughly as possible; squeezing it in a clean tea towel works wonders. Secondly, do not skip the chilling time; giving the dough an hour in the fridge firms everything up nicely, making those balls easy to handle, even if you’re usually rushed off your feet like Father Christmas on Christmas Eve.
Can I make these Pineapple Christmas Balls ahead of time, or do they have to be fresh?
These are brilliant for making in advance, which is a lifesaver during the festive period! Once baked and fully cooled, they keep splendidly in an airtight container at room temperature for up to a week, or they can be frozen for up to three months. If freezing, let them thaw overnight in the fridge before serving.
If I don't have time to bake them, does the no-bake option really work well?
Yes, the no-bake option is smashing! Since the stovetop process reduces the pineapple mixture, it concentrates the flavour beautifully. Just ensure you chill the rolled balls for at least 30 minutes after coating; this sets the butter and gives them a lovely, chewy texture that is less crumbly than the baked version.
My mixture seems too dry after I added the flour; what should I do?
Don't panic, this can happen if your pineapple was exceptionally well drained or if your flour measurements were slightly off. If it won't hold together when squeezed, try mixing in half a teaspoon of softened butter or a teaspoon of pineapple juice (not water!) until you reach a pliable consistency.
Remember, it should feel like firm cookie dough, not cake mix.
Are these suitable for gifting, and what's the best way to package them?
They make superb edible gifts far better than shop bought tat! For presentation, line a nice tin or small cardboard box with greaseproof paper or some festive cellophane. Arrange them neatly in rows, perhaps separating layers with small squares of parchment paper to prevent sticking.
They look absolutely brilliant stacked up!
Chewy Pineapple Christmas Balls

