Graveyard Grub Decadent Chocolate Pudding Cups with Gooey Zombie Brain Topping
- Unearth the Most Delightful Horror: Why These Zombie Pudding Cups Reign Supreme
- Setting the Scene: The Allure of Gruesome Gourmet Desserts
- The Macabre Manifest: Gathering Supplies for Your Creation
- What's Lurking in the Pantry: Component Breakdown
- The Ritual of Assembly: Crafting Layer by Layer
- Achieving Spooky Perfection: Tips for Setting and Chilling
- Beyond the Grave: Storage, Variations, and Troubleshooting
- Making Your Zombie Pudding Cups Party-Ready
- Frequently Asked Questions
- 📝 Recipe Card
Unearth the Most Delightful Horror: Why These Zombie Pudding Cups Reign Supreme
When the veil between worlds thins and Halloween approaches, ordinary desserts simply won't cut it. We crave something dramatic, something that whispers of graveyard secrets and mad scientist experiments. Enter the Zombie Pudding Cups .
These aren't just a fleeting treat; they are a centerpiece, a delightfully gruesome construction that promises rich flavour beneath its terrifying facade. Forget those tired, pre-packaged sweets; this recipe delivers deep, decadent chocolate pudding richer than a London banker punctuated by a surprisingly zesty, lurid green 'slime' topping, subtly molded to resemble something freshly unearthed.
They are individually portioned, making serving a breeze, and the textural contrast between the dense chocolate and the bright, almost tangy topping is absolutely killer. With a difficulty level rated as Easy, this creation relies on straightforward assembly rather than taxing culinary wizardry, meaning even if you’ve been busy brewing potions all day, you can master these frighteningly delicious Halloween Pudding Cups .
Setting the Scene: The Allure of Gruesome Gourmet Desserts
There is an undeniable thrill in transforming something visually unsettling into something utterly delicious. These Spooky Desserts Halloween creations tap directly into that playful macabre spirit.
They are designed to elicit gasps of delight (and perhaps a slight shiver) before they disappear instantly from the party table. By focusing on rich layers and vibrant, contrasting colours deep midnight chocolate meeting an almost toxic green we elevate the standard layered dessert into something memorable.
A Frightfully Fun Alternative to Standard Halloween Candy
For those hosting gatherings, especially those involving school aged monsters who are already overloaded on sugar, these Halloween Treats For Kids School alternatives offer something sophisticated yet fun.
Their single serving format ensures perfect portion control, and the visual appeal means less begging for seconds and more appreciation for the artistry involved. They manage to hit that perfect sweet spot: genuinely tasty for adults while being perfectly themed for younger crowds.
The Secret to the 'Brain' Topping's Ominous Hue
The key to making these truly look like Zombie Dirt Pudding Cups lies in that specific shade of green. Achieving the perfect 'putrid' or 'radioactive' look requires careful selection of colouring. While any food dye will work, gel colours are highly recommended.
They deliver concentrated pigment without thinning out our carefully crafted cream cheese topping. A gentle, gradual addition allows you to dial in that lurid shade that screams 'toxic ooze' rather than 'mint chocolate chip.'
Perfect Portions for Party Guests
The choice of container is paramount for setting the scene. Clear glass jars or rustic ramekins work beautifully, allowing guests to see the layers building up to the horrific crescendo on top. This structure not only enhances the visual drama but also inherently solves serving dilemmas.
Should you wish to transition your party themes to an adult gathering later in the evening, the foundational chocolate pudding base is easily adapted into Halloween Pudding Shots simply by substituting a portion of the milk with a complementary liqueur during the final stirring stage.
The Macabre Manifest: Gathering Supplies for Your Creation
To summon these Horror Treats from the depths of your kitchen, preparation is everything. The process is broken down into two main acts: creating the rich, dark chocolate foundation, and crafting the zesty, gruesome green brain topping.
Before turning on the heat, gather all your measured ingredients and necessary implements to ensure a smooth assembly ritual.
What's Lurking in the Pantry: Component Breakdown

Our Graveyard Grub relies on contrasting elements: a deep, comforting chocolate layer and a bright, creamy texture above it. The entire recipe is designed to be straightforward, focusing on simple techniques that yield maximum theatrical impact.
Foundation Layers: Components for Rich Chocolate Sludge
The base needs to be intensely chocolatey and thick enough to support the weight of the topping without collapsing. We start with 2 cups of whole milk , enriched with 1/2 cup of granulated sugar and a generous 1/2 cup of unsweetened cocoa powder —Dutch process is preferred here for that dark, almost black colour.
To achieve that essential pudding thickness without baking, we incorporate 1/4 cup of cornstarch and a pinch of salt. Crucially, 2 large egg yolks will add richness and body, while 2 tablespoons of unsalted butter melted in at the end provide that desirable glossy finish alongside 1 teaspoon of vanilla extract .
Assembling the Oozing Brain Mixture (Pudding Topping)
This layer requires a slight tang to cut through the chocolate’s richness. We begin with 4 oz of softened cream cheese and 2 tablespoons of softened unsalted butter , whipped until fluffy.
Into this, we gradually beat 1 1/2 cups of sifted powdered sugar . Flavour is added via 1 teaspoon of lime or lemon zest and an optional 1/2 teaspoon of lime or almond extract for a subtle sharpness.
Finally, the colour comes from careful additions of green food colouring gel until the desired sickly hue is achieved.
Essential Equipment for Assembling Zombie Pudding Cups
You will require a medium heavy bottomed saucepan for cooking the pudding, ensuring the heat distributes evenly to prevent scorching. A sturdy whisk and rubber spatula are essential tools for incorporating ingredients and scraping down the sides.
For the topping, a mixer (handheld or stand) speeds up the creaming process. Finally, select 6 clear glass jars or small cups for presentation, and if you desire sculpted brains, have a piping bag fitted with a medium star tip ready.
Related Recipes Worth Trying
- The Ultimate Stovetop Chocolate Pudding Recipe — Make truly creamy chocolate pudding from scratch with this foolproof stovetop recipe Achieve a rich velvety texture that beats any packet mix
- The Best Old Fashioned Rice Pudding SlowBaked Creamy Classic — Get that proper nostalgic taste This traditional British baked rice pudding is slowbaked for a luxurious creamy custard beneath the perfect golden brown...
- Nans Dreamy Rice Pudding 5 Comforting Steps to Creamy Joy — Forget school dinners This classic Rice Pudding 5 Comforting Steps recipe is pure creamy bliss just like Nan used to make Rich vanillainfused and so easy...
The Ritual of Assembly: Crafting Layer by Layer
The magic of these Zombie Dirt Pudding Cups happens through careful layering and chilling. We must ensure each stage is completed before moving to the next to guarantee structural integrity for our gruesome presentation.
Achieving Spooky Perfection: Tips for Setting and Chilling
The total time commitment is low about 30 minutes of active prep and 15 minutes of stovetop cooking but the chilling time is non-negotiable for success.
Expect a total time commitment of about two and a half hours minimum, though most of that is hands off waiting.
Step One: Preparing the Dark Chocolate Base
In your saucepan, whisk together the dry ingredients sugar, cocoa, cornstarch, and salt until perfectly smooth. Whisk in the egg yolks until a thick paste forms, then slowly incorporate the milk until the mixture is uniform.
Cook this over medium heat, whisking constantly, until it comes to a visible simmer and thickens considerably, clinging heavily to the back of your spoon. Immediately remove it from the heat and vigorously stir in the butter and vanilla until the pudding is luxurious and glossy.
Method for Molding the Putrid Green Brain Layer
While the pudding cools slightly, prepare the topping. Beat the cream cheese and butter until light and airy. Slowly mix in the sifted powdered sugar, followed by the zest and extract.
Now, introduce the green food colouring incrementally, mixing thoroughly after each addition until you achieve that perfect, unsettling shade of green.
Constructing the Three Dimensional Layers
Divide the warm chocolate pudding evenly among your 6 chosen serving vessels. This is critical: to prevent a rubbery skin from forming on the surface, immediately press a piece of plastic wrap directly onto the surface of each pudding layer.
Refrigerate for a minimum of two hours, or until the chocolate layer is completely firm to the touch.
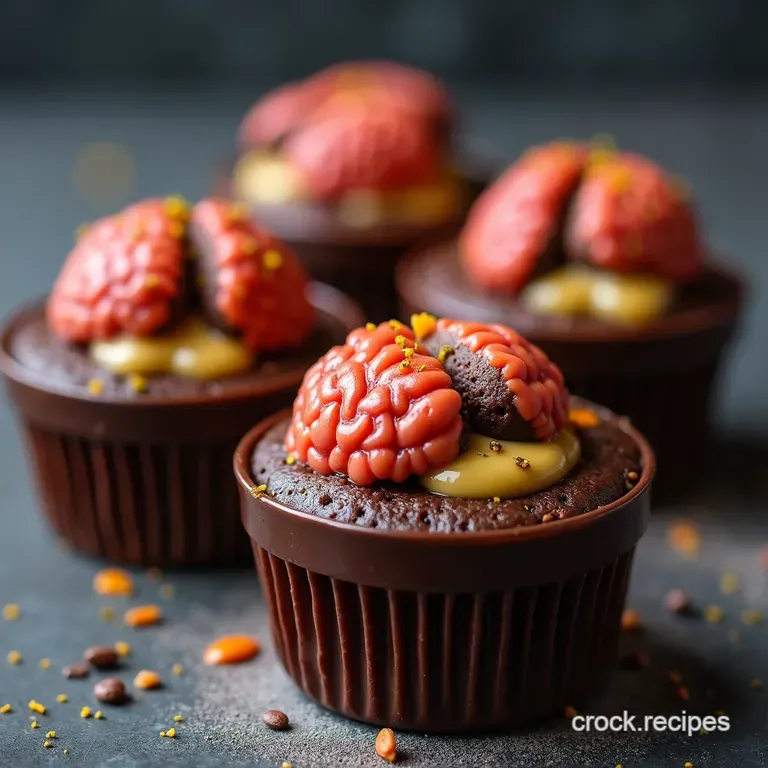
The Final Touches: Garnishing Your Terrifying Treats
Once the chocolate base is solid, it’s time for the horror reveal. Transfer the green cream cheese mixture to your piping bag. Pipe a generous dollop onto the chilled chocolate base.
Use the back of a small spoon or a clean toothpick to quickly drag lines outward from the centre of the dollop, mimicking the gyri and sulci of a brain. For the final touch, lightly crush 6 Oreo cookies and sprinkle the dark crumbs around the base of the green topping, creating the illusion of disturbed grave dirt.
Beyond the Grave: Storage, Variations, and Troubleshooting
Successfully completing your Zombie Pudding Cups opens the door to easy customization and storage planning for your next fright night event.
Shelf Life of these Spooky Desserts
Because these Horror Treats are assembled in individual cups and contain dairy components (milk, cream cheese), they must be kept chilled. They are best consumed within 3 days of assembly.
If you need to prep further in advance, the chocolate pudding base can be made up to 4 days ahead and stored tightly covered in the refrigerator. Apply the green topping only 12- 24 hours before serving to keep the "brain" texture firm and distinct.
Adapting the Recipe: gluten-free Ghoulish Goodies
Creating gluten-free Halloween Treats For Kids School is simple with this base recipe. The pudding itself contains no gluten (relying on cornstarch as a thickener). Simply ensure you use certified gluten-free dark chocolate wafers or cookies when crushing them for the final dirt garnish.
Creative Ways to Enhance the 'Rotten' Aesthetic
To truly elevate the grotesque factor, consider adding small edible accents. A single, red-dyed candy melt shaped like a severed eyeball placed strategically on the green topping provides a fantastic focal point.
Alternatively, for an extra layer of texture, sprinkle a thin layer of finely ground graham crackers mixed with cinnamon beneath the chocolate pudding layer, creating a "rotting earth" transition between the cup bottom and the dark chocolate sludge.
Making Your Zombie Pudding Cups Party Ready
These delicious Zombie Pudding Cups are not only a treat for the tastebuds but a triumph of spooky presentation. They are easy to transport, require no last minute heating or plating, and offer a satisfying, rich conclusion to any Halloween feast.
Serve them cold, ideally accompanied by a spooky soundtrack, and watch your guests marvel at your delightfully gruesome culinary skills!

Frequently Asked Questions
Can I make the chocolate pudding base ahead of time for these Zombie Pudding Cups?
Absolutely! This is highly recommended, as chilling is key. You can prepare the chocolate pudding base up to two days in advance. Just ensure you press plastic wrap directly onto the surface before chilling to stop that horrible 'skin' from forming nobody wants a leather topped zombie treat!
My green topping looks more like slime than brains how do I get that texture?
The texture comes down to technique! For defined 'brains,' use a piping bag fitted with a star tip and pipe small swirls, then use a skewer to pull lines outwards. If you prefer a messier, more organically gruesome look, simply dollop the frosting on and gently wiggle the back of a spoon across the top to create ridges.
What can I substitute for the lime flavour in the 'brain' topping?
If lime isn't your cup of tea, you have a couple of cracking options. Almond extract works wonderfully, giving a subtle marzipan like depth that pairs nicely with the chocolate. Alternatively, a few drops of peppermint extract can give it a nice, cool ‘toxic waste’ flavour.
How long will these pudding cups keep in the fridge before they start looking past their prime?
They are best eaten within 3 days for peak freshness and structural integrity. The pudding base holds up brilliantly, but if you add the cookie "dirt" garnish too far in advance, it might get a bit soggy. For best results, leave the cookie crumbs off until about an hour before serving.
Do I really need to use Dutch processed cocoa, or will regular baking cocoa do the trick for the Zombie Pudding Cups?
While regular cocoa will certainly work in a pinch, Dutch processed cocoa is highly recommended. It’s less acidic, resulting in a much deeper, darker chocolate flavour think intense, rich dark chocolate rather than a standard milk chocolate bar.
This depth really helps the bright green topping pop visually and flavour wise.
Gooey Zombie Pudding Cups

Ingredients:
Instructions:
Nutrition Facts:
| Calories | 1541 kcal |
|---|---|
| Protein | 11.8 g |
| Fat | 60.6 g |
| Carbs | 78.6 g |
| Fiber | 7.2 g |
| Sodium | 319 mg |
