The Ultimate Island Ambrosia Cake Ultramoist Pineapple Coconut Layer Cake

- Transport Your Tastebuds: The Essence of Our Hawaiian Pineapple Coconut Dream Cake
- Why This Tropical Layer Cake Deserves Center Stage
- Assembling Your Tropical Pantry: Necessary Components for Success
- Mastering Ingredient Selection for Peak Flavour
- Step-by-Step Alchemy: Baking the Perfect Hawaiian Pineapple Coconut Dream Cake Layers
- The Crucial Technique: Ensuring Maximum Moisture Retention
- Frosting Fantasies and Final Touches for Your Tropical Masterpiece
- Longevity and Substitutions: Maximizing Your Cake Experience
- Recipe FAQs
- 📝 Recipe Card
Transport Your Tastebuds: The Essence of Our Hawaiian Pineapple Coconut Dream Cake
If you've ever dreamt of an escape to a sun-drenched locale, where the air is sweet and the breezes whisper tales of the tropics, then it’s time you baked this very special creation. Today, we are diving deep into the creation of the Hawaiian Pineapple Coconut Dream Cake .
This isn't just another dessert; it’s an experience a commitment to the moistest, most flavour packed celebration cake you will ever pull from your oven. We are aiming for that sublime marriage of tangy fruit and creamy tropical sweetness, all held together in a structure that is perfectly suited for stacking and celebration.
Forget your standard lemon drizzle; this is where the real party is at! This cake is a rich, incredibly moist layer cake inspired by classic Hawaiian Cake Recipe traditions, featuring crushed pineapple folded right into the batter for unparalleled moisture, layered with a bright, tangy cream cheese frosting studded with toasted coconut flakes.
It strikes that perfect balance between sweet tropical indulgence and satisfying home baking simplicity.
Why This Tropical Layer Cake Deserves Center Stage
Baking should feel rewarding, and few things are as rewarding as presenting a towering, beautifully frosted layer cake that tastes exactly like vacation. This specific bake, which we affectionately call the Pineapple Coconut Dream , requires attention to detail especially regarding moisture control but the result is unmatched among Tropical Cake Recipes .
It falls into the Medium difficulty category, demanding focused preparation but relying on familiar techniques rather than high end pastry skills. We’re dedicating approximately 35 minutes to prep and about 30– 35 minutes in the oven, resulting in a total time commitment of just under three hours, including crucial cooling, leading to a generous serving size of 10 to 12 slices of pure paradise.
Unpacking the Soulful Flavor Profile of This Island Bake
What sets this Hawaiian Pineapple Coconut Dream Cake Recipe apart is the integration of its core components directly into the batter, not just as toppings. The secret weapon is the finely crushed pineapple.
When properly drained and I cannot stress the necessity of thorough draining enough it imparts incredible natural moisture and a subtle, necessary tang that cuts through the richness of the butter and sugar.
Paired with the subtle nuttiness of the coconut mixed throughout the cake, you have a foundational flavour profile that sings. This is truly a Delicious Pineapple Coconut Dessert designed to please everyone at the table.
The American Layer Cake Structure Meets Tropical Delight
We are intentionally utilizing the structure of a classic American layer cake here. This means we rely on traditional creaming methods to incorporate air, resulting in a tender, lofty crumb that can stand up to heavy fillings and frosting.
Unlike a delicate sponge, this cake has enough substance to support our desired altitude while maintaining a supremely soft texture thanks to the fruit inclusions. This blend of familiar baking architecture with exotic flavourings is what makes the Pineapple Coconut Cake Recipe so consistently successful.
Setting the Scene: What Makes This Recipe Essential?
This Coconut Dream Cake Recipe is essential because it performs beautifully under pressure. It travels well, tastes even better the next day, and uses accessible ingredients to achieve an exotic flavour profile.
It is perfect for birthday celebrations, summer gatherings, or simply when you need a baking project that guarantees a show stopping result without demanding hours spent on complicated techniques. It’s designed to be the centrepiece of any tropical themed event.
Assembling Your Tropical Pantry: Necessary Components for Success
Before we even touch the mixer, organization is key, especially when dealing with high moisture ingredients like crushed pineapple. Success in this Dream Cake Recipe hinges on having everything measured, prepped, and, crucially, at the correct temperature.
Remember, room temperature ingredients butter, eggs, and buttermilk are vital for achieving a smooth emulsion that traps air efficiently, leading to that perfect light texture.
We require three 8 inch round cake pans, lined meticulously with parchment paper, alongside standard baking tools, including an electric mixer and a reliable wire cooling rack.
Mastering Ingredient Selection for Peak Flavour
For the best Hawaiian Pineapple Coconut Cake , ingredient quality truly matters. While the list might look familiar, the way we treat certain components transforms the final product.
The Dry & Wet Foundations: Flour, Leavening, and Liquids Required
The dry ingredients 2 ¾ cups of all-purpose flour, 1 ¾ cups of sugar, 1 tablespoon of baking powder, and ½ teaspoon of fine sea salt must be whisked thoroughly before introduction to the wet elements.
For the liquids, we rely on 1 cup of softened, unsalted butter, 4 room temperature large eggs, and ½ cup of room temperature buttermilk. The buttermilk provides the slight acidity needed to activate the leavening agents and tenderize the crumb beautifully.
A teaspoon of high-quality vanilla extract rounds out the flavour base.
The Star Inclusions: Choosing the Perfect Pineapple and Coconut Textures
This is where the magic of this Tropical Cake Recipe truly begins. You need one standard 20 oz can of crushed pineapple. The most critical step here is draining it. Open the can and place the contents in a fine mesh sieve, pressing down firmly to expel as much sugary liquid as possible.
Any residual moisture will sabotage the texture of your cake layers. We also incorporate ½ cup of sweetened flaked coconut directly into the batter for texture, and we reserve an additional cup for toasting later as a garnish. Toasting brings out a deep, nutty flavour that raw coconut simply cannot match.
Essential Tools: Equipment Needed to Craft Your Dream Cake
To execute this Hawaiian Pineapple Coconut Dream Cake flawlessly, ensure you have three 8 inch round cake pans prepared. If you only have two, you can use two 9 inch pans, though the baking time will need careful monitoring.
A small, dry skillet is essential for toasting the coconut until it is golden brown. Finally, an electric mixer is highly recommended for creaming the butter and sugar adequately and whipping the frosting to the necessary light, fluffy consistency.
Related Recipes Worth Trying
- NoFuss Mini Peanut Butter Cup Cheesecakes Recipe — These surprisingly simple Mini Peanut Butter Cup Cheesecakes bake up beautifully in a muffin tin Get the foolproof recipe for rich creamy mini desserts
- Easy Cheesecake Cups Foolproof NY Style in Muffin Tins — Stop wrestling with springforms These Easy Cheesecake Cups deliver rich tangy flavour in a perfect portion A simple recipe for No Bake Cheesecake Cups fans
- The Ultimate Creamy Reeses Cheesecake Recipe Water Bath Guide — Stop settling for dry imitations This Reeses Cheesecake recipe guarantees a velvety crackfree filling loaded with peanut butter cups Learn the water bath...
Step-by-step Alchemy: Baking the Perfect Hawaiian Pineapple Coconut Dream Cake Layers
Once your ingredients are prepped, the assembly process moves swiftly. Start by preheating your oven to 350° F ( 175° C). While the oven warms, whisk together your dry ingredients and cream the softened butter until pale and fluffy this should take about two minutes.
Add the eggs one by one, ensuring full incorporation before moving to the next, followed by the buttermilk and vanilla. Gradually introduce the dry mixture to the wet on low speed, stopping mixing the very moment the last streaks of flour disappear.
You are looking for a smooth, cohesive batter, but resist the urge to beat it vigorously, as that develops gluten and leads to toughness.
The Crucial Technique: Ensuring Maximum Moisture Retention
The entire baking process for this Pineapple Coconut Dream is centred around locking in moisture without compromising structure. This balance is what elevates this bake from good to truly memorable.
Mixing Secrets: Achieving the Ideal Batter Consistency
After the base batter is formed, gently fold in your well drained crushed pineapple and the ½ cup of internal coconut using a rubber spatula. Use sweeping, upward motions to keep the air you incorporated during creaming intact. The goal is to distribute the fruit evenly without deflating the entire mixture.
The batter will appear slightly wetter than a standard vanilla cake batter, but that’s precisely what we want.
Baking Dynamics: Oven Temperatures and Testing for Doneness
Divide the batter evenly among your prepared pans. Bake for 30 to 35 minutes. The indicators of doneness are standard but important: the edges will just begin to pull away from the pan sides, and a wooden skewer inserted into the centre should emerge clean, perhaps with a few moist crumbs attached, but certainly no wet batter.
The Cooling Protocol: Preventing Structural Collapse Post Bake
Do not rush the cooling phase. Let the layers rest in their pans on a wire rack for 15 minutes. This allows the structure to set sufficiently to handle inversion.
After 15 minutes, carefully turn the cakes out onto the rack, peel off the parchment paper, and allow them to cool completely this can take over an hour. Attempting to frost warm layers will result in melted frosting and potential sliding disasters.
Patience is a virtue in this Coconut Dream Cake Recipe .
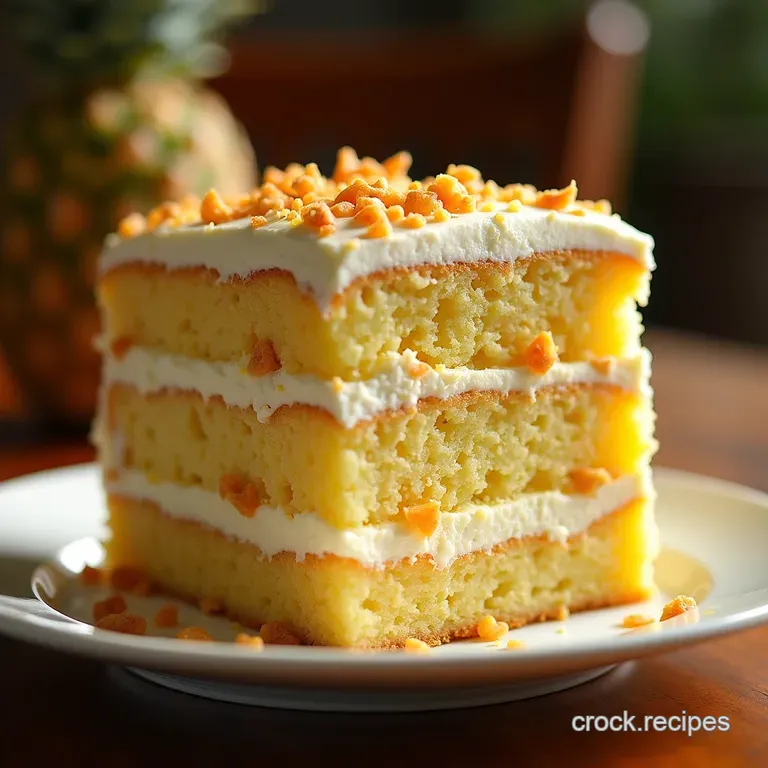
Frosting Fantasies and Final Touches for Your Tropical Masterpiece
While the layers cool, turn your attention to the crowning glory: a tangy cream cheese frosting designed to complement the pineapple’s acidity.
Crafting the Ultimate Cream Cheese Coconut Frosting
For this frosting, you’ll need 8 oz of full fat cream cheese and ½ cup of butter, both softened to true room temperature. Beat them together until absolutely lump free and creamy. Gradually incorporate 4 cups of sifted powdered sugar, beating on low speed first, then increasing speed.
Finally, add 1 teaspoon of vanilla and 1 to 2 tablespoons of heavy cream until the frosting is light, fluffy, yet firm enough to hold its shape. This recipe is an exceptional iteration of a classic, providing the necessary tang to balance the sweetness of this Delicious Pineapple Coconut Dessert .
Once the layers are fully cooled, apply a thin 'crumb coat' of frosting all over the entire cake and chill for 15 minutes. This seals in any loose crumbs. Follow this with a final, generous layer of the cream cheese frosting.
Take the reserved toasted coconut and gently press it onto the top and sides of the cake for that final tropical flourish, completing your Hawaiian Pineapple Coconut Dream Cake .
Longevity and Substitutions: Maximizing Your Cake Experience
This spectacular bake holds up beautifully, which is part of why it is such a popular Pineapple Coconut Cake Recipe .
Creative Twists: dairy-free Options and Fresh Fruit Swaps for This Cake
For those navigating dietary needs, substitutions are simple. If you lack buttermilk, mix ½ cup of whole milk with ½ tablespoon of white vinegar; let it sit for five minutes to curdle before using.
If you need a dairy-free option, substitute the butter in the frosting with a high-quality vegan butter stick, and ensure your cream cheese is a plant based variety that whips well.
For an added layer of complexity, consider folding ½ cup of chopped macadamia nuts into the batter alongside the pineapple for a delightful crunch.
Storage Wisdom: Keeping the Dream Fresh for Days
Because of the moisture provided by the pineapple and the cream cheese in the frosting, this cake should be stored in an airtight container in the refrigerator. It maintains its peak flavour and texture for up to four days.
Allow it to sit at room temperature for about 30 minutes before serving for the frosting to soften slightly.
Serving Suggestions to Elevate Your Pineapple Celebration
To truly honour the spirit of this Hawaiian Cake Recipe , serve a slice alongside a vibrant platter of fresh mango and kiwi the bright acidity cuts through the richness perfectly.
A glass of chilled sparkling cider or a strong, cold brewed iced coffee offers a wonderful counterpoint to the deep sweetness of this Hawaiian Pineapple Coconut Dream Cake . Enjoy every tropical, moist bite!
Recipe FAQs
My cake layers always turn out a bit soggy after baking; what’s the secret to avoiding a flop when making the Hawaiian Pineapple Coconut Dream Cake?
The absolute key here lies with that beautiful crushed pineapple! You must drain it far more thoroughly than you think necessary seriously, press out every last drop using paper towels or a cheesecloth. Excess moisture equals a sunken, gummy centre, and nobody wants that sad outcome.
Can I make this cake ahead of time, or does it need assembling right before serving?
You can certainly bake the layers a day ahead and store them tightly wrapped at room temperature, or even freeze them once cooled. However, the frosting is best made the day you plan to assemble, as cream cheese frosting can sometimes weep if stored frosted for too long, especially in warmer weather.
I’m not a fan of cream cheese; what’s a good substitute for the frosting on this cake?
If cream cheese isn't your cuppa tea, you can swap it for an equal weight of mascarpone cheese, which gives a slightly richer, milder flavour profile, or switch entirely to a classic American vanilla buttercream.
How should I store leftovers to keep this tropical delight tasting fresh?
Because of the cream cheese frosting, this cake definitely needs refrigeration don't leave it out on the counter like a plain Victoria Sponge. Cover any cut edges well with extra frosting or plastic wrap, and it should keep beautifully in the fridge for about three to four days.
I only have one 9 inch cake pan; can I still make this recipe, or will it mess up the baking time?
If you only have one 9 inch pan, you'll need to bake in two batches, as the batter is quite substantial. You can still use the recipe, but the baking time will increase significantly perhaps closer to 45-50 minutes so check with a skewer frequently to prevent drying out the bottom layer.
Is the toasted coconut garnish essential, and how do I stop it from falling off the sides?
The toasted coconut adds texture and a lovely nutty depth, so it’s highly recommended! To get it to stick to the sides, apply a thin 'crumb coat' of frosting first, chill the cake for 15 minutes, and then gently press the toasted flakes onto the chilled surface.
Pineapple Coconut Dream Cake

