The Ultimate Smoky Bbq Pulled Pork Mac Cheese Bake
- Why This Is the Only Pulled Pork Mac Cheese Recipe You Need
- Essential Components for Our Comfort Food Colossus
- Crafting the Silky Smooth Cheese Sauce (Roux to Richness)
- Troubleshooting and Pro Tips for a Perfect Bake
- Customizing Your Comfort: Delicious Pulled Pork Mac Cheese Variations
- Recipe FAQs
- 📝 Recipe Card
Why This Is the Only Pulled Pork Mac Cheese Recipe You Need
This isn't just another comfort dish; it’s a show stopping culinary collision. Our definitive Pulled Pork Mac Cheese recipe successfully merges the smoky, savory flavors of championship barbecue with the velvety, baked luxury of a truly great macaroni and cheese.
While the ingredients are straightforward, we elevate this classic using precise French technique for the sauce, ensuring a final product that is complex, deeply satisfying, and completely lump free.
Designed to feed six to eight hungry people, this recipe is a slightly challenging but ultimately rewarding endeavor, requiring about 60 minutes of active prep and cook time (assuming your Pulled Pork is already prepared).
Forget those dry, disappointing versions; this method guarantees a rich, creamy, and spectacularly flavorful Easy Casserole Recipes addition to your repertoire.
BBQ Meets Béchamel: The Flavor Fusion Strategy
The genius of this specific pulled pork mac & cheese recipe lies in the balance. We don't just dump meat on top of pasta; we integrate the smoky, slightly sweet bbq pork mac & cheese elements directly into the sauce and pasta mixture, creating a unified dish rather than two separate components sharing a pan.
We achieve this profound flavor profile by relying on a few key steps: utilizing a vinegar or bourbon based BBQ sauce that cuts through the richness, incorporating subtle spices like smoked paprika into the béchamel, and ensuring the pre-cooked meat is tender and shredded perfectly before mixing.
The Secret Weapon: Perfecting the Béchamel Base
A baked mac and cheese is only as good as its foundational sauce. Many recipes skip straight to melting cheese, resulting in oily, grainy results. We start with a classic béchamel a white sauce thickened with a butter and flour roux which provides a robust, stable base that can effortlessly hold copious amounts of cheese and stand up to the heat of the oven without splitting.
This technical foundation is essential for achieving that restaurant quality, silky mouthfeel.
Essential Components for Our Comfort Food Colossus
To achieve the ultimate richness required for this level of Pulled Pork Mac Cheese , sourcing and preparing the correct ingredients and tools is non-negotiable. This section details the building blocks necessary before we even touch the heat.
Selecting the Supreme Cheese Blend for Maximum Creaminess
The cheese blend is what defines this dish. For the deepest flavor, we use a dominant quantity of sharp yellow or white cheddar (about twelve ounces), which provides the classic tangy bite. To ensure maximum melt and stretch, we pair the cheddar with four ounces of Monterey Jack or Gruyère.
Crucially, always shred the cheese yourself using a box grater. Pre-shredded varieties often contain anti caking starches that can lead to a gritty béchamel, ruining the smooth texture we are aiming for.
Non-Negotiable Tools: Preparing for the Ultimate Bake
Success in this recipe relies heavily on the right equipment. You will need a large stockpot for boiling the pasta, but the true hero is the heavy bottomed saucepan. This pan provides even heat distribution necessary for mastering the delicate roux without burning.
Plus,, a sturdy whisk is indispensable for smooth sauce making, and the final dish will require a well greased 9x13 inch baking dish for the ultimate bake.
Preparing the Pulled Pork: Flavor Infusion vs. Sauce Slather
For this recipe, we assume the meat component is pre-cooked. Whether you prepared it via smoking or used a convenient pulled pork mac and cheese crock pot method, the preparation before assembly is key.
We integrate approximately two cups of warm or room temperature shredded Pulled Pork with one cup of a high-quality, flavorful BBQ sauce. Tossing the meat in the sauce before mixing it into the pasta ensures every bite of this massive Pork Dishes centerpiece is perfectly coated, delivering that desirable smoky and tangy punch.
Related Recipes Worth Trying
- Easter Egg Fruit Pizza Buttery Cookie Crust Strawberry Cream Cheese Swirl — Forget faffing about with tiny treats This spectacular Easter Egg Fruit Pizza uses a buttery sugar cookie base and tangy strawberry cream cheese A...
- SoftBaked Cinnamon Roll Sugar Cookies with Cream Cheese Glaze — Capture that sticky bun joy without the yeast fuss These Cinnamon Roll Sugar Cookies are rolled spiced and topped with tangy cream cheese frosting Perfect...
- The Liberty Bell Banger Philly Cheesesteak Stuffed Shells Recipe — Love a Philly Cheesesteak Try this fusion savoury steak and sharp cheese tucked into jumbo pasta shells smothered in Provolone Mornay Pure comfort food magic
Crafting the Silky Smooth Cheese Sauce (Roux to Richness)

The creation of the cheese sauce is where simple ingredients transform into liquid gold. This process requires patience and technique, starting with the foundation that defines the texture and richness of the finished mac.
The Golden Ratio: Mastering the Flour and Butter Roux
A roux is equal parts fat (butter) and starch (flour) by weight, used to thicken the sauce while adding a slightly nutty depth of flavor. In your heavy bottomed saucepan, melt four tablespoons of unsalted butter over medium heat. Whisk in a quarter cup of all-purpose flour.
Cook this mixture, stirring constantly, for one to two minutes. It should smell gently toasted and nutty, like popcorn, but must not be allowed to brown. Cooking the roux properly eliminates the raw flour taste, which is essential for a refined cheese sauce.
Incorporating Dairy: Tempering for a Lump Free Finish
Once the roux is cooked, it’s time to incorporate the dairy. We use four cups of whole milk, which should be slightly warmed a crucial tip to prevent the mixture from seizing up. Gradually whisk in the milk, starting slowly to emulsify the roux base and prevent lumps from forming.
Increase the heat to medium high, continuing to stir until the mixture thickens significantly, coating the back of a spoon, which usually takes five to seven minutes. Once thickened, remove the pan from the heat immediately.
Stir in the flavoring agents: Dijon mustard, smoked paprika, a pinch of nutmeg, and finally, salt and pepper. Now, add your freshly shredded cheese blend, one handful at a time, stirring until each batch is fully melted before adding the next.
Keeping the heat off during this stage prevents the cheese proteins from splitting, ensuring a gorgeously smooth sauce.
Al Dente Assurance: Cooking Pasta for a Baked Dish
For any baked mac and cheese, the pasta must be undercooked on the stovetop. Bring a large stockpot of salted water to a rapid boil. Add one pound of dry pasta (elbows or cavatappi work wonderfully) and cook it for precisely two minutes less than the package instructions.
This ensures it is al dente . If you cook it fully now, the pasta will continue to absorb the sauce and turn mushy during the baking process. Drain the pasta immediately and toss it with a tablespoon of neutral oil to prevent it from sticking together while you complete the sauce.
The Final Act: Adding the Crunchy Panko Topping
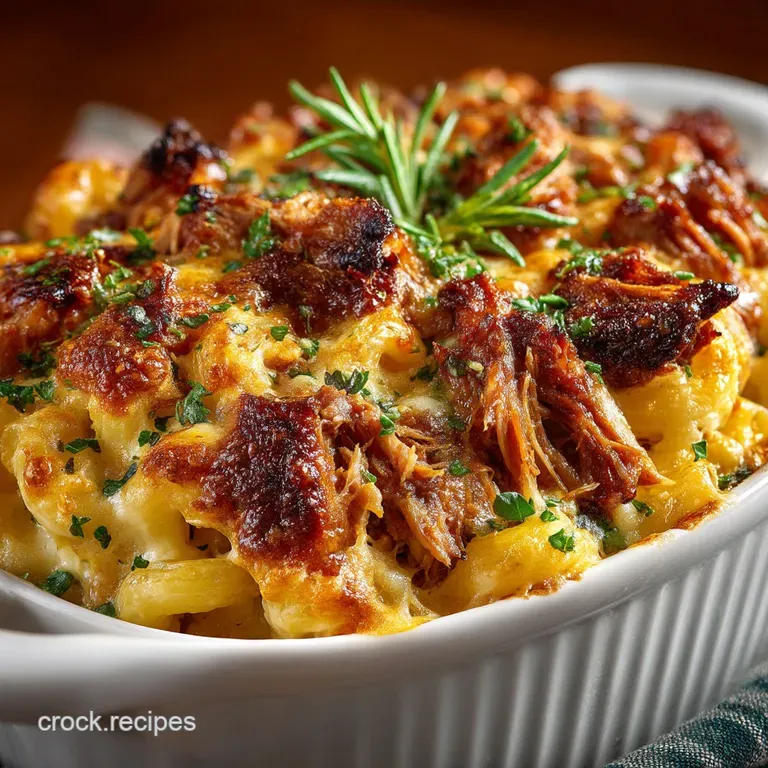
Once the pasta and cheese sauce are combined, gently fold in the sauced pulled pork mixture. You want streaks and pockets of the smoky meat throughout the creamy pasta; don't overmix. Pour this comfort food concoction into your prepared 9x13 baking dish.
To ensure a beautiful, crunchy contrast to the creamy interior, prepare the topping by mixing half a cup of Panko breadcrumbs with two tablespoons of melted butter. Scatter this buttery Panko evenly over the surface.
Bake at 375°F (190°C) for twenty to twenty five minutes, or until the sauce is bubbly and the topping is golden and crisp. Allow a mandatory five minute rest period after removing it from the oven to let the sauce set before serving.
This rest is key to maintaining structural integrity when dishing out your masterpiece.
Troubleshooting and Pro Tips for a Perfect Bake
Achieving the perfect mac and cheese requires attention to detail. The greatest challenge lies in maintaining a consistently smooth sauce and preventing the final dish from becoming dry or mushy.
Pro Tip 1: The Temperature Rule. As mentioned in the sauce section, cold milk will shock the hot roux, resulting in lumps. Always use room temperature or slightly warmed milk. Likewise, ensuring the heat is off when incorporating the cheese guarantees a non-grainy sauce.
Pro Tip 2: Under Cook, Every Time. The decision to cook the pasta two minutes under time is non-negotiable. That extra cooking time happens in the oven. Trust the process; this prevents the starches from breaking down too much, guaranteeing a firm but tender result in the finished pulled pork mac & cheese bowl .
Pro Tip 3: Rest is Best. After pulling the baked casserole from the oven, the sauce is molten and unstable. Allowing the dish to rest for five minutes permits the temperature to drop slightly, allowing the sauce to thicken and cling perfectly to the pasta and pork when served.
Customizing Your Comfort: Delicious Pulled Pork Mac Cheese Variations
The foundation of this recipe is sturdy enough to allow for delightful customizations, adapting it for everything from party snacks to unique main courses. This recipe can easily transform into pulled pork mac cheese sliders by spooning it onto Hawaiian rolls, or into individual portions served in small bowls.
Preventing Graininess: How to Fix a Broken Cheese Sauce
If you rush the process or allow the cheese to get too hot after adding it, the fat can separate from the protein, leaving you with an oily, grainy mess. The best prevention is keeping the heat off, but if disaster strikes, try adding a tablespoon of cold milk or heavy cream and whisking vigorously.
The introduction of cold dairy can sometimes re-emulsify the sauce.
Making Ahead: Storing the Mac Cheese Base Safely
This recipe is a wonderful option for prepping ahead of time, a true standout among Easy Casserole Recipes . Complete the dish up to the point of adding the Panko topping. Cover the baking dish tightly and refrigerate for up to 24 hours.
When ready to bake, allow the dish to come to room temperature for 30 minutes before adding the topping and baking as directed. Note that cold mac and cheese may require an additional 5- 10 minutes in the oven.
Reheating Strategies: Keeping That Crispy Top Intact
Leftovers of BBQ pork mac & cheese should ideally be reheated in the oven, not the microwave. The microwave tends to steam the crispy Panko topping. For individual portions, place them in an oven safe dish and tent lightly with foil.
Remove the foil for the last five minutes to ensure the topping re-crisps.
Spice It Up: Adding a Kick with Chipotle and Chili Powder
For those who enjoy a little heat alongside their smoke, incorporating spice is simple and effective. Alongside the smoked paprika, stir in one to two teaspoons of chipotle powder or chili powder directly into the béchamel base after you remove it from the heat but before adding the cheese.
This adds a smoky, earthy heat that complements the Pulled Pork .
Gluten-free and Dairy Swaps: Adapting the Recipe Successfully
The versatility of this dish allows for dietary modifications. To make the recipe gluten-free, substitute the all-purpose flour in the roux with an equal amount of cornstarch mixed into a small slurry of water, though you will lose some of the depth of the cooked roux.
For dairy substitutions, while whole milk offers the best richness, you can use 2% milk, provided you supplement it with two tablespoons of heavy cream to maintain the required body in the cheese sauce.
Use certified gluten-free pasta varieties, and your Pulled Pork Mac Cheese will remain spectacular.
Recipe FAQs
I'm short on time can I use shop bought pulled pork, or should I make it from scratch?
This recipe assumes the pulled pork is already cooked and shredded, which is a real time saver so yes, using a quality shop bought tub or excellent leftovers from a Sunday roast is absolutely fine!
If you are preparing it yourself, slow cook the pork shoulder until it's fork tender and shred it before mixing thoroughly with your chosen BBQ sauce. The quality of the pork really shines through, so don't skimp if you can help it!
Oh blimey, my cheese sauce is lumpy! Is it ruined, or can I save the béchamel?
Don't panic, it’s usually salvageable! A lumpy sauce often means the roux wasn't properly cooked or the milk was added too quickly. You have two options: either pass the entire sauce through a fine mesh sieve into a clean pan to catch the rogue lumps, or, even easier, use an immersion blender for about 30 seconds to smooth it out completely.
Remember to warm your milk slightly next time, which helps prevent this common cooking hiccup.
What's the best way to store leftovers and reheat this Pulled Pork Mac Cheese without it going dry?
Leftovers of this comfort food colossus keep brilliantly, sealed tight in the fridge, for 3 4 days. When reheating, the key is moisture, as the pasta will have absorbed most of the sauce while chilling.
Add a splash of milk or chicken stock to your portion before microwaving, or, for best results, reheat in a low oven (covered with foil) until piping hot; this helps re-emulsify the cheese sauce, keeping it creamy.
For this Ultimate Smoky BBQ Pulled Pork Mac Cheese, does the type of BBQ sauce really matter?
It absolutely does! The BBQ sauce acts as the primary seasoning for the pulled pork, and therefore for the entire dish. We recommend a vinegar or bourbon based sauce because the acidity cuts through the extreme richness of the creamy cheese and pork, stopping the final result from being too heavy or cloying.
Avoid overly thick or sugary sauces if you can, as they can overwhelm the delicate cheese flavour.
I need to cater for guests can I make this whole dish ahead of time, or can I freeze portions?
You can definitely prep this ahead! Assemble the entire dish (Steps 1-4), pour it into your baking tray, and skip the topping and the final bake. Cover it tightly and refrigerate for up to 24 hours.
When ready to serve, sprinkle on the Panko topping and add about 10 15 minutes to the baking time to ensure it heats through completely. We don't recommend freezing the finished dish, however, as the pasta texture can suffer when thawed.
Ultimate Bbq Pulled Pork Mac Cheese