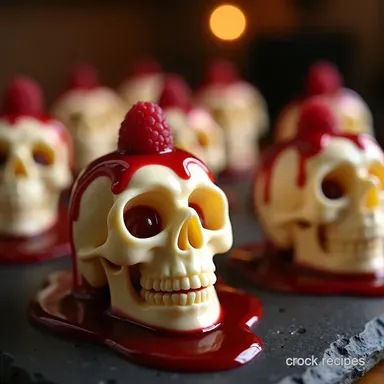
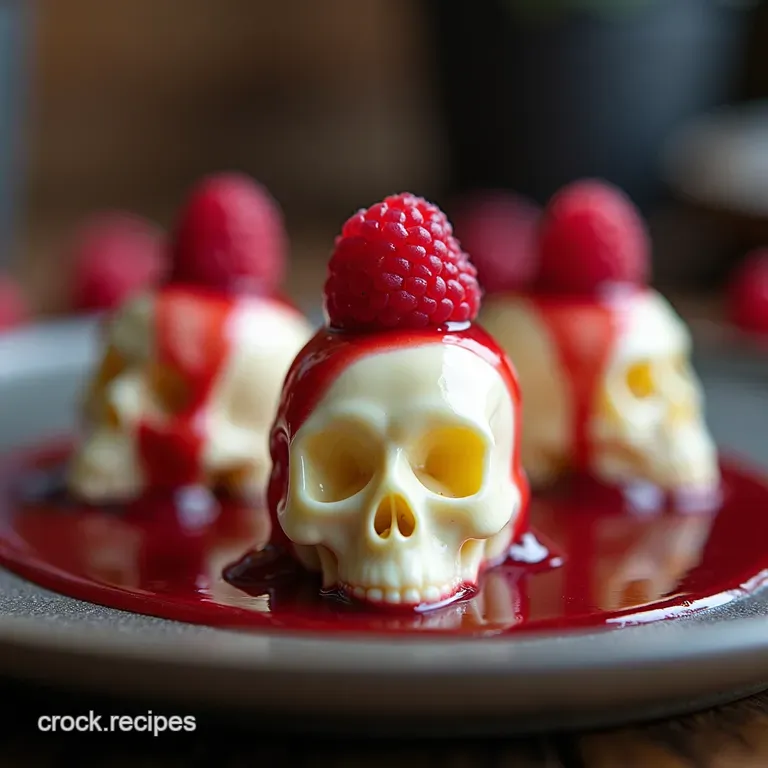
The Ghostly Grin Decadent White Chocolate Skull Mousse Domes with Raspberry Blood Coulis
- Crafting Creepy-Chic: Why These Mousse Domes Define Halloween Elegance
- Beyond Basic Bonfires: Introducing Your Signature White Chocolate Skulls Dessert
- Gathering the Ghoulish Goods: Essential Components for Skull Formation
- Precision Pantry: Sourcing High-Quality Dairy and Flavor Agents
- The Architect’s Blueprint: Assembling the Mousse Dome Structure
- Forging the Final Form: Demolding and Detailing Your White Chocolate Creation
- The Crimson Cascade: Preparing the Raspberry 'Blood' Coulis
- Pro Tips for Polishing Your Spooktacular White Chocolate Skulls Dessert
- Recipe FAQs
- 📝 Recipe Card
Crafting Creepy Chic: Why These Mousse Domes Define Halloween Elegance
When the air turns crisp and the shadows deepen, it’s time to elevate the usual fare of frights. While popcorn balls and candy corn have their place, true culinary artistry during Halloween demands something more refined. We aren't just making snacks; we are engineering edible centrepieces.
This quest for the spectacular leads us directly to the creation of White Chocolate Skulls Dessert —a dish that perfectly balances sophisticated flavour with a necessary dose of the macabre.
Forget messy, overly sweet concoctions; we are aiming for creepy chic , where meticulous structure meets decadent taste.
Beyond Basic Bonfires: Introducing Your Signature White Chocolate Skulls Dessert
If you’ve been searching for standout Halloween Themed Desserts that will impress seasoned party goers, look no further. This recipe, "The Ghostly Grin: Decadent White Chocolate Skull Mousse Domes with Raspberry 'Blood' Coulis," transforms humble ingredients into an absolute showstopper.
It’s designed to be surprisingly approachable, though it demands precision a hallmark of great pastry work. This isn't merely about covering something in green food dye; it’s about structure, mouthfeel, and contrast.
The Allure of the Eerie Edible Art Piece
The magic of this creation lies in its duality. Visually, it delivers on the spooky promise, using specialized silicone moulds to achieve detailed, three dimensional skulls. Yet, the taste profile is pure luxury.
We swap out the traditional heavy frostings for a silky white chocolate mousse, encased within a delicate structure. This makes it one of those Creepy Chic Desserts that delights guests before they even take the first bite.
Achieving the Perfect 'Ghostly Grin' Aesthetic
The key to making these spooky snacks successful is ensuring the mousse fills the mould perfectly. This requires careful temperature management when folding the whipped cream into the melted chocolate base.
Any inconsistencies, such as undissolved gelatin or air pockets near the eyes, will compromise the final presentation upon demoulding. We aim for a flawless, pale canvas ready for its dramatic accompaniment.
Why Creamy White Chocolate Trumps Fright Factor
While dark chocolate might traditionally suit the Halloween mood, using high-quality white chocolate here is intentional. It provides a neutral, creamy base that absorbs and complements the tartness of the accompanying coulis beautifully.
This choice ensures that the resulting Halloween Sweets Ideas are rich without being overwhelmingly heavy, securing its place among the best Halloween Treats Desserts .
Gathering the Ghoulish Goods: Essential Components for Skull Formation
Creating these domes requires a slightly more specialized toolkit than your average batch of cookies, but these items are well worth the investment for future seasonal baking. Since this dessert yields 6 individual servings , ensure your moulds match this capacity.
The complexity level falls into the Medium category; the active work is around 45 minutes, but the necessary chilling time pushes the Total Time to about 7 hours, making this an overnight affair for perfection.
The foundation of each dessert is a crisp Almond Shortbread Base . For this, you’ll need 100g of All-Purpose Flour, 50g of cold, cubed Unsalted Butter, 30g of Granulated Sugar, 25g of Ground Almonds (Almond Meal), and a pinch of Fine Sea Salt.
These simple components bake quickly about 12 minutes at 350° F ( 175° C) providing the necessary textural counterpoint to the soft mousse.
Precision Pantry: Sourcing high-quality Dairy and Flavor Agents

The success of any mousse hinges on the quality and treatment of its core ingredients. For a truly exceptional White Chocolate Skulls Dessert , we must pay close attention to the chocolate and the stabilizers.
The Meltdown Mandate: Selecting Premium White Chocolate Bars
Since white chocolate is the star, its quality is non-negotiable. We call for 150g of high-quality White Chocolate , ideally one with at least 30% cocoa solids, finely chopped.
Using baking bars rather than chips helps ensure a smoother melt without the need for additional stabilizers that chips often contain.
Mousse Mastery: Stabilizers and Sweeteners for the Ideal Texture
To ensure the mousse holds the intricate shape of the skull for beautiful presentation, stabilization is crucial. We utilize 2 sheets of Gold strength Gelatin (or about 1 teaspoon of powdered gelatin), bloomed in cold water.
This is dissolved into 60ml of Whole Milk warmed with 25g of Granulated Sugar . For that signature smooth mouthfeel, 240ml of cold Heavy Cream will be whipped separately to soft peaks and gently folded in.
Tools of Terror: Specialized Silicone Skull Molds Required
There is no substitute here: Silicone Skull Moulds that offer deep, clear detail are the single most important piece of equipment. These flexible moulds allow for the clean release of the chilled mousse, maintaining the integrity of the eye sockets and cheekbones, essential for creating believable Halloween Treats Desserts .
A stand mixer or hand mixer will save significant effort when whipping the cream.
Related Recipes Worth Trying
- Best Homemade Salted Caramel Truffles Recipe Rich Dark Chocolate — Forget the fuss Master these decadent homemade salted caramel truffles with our foolproof threestep method for the best truffle recipes A true showstopper
- Ultimate Caramel Apple Tarte Tatin Recipe Classic Apple Dessert Recipes — Master the classic French Tarte Tatin This is the perfect recipe for achieving deep rich caramel in your apple dessert recipes A foolproof guide to flip...
- The Black Magic Chocolate Loaf Foolproof Deeply Moist — Tired of dry sponges This easy Chocolate Cake Recipe uses simple secrets for an intensely rich velvety crumb Your new goto from scratch bake
The Architect’s Blueprint: Assembling the Mousse Dome Structure
The first stage involves preparing the crunchy anchors. Once the shortbread dough is mixed, chilled, and cut into circles slightly larger than the base of your moulds, they must be baked until pale gold. While those cool, attention shifts to the heart of the dessert: the mousse.
The technique involves creating a luscious white chocolate ganache base first. The dissolved gelatin/milk mixture is poured over the chopped chocolate and stirred until perfectly smooth, then allowed to cool to lukewarm. This step is vital; if the mixture is too hot, it will deflate the whipped cream.
Once cooled, the cream is folded in carefully, ensuring you integrate every last bit of the lighter component into the denser chocolate base without losing volume.
Forging the Final Form: Demolding and Detailing Your White Chocolate Creation
After the mousse is piped or spooned into the silicone moulds and has set in the refrigerator for a minimum of six hours (overnight is best), the moment of truth arrives. A common trick for a clean release is briefly placing the bottom of the mould into very warm water for mere seconds before inverting.
Immediately unmoulding reveals the polished, white structure.
Brushwork and Bling: Painting Shadows onto Your Edible Skulls
While the white skull is inherently striking, you can use cocoa powder dusted lightly through a fine sieve around the base to suggest dark earth, enhancing the overall dramatic presentation of these Easy Halloween Desserts .
For those seeking a more defined look, a tiny brush dipped in thinned cocoa or edible black dust can be used to lightly shadow the eye sockets and teeth.
The Crimson Cascade: Preparing the Raspberry 'Blood' Coulis
No self respecting skull is complete without its dramatic counterpoint. The Raspberry ‘Blood’ Coulis provides the necessary visual and flavour contrast to cut through the richness of the white chocolate.
Whipping the Whisper: Creating the Lightest White Chocolate Mousse Base
As detailed above, achieving the light texture involves working the chocolate base to the correct temperature before gently folding in the whipped cream this ensures the mousse remains airy, a whisper of flavour rather than a heavy cloud.
Chilling to Perfection: Setting the Domes for Structural Integrity
The extended chilling time is non-negotiable. It ensures the gelatin has fully set the mousse, giving the final White Chocolate Skulls enough rigidity to stand upright on their shortbread bases without slumping or losing definition.
Flavor Finessing: Variations on the Decadent Theme
To elevate the fruit component, we combine 200g of Raspberries with 30g of Caster Sugar , a splash of water, and 1 tsp of Lemon Juice .
Simmering this mixture gently for about 7 minutes, followed by pressing it through a fine sieve, yields a vibrant, seedless, intensely tart sauce the perfect foil for this among Halloween Desserts .
Pro Tips for Polishing Your Spooktacular White Chocolate Skulls Dessert
To ensure your efforts result in stunning, Instagram worthy results, remember that temperature control is your best friend throughout the mousse making process. Pay special attention when folding the cream into the chocolate base; the goal is incorporation without deflation.
Troubleshooting Temperamental Chocolate: Avoiding Bloom and Smudges
If your white chocolate seizes or becomes grainy, it’s usually due to water contamination or overheating. Always ensure your bowl is perfectly dry. If you notice greyish streaks after unmoulding, this is fat bloom, often caused by temperature fluctuation during setting. Ensure the chilled environment is stable.
Storage Secrets: Keeping Your Skulls Fresh Until Hallow's Eve
These finished desserts should be stored in an airtight container in the refrigerator. They are best assembled (plating the base, skull, and coulis) no more than 2 hours before serving to keep the shortbread crisp and the coulis vibrant.
Marble Swirl Upgrades: Incorporating Dark Chocolate Veining
For an added layer of visual interest among your Spooky Snacks , you can reserve about one-quarter of the melted white chocolate base before folding in the cream.
After filling the moulds halfway, drizzle the plain dark chocolate into the remaining white chocolate mousse, swirl once or twice with a skewer, and then finish filling the mould. This creates beautiful, subtle marbling.
Pairing Pointers: What Beverages Complement This Rich Treat?
The richness of the cream and white chocolate demands something bright to accompany it. A lightly sweet, slightly effervescent wine like Moscato d’Asti cleanses the palate beautifully.
Alternatively, a strong, chilled Earl Grey tea offers a tannic counterpoint that surprisingly complements the vanilla notes of the chocolate.
Recipe FAQs
I'm a beginner; how tricky is the moulding process for the White Chocolate Skulls Dessert?
Don't sweat it; while it requires precision, it's totally achievable! The trickiest bit is making sure you tap all the air bubbles out of the mousse once it’s in the silicone mould. If you don't, you might end up with a slightly pock marked skull, but it will taste brilliant nonetheless.
Patience when unmoulding is key a quick dip in warm water helps things slide right out!
Can I make these ahead of time, or is this a last minute job?
This dessert absolutely demands advance planning it’s perfect for prepping the day before your event. The mousse needs a minimum of six hours to set properly, but overnight is highly recommended for the best results and crispest unmoulding.
Just keep them chilled, and they’ll be ready to plate up when your guests arrive.
My white chocolate seized up when I tried to mix it! What went wrong with my mousse?
That’s a classic kitchen wobble! White chocolate is notorious for seizing if it gets too hot or if too much liquid is introduced too quickly. You likely added the warm milk mixture to the chocolate before it cooled down enough, or you whisked too vigorously.
Next time, let the melted chocolate cool until it's just lukewarm before folding in the whipped cream that prevents curdling.
I need to avoid gelatin. Can I still make the White Chocolate Skulls Dessert?
Absolutely, you can skip the animal products! You'll want to substitute the gelatin with a vegan alternative like Agar Agar powder, usually around half a teaspoon for this quantity, but be warned that it sets very firmly.
Alternatively, you could try a recipe that uses only a very stiffly whipped cream folded into a thick white chocolate ganache, though the structure might be slightly softer.
The raspberry 'blood' coulis sounds messy are there alternative flavourings for the topping?
If you’re not feeling the dramatic ‘blood’ look, you have plenty of options to complement the rich white chocolate. A shiny mirror glaze tinted deep purple (using blackcurrant or blackberry) looks very elegant, or simply dust the skulls lightly with icing sugar for a ghostly, frosted effect.
A drizzle of salted caramel sauce is also a posh alternative!
White Chocolate Skulls Dessert