Fivestar Fancies Decadent Chocolate Peanut Butter Mini Cheesecakes

The Ultimate Bite Sized Indulgence: Introducing Our Mini Cheesecakes
Forget the fuss of slicing and serving a towering dessert! These Chocolate Peanut Butter Mini Cheesecakes represent the pinnacle of indulgence distilled into perfect, single serving portions.
We’ve taken the iconic, beloved pairing of rich chocolate and salty sweet peanut butter and miniaturized it into what can only be described as an intensely satisfying treat. Inspired by classic American diner desserts but elevated for the discerning home baker, these Peanut Butter Cheesecake Bites eliminate portion anxiety entirely.
They are dense, creamy, perfectly tangy, and feature a satisfyingly crunchy dark chocolate cookie base a guaranteed showstopper for any gathering, or simply for a quiet evening treat.
Why Portion Perfection Matters for This Classic Flavor Duo
The alchemy between chocolate and peanut butter is legendary in the dessert world. When you shrink this combination down, the flavour intensity seems to amplify. These Mini Peanut Butter Cheesecake delights are designed to deliver that full bodied richness without overwhelming the palate, offering a satisfying finish that leaves you feeling content rather than stuffed.
A Sophisticated Twist on Comfort Food Classics
While the flavour profile leans heavily on nostalgic comfort, the execution here is all about refinement. We are moving beyond the realm of simple squares and aiming for a texture that is smooth, silken, and entirely luxurious.
The careful balance of tangy cream cheese against the depth of the chocolate crust creates a sophisticated experience worthy of any five star menu.
Unveiling the Magic Behind Chocolate Peanut Butter Mini Cheesecakes
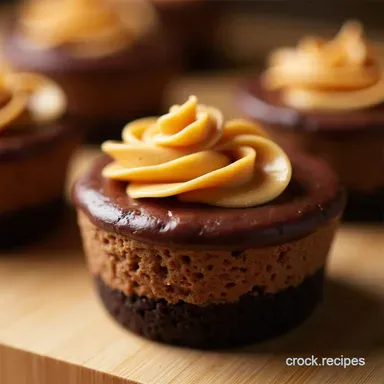
What makes this specific iteration of Peanut Butter Chocolate Cheesecake so compelling is the textural contrast. We start with a sharp, dark chocolate cookie crust, followed by a velvety cheesecake filling that must remain perfectly smooth.
The final touch involves swirling in a homemade peanut butter mixture, creating a beautiful marbled effect that ensures every bite of these Mini Chocolate Peanut Butter Cheesecakes offers a harmonious blend of all core elements.
Effortless Elegance: Perfect for Any Occasion
With only 35 minutes of active preparation time, plus mandatory chilling, these Mini Cheesecake Recipes Chocolate style are surprisingly accessible. They are ideal for everything from impromptu dessert cravings to serving at elegant brunches.
They look incredibly polished, especially when drizzled with Chocolate Covered Mini Cheesecakes style melted chocolate, yet require no complex plating whatsoever.
Assembling Your Confectionery Components

Crafting truly exceptional Chocolate Peanut Butter Mini Cheesecakes relies on high-quality components treated with respect. While the recipe is straightforward, understanding the role of each ingredient ensures a flawless final product.
Remember, the goal is a smooth, lump free filling that sets beautifully.
Essential Tools for Cheesecake Craftsmanship
Before you begin mixing, gather your equipment. For this recipe, which yields 12 standard muffin tin sized portions, you will need a standard 12-cup muffin tin, ideally lined with silicone or paper liners for easy extraction of these delicate Peanut Butter Cheesecake Balls .
A food processor is highly recommended for achieving the fine crumbs needed for the base, and an electric mixer (stand or handheld) will be essential for whipping the cream cheese to the correct airy texture.
The Foundation: Creating the Deep Chocolate Cookie Crust
The base sets the stage. For the deep chocolate cookie crust, you will need approximately 1 ½ cups of finely crushed chocolate sandwich cookies the entire cookie, cream and all, provides the perfect amount of binding fat. These crumbs are mixed with 6 tablespoons of unsalted butter, melted until liquid.
This mixture is pressed firmly into the base of each lined cup before being briefly baked for 8 minutes at 325° F ( 160° C). This initial bake ensures the crust is sturdy enough to hold the creamy filling without becoming soggy.
Perfecting the Cream Cheese Batter Blend
The heart of these Chocolate Peanut Butter Mini Cheesecakes is the filling. Begin with 24 ounces of full fat cream cheese, ensuring it is softened completely to room temperature this is non-negotiable for lump prevention.
This is beaten until fluffy before ¾ cup of granulated sugar is gradually incorporated. The crucial next step involves adding 2 large room temperature eggs, one at a time, mixing only until just combined after each addition. We aim for minimal air incorporation here to prevent cracking later.
Finally, stir in ¼ cup of heavy cream (or sour cream for a tangier result) and a pinch of salt.
Sourcing Premium Peanut Butter Elements
The swirl is where the distinct peanut butter flavour shines through. For this, you will combine ½ cup of creamy peanut butter with 2 tablespoons of granulated sugar and 1 teaspoon of pure vanilla extract. Whisk this mixture separately until it is smooth and easily dollop able.
If your chosen peanut butter is particularly stiff, a brief 10-15 second microwave zap will make it pliable for swirling.
Equipment Checklist: Muffin Tins and Beyond
Beyond the core mixing tools, ensure you have a good quality rubber spatula for scraping down the sides of the mixing bowl frequently. This ensures every bit of cream cheese is fully incorporated into the batter, leading to the smoothest possible texture in your final Mini Peanut Butter Cheesecake .
Related Recipes Worth Trying
- Healthy Meatloaf Muffins Easy Lean MiniLoaves Recipe — Ditch the dry loaf These Healthy Meatloaf Muffins are lean flavourpacked and perfect for Meatloaf Meal Prep Ready in under an hour
- NoFuss Mini Peanut Butter Cup Cheesecakes Recipe — These surprisingly simple Mini Peanut Butter Cup Cheesecakes bake up beautifully in a muffin tin Get the foolproof recipe for rich creamy mini desserts
- Decadent White Chocolate Skull Mousse Domes Halloween Dessert — Craft the ultimate creepychic White Chocolate Skulls Dessert These elegant domes are surprisingly easy and feature rich mousse atop a buttery base See the...
Mastering the Assembly: step-by-step Baking Guide
With your components prepared, the assembly phase requires careful layering to ensure structural integrity and visual appeal. Once the crusts are slightly cooled from their initial bake, you are ready to layer.
Preparing the Mini Muffin Tins for Success
Line your 12-cup muffin tin meticulously. While paper liners are fine, silicone liners often release the Peanut Butter Cheesecake Bites with far less resistance, maintaining their perfect circular shape. Ensure the liners sit neatly within the cups.
Building the Layers: Pressing the Crust Base
After the 8-minute pre-bake, remove the crusts and let them rest while you prepare the filling. Use the base of a small glass or spoon to firmly pack the buttered crumbs into the bottom of each cup. A dense base prevents breakage when serving these Chocolate Peanut Butter Mini Cheesecakes .
Blending the Cheesecake Filling Components Without Overmixing
As detailed earlier, the key to the filling texture comes after the eggs are added. Once the eggs are incorporated, switch to folding everything together with a rubber spatula until you see no streaks of white or yellow, but stop immediately.
Overmixing at this stage introduces air bubbles that expand during baking, creating those tell tale fissures on the surface.
Crucial Cooling Times for Optimal Setting
After filling the cups about three quarters full and dropping the peanut butter dollops on top, the baking is quick only 18 to 22 minutes at 325° F ( 160° C). The most critical part follows: the cooling.
Immediately after baking, turn the oven off, prop the door open slightly (a wooden spoon works perfectly), and allow the cheesecakes to cool inside the oven for a full hour.
This gradual temperature reduction is essential for preventing surface cracks on your Peanut Butter Chocolate Cheesecake .
Troubleshooting and Elevating Your Batch
Even expert bakers encounter minor hiccups. Understanding how to manage temperature changes and how to enhance the final presentation will elevate these from good to truly exceptional.
Expert Tips for Preventing Cracks in Your Mini Treats
Temperature shock is the nemesis of cheesecake. Beyond the slow cooling method in the oven, ensure all your dairy components cream cheese, eggs, and heavy cream are genuinely at room temperature before mixing.
If you opt to use a water bath (though often unnecessary for mini versions), place the muffin tin inside a larger roasting pan and fill the larger pan halfway up the sides of the muffin tin with hot water before baking.
Creative Topping Variations Beyond the Basics
While a simple drizzle of melted dark chocolate and a sprinkle of chopped peanuts transforms these into Chocolate Covered Mini Cheesecakes , don't stop there.
Consider garnishing with miniature peanut butter cups crumbled on top, a light dusting of cocoa powder, or a swirl of salted caramel sauce just before serving. These small additions boost visual appeal and flavour complexity in these Mini Cheesecake Recipes Chocolate focused treats.
Calculating Approximate Nutritional Value
While specific figures depend on your brand choices (especially the cookie base and peanut butter), you can estimate that each of these Peanut Butter Cheesecake Bites clocks in around 320 350 calories.
They contain a moderate amount of carbohydrates from the crust and sugar, balanced somewhat by the protein and fat content of the cream cheese and peanut butter. Treat them as the decadent indulgence they are!
Best Practices for Freezing Chocolate Peanut Butter Mini Cheesecakes
These miniature marvels freeze exceptionally well, making them perfect for advance preparation. After they have fully chilled in the refrigerator (at least 4 hours), arrange the Chocolate Peanut Butter Mini Cheesecakes on a baking sheet and place them in the freezer until solid.
Once frozen, transfer them to an airtight container, separating layers with parchment paper. They will keep well for up to three months. To thaw, simply move them to the refrigerator overnight before serving.
Recipe FAQs
Can I make these Chocolate Peanut Butter Mini Cheesecakes ahead of time, or do they need to be eaten right away?
These are perfect for making ahead! In fact, they taste even better once they’ve had a good long chill. Store them tightly covered in the refrigerator for up to 4 days. If you need to freeze them, skip the final drizzle garnish, freeze them solid on a tray, and then transfer them to an airtight container for up to a month.
My cheesecake batter looked lumpy; will my Chocolate Peanut Butter Mini Cheesecakes still turn out alright?
A slightly lumpy texture usually means your cream cheese wasn't quite at room temperature, which is the main culprit. While they might not be as silk smooth as a professional bakery version, they will certainly still taste divine!
Give the batter one final, thorough scrape down and beat on low speed; the baking process often smooths out minor lumps.
Do I absolutely need to use a muffin tin with liners for these mini cheesecakes?
Liners (especially silicone ones) make removal significantly easier, preventing sticking and cracking when lifting them out think of it as essential armour for your delicate treats!
If you must skip liners, grease and flour the muffin tin cups very thoroughly, but be prepared for a bit more delicate handling when serving.
What’s the trick to stopping the tops from cracking while they bake or cool?
The two cardinal sins of cheesecake baking are overmixing the eggs and shocking the cake with a sudden temperature change. Always mix eggs only until just combined, and crucially, follow the slow cooling method: turn the oven off and leave them inside with the door slightly ajar for an hour to acclimatise gently.
Can I substitute the peanut butter for another type of nut butter, like almond or cashew butter?
Absolutely, go for it! If you fancy a different flavour profile, almond or cashew butter works splendidly and maintains that necessary swirl texture. Just ensure whatever nut butter you choose is the smooth, shelf stable kind rather than the thin, oily natural varieties, as those can thin out your swirl too much.
Chocolate Peanut Butter Minis