Managed Temperature Sous Vide Wellington Bites
- Finally, a Foolproof Wellington that Won't Cause a Meltdown
- Why Sous Vide is Your Secret Weapon
- Conquering the Soggy Bottom Dread
- Preparation and Chill Factor
- The Essentials: Shopping List and Kitchen Kit
- Achieving the Impossible: Foolproof Wellington Bites
- Prep Stages: Dryness is Next to Godliness
- Managed Assembly Guide
- Pro Tips to Prevent Disaster
- Making Them Look Like A Million Quid (Serving Suggestions)
- Keeping Things Fresh (Storage Tips)
- Mix It Up, Mate! (Variations & Swaps)
- The Lowdown on Fuel (Nutrition Basics)
- Frequently Asked Questions
- 📝 Recipe Card
Finally, a Foolproof Wellington that Won't Cause a Meltdown
Oh my gosh, I know what you are thinking. Beef Wellington? Isn't that the most stressful dinner party dish ever? It used to be! Honestly, I once ruined an entire Christmas dinner trying to guess the internal temp.
Nightmare. But that was before I figured out how the entire process should be managed .
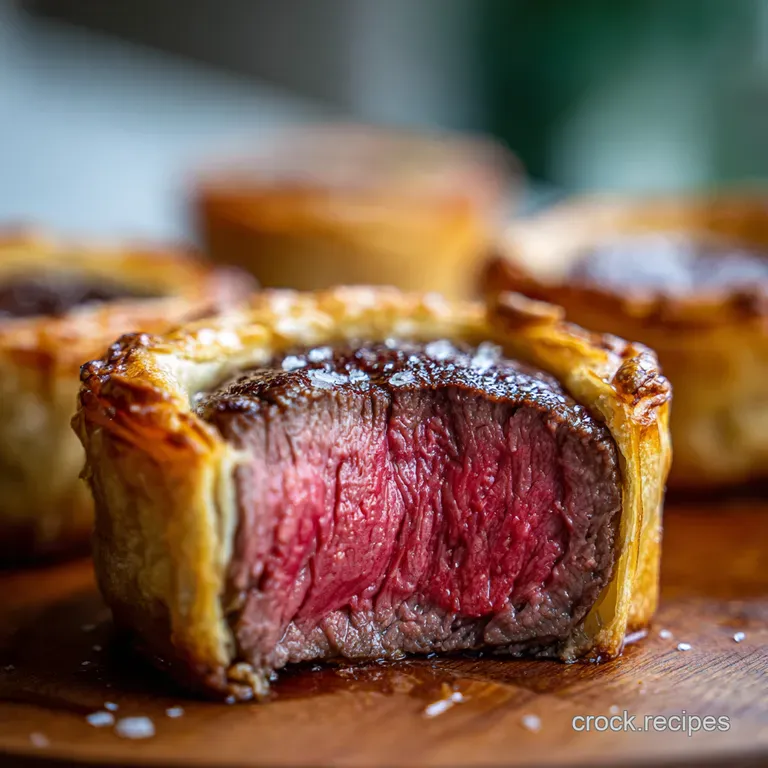
Forget everything you think you know about high stress cooking. We are making the ultimate classic, but mini: these incredible Sous Vide Wellington Bites ! This is the truly Foolproof Beef Wellington Recipe .
It’s elegant, rich, and totally delicious.
Why Sous Vide is Your Secret Weapon
This recipe takes a complicated British showstopper and brings it into the 21st century. Traditionally, getting that beef medium rare without burning the pastry felt like pure luck. We eliminate that chaos entirely.
By using Precision Low-Temperature Cooking with a Sous Vide Immersion Circulator preparation , we handle the hardest part first. That’s why I rate this a medium difficulty now.
The beef is cooked exactly right before it even touches the pastry.
Conquering the Soggy Bottom Dread
The real enemy of a good Wellington isn’t the temperature it’s moisture. That dreadful soggy bottom ruins everything! We tackle that head-on using two key tricks.
First, we perfect the essential Duxelles Moisture Management Technique . The mushroom paste must be bone dry. Second, we employ the vital Parma Ham Moisture Barrier before assembly.
This delicate ham absorbs any residual wetness.
The core benefit is control. Our Temperature Controlled Fillet Mignon guarantees a tender core at 55° C ( 131° F) every single time.
This entire system is a carefully Managed Assembly Guide for Beef Wellingtons , resulting in flakey pastry and juicy beef.
Preparation and Chill Factor
The only tricky part left is Mastering Puff Pastry Chilling Stages . I cannot stress this enough: chill everything! This recipe yields 12 gorgeous little bites.
Perfect for six generous servings or a dazzling starter platter for a party.
The total active time is only about 45 minutes, but you must respect the two hours minimum of chilling time.
Don't rush the chill! That rest time is crucial for learning How to Prevent Soggy Bottom Wellington . Ready to ditch the stress and impress your mates? Let’s check out the gear you’ll need.
The Essentials: Shopping List and Kitchen Kit
Okay, let's talk shop. This recipe is a genuine game changer. I know making Beef Wellington sounds fancy and scary. Honestly, I ruined three before I figured out the secrets! But this version? These Sous Vide Wellington Bites are a total Foolproof Beef Wellington Recipe .
It's all about control, mate.
Perfecting the Fillet
We are focusing on mini Wellingtons. That means small cuts of beef. Go for 600 g (1.3 lb) of centre cut beef fillet mignon.
Cut it into twelve even, thick medallions. Using the sous vide allows for perfect Precision Low-Temperature Cooking . This guarantees your beef is medium rare all the way through.
The internal temperature is totally managed .
For the outside, you need 12 slices of the best Parma Ham Moisture Barrier you can find. Seriously, good quality prosciutto acts like edible cling film.
Trust me, cheap ham rips too easily when wrapping.
Duxelles: The Flavour Engine
Next up is the mushroom paste, or Duxelles . This is where most cooks mess up. We need 400 g (14 oz) of mixed mushrooms.
They must be bone dry by the end. This is the absolute secret to How to Prevent Soggy Bottom Wellington .
Focus hard on the Duxelles Moisture Management Technique . Cook them down until they look like thick, savoury cement, not a soup! Use 60 ml (¼ cup) of dry sherry or Madeira for a rich, deep flavour.
It burns off the alcohol but leaves amazing complexity.
Necessary Kit and Chill Time
The equipment list is thankfully short. You absolutely need your Sous Vide Immersion Circulator preparation and a water bath. That’s non-negotiable for the perfect Temperature Controlled Fillet Mignon .
A heavy cast iron skillet is crucial for that fast, hot sear. We are creating a crust in 30 seconds, so it needs to be screaming hot.
The final key tool is the fridge. A successful Managed Assembly Guide for Beef Wellingtons relies on serious chill time.
We are talking hours, not minutes. This is how you achieve Mastering Puff Pastry Chilling Stages . If the pastry gets warm, your delicate, buttery layers just melt into a puddle.
Chill everything at every stage! I learned that the hard way. Waiting is vital for that beautiful, flaky finish. Get your kit ready!
Achieving the Impossible: Foolproof Wellington Bites
Honestly, the Beef Wellington used to be my cooking nemesis. I mean, how do you keep the pastry crisp while the centre cooks perfectly? It felt like mission impossible.
But here’s the secret, folks: it’s all about managed temperature. When you embrace Precision Low-Temperature Cooking using a Sous Vide Immersion Circulator preparation , you remove all the terrifying guesswork.
We are making miniature versions our glorious Sous Vide Wellington Bites and they are surprisingly easy! This is truly a Foolproof Beef Wellington Recipe .
Prep Stages: Dryness is Next to Godliness

Before we wrap anything, organization is key. This is your essential mise en place . First, get your Temperature Controlled Fillet Mignon out of the fridge.
While the beef is chilling (we’ll get to why that is so vital later), focus entirely on the mushrooms.
The single biggest fail point in any Wellington is moisture. We need to implement the Duxelles Moisture Management Technique .
- Chop It Fine: Finely mince your mushrooms, shallots, and garlic.
- Cook Hard: Sauté them over medium high heat. You must cook them until all the liquid has evaporated. When you push the mixture aside, no wet sheen should remain.
- Deglaze and Dry: Add the sherry and cook it down completely. Seriously, if you think it’s dry, cook it for another minute. This Duxelles Moisture Management Technique is non-negotiable.
- Chill Out: Spread the finished Duxelles thinly on a plate and pop it straight into the fridge to chill completely. 30 minutes minimum.
Managed Assembly Guide
Now for the fun part: wrapping. This needs to happen quickly, as chilled components are crucial for maximum puff.
- The Barrier: Lay out your thin slices of Parma Ham Moisture Barrier on cling film. Overlap them slightly.
- Spread Thin: Spread a very thin layer of the chilled Duxelles over the ham. Do not go thick here!
- Wrap the Beef: Place your pre-seared, chilled beef medallion on the edge. Use the cling film to pull the ham and Duxelles tightly around the beef, forming a neat cylinder. This tight wrap is essential for a beautiful final shape. This is your Managed Assembly Guide for Beef Wellingtons .
- The Super Chill: Roll them up tight like a Christmas cracker. Twist the ends. Now, back into the fridge. They need at least 1 hour here. This isn’t a suggestion; it’s the secret to Mastering Puff Pastry Chilling Stages .
Pro Tips to Prevent Disaster
Want to know How to Prevent Soggy Bottom Wellington ? Two words: Chill and Ham. The Parma Ham Moisture Barrier stops the juice from the beef from hitting the pastry directly.
I learned this the hard way. Once, I skipped the final chill, thinking, "Oh, 10 minutes will be fine." Rookie mistake.
The second that slightly warm assembly hit the oven, the butter melted immediately. It spread instead of rising! No puff, just sad, wet pastry.
So, here’s the key takeaway: once the Wellingtons are fully wrapped in pastry, they go back to the fridge for 30 minutes before baking.
This cold start ensures the oven's high heat (200° C ( 390° F) ) hits the butter and creates explosive steam, giving you that beautiful, airy flake.
Trust me, embrace the chill, and you’ll achieve culinary glory.
Hello there, fellow cook! I’m delighted you’re looking to tackle a dish that, while sounding intimidating, is completely achievable when you managed the temperature and prep stages precisely.
Honestly, using the Sous Vide Immersion Circulator preparation technique makes this whole process feel like cheating, but in the best way possible.
Making Them Look Like A Million Quid (Serving Suggestions)
You managed the hard work, so let’s talk about making these Sous Vide Wellington Bites look absolutely epic. Remember, after all that effort in Mastering Puff Pastry Chilling Stages , your bites need a quick rest.
Let them sit for five minutes when they come out of the oven. This helps the pastry set and keeps the meat juicy.
Serve these beauties simply. A clean white plate really makes that golden, flaky pastry pop. You don't need much gravy because the filling is so rich, but a spoonful of simple red wine reduction is pure heaven.
For the side, you want crunch and colour. Simple blanched asparagus or tenderstem broccoli, dressed lightly with lemon, cuts through the richness beautifully.
This elevates the whole Foolproof Beef Wellington Recipe into something truly spectacular.
Keeping Things Fresh (Storage Tips)
Leftovers? Is that even a thing when Wellingtons are involved? But just in case, if you have any of these perfect little Temperature Controlled Fillet Mignon bites remaining, store them airtight in the fridge.
They are safe and tasty for up to 3 days .
The eternal question: How to Prevent Soggy Bottom Wellington upon reheating? Never, ever use the microwave. That just turns the pastry into sad, wet tissue.
To bring back the crispiness, wrap them loosely in foil and pop them in a hot oven, about 180° C ( 350° F) .
After about 10 minutes, remove the foil for the final 5 minutes. That blast of dry heat will save the flake!
Mix It Up, Mate! (Variations & Swaps)
The beauty of this recipe structure is its flexibility. We achieved perfection thanks to the Managed Assembly Guide for Beef Wellingtons , but you can easily adapt the core filling.
If you have vegetarian friends coming over, swap the beef for a firm filling of roasted butternut squash and lentils.
You have to remember the strict Duxelles Moisture Management Technique here that veggie filling must be super dry before wrapping.
Also, if you’re not keen on Parma ham, don't fret. The ham is mainly there to act as the essential Parma Ham Moisture Barrier .
I once used very thin French crêpes brushed with Dijon mustard instead. It worked a treat! The mustard adds a nice tang too.
For seasonal flair, try adding chopped chestnuts to the Duxelles in the winter.
The Lowdown on Fuel (Nutrition Basics)
Look, this is a celebration dish. We aren’t pretending it’s a salad, are we? The main caloric component is the butter in the glorious puff pastry.
But using the Precision Low-Temperature Cooking method for the beef ensures you are eating lean, high-quality protein. The mushrooms pack in the fibre and essential B vitamins, helping managed metabolism.
You made something incredible and complicated taste easy. Embrace the richness! You deserve it.
Frequently Asked Questions
Why is the temperature control so managed in this recipe, and can I skip the sous vide altogether?
The term “managed” specifically refers to the sous vide preparation of the beef, which guarantees a perfect, edge-to-edge medium rare cook a real game changer for traditional Wellington. While you can roast the fillet conventionally, the sous vide method removes all the guesswork and oven anxiety.
It means your beef is already perfectly cooked before the pastry goes on, allowing you to focus purely on achieving that beautiful, crisp pastry finish, rather than worrying about the internal meat temperature.
Help! How do I avoid a classic 'soggy bottom' disaster with the puff pastry?
Ah, the classic British baking fear! Avoiding a soggy bottom relies on meticulous moisture management. You must cook the mushroom Duxelles until it is completely bone dry and resembles a paste, not a chunky sauce.
Secondly, the Parma ham acts as a crucial moisture shield, ensuring the juicy beef doesn't touch the pastry directly. If you skip these steps, the interior moisture will steam your pastry from the inside out, turning your beautiful bake into a flop.
This looks like a showstopper! How far ahead can I prep these for a dinner party?
Absolutely, prepping ahead is one of the best parts of using the sous vide method here! You can complete the entire assembly (Duxelles, ham-wrapping, and encasing the beef in the puff pastry) up to 24 hours in advance. Keep the finished, egg-washed Wellingtons tightly covered and chilled in the refrigerator.
Baking them straight from the fridge is actually preferable, as the colder they are, the better the butter in the pastry will puff and flake.
Good heavens, why are there so many chilling steps is it truly necessary?
Yes, those repeated chilling stages are essential for technical success, much like letting tea brew properly! Chilling the beef after cooking and searing stops any residual heat from melting the butter in the puff pastry prematurely. This firmness ensures maximum lift and flakiness during the fast bake.
It also firms up the Duxelles and the ham wrapping, making the final delicate assembly much easier and ensuring sharp, neat edges on your finished bites.
I have guests who don't eat beef. Are there any easy protein substitutions for this recipe?
Definitely! This technique works brilliantly with other dense proteins. For poultry, use thick chicken breast cooked sous vide to 63°C (145°F). For a wonderful vegetarian option, substitute the beef with a dense, chilled mixture of cooked lentils, roasted sweet potato puree, and the mushroom Duxelles mixture.
Just ensure the veggie filling is compact, firm, and completely dry before wrapping in the ham or crepes.
Managed Temperature Sous Vide Wellington Bites

